[android studio] How to Convert Any Website to Android App in Android Studio?

Here, we are going to make an application for the “GeeksForGeeks” website. By making this application we will be able to learn how we can convert a website to an Android Application just by following simple steps. You can use this concept for your personal website too and learn something new.

How-to-Convert-Any-Website-to-Android-App-in-Android-Studio


What we are going to build in this article? 

In this application, we will learn how we can use different portals of a website and show them as fragments in our android application. In this application three portals of the Geeksforgeeks website- Home, Practice and Contribute will be used as fragments in our application. So, you can see a live example to convert a website into an application. The concept of WebView is used to do this desired work. A sample video is given below to get an idea about what we are going to do in this article. We are going to implement this project using both Java and Kotlin Programming Language for Android.

Video Player
 
00:00
 
00:31

Simple Steps to Convert Your Website into an Android Application:

  • To add the logo of your application.
  • To add a splash screen to your application.
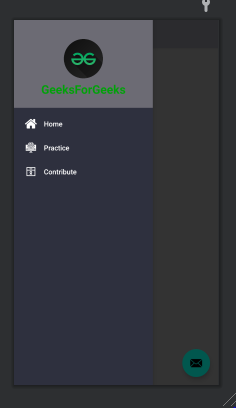
  • To use the Navigation drawer in our application so that, different portals of our website can be used as fragments in the navigation drawer.
  • To use a WebView so that, the web content can be accessed easily.
  • To use WebViewController class so that the content on the Website can be directly shown in the application rather than opening it in the browser.
  • To add a helpline activity.

And by following these steps you can convert your website to an application in the simplest way. So, let us see a step-by-step implementation to convert GeeksForGeeks Website into an application.

Step by Step Implementation

Step 1: Create a New Project in Android Studio

To create a new project in Android Studio please refer to How to Create/Start a New Project in Android Studio. The code for that has been given in both Java and Kotlin Programming Language for Android.

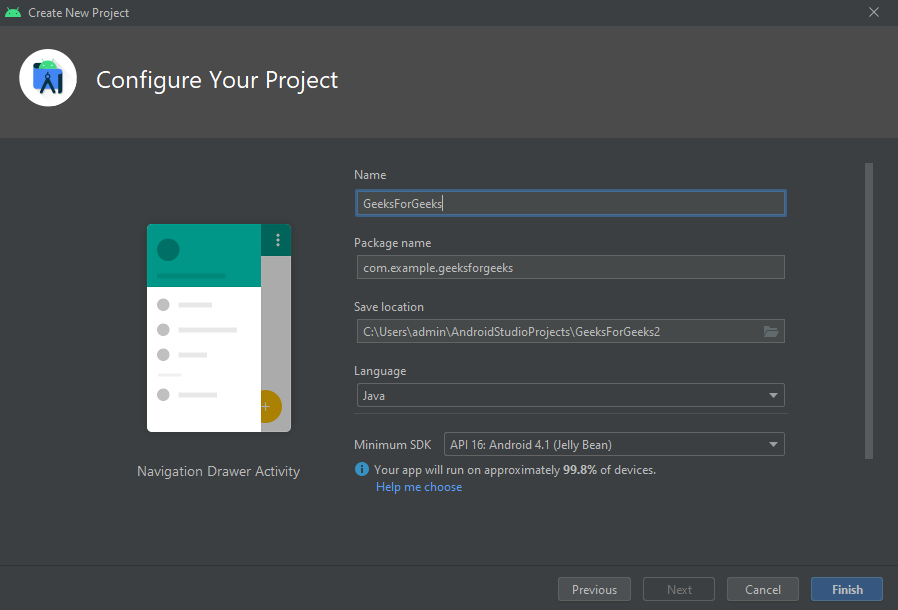
If you don’t know how to create a new project in Android Studio then you can refer to How to Create/Start a New Project in Android Studio? 


Step 2: Adding Logo to the Application

Paste the logo of your application in res > drawable. Refer to How to change the default icon of the Android App for further steps.

Step 3: Add Splash Screen to the Application

Refer to Creating a Splash Screen to learn How to Add a Splash Screen to the Application. Sample design of Splash Screen of the Application.

Step 4: Working with the XML Files

Open layout > nav_header_main.xml file to design the header of our Navigation Drawer. For that use the following code in it.


<?xml version="1.0" encoding="utf-8"?>
<!-- Constraint Layout to display all the details of header file -->
<androidx.constraintlayout.widget.ConstraintLayout
    android:layout_width="match_parent"
    android:layout_height="@dimen/nav_header_height"
    android:background="#6C6B74"
    android:gravity="bottom"
    android:orientation="vertical"
    android:paddingLeft="@dimen/activity_horizontal_margin"
    android:paddingTop="@dimen/activity_vertical_margin"
    android:paddingRight="@dimen/activity_horizontal_margin"
    android:paddingBottom="@dimen/activity_vertical_margin"
    android:theme="@style/ThemeOverlay.AppCompat.Dark">
 
    <!-- Image View to display logo of application in header -->
    <ImageView
        android:id="@+id/imageView"
        android:layout_width="107dp"
        android:layout_height="87dp"
        android:layout_gravity="center"
        android:contentDescription="@string/nav_header_desc"
        android:foregroundGravity="center"
        android:paddingTop="@dimen/nav_header_vertical_spacing"
        app:layout_constraintBottom_toBottomOf="parent"
        app:layout_constraintEnd_toEndOf="parent"
        app:layout_constraintStart_toStartOf="parent"
        app:layout_constraintTop_toTopOf="parent"
        app:layout_constraintVertical_bias="0.247"
        app:srcCompat="@drawable/gfg_round" />
 
    <!-- TextView for name of application -->
    <TextView
        android:layout_width="wrap_content"
        android:layout_height="51dp"
        android:layout_gravity="center"
        android:gravity="center"
        android:paddingTop="@dimen/nav_header_vertical_spacing"
        android:text="GeeksForGeeks"
        android:textAppearance="@style/TextAppearance.AppCompat.Body1"
        android:textColor="#01A109"
        android:textSize="24sp"
        android:textStyle="bold"
        app:layout_constraintBottom_toBottomOf="parent"
        app:layout_constraintEnd_toEndOf="parent"
        app:layout_constraintStart_toStartOf="parent"
        app:layout_constraintTop_toTopOf="@+id/imageView"
        app:layout_constraintVertical_bias="1.0" />
</androidx.constraintlayout.widget.ConstraintLayout>

Change the color of the Action Bar to “#6C6B74” so that it can match the color code of the logo of our application and our UI can become more attractive. If you do not know how to change the color of the ActionBar then you can refer to How to change the color of Action Bar in an Android App to learn it. Open menu > activity_main_drawer.xml file and use the following code in it so that we can add different items(portals of our website) to our navigation drawer and use their fragments.


<?xml version="1.0" encoding="utf-8"?>
    <!-- Group is used to group all these items together -->
    <group android:checkableBehavior="single">
 
        <!-- Three items are added as name of three portals -->
        <!-- Portal number 1- Home -->
        <!-- menu category is used as secondary so that backstack
        (going back by pressing back button) can be used -->
        <item
            android:id="@+id/nav_home"
            android:icon="@drawable/home"
            android:menuCategory="secondary"
            android:title="@string/menu_home" />
 
        <!-- Portal number 2- Practice -->
        <item
            android:id="@+id/nav_gallery"
            android:icon="@drawable/practice_gfg"
            android:menuCategory="secondary"
            android:title="Practice" />
 
        <!-- Portal number 3- Contribute -->
        <item
            android:id="@+id/nav_slideshow"
            android:icon="@drawable/contribute_gfg"
            android:menuCategory="secondary"
            android:title="Contribute" />
    </group>
</menu>

Go to the layout > activity_main.xml and use the following code in it.


<?xml version="1.0" encoding="utf-8"?>
<!-- DrawerLayout acts as top level container for window content that allows for
     interactive “drawer” views to be pulled out from one or both vertical edges of the window -->
<androidx.drawerlayout.widget.DrawerLayout
    xmlns:tools="http://schemas.android.com/tools"
    android:id="@+id/drawer_layout"
    android:layout_width="match_parent"
    android:layout_height="match_parent"
    android:fitsSystemWindows="true"
    tools:openDrawer="start">
 
    <!-- To reuse layouts include tag is used -->
    <include
        layout="@layout/app_bar_main"
        android:layout_width="match_parent"
        android:layout_height="match_parent" />
 
    <!-- Navigation view to make navigation drawer -->
    <com.google.android.material.navigation.NavigationView
        android:id="@+id/nav_view"
        android:layout_width="wrap_content"
        android:layout_height="match_parent"
        android:layout_gravity="start"
        android:background="#2E303E"
        android:fitsSystemWindows="true"
        app:headerLayout="@layout/nav_header_main"
        app:itemIconTint="#fff"
        app:itemTextColor="#fff"
        app:menu="@menu/activity_main_drawer" />
</androidx.drawerlayout.widget.DrawerLayout>

After Implementing the above code, the design of the activity_main.xml file looks like this. 

Converting Any Website to Android App in Android Studio

Go to the navigation > mobile_navigation.xml file and use the following code in it so that we can specify the title and label of our website portals and can easily use them in java files.


<?xml version="1.0" encoding="utf-8"?>
<navigation
    xmlns:tools="http://schemas.android.com/tools"
    android:id="@+id/mobile_navigation"
    app:startDestination="@+id/nav_home">
 
    <!-- These fragments are made to work on all
    the items listed in navigation drawer
    so that the java files can be managed separately -->
 
    <!-- Fragment for Home portal-->
    <fragment
        android:id="@+id/nav_home"
        android:name="com.example.geeksforgeeks.ui.home.HomeFragment"
        android:label="@string/menu_home"
        tools:layout="@layout/fragment_home" />
 
    <!-- Fragment for Practice portal-->
    <fragment
        android:id="@+id/nav_gallery"
        android:name="com.example.geeksforgeeks.ui.gallery.GalleryFragment"
        android:label="Practice"
        tools:layout="@layout/fragment_gallery" />
 
    <!-- Fragment for Contribute-->
    <fragment
        android:id="@+id/nav_slideshow"
        android:name="com.example.geeksforgeeks.ui.slideshow.SlideshowFragment"
        android:label="Contribute"
        tools:layout="@layout/fragment_slideshow" />
</navigation>

Now it’s time to insert WebView in all the fragments, Open fragment_home, fragment_gallery, and fragment_slideshow XML files and use the code respectively.


경축! 아무것도 안하여 에스천사게임즈가 새로운 모습으로 재오픈 하였습니다.
어린이용이며, 설치가 필요없는 브라우저 게임입니다.
https://s1004games.com

<?xml version="1.0" encoding="utf-8"?>
<androidx.constraintlayout.widget.ConstraintLayout
    xmlns:tools="http://schemas.android.com/tools"
    android:layout_width="match_parent"
    android:layout_height="match_parent"
    tools:context=".ui.home.HomeFragment">
 
    <!-- WebView is added on full screen so that application interface can
    be interactive and user can the web content is visible on full screen -->
    <WebView
        android:id="@+id/web_view_home"
        android:layout_width="match_parent"
        android:layout_height="match_parent"
        app:layout_constraintBottom_toBottomOf="parent"
        app:layout_constraintEnd_toEndOf="parent"
        app:layout_constraintStart_toStartOf="parent"
        app:layout_constraintTop_toTopOf="parent" />
</androidx.constraintlayout.widget.ConstraintLayout>

Now we have to create a new Activity named “help”. So that, the application user can get info to take help from the service provider. Go to layout > right-click > new > activity > Empty Activity. 

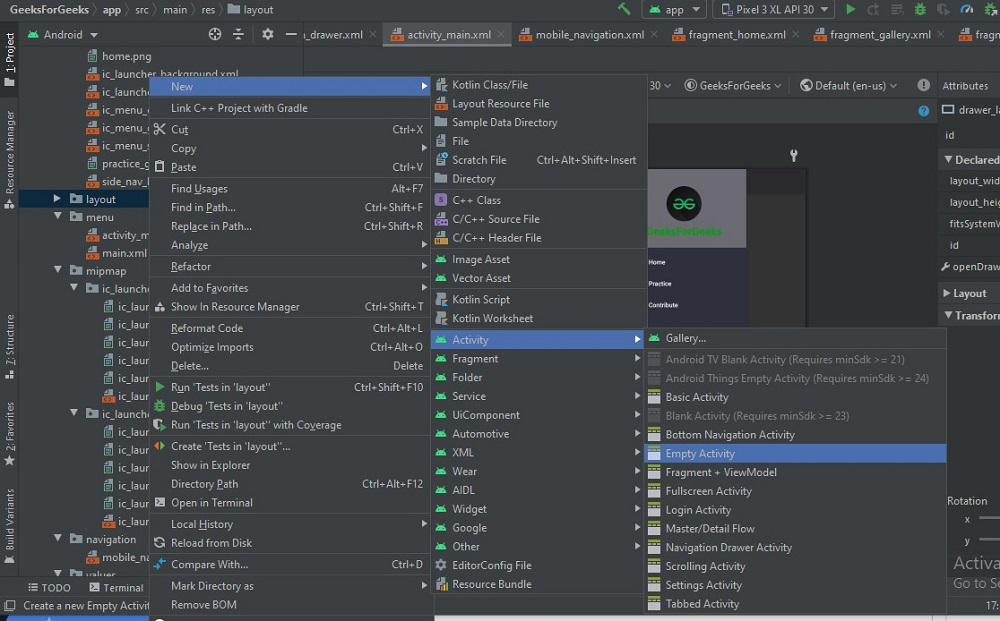
Put the name of the activity according to your choice(name used in this application-“help”). Open layout > activity_help.xml and use the following code in it.


<?xml version="1.0" encoding="utf-8"?>
<androidx.constraintlayout.widget.ConstraintLayout
    xmlns:tools="http://schemas.android.com/tools"
    android:layout_width="match_parent"
    android:layout_height="match_parent"
    android:background="#6C6B74"
    tools:context=".help">
 
    <!-- Image to display help sign-->
    <ImageView
        android:id="@+id/imageView3"
        android:layout_width="255dp"
        android:layout_height="173dp"
        app:layout_constraintBottom_toBottomOf="parent"
        app:layout_constraintEnd_toEndOf="parent"
        app:layout_constraintStart_toStartOf="parent"
        app:layout_constraintTop_toTopOf="parent"
        app:layout_constraintVertical_bias="0.222"
        app:srcCompat="@drawable/help" />
 
    <!-- Indicating user that we are here
         to help by using a textview-->
    <TextView
        android:id="@+id/textView2"
        android:layout_width="371dp"
        android:layout_height="95dp"
        android:background="#2E303E"
        android:text="For any kind of queries or help you can contact us at-"
        android:textColor="#FFFCFC"
        android:textSize="30sp"
        app:layout_constraintBottom_toBottomOf="parent"
        app:layout_constraintEnd_toEndOf="parent"
        app:layout_constraintStart_toStartOf="parent"
        app:layout_constraintTop_toBottomOf="@+id/imageView3"
        app:layout_constraintVertical_bias="0.296" />
 
    <!-- Contact details for help-->
    <TextView
        android:id="@+id/textView3"
        android:layout_width="393dp"
        android:layout_height="59dp"
        android:background="#2E303E"
        android:text="careers@geeksforgeeks.org"
        android:textColor="#FFFFFF"
        android:textSize="30sp"
        app:layout_constraintBottom_toBottomOf="parent"
        app:layout_constraintEnd_toEndOf="parent"
        app:layout_constraintHorizontal_bias="0.666"
        app:layout_constraintStart_toStartOf="parent"
        app:layout_constraintTop_toBottomOf="@+id/textView2"
        app:layout_constraintVertical_bias="0.159" />
</androidx.constraintlayout.widget.ConstraintLayout>

Now we have added a piece of code to take permission for access to the internet so that our WebView can work easily. Go to manifests > AndroidManifest.xml file and add the following code to it.

<uses-permission android:name="android.permission.INTERNET" />

Step 5: Working with Java/Kotlin Files

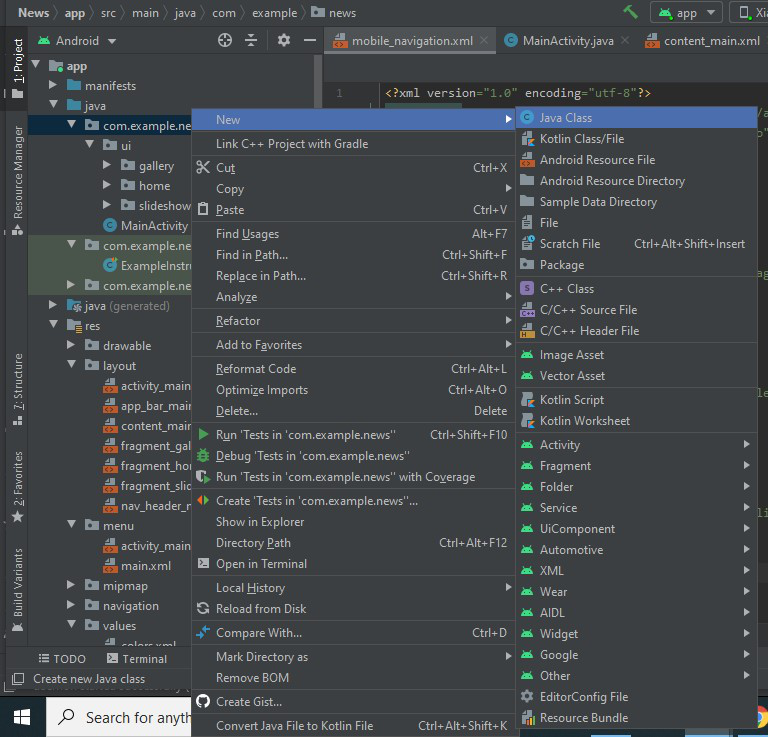
Create a new class as shown below and name it “WebViewController” 

Use the following code in the WebViewController File so that code to use the URL of a website can be executed.


import android.webkit.WebView;
import android.webkit.WebViewClient;
 
// class is extended to WebViewClient to access the WebView
public class WebViewController extends WebViewClient {
   
    @Override
    public boolean shouldOverrideUrlLoading(WebView view, String url) {
        // loadurl function will load the
        // url we will provide to our webview 
        view.loadUrl(url);
        return true;
    }
}

Open the HomeFragment file and use the code respectively.


import android.os.Bundle;
import android.view.LayoutInflater;
import android.view.View;
import android.view.ViewGroup;
import android.webkit.WebView;
import androidx.annotation.NonNull;
import androidx.fragment.app.Fragment;
import androidx.lifecycle.ViewModelProvider;
import com.example.geeksforgeeks.R;
import com.example.geeksforgeeks.WebViewController;
 
public class HomeFragment extends Fragment {
 
    private HomeViewModel homeViewModel;
 
    public View onCreateView(@NonNull LayoutInflater inflater, ViewGroup container, Bundle savedInstanceState) {
 
        homeViewModel = new ViewModelProvider(this).get(HomeViewModel.class);
        View root = inflater.inflate(R.layout.fragment_home, container, false);
 
        // Created a WebView and used the loadurl method to give url to WebViewController class
        WebView webView = root.findViewById(R.id.web_view_home);
        webView.loadUrl("https://www.geeksforgeeks.org/");  // Url of portal is passed
        webView.setWebViewClient(new WebViewController());  // WebViewController is used
        return root;
    }
}

Open the GalleryFragment file and use the code respectively.


import android.os.Bundle;
import android.view.LayoutInflater;
import android.view.View;
import android.view.ViewGroup;
import android.webkit.WebView;
import androidx.annotation.NonNull;
import androidx.fragment.app.Fragment;
import androidx.lifecycle.ViewModelProvider;
import com.example.geeksforgeeks.R;
import com.example.geeksforgeeks.WebViewController;
 
public class GalleryFragment extends Fragment {
 
    private GalleryViewModel galleryViewModel;
 
    public View onCreateView(@NonNull LayoutInflater inflater, ViewGroup container, Bundle savedInstanceState) {
 
        galleryViewModel = new ViewModelProvider(this).get(GalleryViewModel.class);
        View root = inflater.inflate(R.layout.fragment_gallery, container, false);
 
        WebView webView = root.findViewById(R.id.web_view_practice);
        webView.loadUrl("https://practice.geeksforgeeks.org/");
        webView.setWebViewClient(new WebViewController());
        return root;
    }
}

Open the SlideshowFragment file and use the code respectively.


import android.os.Bundle;
import android.view.LayoutInflater;
import android.view.View;
import android.view.ViewGroup;
import android.webkit.WebView;
import androidx.annotation.NonNull;
import androidx.fragment.app.Fragment;
import androidx.lifecycle.ViewModelProvider;
import com.example.geeksforgeeks.R;
import com.example.geeksforgeeks.WebViewController;
 
public class SlideshowFragment extends Fragment {
 
    private SlideshowViewModel slideshowViewModel;
 
    public View onCreateView(@NonNull LayoutInflater inflater, ViewGroup container, Bundle savedInstanceState) {
 
        slideshowViewModel = new ViewModelProvider(this).get(SlideshowViewModel.class);
        View root = inflater.inflate(R.layout.fragment_slideshow, container, false);
 
        WebView webView = root.findViewById(R.id.web_view_contribute);
        webView.loadUrl("https://www.geeksforgeeks.org/contribute/");
        webView.setWebViewClient(new WebViewController());
        return root;
    }
}

Now all of our work is done and the last work is to connect the help activity to the floating button in our application with help of intent in the MainActivity file. Use the following code to do so. 


import android.content.Intent;
import android.os.Bundle;
import android.view.Menu;
import androidx.appcompat.app.AppCompatActivity;
import androidx.appcompat.widget.Toolbar;
import androidx.drawerlayout.widget.DrawerLayout;
import androidx.navigation.NavController;
import androidx.navigation.Navigation;
import androidx.navigation.ui.AppBarConfiguration;
import androidx.navigation.ui.NavigationUI;
import com.google.android.material.floatingactionbutton.FloatingActionButton;
import com.google.android.material.navigation.NavigationView;
 
public class MainActivity extends AppCompatActivity {
 
    private AppBarConfiguration mAppBarConfiguration;
 
    @Override
    protected void onCreate(Bundle savedInstanceState) {
        super.onCreate(savedInstanceState);
        setContentView(R.layout.activity_main);
         
        Toolbar toolbar = findViewById(R.id.toolbar);
        setSupportActionBar(toolbar);
 
        // Code for floating button
        FloatingActionButton fab = findViewById(R.id.fab);
 
        // On click listener is used on floating button
        // to redirect to help activity
        fab.setOnClickListener(view -> {
            // Intent is used to connect help activity to floating button
            Intent activity2Intent = new Intent(getApplicationContext(), help.class);
            startActivity(activity2Intent);
        });
 
        // default code for drawer layout and navigation view
        DrawerLayout drawer = findViewById(R.id.drawer_layout);
        NavigationView navigationView = findViewById(R.id.nav_view);
 
        // Passing each menu ID as a set of Ids because each
        // menu should be considered as top level destinations.
        mAppBarConfiguration = new AppBarConfiguration.Builder(
                R.id.nav_home, R.id.nav_gallery, R.id.nav_slideshow)
                .setOpenableLayout(drawer)
                .build();
 
        // default code to control the navigation view
        NavController navController = Navigation.findNavController(this, R.id.nav_host_fragment);
        NavigationUI.setupActionBarWithNavController(this, navController, mAppBarConfiguration);
        NavigationUI.setupWithNavController(navigationView, navController);
    }
 
    @Override
    public boolean onCreateOptionsMenu(Menu menu) {
        // Inflate the menu; this adds items
        // to the action bar if it is present.
        getMenuInflater().inflate(R.menu.main, menu);
        return true;
    }
 
    @Override
    public boolean onSupportNavigateUp() {
        NavController navController = Navigation.findNavController(this, R.id.nav_host_fragment);
        return NavigationUI.navigateUp(navController, mAppBarConfiguration)
                || super.onSupportNavigateUp();
    }
}

Note: In MainActivity.java whole code is by default or pre-existing we have just added intent code to connect help activity with the floating button.

Output:

Video Player
 
00:00
 
00:31


[출처] https://www.geeksforgeeks.org/how-to-convert-any-website-to-android-app-in-android-studio/


본 웹사이트는 광고를 포함하고 있습니다.
광고 클릭에서 발생하는 수익금은 모두 웹사이트 서버의 유지 및 관리, 그리고 기술 콘텐츠 향상을 위해 쓰여집니다.
번호 제목 글쓴이 날짜 조회 수
121 [android studio] 안드로이드 스튜디오 패키지명 변경 방법 file 졸리운_곰 2024.01.28 1
120 [React Native] 리액트 네이티브 안드로이드 기기 빌드 에러 졸리운_곰 2023.12.17 1
119 [android studio] 안드로이드 앱 내부 배포 시 Play프로텍트에 인증받고 배포하기 file 졸리운_곰 2023.03.23 3
118 [android studio] [Java][Android] 안드로이드 다국어 지원 file 졸리운_곰 2023.03.21 5
117 [android studio] [안드로이드 스튜디오] 다국어 지원 strings.xml 파일 생성 방법 file 졸리운_곰 2023.03.21 12
116 [android studio] 구글 플레이 스토어 등록 어떻게? 2편 - 키스토어 생성과 릴리즈 빌드 하기 file 졸리운_곰 2023.03.21 5
115 [android studio] 구글 플레이 스토어 등록 어떻게? 1편 - 준비해야 할 것들 졸리운_곰 2023.03.21 5
114 [android studio] 웹페이지를 apk 앱으로 | 쉽게 따라하는 웹앱 만들기 file 졸리운_곰 2023.03.21 11
113 [android studio] 안드로이드 아이콘이 2개 생성될 때 졸리운_곰 2023.03.21 2
112 [android studio] Convert Any Website to Android App using Android Studio file 졸리운_곰 2023.03.18 1
» [android studio] How to Convert Any Website to Android App in Android Studio? file 졸리운_곰 2023.03.18 5
110 [phonegap][cordova] [안드로이드] 코도바 앱(App) 개발 환경 세팅 file 졸리운_곰 2023.02.05 10
109 [android studio] 에러 해결: android gradle plugin requires java 11 to run. you are currently using java 1.8. file 졸리운_곰 2022.11.17 4
108 [android sdk] 안드로이드에서 JWT 사용하기 졸리운_곰 2022.07.15 22
107 [Android Studio] Android Native App 에서 mysql , php 연결 : PHP MySQL REST API for Android file 졸리운_곰 2021.12.02 104
106 Android PHP MySQL 예제 - 데이터베이스에서 데이터를 JSON 형식으로 가져오기 file 졸리운_곰 2021.07.24 208
105 Android PHP MySQL 예제 - 데이터베이스 질의(query) 결과 출력하기 file 졸리운_곰 2021.07.24 539
104 [android] 안드로이드에서 mysql 데이터베이스 입력, 접속 / Android PHP MySQL 예제 - 데이터베이스에 데이터 입력하기 file 졸리운_곰 2021.07.24 117
103 Android 에서 Opencv 설치하고 간단한 예제 실행해보기!! file 졸리운_곰 2020.10.31 333
102 안드로이드 나인 패치(9-Patch) 이미지 버튼. (Android Nine-Patch Image Button) file 졸리운_곰 2020.10.10 147
대표 김성준 주소 : 경기 용인 분당수지 U타워 등록번호 : 142-07-27414
통신판매업 신고 : 제2012-용인수지-0185호 출판업 신고 : 수지구청 제 123호 개인정보보호최고책임자 : 김성준 sjkim70@stechstar.com
대표전화 : 010-4589-2193 [fax] 02-6280-1294 COPYRIGHT(C) stechstar.com ALL RIGHTS RESERVED