
- 전체
- android studio
- Android SDK
- Android NDK
- Android ADK
- Android Etc. Lib.
- Android dalvik VM
- Android 보안
- PhoneGap
- AOSP 개발
- MIT App Inventor 2
- kivy (python)
- ionic framework
- Kotlin (코틀린)
- React Native
android studio [android studio] Convert Any Website to Android App using Android Studio
2023.03.18 18:24
[android studio] Convert Any Website to Android App using Android Studio
Hello Everyone, Today in this post we are going to learn how to create Mobile Applications for your WordPress Websites, Blogs, Magazines, or Stores. In this article, I will be demonstrating my website i.e TechsBucket. So, we will discuss how to convert your website into a mobile application using Android Studio with tips on how to create an active mobile app version of your WordPress site for Android which means that you actually take these apps and upload them into google app store and the visitors will be able to download your app through their smartphones.
Requirement
- A good internet connection
- A Laptop or Desktop loaded with Android Studio
- A WordPress Website
Steps to Build a Mobile App
We can build a Mobile App with some basic knowledge in Android Studio. You don’t need to be a hardcore coder or have no need for deep coding here to build your mobile app, you will just need a WordPress-based website and only copy-paste work from this post.
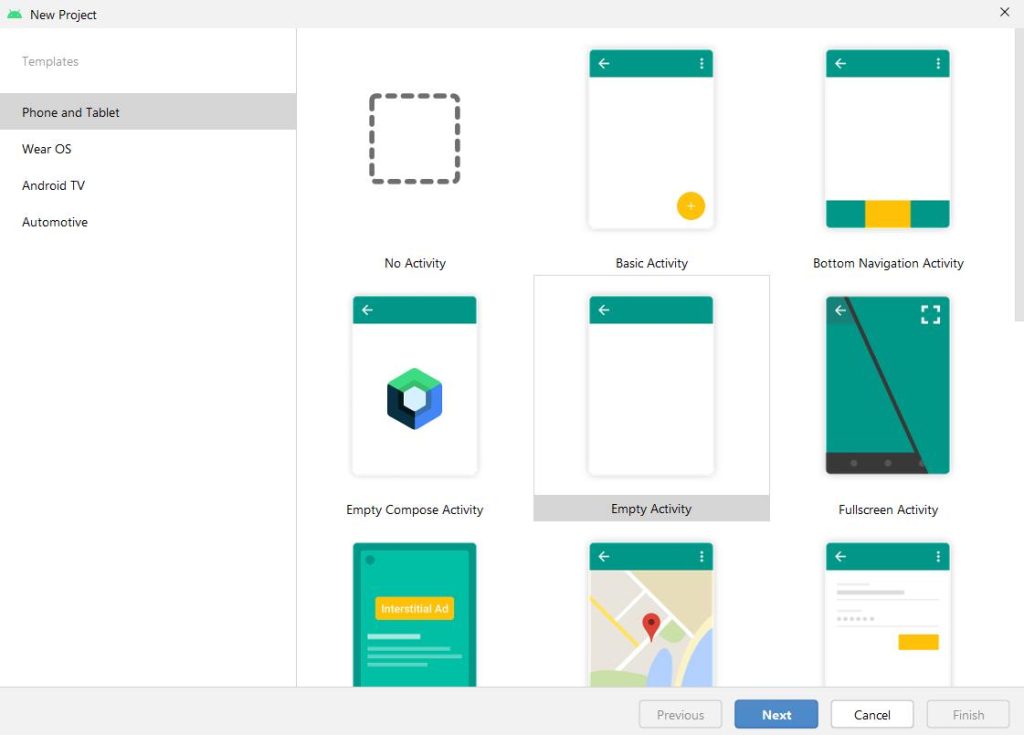
Step 1
Open Android Studio and click on New Project and select Empty Activity.
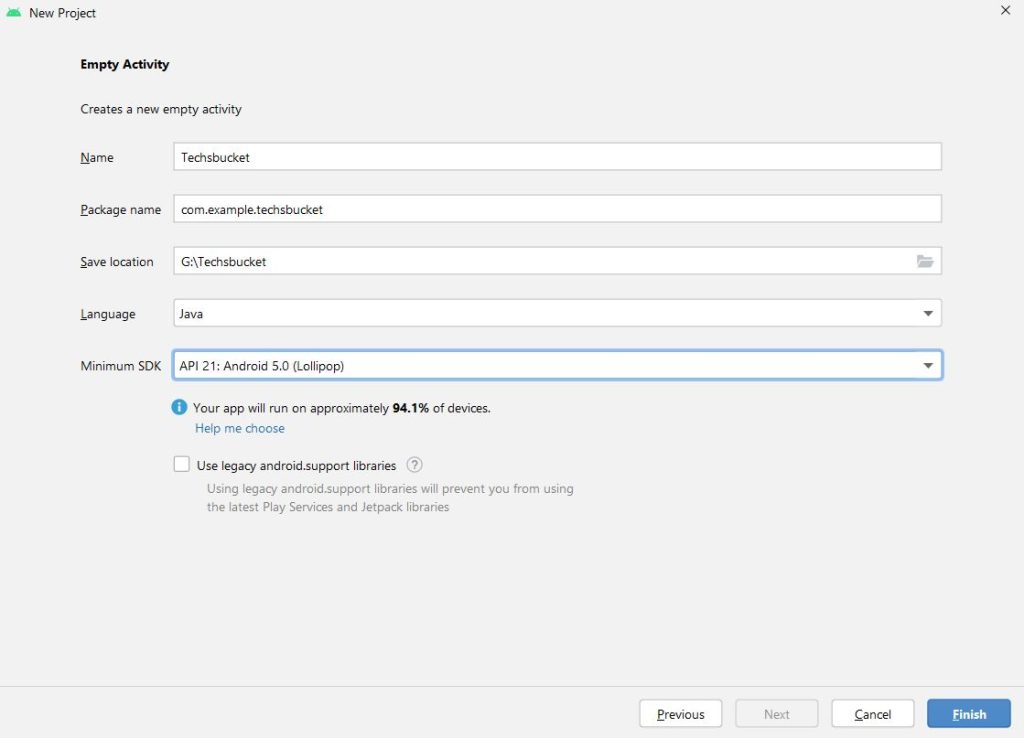
Step 2
IN this screen, give your application name, folder location to store, and select JAVA language. Minimum SDK I will recommend selecting an older version of Android OS because you will get a huge number of users who are using an older version OS, as you can see 94.1 %
Step 3
Once you click on Finish, it will take some time to load all the dependencies that depend on your computer and internet speed and performance. You can see my screen is now fully loaded and ready to put a code to build Android App.
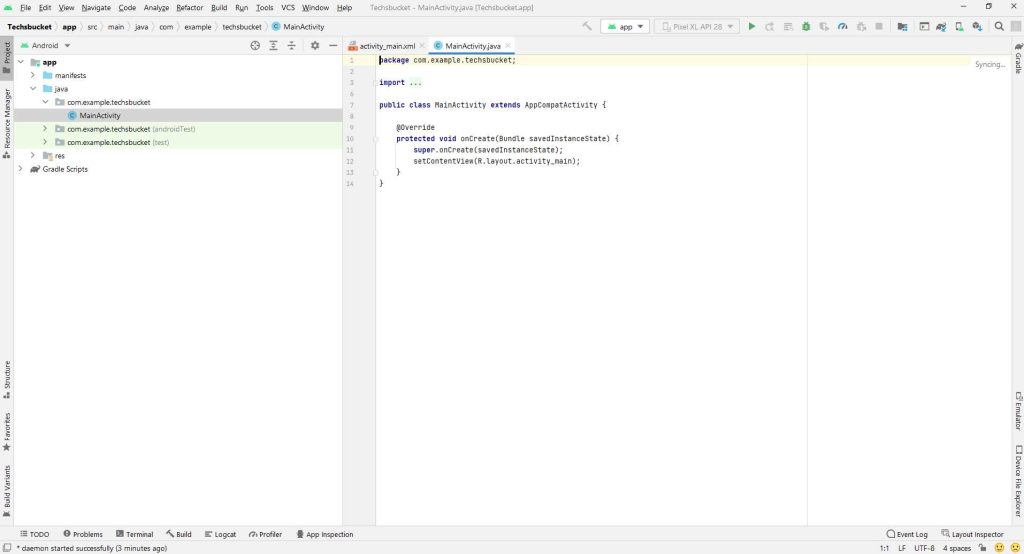
Step 4
Finally, the project screen is open and you will see two files are already opened one is MainActivity.java and another is activity_main.xml. Select activity_main.java and click on the code you will get exact below like screen
Step 5
One more file you will have to open from manifests from the left side menu. Expand manifest and double click on AndroidManifest.xml file.

Step 6
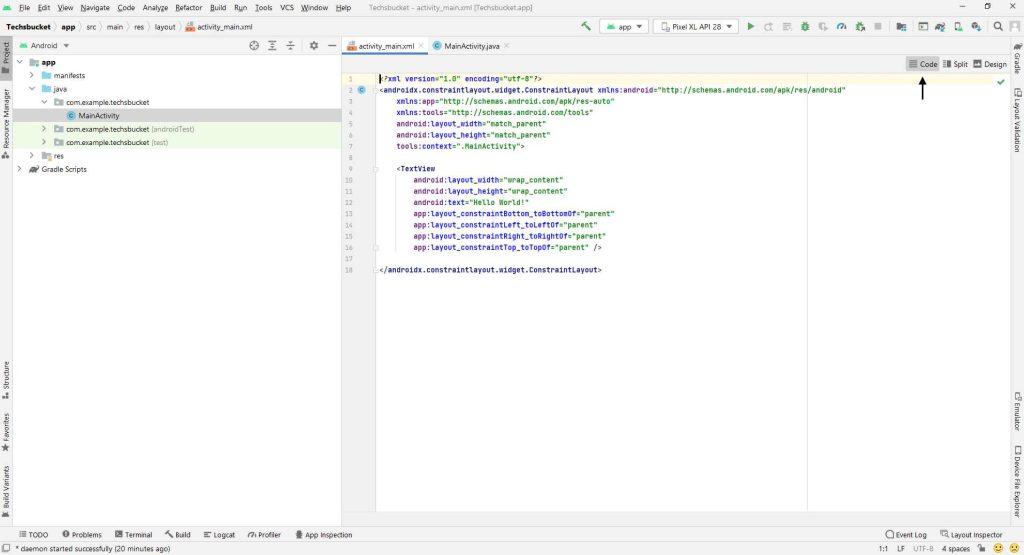
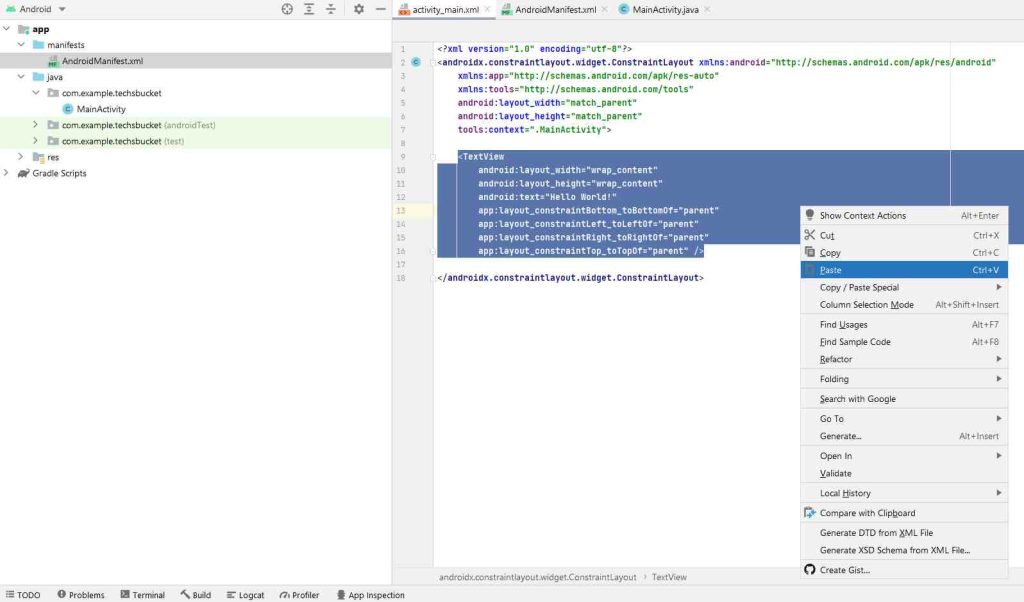
In this step, we will start placing the codes. Open activity_main.xml then copy and paste the below code as it is into your activity_main.xml file. This code will convert the Android App into Web View. Very important, replace from <Textview to parent” /> from below code
<WebView
          android:layout_width="fill_parent"
          android:layout_height="fill_parent"
          android:id="@+id/webView"
          android:layout_alignParentTop="true"
          android:layout_alignParentLeft="true"
          android:layout_alignParentStart="true"
          android:layout_alignParentBottom="true"
          android:layout_alignParentRight="true"
          android:layout_alignParentEnd="true"
          tools:ignore="MissingConstraints" />
Step 7
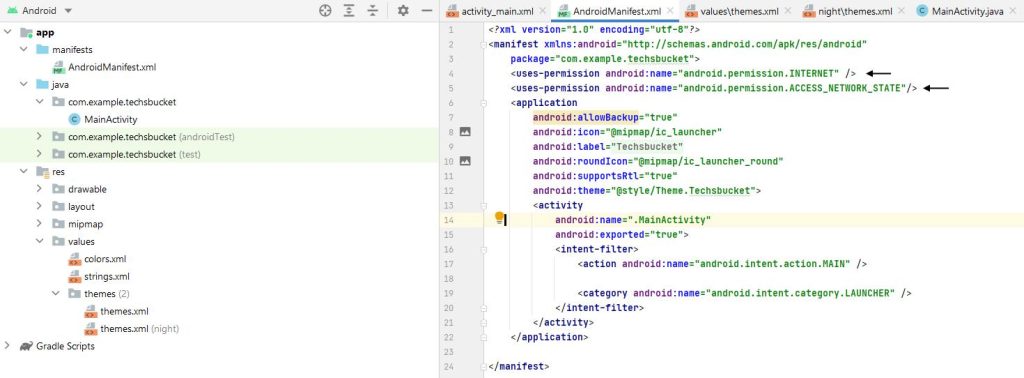
Allow Internet connection to the Android App by adding the below code in AndroidMinifest.xml file.
<uses-permission android:name="android.permission.INTERNET" />
If the user is not connected to the internet and he should get “No internet connection” after opening the app then simply add the below code in the same file.
<uses-permission android:name="android.permission.ACCESS_NETWORK_STATE"/>
Step 8
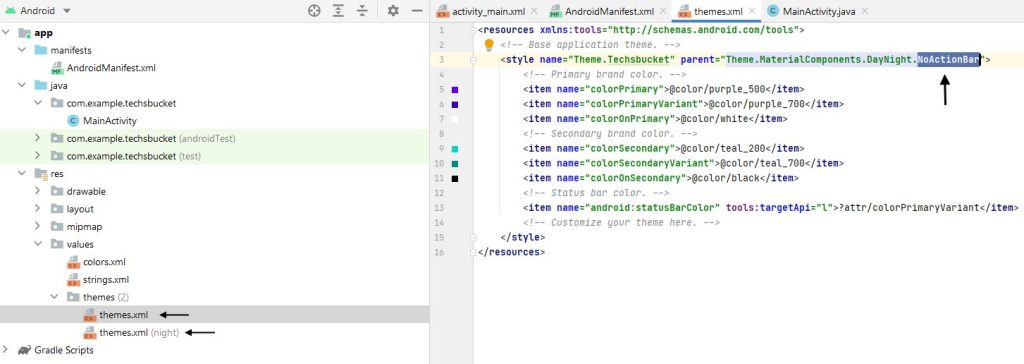
Expand the resource from the left side menu, expand values then expand the themes and double click on both the themes.xml file one by one, and find DarkActionBar and Replace with NoActionBar. This code will remove the extra header.
Step 9


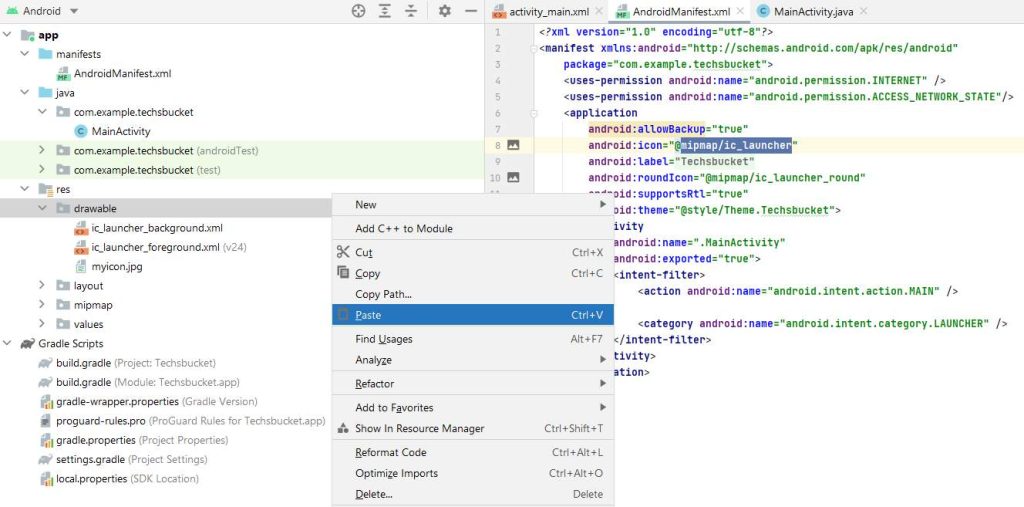
Now add the icon for your application. Copy your icon first then expand res right-click on drawable and paste the copied icon, you will find your icon name under drawable. In my case, my icon name is “myicon.jpg”.
Step 10
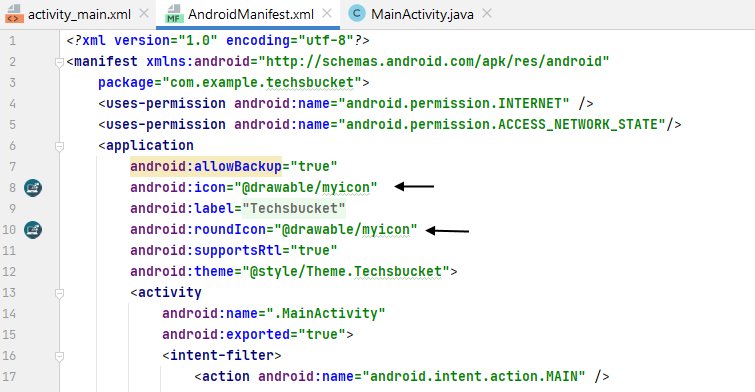
Once the icon is uploaded, go back to the AndroidManifest.xml file and find “@mipmap/ic_launcher” and “@mipmap/ic_launcher_round”. Replace both codes with “@drawable/myicon” ( Replace the code with Your Icon Name )
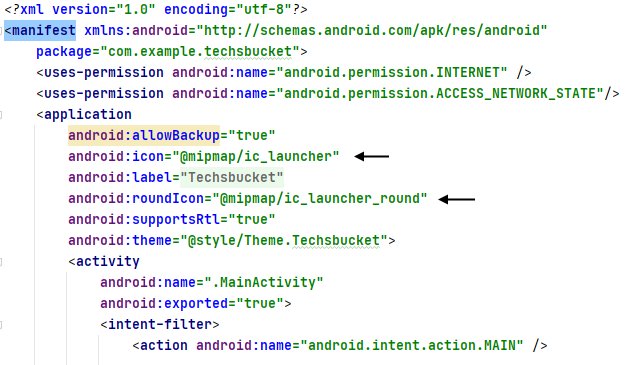
After Replacing “@mipmap/ic_launcher” to “@drawable/myicon”
Step 11
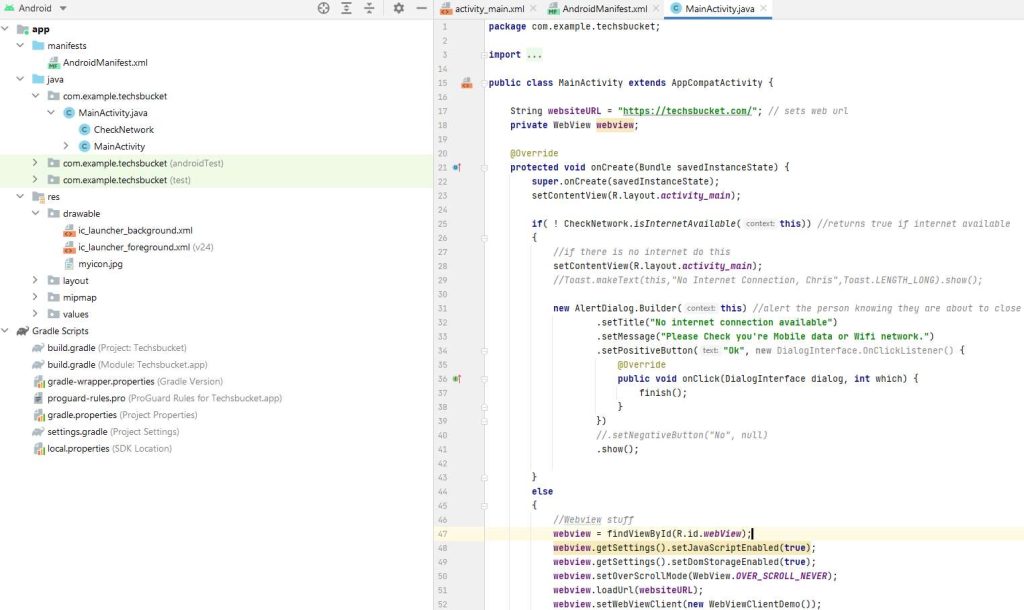
Open MainActivity.java file and copy-paste all the below codes after import. The below code will show “No Internet Connection” message if you are not connected to the internet. If you close your App and go back to App again, you will find the same post which was open previously also you will see an exit message once you will tap on the back. Don’t forget to replace your website’s name in the code below.
import android.app.AlertDialog;
import android.content.Context;
import android.content.DialogInterface;
import android.net.ConnectivityManager;
import android.net.NetworkInfo;
import android.os.Bundle;
import android.util.Log;
import android.webkit.WebView;
import android.webkit.WebViewClient;

import androidx.appcompat.app.AppCompatActivity;

public class MainActivity extends AppCompatActivity {

    String websiteURL = "https://techsbucket.com/"; // sets web url
    private WebView webview;

    @Override
    protected void onCreate(Bundle savedInstanceState) {
        super.onCreate(savedInstanceState);
        setContentView(R.layout.activity_main);

        if( ! CheckNetwork.isInternetAvailable(this)) //returns true if internet available
        {
            //if there is no internet do this
            setContentView(R.layout.activity_main);
            //Toast.makeText(this,"No Internet Connection, Chris",Toast.LENGTH_LONG).show();

            new AlertDialog.Builder(this) //alert the person knowing they are about to close
                    .setTitle("No internet connection available")
                    .setMessage("Please Check you're Mobile data or Wifi network.")
                    .setPositiveButton("Ok", new DialogInterface.OnClickListener() {
                        @Override
                        public void onClick(DialogInterface dialog, int which) {
                            finish();
                        }
                    })
                    //.setNegativeButton("No", null)
                    .show();

        }
        else
        {

            //Webview stuff
            webview = findViewById(R.id.webView);
            webview.getSettings().setJavaScriptEnabled(true);
            webview.getSettings().setDomStorageEnabled(true);
            webview.setOverScrollMode(WebView.OVER_SCROLL_NEVER);
            webview.loadUrl(websiteURL);
            webview.setWebViewClient(new WebViewClientDemo());

        }

    }

    private class WebViewClientDemo extends WebViewClient {
        @Override
        //Keep webview in app when clicking links
        public boolean shouldOverrideUrlLoading(WebView view, String url) {
            view.loadUrl(url);
            return true;

        }

    }

    //set back button functionality
@Override
public void onBackPressed() { //if user presses the back button do this
    if (webview.isFocused() && webview.canGoBack()) { //check if in webview and the user can go back
        webview.goBack(); //go back in webview
    } else { //do this if the webview cannot go back any further
        new AlertDialog.Builder(this) //alert the person knowing they are about to close
                .setTitle("EXIT")
                .setMessage("Are you sure. You want to close this app?")
                .setPositiveButton("Yes", new DialogInterface.OnClickListener() {
                    @Override
                    public void onClick(DialogInterface dialog, int which) {
                        finish();
                    }
                })
                .setNegativeButton("No", null)
                .show();
    }

}

}

class CheckNetwork {

    private static final String TAG = CheckNetwork.class.getSimpleName();

    public static boolean isInternetAvailable(Context context)

    {
        NetworkInfo info = (NetworkInfo) ((ConnectivityManager)

                context.getSystemService(Context.CONNECTIVITY_SERVICE)).getActiveNetworkInfo();

        if (info == null)

        {
            Log.d(TAG,"no internet connection");

            return false;

        }
        else
        {

            if(info.isConnected())

            {

                Log.d(TAG," internet connection available...");

                return true;

            }

            else

            {

                Log.d(TAG," internet connection");

                return true;
            }
        }
    }
}
Step 12
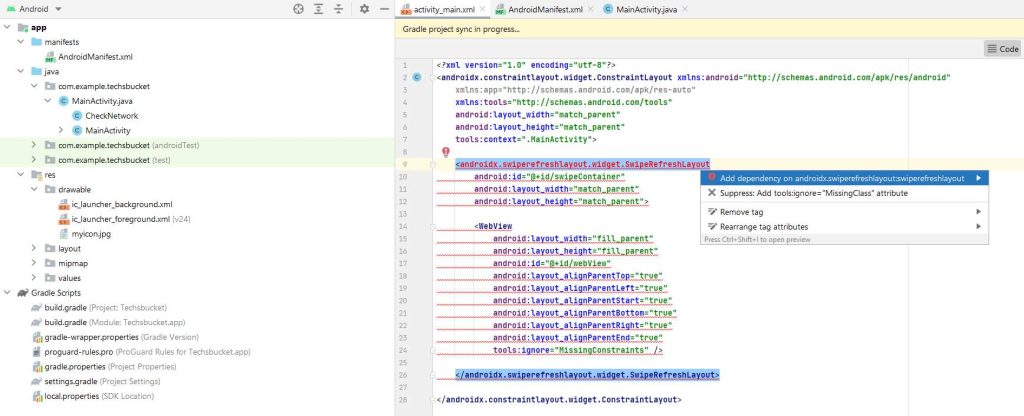
Add the next code in the main_activity.xml file, replace the whole <Webview. This code will allow you to “Swipe Down to Refresh”. You will see a loading icon once you swipe down any post.
<androidx.swiperefreshlayout.widget.SwipeRefreshLayout
    android:id="@+id/swipeContainer"
    android:layout_width="match_parent"
    android:layout_height="match_parent">

    <WebView
        android:layout_width="fill_parent"
        android:layout_height="fill_parent"
        android:id="@+id/webView"
        android:layout_alignParentTop="true"
        android:layout_alignParentLeft="true"
        android:layout_alignParentStart="true"
        android:layout_alignParentBottom="true"
        android:layout_alignParentRight="true"
        android:layout_alignParentEnd="true"
        tools:ignore="MissingConstraints" />

</androidx.swiperefreshlayout.widget.SwipeRefreshLayout>
After pasting the code, you will see one error for “<androidx.swiperefreshlayout.widget.SwipeRefreshLayout“, just right click on this and select the first option “Add dependancy on androidx.swiper….” or simply press the “Alt+Enter” key.
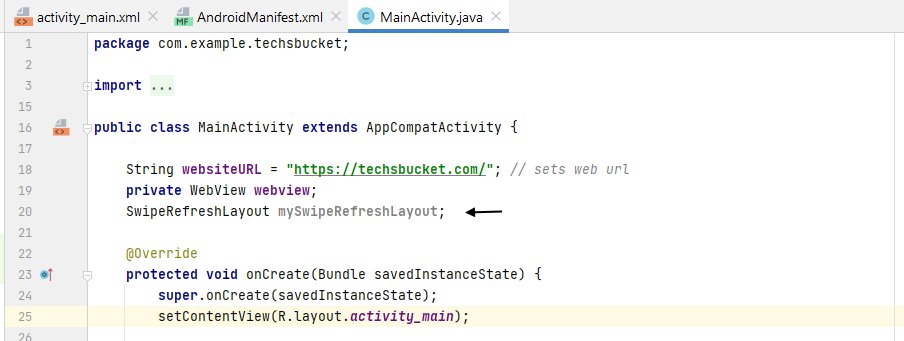
Now go back to the MainActivity.java and copy the below code after “private WebView webview“. You will see the error for “SwipeRefreshLayout “, simply click on SwipeRefreshLayout and press “Alt+Enter”.
SwipeRefreshLayout mySwipeRefreshLayout;
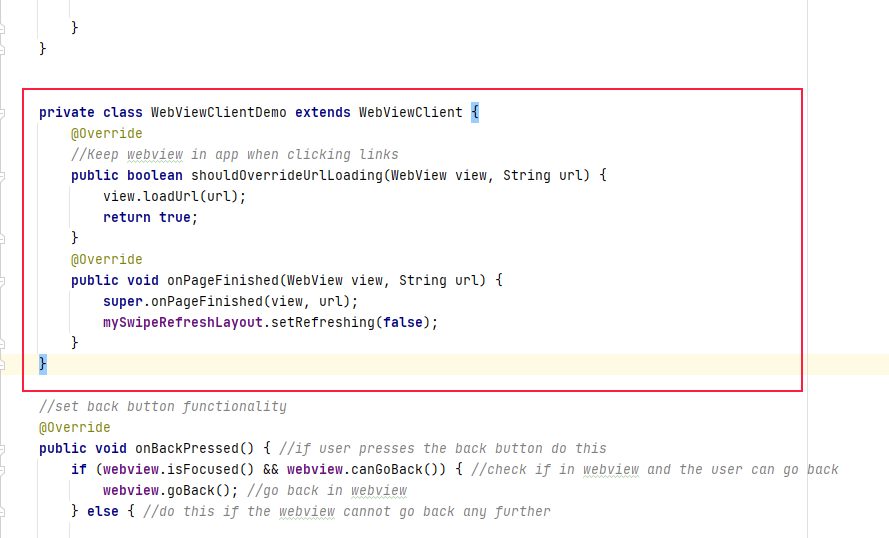
In the same file find and replace with “private class WebViewClientdemo to second curl bracket } below code.
private class WebViewClientDemo extends WebViewClient {
    @Override
    //Keep webview in app when clicking links
    public boolean shouldOverrideUrlLoading(WebView view, String url) {
        view.loadUrl(url);
        return true;

    }

    @Override
    public void onPageFinished(WebView view, String url) {
        super.onPageFinished(view, url);
        mySwipeRefreshLayout.setRefreshing(false);

    }

};

After replacing the code
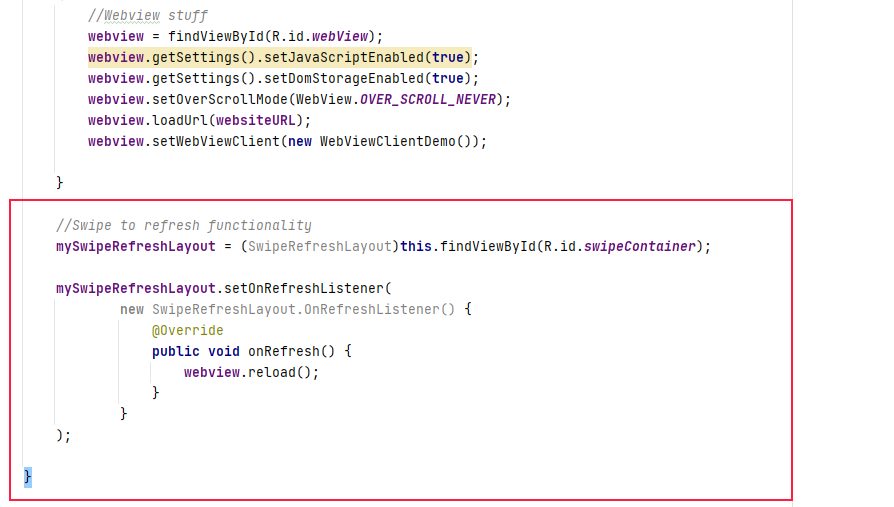
And add the below code after “//Webviewstuff” as per the following.
//Swipe to refresh functionality
mySwipeRefreshLayout = (SwipeRefreshLayout)this.findViewById(R.id.swipeContainer);

mySwipeRefreshLayout.setOnRefreshListener(
        new SwipeRefreshLayout.OnRefreshListener() {
            @Override
            public void onRefresh() {
                webview.reload();
            }
        }

);
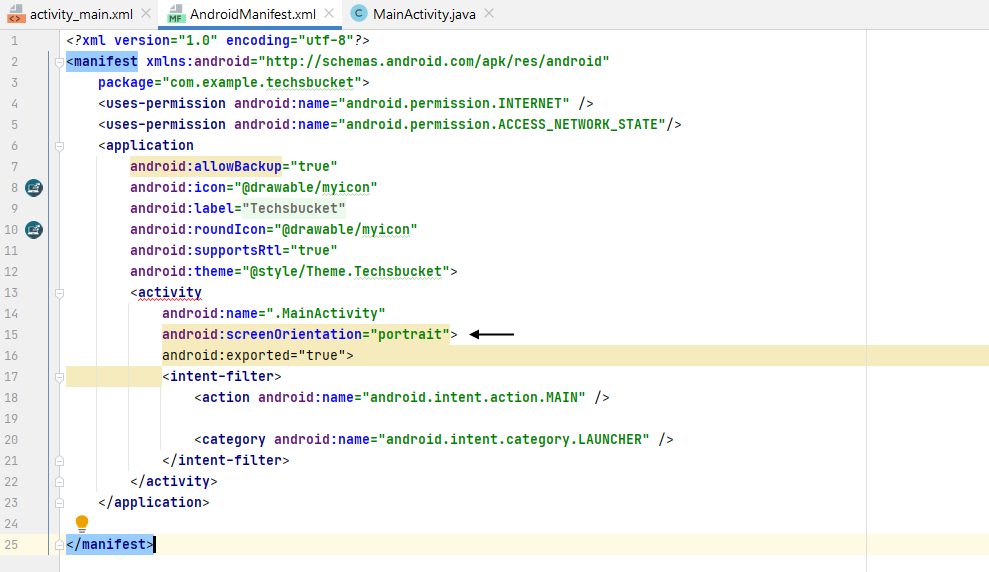
Step 13
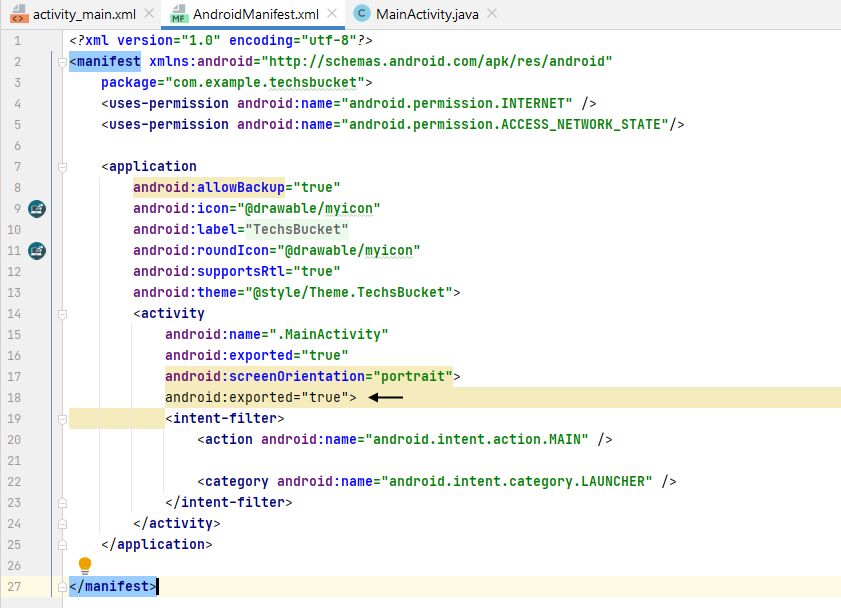
To enable screen rotation, simply add the below code in Android.Manifest.xml file in <application then inside the <activity
android:screenOrientation="portrait">
Step 14
Finally, run your application on a Virtual Mobile device. You will find a play button on the top just click on the play button this will open your App with the virtual mobile device.

android:exported="true"
Finally, reopen App in the Virtual Android Device, you can check the whole app will be working fine.
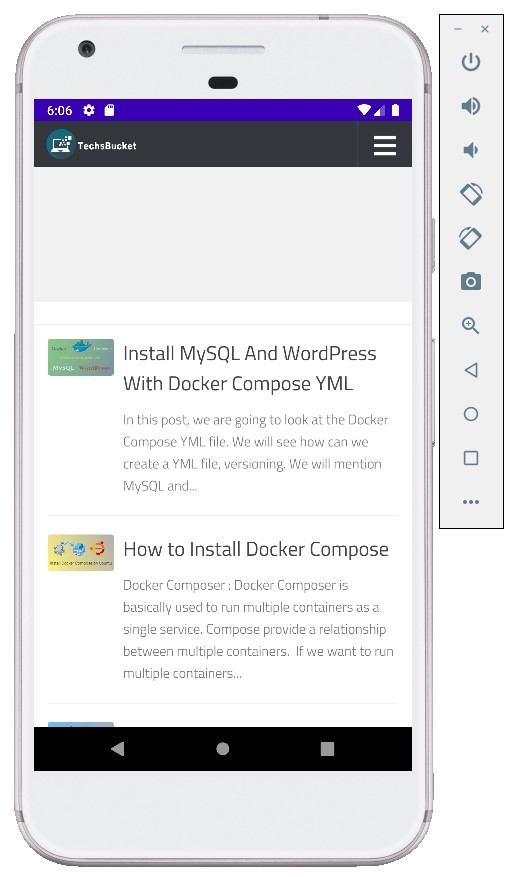
Congratulations… Android app is running on Android Virtual Device. The next step is to export the whole project along with the Android apk file. Once you get your apk file then this apk can be uploaded on the google play store easily. Watch the video tutorial below of this post and get the information about apk file location after saving the whole project.
광고 클릭에서 발생하는 수익금은 모두 웹사이트 서버의 유지 및 관리, 그리고 기술 콘텐츠 향상을 위해 쓰여집니다.