
[Java Web 프로그래밍] SPRING BOOT SSO 자료 정리
2022.07.27 17:38
[Java Web 프로그래밍] SPRING BOOT SSO 자료 정리
출처: http://www.baeldung.com/sso-spring-security-oauth2
스프링 부트를 이용한 sso 에 관심있어 해당 기사를 번역한다.
1. Overview
이 튜토리얼에서 우리는 Spring Security OAuth 와 Spring Boot 를 이용한 SSO (Single Sign On) 구현방법에 대해 이야기 할 것이다.
우리는 다음 3개의 개별 애플리케이션들을 사용할 것이다.
하나의 인가서버(Authorization Server): 중앙 인증 매카니즘 구현
2개의 클라이언트 애플리케이션: SSO를 사용
매우 간단히 사용자가 클라이언트 애플리케이션 내의 보안된 페이지에 접근하려고 하면 먼저 인증 서버를 통한 인증을 하기 위해 리다이렉트 될 것 이다.
그리고 인증 위임을 위해 OAuth2 의 Authorization Code 권한 타입을 사용할 것이다.
2. The Client App
클라이언트 애플리케이션 개발을 시작해 보자. 설정을 최소화 하기 위해 Spring Boot 를 사용하자.
2.1. Maven Dependencies
먼저 pom.xml 에 아래의 디펜던시들이 필요할 것이다.
<dependency>
	<groupId>org.springframework.boot</groupId>
    <artifactId>spring-boot-starter-web</artifactId>
</dependency>
<dependency>
	<groupId>org.springframework.boot</groupId>
    <artifactId>spring-boot-starter-security</artifactId>
</dependency>
<dependency>
	<groupId>org.springframework.security.oauth</groupId>
    <artifactId>spring-security-oauth2</artifactId>
</dependency>
<dependency>
	<groupId>org.springframework.boot</groupId>
    <artifactId>spring-boot-starter-thymeleaf</artifactId>
</dependency>
<dependency>
	<groupId>org.thymeleaf.extras</groupId>
    <artifactId>thymeleaf-extras-springsecurity4</artifactId>
</dependency>
2.2. Security Configuration
다음은 가장 중요한 클라이언트 애플리케이션의 보안 환경 설정이다.
@Configuration
@EnableOAuth2Sso
public class UiSecurityConfig extends WebSecurityConfigurerAdapter {

	@Override public void configure(HttpSecurity http) throws Exception {
    	http.antMatcher("/**")
        .authorizeRequests()
        .antMatchers("/", "/login**")
        .permitAll()
        .anyRequest()
        .authenticated();
        }
}
}
이 설정의 핵심은 Single Sign On 을 활성화 하기 위한 @EnableOAuth2Sso 애노테이션 이다.
WebSecurityConfigurerAdapter 를 확장해야 함을 알아두자
이 부분이 없다면 모든 경로들의 접근에 인증을 필요로 하게 될 것이다. 따라서 사용자들이 어떤 페이지로 접근을 시도하면 사용자들은 로그인을 하도록 리다이렉트 될 것이다.여기서는 인덱스와 로그인 페이지 만이 인증없이 접근될 수 있는 페이지되도록 설정하였다.
마지막으로, 리퀘스트 범위를 처리하는 RequestContextListener 를 정의 하였다. <--- 어디에 정의를 했는지 모르겠다.
application.yml 설정은 아래와 같다.
server:
	port: 8082
    context-path: /ui
    session:
    	cookie:
        name: UISESSION
security:
	basic:
    	enabled: false
    oauth2:
    	client:
        	clientId: SampleClientId
            clientSecret: secret
            accessTokenUri: http://localhost:8081/auth/oauth/token
            userAuthorizationUri: http://localhost:8081/auth/oauth/authorize
        resource: userInfoUri: http://localhost:8081/auth/user/me
spring:
	thymeleaf:
    	cache: false
위의 설정 몇개를 요약하면..
- Basic Authentication 을 비활성화 했다.
- accessTokenUri 는 Access Tokens 을 얻기 위한 URI 이다.
- userAuthorizationUri 는 사용자들이 리다이렉트될 인가 URI 이다.
- userInfoUri 는 현재 사용자의 상세정보를 얻기위한 사용자 엔드포인트 URI 이다.
이 예제에서 우리는 Authorization Server 를 사용했으나 Facebook 이나 GitHub 과 같은 써드파티를 사용할 수 있다.
2.3. Front End
이제 클라이언트 애플리케이션의 프론트 엔드 환경설정을 알아보자.
여기에 초점을 맞추지는 않을 것인다.
http://www.baeldung.com/spring-thymeleaf-3 에서 다루기 때문이다.
클라이언트 애플리케이션은 매우 간단한 프론트엔드로서 index.html 은 아래와 같다.
<h1>Spring Security SSO</h1>
<a href="securedPage">Login</a>
securedPage.html 은 아래와 같다.
<h1>Secured Page</h1>
Welcome, <span th:text="${#authentication.name}">Name</span>
securedPage.html 은 사용자들이 인증을 받아야 볼 수 있는 페이지다. 인증받지 않은 사용자가 securedPage.html 에 접근을 시도하려고 하면 처음의 로그인 페이지로 리다이렉트 될 것이다.
3. The Auth Server
이제 Authorization Server 에 대해 알아보자
3.1. Maven Dependencies
먼저 pom.xml 에 다음과 같이 디펜던시들을 정의하자.
<dependency>
	<groupId>org.springframework.boot</groupId>
	<artifactId>spring-boot-starter-web</artifactId>
</dependency>
<dependency>
	<groupId>org.springframework.security.oauth</groupId>
	<artifactId>spring-security-oauth2</artifactId>
</dependency>
3.2. OAuth Configuration
우리는 Authorization Server 와 Resource Server 를 단일 배포단위로서 함께 실행할 것이라는 것을 이해하는 것이 중요하다.
기본 Boot 애플리케이션으로 사용되는 Resource Server 환경설정을 시작하자.
@SpringBootApplication
@EnableResourceServer
public class AuthorizationServerApplication extends SpringBootServletInitializer {

    public static void main(String[] args) {
    	SpringApplication.run(AuthorizationServerApplication.class, args);
    }
}
그 다음 Authorization 서버를 다음과 같이 설정 할 것이다.
@Configuration
@EnableAuthorizationServer
public class AuthServerConfig extends AuthorizationServerConfigurerAdapter {
	@Autowired
    private AuthenticationManager authenticationManager;

    @Override
    public void configure( AuthorizationServerSecurityConfigurer oauthServer) throws Exception {
    	oauthServer.tokenKeyAccess("permitAll()")
        .checkTokenAccess("isAuthenticated()");
        }
    @Override
    public void configure(ClientDetailsServiceConfigurer clients) throws Exception {
    	clients.inMemory()
        .withClient("SampleClientId")
        .secret("secret")
        .authorizedGrantTypes("authorization_code")
        .scopes("user_info")
        .autoApprove(true) ; }

    @Override
    public void configure(
    AuthorizationServerEndpointsConfigurer endpoints) throws Exception {
        endpoints.authenticationManager(authenticationManager)
; } }
authorization_code 권한 타입을 사용하는 클라이언트가 어떻게 사용되는지만 알아두자.
또한, 우리가 어떤 범위에서도 수동으로 리다이렉트 되거나 이동하지 않도록 하기 위한 방법으로 autoApprove 를 true로 설정한것을 알아두자.
3.3. Security Configuration
먼저 다음과 같이 application.properties 를 이용해 기본 Basic Authentication 을 비활성화 할 것이다.
server.port=8081
server.context-path=/auth
security.basic.enabled=false
다음은 환경설정과 간단한 폼 로그인 매커니즘 정의에 대해 알아보자
@Configuration
public class SecurityConfig extends WebSecurityConfigurerAdapter {

	@Autowired
	private AuthenticationManager authenticationManager;

	@Override
	protected void configure(HttpSecurity http) throws Exception {
		http.requestMatchers()
		.antMatchers("/login", "/oauth/authorize")
	    .and()
	    .authorizeRequests()
	    .anyRequest()
	    .authenticated()
	    .and()
	    .formLogin()
	    .permitAll();
    }

	@Override protected void configure(AuthenticationManagerBuilder auth) throws Exception {
		auth.parentAuthenticationManager(authenticationManager)
	    	.inMemoryAuthentication()
	        .withUser("john")
	        .password("123")
	        .roles("USER");
    }
}
우리는 간단히 인메모리 인증을 했으나 커스텀 userDetailsService 로 대체할 수 있다는 것을 알아두자.
3.4. User Endpoint
마지막으로 우리가 초반부에 환경설정에서 사용했던 사용자 엔드 포인트를 생성할 것이다.
@RestController
public class UserController {
	@GetMapping("/user/me")
    public Principal user(Principal principal) {
    return principal;
    }
}
자연스럽게 Json으로 사용자 데이터를 반환할 것이다.
4. Conclusion
이 튜토리얼에서 우리는 Spring Security Oauth2 a와 Spring Boot 를 이용하여 Single Sign On 구현에 초점을 맞췄다.
소스는 깃헙에서 받을 수 있다.
https://github.com/eugenp/tutorials/tree/master/spring-security-sso
[출처] Spring Boot sso 예제|작성자 멋진태혁
Spring Boot와 JSon Web Token(JWT), Single Sign On(SSO)를 이용하여 확장가능한 인증에 대한 과정에 대하여 다룬다. JWT 기반의 SSO는 데이터베이스에 접근하지 않고도 유저를 인증할 수 있다. JWT는 Cookie와 Session의 대안으로 만들어진 정보 교환 방식으로 "크로스 도메인 쿠키 문제"에 대안으로 사용될 수 있다. 즉 Cookie같은 경우에는 발행한 해당 서버에서만 유효하지만, 토큰은 HTML Body형태로 전송하기 때문에 다른 도메인에서도 사용할 수 있다.
샘플 소스
아래 Github에서 소스를 다운로드 받는다. 왜 두가지 소스를 받는지에 대해서는 아래에서 설명한다.
- Authentication Service : https://github.com/hellokoding/single-sign-on-out-auth-jwt-cookie-redis-springboot-freemarker.git
- Resource Service : https://github.com/hellokoding/single-sign-on-out-resources-jwt-cookie-redis-springboot-freemarker.git
Keywords
- Json Web Token(JWT) : JSON 포맷을 이용한 Web Token으로 기본 구조는 Header, Payload, Signature로 나뉜다.
JSON ex.
header
|
'{"alg":"HS256","typ":"JWT"}' |
payload
|
'{"loggedInAs":"admin","iat":1422779638}' |
signature = Signature는 header와 playload를 base64로 인코딩 후 합쳐진다.
|
key = 'secretkey' |
JWT ex.
token = encodeBase64Url(header) + '.' + encodeBase64Url(payload) + '.' + encodeBase64Url(signature)
-> eyJhbGciOiJIUzI1NiIsInR5cCI6IkpXVCJ9.eyJsb2dnZWRJbkFzIjoiYWRtaW4iLCJpYXQiOjE0MjI3Nzk2Mzh9.gzSraSYS8EXBxLN_oWnFSRgCzcmJmMjLiuyu5CSpyHI
JWT는 마침표(.)를 구분자로 이용하여 header,payload,signature를 합친다.
- Claim based Token : Claim이란 사용자에 대한 속성을 의미하는데, JWT는 이 Claim을 JSON값으로 정의한다.
JWT에 대한 자세한 설명은 아래 링크를 참고한다.
https://velopert.com/2389
http://sanghaklee.tistory.com/47
https://www.joinc.co.kr/w/man/12/jwt
JWT 인증 과정
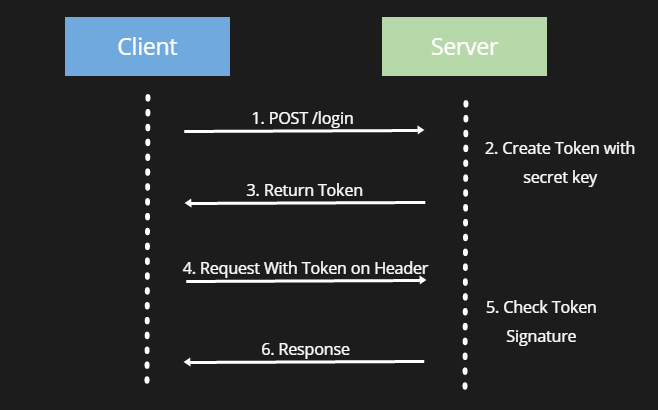
1. POST API로 Server에 로그인을 시도한다.
2~3. Server에서는 Secret key로 Token을 생성하여 Client에 반환해준다.
4. Client는 Header에 있는 Token으로 요청한다.
* Client에서는 도대체 JWT Token을 어디에 보관하나?
방법 1. HTML5 web storage
방법 2. Cookies
참고 : http://lazyhoneyant.tistory.com/7
5~6. Server에서는 Client로부터 전달받은 Token을 검사한 후 이애 대한 Response를 Client로 전달해준다.
Prerequisite
- JDK 1.7+
- Redis
* 해당 프로젝트는 Redis로 Login이 수행되기 때문에 사전에 Redis server가 실행되어야 한다.
- Maven 3+
Stack
Java
Single Sign On
Single Sign Out
JSON Web Token
Redis
Cookie
Spring Boot
FreeMarker (.ftl)
Redis Server 설치 및 실행
Redis란?
레디스(Redis)는 Remote Dictionary Server의 약자로서 ‘키-값’ 구조의 비관계형 데이터를 저장하고 관리하기 위한 NoSQL의 일종이다. 2009년 Salvatore Sanfilippo가 처음 개발했다. 2015년부터 Redis Labs가 지원하고 있다. 모든 데이터를 메모리로 불러와서 처리하는 메모리 기반 DBMS이다. BSD 라이선스를 따른다. DB-Engines.com의 월간 랭킹에 따르면, 레디스는 가장 인기 있는 키-값 저장소이다.
Redis 설치
windows 및 linux 환경에 맞게 설치한다.
Windows 64bit에서 설치
Redis는 공식적으로 Windows를 지원하지 않지만, Microsoft Open Tech 에서 64bit 기반으로 포팅하여 개발 및 유지보수를 하고 있다. 아래 GitHub 에서 다운로드 받아 Redis를 설치하도록 한다.
https://github.com/MicrosoftArchive/redis/releases
Redis 실행
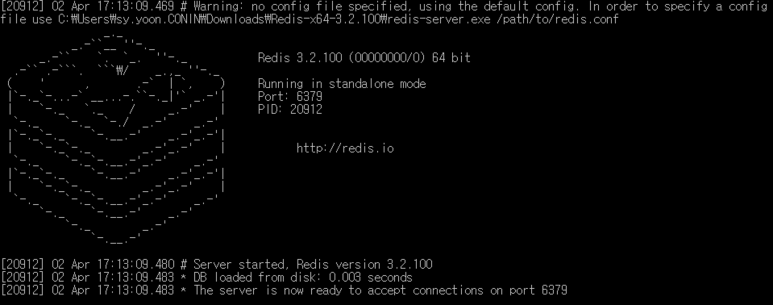
redis-server.exe 를 실행시킨다.
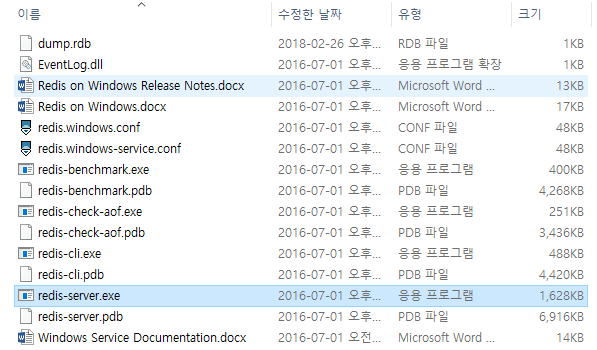
Redis Server 실행 화면
Reference.
http://hwigyeom.ntils.com/entry/Windows-%EC%97%90-Redis-%EC%84%A4%EC%B9%98%ED%95%98%EA%B8%B0-1
Authentication Service
인증 서버에서는 인증 및 토큰 발행을 해주는 서비스를 제공한다. 로그인이 성공하면 유저 정보를 포함한 JWT 토큰을 발행해준다.
pom.xml
<?xml version="1.0" encoding="UTF-8"?> <project xmlns="http://maven.apache.org/POM/4.0.0" xmlns:xsi="http://www.w3.org/2001/XMLSchema-instance" xsi:schemaLocation="http://maven.apache.org/POM/4.0.0 http://maven.apache.org/xsd/maven-4.0.0.xsd"> <modelVersion>4.0.0</modelVersion> <artifactId>com.hellokoding.security</artifactId> <name>ssout-jwt-auth-java</name> <description>ssout-jwt-auth-java</description> <parent> <groupId>org.springframework.boot</groupId> <artifactId>spring-boot-starter-parent</artifactId> <version>1.5.2.RELEASE</version> </parent> <properties> <java.version>1.7</java.version> </properties> <dependencies> <dependency> <groupId>org.springframework.boot</groupId> <artifactId>spring-boot-starter-freemarker</artifactId> </dependency> <dependency> <groupId>redis.clients</groupId> <artifactId>jedis</artifactId> <version>2.9.0</version> </dependency> <dependency> <groupId>io.jsonwebtoken</groupId> <artifactId>jjwt</artifactId> <version>0.6.0</version> </dependency> </dependencies> <build> <plugins> <plugin> <groupId>org.springframework.boot</groupId> <artifactId>spring-boot-maven-plugin</artifactId> </plugin> </plugins> </build> </project>
해당 프로젝트에서 필요로 하는 freemarker, Java, Spring Boot, JsonWebToken, Redis를 설정하였다. jedis는 Java에서 redis를 쉽게 사용할 수 있도록 해주는 라이브러리이다. Jedis에대한 내용은 아래 링크를 참고한다.
http://jeong-pro.tistory.com/140
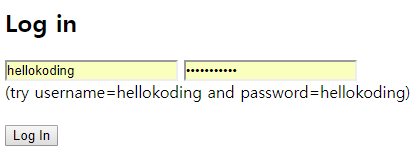
login.ftl
<!DOCTYPE html> <html lang="en"> <head> <title>Authentication Service</title> </head> <body> <form method="POST" action="/login?redirect=${RequestParameters.redirect!}"> <h2>Log in</h2> <input name="username" type="text" placeholder="Username" autofocus="true"/> <input name="password" type="password" placeholder="Password"/> <div>(try username=hellokoding and password=hellokoding)</div> <div style="color: red">${error!}</div> <br/> <button type="submit">Log In</button> </form> </body> </html>
아래 로그인 화면을 나타내는 freemarker 템플릿이다. usesrname과 password를 입력하면 POST method로 ${RequestParameters.redirect!} URL로 redirection 된다. 여기서 RequestParameters.redirect!는 http://localhost:8080/login?redirect=http://localhost:8180/protected-resource 에서 redirect 할 URL = http://localhost:8180/protected-resource 를 의미한다. "Log In" 버튼을 클릭하면 form이 controller로 전송된다. (MVC)
login.ftl form에서 username, password, redirect가 controller로 전달됨.
LoginController.java
1 package com.hellokoding.sso.auth; 2 3 import org.springframework.stereotype.Controller; 4 import org.springframework.ui.Model; 5 import org.springframework.web.bind.annotation.RequestMapping; 6 import org.springframework.web.bind.annotation.RequestMethod; 7 8 import javax.servlet.http.HttpServletResponse; 9 import java.util.HashMap; 10 import java.util.Map; 11 @Controller 12 public class LoginController { 13 private static final String jwtTokenCookieName = "JWT-TOKEN"; 14 private static final String signingKey = "signingKey"; 15 private static final Map<String, String> credentials = new HashMap<>(); 16 17 public LoginController() { 18 credentials.put("hellokoding", "hellokoding"); 19 credentials.put("hellosso", "hellosso"); 20 } 21 22 @RequestMapping("/") 23 public String home(){ 24 return "redirect:/login"; 25 } 26 27 @RequestMapping("/login") 28 public String login(){ 29 return "login"; 30 } 31 32 @RequestMapping(value = "login", method = RequestMethod.POST) 33 public String login(HttpServletResponse httpServletResponse, String username, String password, String redirect, Model model){ 34 35 if (username == null || !credentials.containsKey(username) || !credentials.get(username).equals(password)){ 36 model.addAttribute("error", "Invalid username or password!"); 37 return "login"; 38 } 39 40 String token = JwtUtil.generateToken(signingKey, username); 41 CookieUtil.create(httpServletResponse, jwtTokenCookieName, token, false, -1, "localhost"); 42 43 return "redirect:" + redirect; 44 } 45 }
line 22 : @RequestMapping 어노테이션으로 "/" URL 패턴으로 request하면 home() 메소드를 호출하게 된다.
line 24 : /login 으로 리다이렉션된다.
line 27 : @RequestMapping 어노테이션으로 "/login" URL 패턴으로 맵핑된 login()메소드를 호출하게 된다.
line 29 : controller에서 "login"과 같이 string을 리턴하는 경우 view 가 호출된다. (login 화면이 나옴)
line 32 : client(view) 에서 POST로 전송한 form을 받는다. value는 url 패턴을 의미함
line 35 : view에서 전달받은 username, password값이 유효한지 확인한다.
line 40 : 유효한 값을 받았다면 Token을 생성한다. JwtUtil.java 에서 generateToke 메소드를 참고한다.
line 41 : Cookie를 생성한다. CookieUtil.java에서 create메소드를 참고한다.
line 43 : redirect: url로 이동한다.(http://localhost:8180/protected-resource) or (http://localhost:8280/protected-resource)
JwtUtil.java
JWT를 사용하여 JWT Token을 생성하고 파싱한다.
1 package com.hellokoding.sso.auth; 2 3 import io.jsonwebtoken.JwtBuilder; 4 import io.jsonwebtoken.Jwts; 5 import io.jsonwebtoken.SignatureAlgorithm; 6 7 import javax.servlet.http.HttpServletRequest; 8 import java.util.Date; 9 10 public class JwtUtil { 11 private static final String REDIS_SET_ACTIVE_SUBJECTS = "active-subjects"; 12 13 public static String generateToken(String signingKey, String subject) { 14 long nowMillis = System.currentTimeMillis(); 15 Date now = new Date(nowMillis); 16 17 JwtBuilder builder = Jwts.builder() 18 .setSubject(subject) 19 .setIssuedAt(now) 20 .signWith(SignatureAlgorithm.HS256, signingKey); 21 22 String token = builder.compact(); 23 24 RedisUtil.INSTANCE.sadd(REDIS_SET_ACTIVE_SUBJECTS, subject); 25 26 return token; 27 } 28 29 public static String parseToken(HttpServletRequest httpServletRequest, String jwtTokenCookieName, String signingKey){ 30 String token = CookieUtil.getValue(httpServletRequest, jwtTokenCookieName); 31 if(token == null) { 32 return null; 33 } 34 35 String subject = Jwts.parser().setSigningKey(signingKey).parseClaimsJws(token).getBody().getSubject(); 36 if (!RedisUtil.INSTANCE.sismember(REDIS_SET_ACTIVE_SUBJECTS, subject)) { 37 return null; 38 } 39 40 return subject; 41 } 42 43 public static void invalidateRelatedTokens(HttpServletRequest httpServletRequest) { 44 RedisUtil.INSTANCE.srem(REDIS_SET_ACTIVE_SUBJECTS, (String) httpServletRequest.getAttribute("username")); 45 } 46 }
line 13 : loginController.java에서 전달받은 signingKey와 subject로 Token을 생성하는 메소드
line 18: subject를 set한다. 여기서 subject는 username이다.
line 19 : jwt 발행 시점을 set한다.
lien 20 : 서명 알고리즘과 서명 키를 set한다. 여기서 사용된 서명 알고리즘은 HS256 알고리즘을 사용하였고 서명 키는 "signingKey" String으로 사용하였다.
line 22 : 실제로 JWT를 빌드하고 JWT Compact Serialization 규칙에 따라 압축 된 URL-safe 문자열로 직렬화 한다.
JTW Builder API : http://javadox.com/io.jsonwebtoken/jjwt/0.4/io/jsonwebtoken/JwtBuilder.html
line 24 : Jedis-Redis에 key ("active-subjects"), value (username) 를 add?? 뭔지는 모르겠지만 일단 add한다. (RedisUtill.java에서 sadd 메소드 참고)
CookieUtil.java
JwtUtil에서 생성한 Token으로 Cookie를 생성한다.
1 package com.hellokoding.sso.auth; 2 3 import org.springframework.web.util.WebUtils; 4 5 import javax.servlet.http.Cookie; 6 import javax.servlet.http.HttpServletRequest; 7 import javax.servlet.http.HttpServletResponse; 8 9 public class CookieUtil { 10 public static void create(HttpServletResponse httpServletResponse, String name, String value, Boolean secure, Integer maxAge, String domain) { 11 Cookie cookie = new Cookie(name, value); 12 cookie.setSecure(secure); 13 cookie.setHttpOnly(true); 14 cookie.setMaxAge(maxAge); 15 cookie.setDomain(domain); 16 cookie.setPath("/"); 17 httpServletResponse.addCookie(cookie); 18 } 19 20 public static void clear(HttpServletResponse httpServletResponse, String name) { 21 Cookie cookie = new Cookie(name, null); 22 cookie.setPath("/"); 23 cookie.setHttpOnly(true); 24 cookie.setMaxAge(0); 25 httpServletResponse.addCookie(cookie); 26 } 27 28 public static String getValue(HttpServletRequest httpServletRequest, String name) { 29 Cookie cookie = WebUtils.getCookie(httpServletRequest, name); 30 return cookie != null ? cookie.getValue() : null; 31 } 32 }
line 11 : name, value(token값)로 cookie를 생성한다. (name : "JWT-TOKEN")
11에서 생성 된 cookie의 attribute들을 set한다.
line 12 : false
line 13 : true
line 14 : -1
line 15 : localhost
line 16 : "/"
line 17 :
Cookie API : https://docs.oracle.com/cd/E17802_01/products/products/servlet/2.1/api/javax.servlet.http.Cookie.html
RedisUtil.java
간단한 테스트 진행을 위해 user database로 HashMap(credentials)를 사용한다.
package com.hellokoding.sso.auth; import redis.clients.jedis.Jedis; import redis.clients.jedis.JedisPool; import redis.clients.jedis.JedisPoolConfig; public enum RedisUtil { INSTANCE; private final JedisPool pool; RedisUtil() { pool = new JedisPool(new JedisPoolConfig(), "localhost"); } public void sadd(String key, String value) { Jedis jedis = null; try{ jedis = pool.getResource(); jedis.sadd(key, value); } finally { if (jedis != null) { jedis.close(); } } } public void srem(String key, String value) { Jedis jedis = null; try{ jedis = pool.getResource(); jedis.srem(key, value); } finally { if (jedis != null) { jedis.close(); } } } public boolean sismember(String key, String value) { Jedis jedis = null; try{ jedis = pool.getResource(); return jedis.sismember(key, value); } finally { if (jedis != null) { jedis.close(); } } } }
WebApplication.java
package com.hellokoding.sso.auth; import org.springframework.boot.SpringApplication; import org.springframework.boot.autoconfigure.SpringBootApplication; @SpringBootApplication public class WebApplication { public static void main(String[] args) throws Exception { SpringApplication.run(WebApplication.class, args); } }
Resource Service
서비스를 제공한다.
pom .xml
- Authentication Service와 동일하므로 생략.
CookieUtil.java
JWT Token은 브라우저 쿠키를 저장 및 추출한다.
- Authentication Service와 동일하므로 생략.
JwtUtil.java
JJWT를 사용하여 JWT Token을 생성하고 파싱한다.
- Authentication Service와 동일하므로 생략.
JwtFilter.java
JwtFilter는 SSO를 수행한다. JWT Token이 존재하지 않으면 (인증되지 않음) 인증 서비스로 리다이렉션 된다. JWT 토큰이 존재하면 (인증 된) 사용자 ID를 추출하고 요청을 전달한다.
package com.hellokoding.sso.resource; import org.springframework.stereotype.Component; import org.springframework.web.filter.OncePerRequestFilter; import javax.servlet.FilterChain; import javax.servlet.ServletException; import javax.servlet.http.HttpServletRequest; import javax.servlet.http.HttpServletResponse; import java.io.IOException; @Component public class JwtFilter extends OncePerRequestFilter { private static final String jwtTokenCookieName = "JWT-TOKEN"; private static final String signingKey = "signingKey"; @Override protected void doFilterInternal(HttpServletRequest httpServletRequest, HttpServletResponse httpServletResponse, FilterChain filterChain) throws ServletException, IOException { String username = JwtUtil.parseToken(httpServletRequest, jwtTokenCookieName, signingKey); if(username == null){ String authService = this.getFilterConfig().getInitParameter("services.auth"); httpServletResponse.sendRedirect(authService + "?redirect=" + httpServletRequest.getRequestURL()); } else{ httpServletRequest.setAttribute("username", username); filterChain.doFilter(httpServletRequest, httpServletResponse); } } }
Spring OncePerRequestFilter : https://docs.spring.io/spring/docs/current/javadoc-api/org/springframework/web/filter/OncePerRequestFilter.html
ResourceController.java
package com.hellokoding.sso.resource; import org.springframework.stereotype.Controller; import org.springframework.web.bind.annotation.RequestMapping; import javax.servlet.http.HttpServletRequest; import javax.servlet.http.HttpServletResponse; @Controller public class ResourceController { private static final String jwtTokenCookieName = "JWT-TOKEN"; @RequestMapping("/") public String home() { return "redirect:/protected-resource"; } @RequestMapping("/protected-resource") public String protectedResource() { return "protected-resource"; } @RequestMapping("/logout") public String logout(HttpServletRequest httpServletRequest, HttpServletResponse httpServletResponse) { JwtUtil.invalidateRelatedTokens(httpServletRequest); CookieUtil.clear(httpServletResponse, jwtTokenCookieName); return "redirect:/"; } }
WebApplication.java
package com.hellokoding.sso.resource; import org.springframework.beans.factory.annotation.Value; import org.springframework.boot.SpringApplication; import org.springframework.boot.autoconfigure.SpringBootApplication; import org.springframework.boot.web.servlet.FilterRegistrationBean; import org.springframework.context.annotation.Bean; import java.util.Collections; @SpringBootApplication public class WebApplication { @Value("${services.auth}") private String authService; @Bean public FilterRegistrationBean jwtFilter() { final FilterRegistrationBean registrationBean = new FilterRegistrationBean(); registrationBean.setFilter(new JwtFilter()); registrationBean.setInitParameters(Collections.singletonMap("services.auth", authService)); registrationBean.addUrlPatterns("/protected-resource", "/logout"); return registrationBean; } public static void main(String[] args) throws Exception { SpringApplication.run(WebApplication.class, args); } }
application.properties
services.auth=http://localhost:8080/login
protected-resource.ftl
<!DOCTYPE html> <html lang="en"> <head> <title>Protected Resource Service</title> </head> <body> <h2>Hello, ${Request.username!}</h2> <a href="/logout">Logout</a> </body> </html>
How to Run
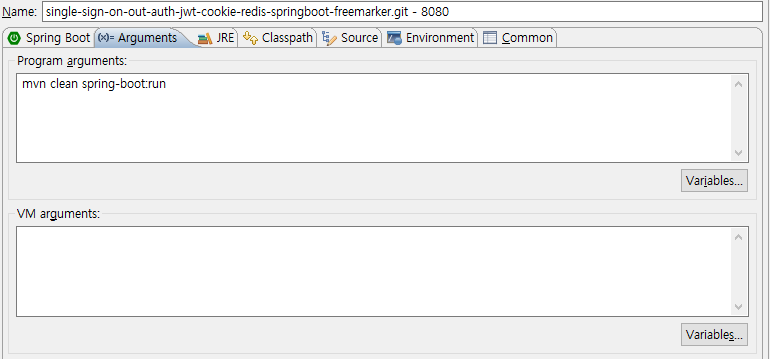
- Authentication Service
> mvn clean spring-boot:run
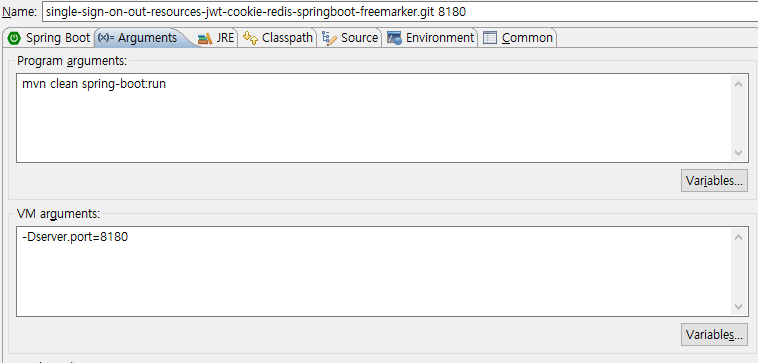
- Resource Service
> mvn clean spring-boot:run -Dserver.port=8180
> mvn clean spring-boot:run -Dserver.port=8280
Eclispe > Run > Run Configurations
아래 그림과 같이 Spring Boot App에 총 3개의 App을 설정해준다.

port 8080
port 8180
port 8280

결과 화면
1. 로그인 화면
하드 코딩된 credintials 계정 정보로 로그인한다. (hellokoding/hellokoding) , (hellosso/hellosso)

1. 로그인 화면

LoginController.java
2. 로그인 후 redirect된 화면 (port number : 8180)
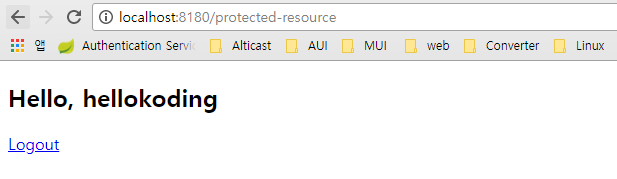
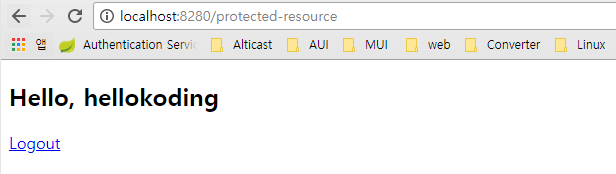
3. port를 8280으로 바꿔서 접속한다 ( 다른 도메인 접속 )
TO DO LIST (기존 프로젝트에 위 JWT 기능을 추가 시키기 위해서)
Spring boot -> Spring
Freemarker -> JSP
Redis -> MySQL??
참고 문헌 : https://hellokoding.com/hello-single-sign-on-sso-with-json-web-token-jwt-spring-boot/
출처: https://soye0n.tistory.com/3 [코린이의 기록]
Spring Boot와 Spring Security, OAuth2를 이용해서, Google 인증을 통한 SSO 인증 예제를 만들어보자.
아래 예제는 https://www.programmergate.com/spring-boot-spring-security-oauth2/ 를 참조하였다.
사용 기술
▶Maven4
▶ Java 1.8
▶ Spring Boot 2.0.0
▶ STS 3.9.5.RELEASE
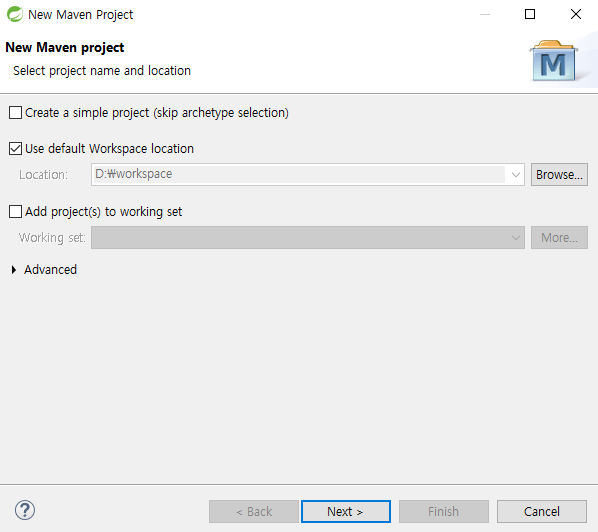
1. Maven Project 생성
New -> Maven Project

workspace 위치를 확인하고, Next를 클릭한다.
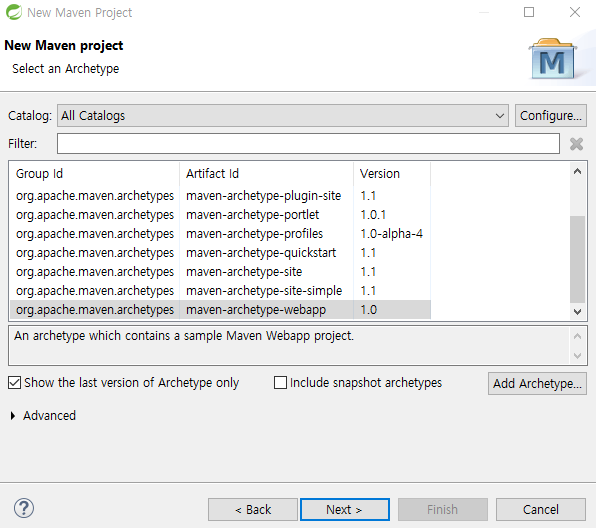
우리가 만드는 것은 web application이므로, Artifact Id가 maven-archetype-webapp 인 것을 선택한다. 나머지 옵션은 그대로 두자.
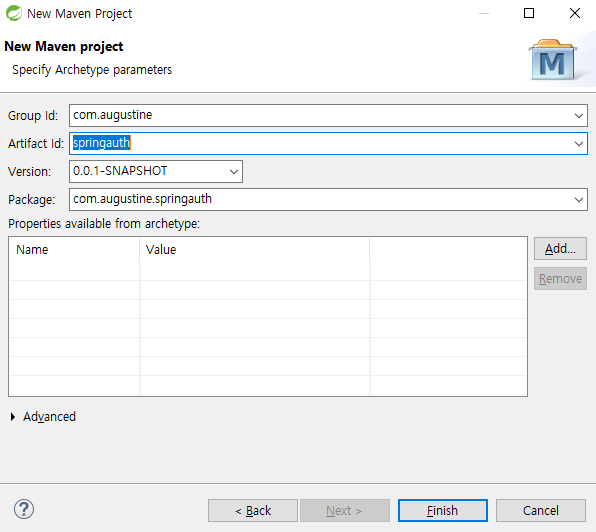
Group ID와 Artifact Id에 원하는 명칭을 적고 Finish를 클릭하자.
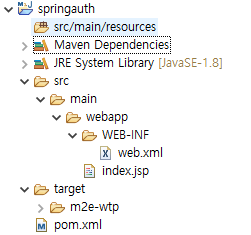
위 절차를 마무리하면, 아래와 같은 프로젝트가 생성된다.
2. pom.xml 설정
pom.xml 파일을 열어서, compiler를 1.8로 설정해준다.
그리고, spring security, Oauth2를 추가해준다. 아래는 설정한 pom.xml 파일이다.
xsi:schemaLocation="http://maven.apache.org/POM/4.0.0 http://maven.apache.org/maven-v4_0_0.xsd">
<modelVersion>4.0.0</modelVersion>
<groupId>com.augustine</groupId>
<artifactId>springauth</artifactId>
<packaging>war</packaging>
<version>0.0.1-SNAPSHOT</version>
<name>springauth Maven Webapp</name>
<properties>
<maven.compiler.source>1.8</maven.compiler.source>
<maven.compiler.target>1.8</maven.compiler.target>
</properties>
<parent>
<groupId>org.springframework.boot</groupId>
<artifactId>spring-boot-starter-parent</artifactId>
<version>2.0.0.RELEASE</version>
</parent>
<dependencies>
<dependency>
<groupId>org.springframework.boot</groupId>
<artifactId>spring-boot-starter-web</artifactId>
</dependency>
<dependency>
<groupId>org.apache.tomcat.embed</groupId>
<artifactId>tomcat-embed-jasper</artifactId>
<scope>provided</scope>
</dependency>
<dependency>
<groupId>org.springframework.boot</groupId>
<artifactId>spring-boot-starter-security</artifactId>
</dependency>
<dependency>
<groupId>org.springframework.security.oauth.boot</groupId>
<artifactId>spring-security-oauth2-autoconfigure</artifactId>
<version>2.0.0.RELEASE</version>
</dependency>
</dependencies>
<build>
<finalName>springauth</finalName>
</build>
</project>


혹시, project에 에러 표시가 있다면, Maven -> Update Project 를 통해 라이브러리를 새로 내려받도록 하자.
3. webapp 의 인증(credentials) 만들기
먼저, OAuth2를 애플리케이션에 적용하기 위해 해야 할 것은, Google Cloud Platform 에서 인증용 GOOGLE API를 신청해야 한다.
아래 절차대로 진행하자.
1) https://console.cloud.google.com/ 에 접속
2) Project 생성
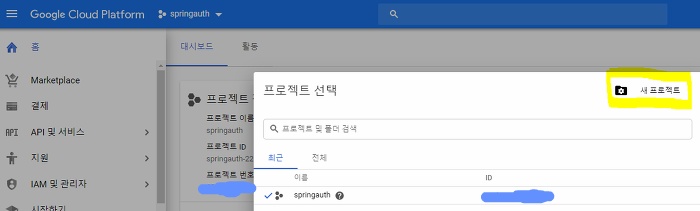
새 프로젝트를 눌러, 프로젝트 이름을 선택해서 만든다.
3) API 및 서비스 -> 사용자 인증 정보를 선택한다.
OAuth 클라이언트 ID를 선택한다.
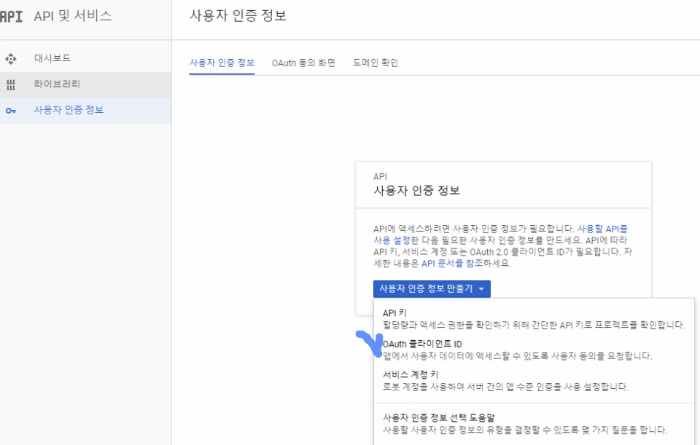
4) 애플리케이션 유형을 선택한다. 우리가 만드는 것은 웹 애플리키에션이기에, 웹 애플리케이션을 선택한다.
처음에 애플리케이션 유형을 선택하는 라디오 버튼이 비활성화 되어 있다. OAuth 클라이언트 이름을 입력한 후, 유형을 선택할 수 있으니 참고하자.
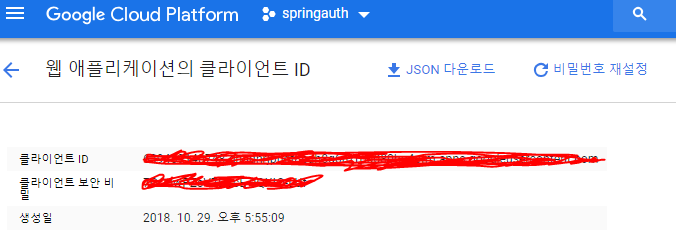
5) 승인된 리디렉션 URI에 Google 인증 후, Redirect 될 주소를 적어준다. 우리는 아래와 같은 주소를 적어준다.

4. application.properties 만들기
서버정보와 OAuth2 정보를 application.properties에서 설정한다.
server.port=7080
spring.mvc.view.prefix=/WEB-INF/jsp/
spring.mvc.view.suffix=.jsp
server.error.whitelabel.enabled=false
security.oauth2.client.clientId=Google api 의 client ID를 입력한다.(아래그림참조)
security.oauth2.client.clientSecret=Google api 의 클라이언트 보안 비밀 번호를 입력한다.(아래그림참조)
security.oauth2.client.preEstablishedRedirectUri=http://localhost:7080/callback #인증을 수행할 action uri
security.oauth2.client.accessTokenUri=https://www.googleapis.com/oauth2/v3/token
security.oauth2.client.userAuthorizationUri=https://accounts.google.com/o/oauth2/auth
security.oauth2.client.tokenName=oauth_token
security.oauth2.client.authenticationScheme=query
security.oauth2.client.clientAuthenticationScheme=form
security.oauth2.client.scope=profile
security.oauth2.resource.user-info-uri=https://www.googleapis.com/userinfo/v2/me
security.oauth2.client.useCurrentUri=false
5. View page 만들기
VIew page가 필요하다. 하나는 초기 화면인 index page와 인증 후인 home page 다.
아래 두 파일을 WEB-INF 밑에 jsp 폴더를 만들어 저장하자.
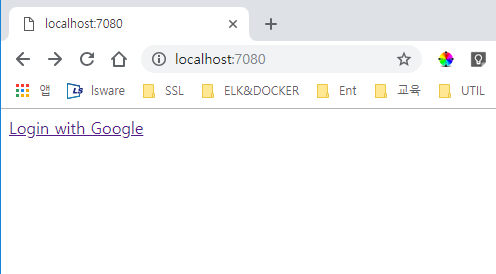
index.jsp
<!DOCTYPE html>
<html>
<head>
</head>
<body>
<a href="/login">Login with Google</a>
</body>
</html>
home.jsp
<!DOCTYPE html>
<html>
<head>
</head>
<body>
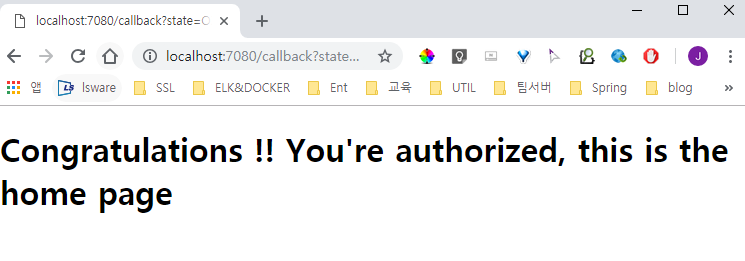
<h1>Congratulations !! You're authorized, this is the home page</h1>
</body>
</html>
6. Application Security 설정
Spring Security는 비인가된 사용자들의 모든 페이지에 대한 접속을 허용하지 않는다. 하지만, 인증 전의 초기 페이지인 index.jsp 페이지는 접속해야 하기에 해당 페이지의 예외를 위해서, WebSecurityConfigurerAdapter 클래스를 상속받은 ApplicationSecurity 클래스를 만들어서, configure 메소드를 다음과 같이 override 한다.
@EnableOAuth2Sso 어노테이션은 필수 어노테이션으로서, OAuth2의 초기화와 자동설정을 지원한다. 해당 어노테이션은 Spring Boot의 설정 클래스(@Configuration)에서 같이 사용할 수 있다.
|
1 2 3 4 5 6 7 8 9 10 11 12 13 14 15 16 17 18 19 20 21 22 |
package com.augustine.springauth;
import org.springframework.boot.autoconfigure.security.oauth2.client.EnableOAuth2Sso; import org.springframework.context.annotation.Configuration; import org.springframework.security.config.annotation.web.builders.HttpSecurity; import org.springframework.security.config.annotation.web.configuration.WebSecurityConfigurerAdapter;
@Configuration @EnableOAuth2Sso public class ApplicationSecurity extends WebSecurityConfigurerAdapter {
@Override protected void configure(HttpSecurity http) throws Exception { http .antMatcher("/**") .authorizeRequests() .antMatchers("/", "/callback", "/login**", "/webjars/**", "/error**") .permitAll() .anyRequest() .authenticated(); } } |
7. Controller 만들기
Client 의 request를 처리할 Controller를 만들자. 특별한건 없이 매우 심플하게 만들자.
|
1 2 3 4 5 6 7 8 9 10 11 12 13 14 15 16 17 18 19 20 21 22 23 |
package com.augustine.springauth;
import org.springframework.security.core.Authentication; import org.springframework.security.core.context.SecurityContextHolder; import org.springframework.stereotype.Controller; import org.springframework.web.bind.annotation.RequestMapping;
@Controller public class HomeController {
@RequestMapping("/") public String login() { Authentication auth = SecurityContextHolder.getContext().getAuthentication(); System.out.println(auth.getPrincipal()); return "/index"; }
@RequestMapping("/callback") public String callback() { System.out.println("redirecting to home page"); return "/home"; } } |
8. Application.java 만들기
Spring Boot 를 구동할 Application 클래스를 만들자. 우리가 만든 Spring Boot Application을 구동하려면 @SpringBootApplication 이 필요하다.
|
1 2 3 4 5 6 7 8 9 10 11 12 |
package com.augustine.springauth;
import org.springframework.boot.SpringApplication; import org.springframework.boot.autoconfigure.SpringBootApplication;
@SpringBootApplication public class Application{
public static void main(String[] args) { SpringApplication.run(Application.class, args); } } |
9. Test
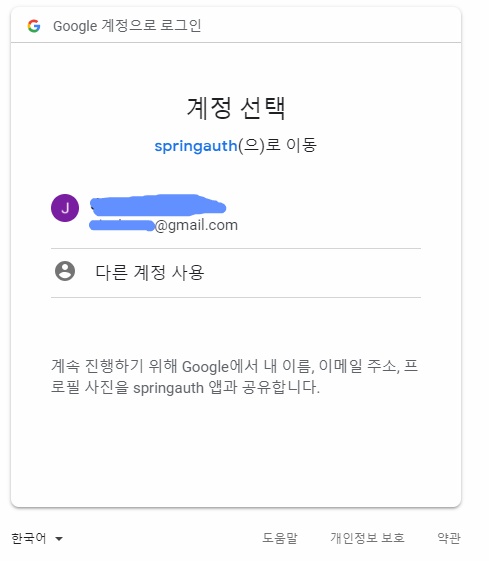
톰캣을 구동 후, http://localhost:7080 으로 접속한다. Login with Google을 클릭하면, 구글 인증 창이 나온다.
인증이 성공하면, 우리가 설정한 home.page로 이동할 것이다.
출처: https://augustines.tistory.com/128 [Augustine]
[출처] https://kimseungjae.tistory.com/15
광고 클릭에서 발생하는 수익금은 모두 웹사이트 서버의 유지 및 관리, 그리고 기술 콘텐츠 향상을 위해 쓰여집니다.