Draw2d Intro
Draw2d Intro
practical introduction to eclipse draw2d project.
eclipse, draw2d, graphics, java, 2d, 2d graphics
- Draw2d Intro
- Draw2D Description
- Draw2 installation
- Draw2d Project
- Sample Draw2d Java Application
- Drawing Draw2d simple figures
- Connection
- Draw2D Advanced
- Draw2D Events
- Draw2D Class Figure
- Draw2D Connection Decoration
- Source Code
- References and Further readings
Draw2D Description
Draw2D is a layout and rendering toolkit built on top of SWT. It may be used standalone (outside Eclipse) or in combination with the GEF or Zest component.
Draw2D is a ligheweight toolkit, for displayng graphical components on SWT canvas. Lightweight means that each graphical component, called figure is a simple java object and has no corresponding resource in the Operating System.
Draw2 installation
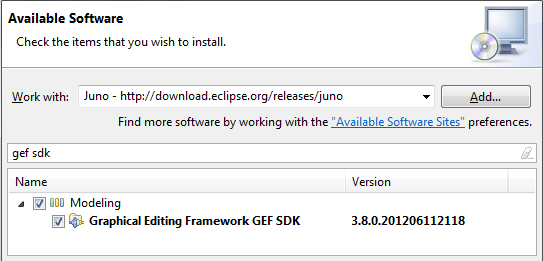
To use Draw2D you need to install the GEF framework into Eclipse.
From menu, select Help > Install new Software.
in the wizard select the update site; type gef sdk into the search box, select Eclipse GEF SDK, and complete the installation, that requires a restart.
Draw2d Project
The full Eclipse RCP framework is not needed to use Draw2D, so you can create a simple Java Application, in eclipse, and include: org.eclipse.draw2d, org.eclipse.swt and org.eclipse.swt.win32.win32.x86 jars, taken from ECLIPSE_HOME/plugins folder.
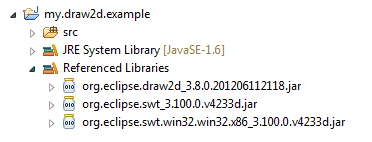
Note The minor number depends on the Eclipse version running
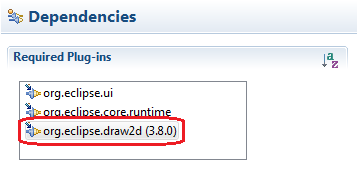
Alternatively you can create an elcipse plug-in project; and add the dependency to org.eclipse.draw2d
Sample Draw2d Java Application
With SWT and Draw2d libraries added to your build path you can build a very simple application window, containing theskeleton for ant Draw2D development.
We build a class with three methods:
main(..) the static application entry pointopen() the method that instantiate the graphical windowbuildDiagram(..) the method that draw the graphical content
Look at the code
/** class for testing SWT with Draw2d */ |
/** Application entry point */ |
public static void main(String[] args) { |
/** Open a Shell call a method for drawing */ |
Shell shell = new Shell(new Display()); |
shell.setText("My Main View"); |
shell.setLayout( new GridLayout() ); |
Canvas canvas = buildDiagram( shell ); |
canvas.setLayoutData(new GridData(GridData.FILL_BOTH)); |
Display display = shell.getDisplay(); |
while( !shell.isDisposed() ) |
while( !display.readAndDispatch() ) |
/** Instantiate the root figure, where we draw figures*/ |
private Canvas buildDiagram( Composite parent ){ |
Figure root = new Figure(); |
root.setFont(parent.getFont()); |
root.setLayoutManager( new XYLayout() ); |
Canvas canvas = new Canvas(parent, SWT.DOUBLE_BUFFERED); |
canvas.setBackground(ColorConstants.white); |
LightweightSystem lws = new LightweightSystem(canvas); |
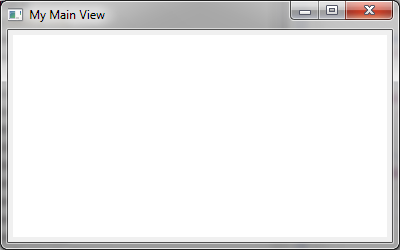
As you can see buildDiagram(..) draws nothing, for the moment. If you launch the main(..) you will see an empty window, build on top of SWT which contains an invisible Draw2D root figure
Now is time to put graphics on the window. My scope is to draw some blocks on on top of the SWT window.
To start I need a method that Build a Figure, containing a label.
/** specific method to draw a block figure */ |
public Figure myBlockFigure(String name){ |
RectangleFigure f = new RectangleFigure(); |
f.setBackgroundColor(ColorConstants.lightGreen); |
f.setLayoutManager( new ToolbarLayout() ); |
f.setPreferredSize( 100, 100 ); |
f.add( new Label( name ) ); |
The code instantiate a RectangleFigure, with a lightGreen background, that contains a Label..
Now, to draw the Figure on our window, we add an hook: a _method call at the end of buildDiagram(..)
private Canvas buildDiagram( Composite parent ){ |
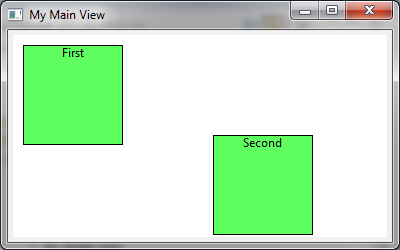
Then we add the code to Draw two figures on the root Figure. Basically we draw twice the save figure, with different labels, in different points.
/** This method draws figures on the root */ |
private void draw(Figure root ) { |
Figure first= myBlockFigure("First"); |
new Rectangle( new Point(10, 10), |
first.getPreferredSize() ) ); |
Figure second= myBlockFigure("Second"); |
new Rectangle( new Point(200, 100), |
second.getPreferredSize() ) ); |
Launching again the Application we can see two blocks inside our window.
Connection
Now we connect the two figures, by using a specialized IFigure called Connection. Simply, this figure draws a line between two points of a canvas, connecting two figures. There are different types of connections, but now we need a simple PolylineConnection connecting figures with ChopboxAnchors.
To make a connection we add a myConnection(..) method to our class
/** return a connection figure with chopbox between two figures */ |
public Connection myConnection(IFigure fig1, IFigure fig2){ |
PolylineConnection conn = new PolylineConnection(); |
conn.setSourceAnchor( new ChopboxAnchor( fig1 ) ); |
conn.setTargetAnchor( new ChopboxAnchor( fig2 ) ); |
To complete the test we need to add the connection to our root figure; so we add a line of code at the end of our draw(..) method
private void draw(Figure root, XYLayout layout) { |
root.add( myConnection( first, second ) ); |
Now, we can test the application by launching again the main(..). The result id visible in the figure below

At this point we have seen basics of Draw2D: Canvas, Figures and Connection.
Draw2D Advanced
Now we proceed with examples on advanced topics of Draw2D, with Events and Complex Figures.
Draw2D Events
We would like to move figure on the canvas, reacting to user’s drag. For this we need a Draw2D event listener, that intercepts user events: Mouse Click, Mouse Move and Mouse Release.
To to this, we need a class implementing MouseListener and MouseMotionListener interfaces.
/** This Listener implements drag and drop for Draw2D Figure */ |
implements MouseListener, MouseMotionListener{ |
/** constructor save reference to figure, then add listeners */ |
public MyListener(Figure figure) { |
figure.addMouseListener(this); |
figure.addMouseMotionListener(this); |
public void mousePressed(MouseEvent me) { |
location = me.getLocation(); |
public void mouseDragged(MouseEvent me) { |
Point newLocation = me.getLocation(); |
if( location==null || newLocation == null) |
Dimension offset = newLocation.getDifference( location ); |
if( offset.width==0 && offset.height==0 ) |
figure.getUpdateManager() |
.addDirtyRegion(figure.getParent(), figure.getBounds()); |
figure.translate( offset.width, offset.height ); |
figure.getUpdateManager() |
.addDirtyRegion( figure.getParent(), figure.getBounds() ); |
figure.getParent().getLayoutManager() |
.setConstraint(figure, figure.getBounds() ); |
public void mouseReleased(MouseEvent me) { |
public void mouseEntered(MouseEvent me) {} |
public void mouseExited(MouseEvent me) {} |
public void mouseHover(MouseEvent me) {} |
public void mouseMoved(MouseEvent me) {} |
public void mouseDoubleClicked(MouseEvent me) {} |
Looking at the code we note
MyListener(.) constructor save a reference to the figure, then adds listenersmousePressed(.) method store the location at the first click on the Figure, then consume the event.mouseDragged(.) method calculate the difference from last movement, translate the figure, and make the repaint happens, by marking dirty the old regon, the new region and notifyng the parent layout manager.mouseReleased(.) method set to null the location and consumes the event.
Finally we need to hook the listener to figure creation. It’s really simple, we need only to put one line on the myBlockFigure(.) method, so that each built figure has its own mouse listener.
public Figure myBlockFigure(String name){ |
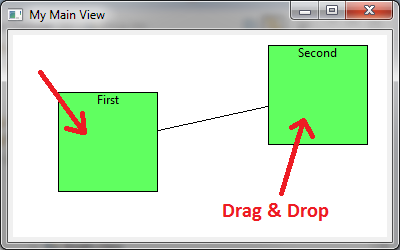
Now, launching the application again we see the same two blocks. By dragging them, we see blocks moving, together with connection. Try yourself to see the Drag And Drop
Now we want to transform our simple block figure into one more complex figure, similar to a class of a class diagram. Our class needs:
- an icon near its name
- a compartment for fiends
- a compartment for methods
So we change our code, by adding a new method that builds the class figure. If you give a look at the conde you can see that is similar to previous myBlockFigure(.), except for few details.
/** this method build a Class image figure */ |
public Figure myClassFigure(String name, String[] fields, String[] methods) { |
RectangleFigure f = new RectangleFigure(); |
f.setBackgroundColor(ColorConstants.lightGray); |
f.setLayoutManager(new ToolbarLayout()); |
f.setPreferredSize(150, 110); |
f.add( new Label( name, getImage("resources/img/class_obj.gif") ) ); |
f.add(myListLabel(fields)); |
f.add(myListLabel(methods)); |
Note we inserted into the project a resource/img folder that contains the class_obj.gif file.
Our method calls two helper methods; one that builds an Image given a path relative to the user dir.
/** build an image starting from relative path wrt user directory */ |
private static Image getImage(String path) { |
File f = new File(System.getProperty("user.dir"), path ); |
return new Image( Display.getCurrent(), f.getAbsolutePath() ); |
And one that build a big label with a top line and a list of elements displayed.
/** builds a label with a list of strings */ |
public Label myListLabel(String[] list) { |
Label label = new Label(text) { |
protected void paintBorder(Graphics g) { |
Rectangle r = getBounds(); |
/** paints horizontal line on top of label */ |
g.drawLine(r.x, r.y, r.x + r.width, r.y); |
public Insets getInsets() { |
return new Insets(5, 0, 0, 0); |
Finally we change the code into the draw(.) method, so that it can draw our class figures.
/** This method draws figures on the root */ |
private void draw(Figure root) { |
Figure first = myClassFigure("First", |
new String[] { "- name:String" }, |
new String[] { "+ First(String)", |
new Rectangle(new Point(10, 10), first.getPreferredSize())); |
Figure second = myClassFigure("Second", |
new String[]{"- email: String"}, |
new String[]{"+ getEmail():String", |
new Rectangle(new Point(200, 100), second.getPreferredSize())); |
root.add(myConnection(first, second)); |
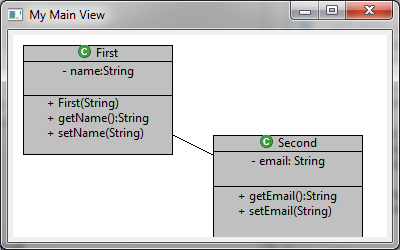
Now the diagram looks like a class diagram. See the following image
Draw2D Connection Decoration
At this point we need only to decorate connections.
First we add a decoration that looks like a containment, with the following code
/** cerate a poligon decoration that looks like a containment */ |
public PolygonDecoration myPolygonDecoration(){ |
PolygonDecoration deco = new PolygonDecoration(); |
PointList pl = new PointList(); |
Then we add a label representing multiplicity, attached to target endpoint, withh following code
/** adds a multiplicity label linked to targte endpoint */ |
public void addMultiplicity(PolylineConnection c){ |
ConnectionEndpointLocator targetEL = new ConnectionEndpointLocator(c, true); |
targetEL.setVDistance(10); |
Label multiplicity = new Label("1..*"); |
c.add(multiplicity, targetEL); |
Finally we join the code, by changing the myConnection(..) method, as follows
/** return a connection figure with chopbox between two figures */ |
public Connection myConnection(IFigure fig1, IFigure fig2) { |
PolylineConnection conn = new PolylineConnection(); |
conn.setSourceAnchor(new ChopboxAnchor(fig1)); |
conn.setTargetAnchor(new ChopboxAnchor(fig2)); |
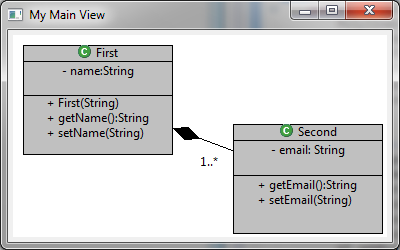
conn.setSourceDecoration( myPolygonDecoration() ); |
The result looks like the following image.
Source Code
You can download the source code of the example
Notes
- The zipped archive (3MB) contain a project together with dependencies.
References and Further readings
[출처] http://www.ingegno.it/programming/eclipse/eclipse-draw2d/


