
GIT Server 구축 : LINUX UBUNTU, MS WIN
2012.07.28 19:01
[출처] http://blog.naver.com/PostView.nhn?blogId=ncs10066&logNo=80128549898
Git 서버 구축(on Ubuntu) - 클라이언트 접속 (Ubuntu, Windows)
1-0) Windows 상에서 클라이언트 SSH 키 만들기
- 특정인만이 레포짓트리로 접근이 가능하게 하기 위한 보안키 생성 작업.
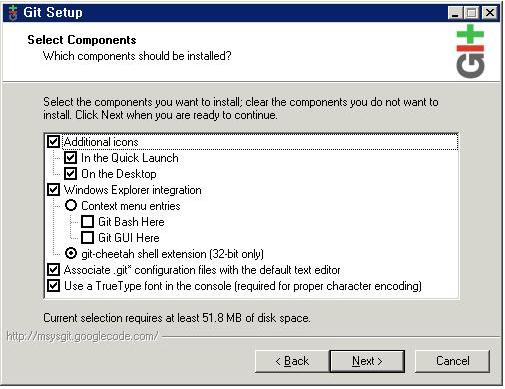
1. http://code.google.com/p/msysgit/downloads/list 에서 최신 버전 (현재 1.74)을 받은 후 설치한다.
2. 동기화 시킬 폴더에 마우스를 가져다 대고 오른쪽 버튼을 누르고 Git init을 해주며 연결할 폴더가 된다.
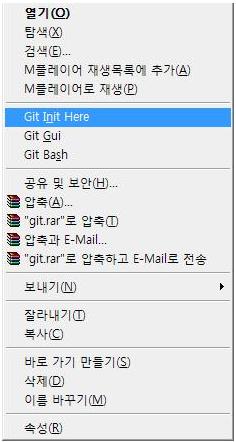
init 후 해당 폴더에 오른쪽 마우스 버튼을 클릭해보면 다음과 같이 바뀝니다.
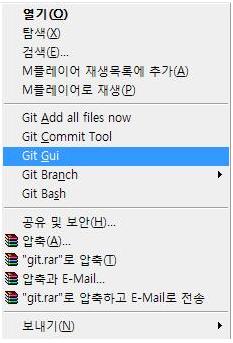
Git Gui를 눌러서 아래와 같은 화면에서 Help-Show SSH Key 를 선택한다.
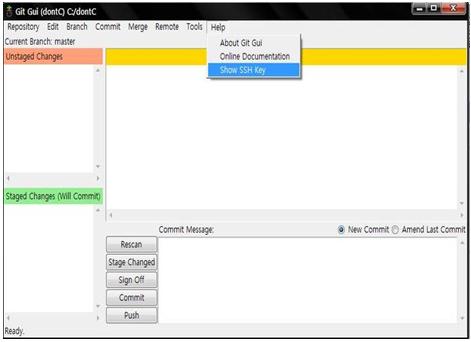
이렇게 생성된 SSH 키는 서버에 접근하는데 쓰이는 보안키의 역할을 하게 된다.
1-1) Linux 상에서 클라이언트 SSH 키 만들기
# ssh-keygen -t rsa
Generating public/private rsa key pair.
Enter file in which to save the key (/root/.ssh/id_rsa): ----> 엔터
Enter passphrase (empty for no passphrase): ----> 엔터
Enter same passphrase again: ----> 엔터
Your identification has been saved in /root/.ssh/id_rsa.
Your public key has been saved in /root/.ssh/id_rsa.pub.
The key fingerprint is: ----> 엔터
47:99:67:77:f6:af:ec:42:ea:2d:7c:ae:7a:06:b8:4c root@cove
#
위와같이 실행하면 개인키가 생성된다.
개인키가 생성되는 위치는 /root/.ssh/ 안에 id_rsa.pub 라는 파일로 생성됨.
2-0) SSH server 에 client SSH key 적용 및 접속 테스트 해보기
1. 접속하고자 하는 client PC에서 생성한 SSH key를 열어보면 키 값이 저장되어 있는데 이 파일을 읽어서 안에 있는 내용을 /root/.ssh/ 안에 authorized_keys 파일에 붙여넣는다.
2. 접속 방법
ssh -P22 root@server주소
3-0) Ununtu 상에서 Server 구축하기
step 1. 기본 환경 설정
- git 패키지 설치 (Ubuntu 10.10에는 이미 설치되어 있음) [Local PC]
$ sudo apt-get install git-core
- git server 계정 생성
$ sudo adduser --system --shell /bin/bash --gecos 'git version control' --group --home /home/git git
$ sudo passwd git
- git 정보가 저장될 repositories 디렉토리 생성 [Local PC]
$ sudo -u git mkdir /home/git/repositories
- 서버측에 저장할 프로젝트를 로컬에 생성 [Local PC]
$ mkdir Project
$ cd Project
$ touch README
$ git init
$ git add .
$ git status
$ git commit -a -m "Project First Commit"
step 2. Setting Up A Public Repository
- 구조
사용한 서버 : git-daemon
Local Personal PC : 원본 repository
Server PC : public repository
- git-daemon
로컬 네트웍이나 소규모 그룹 간의 repository 공유를 위해 최적화된 미니 서버


* 사용법
1. # git clone --bare current_repo new_repo
2. Create an empty file called "git-daemon-export-ok" within the new repository
3. # git-daemon --base-path=parent_of_new_repo
In step 3, base-path should not end in a slash.
이 후, git-daemon이 9418 포트를 통해 구동된다. 주소는 git://server-location/new_repo 로 접속하면 된다.
commit access를 위해서는 SSH가 필요하다.
- 본문
원본 repository가 /Project 라고 했을 때, 먼저 새로운 clone을 만들고 git-daemon에게 그것이 public이라고 알려주어야 한다.
[Local PC]
$ git clone --bare Project Project.git
$ touch Project.git/git-daemon-export-ok
위 작업을 하면 "Project.git" 디렉토리에는 bare git repository 생성이 된다. 그리고 그 안에는 ".git" 디렉토리만 있을 것이다.
"Project.git" 디렉토리를 public repository로 쓸 서버의 디렉토리로 복사를 한다. (git계정의 repositories로 이동)
[Local PC]
$ sudo -u git cp -R Project.git /home/git/repositories
$ cd /home/git/repositories/Project.git
$ sudo -u git git --bare update-server-info
$ sudo -u git mv hooks/post-update.sample hooks/post-update
- git update-server-info
다음 폴더의 정보를 업데이트 한다.
objects/info/packs
info/refs
- git hooks
Hooks are little scripts you can place in $GIT_DIR/hooks directory to trigger action at certain points.
When git init is run, a handful of example hooks are copied into the hooks directory of the new repository, but by default they are all disabled.
To enable a hook, rename it by removing its .sample suffix.
Note. It is also a requirement for a given hook to be executable. However - in a freshly initialized repository - the .sample files are
executable by default.
step 3. Exporting a git repository via the git protocol
git repository 를 http로 공유하는 것보다 git protocol을 이용해서 공유하는 것이 성능상 월등하나 구축과정이 다소 복잡하다.
step 4. Test
다른 컴퓨나 임의의 디렉토리에서 clone 명령을 수행 파일을 제대로 받아오는지 확인 Project.git을 만들때 사용한 Project 디렉토리는 백업후 clone을 통해 새로 생성을 해주도록 한다.
clone을 통해 Project.git 내용을 받아와야 따로 remote를 추가하지 않아도 orgin이라는 alias로 remote가 기본 셋팅이 되게 된다.
[Remote Server]
$ git clone git@HostName(or address):repositories/Project.git
기타 명령어
- 로컬 리포지토리에 서버 저장소 alias 추가
$ pwd
~/Project
$ git remote -v
$ git remote add sv git@HostName:repositories/Project
$ git remote -v
sv git@HostName:repositories/Project (fetch)
sv git@HostName:repositories/Project (push)
- 로컬 리포지토리에서 파일을 수정한뒤 서버 리포지토리에 업로드 하는 방법
$ vim README
$ git commit -a -m "README file modified"
$ git push sv
- 서버 리포지토리에 변경된 내용을 받는 방법
$ git fetch sv
설정에 참고한 사이트
01. git menual : [ http://www.kernel.org/pub/software/scm/git/docs/user-manual.html#setting-up-a-public-repository ]
02. aesop git 강좌 : [ http://www.aesop.or.kr/?document_srl=156745&mid=Board_Documents_Application ]
03. windows git
- msysgit : [ http://code.google.com/p/msysgit/ ]
- git Extensions : [ http://sourceforge.net/projects/gitextensions/files/ ]
windows에서 사용하기로는 git Extensions가 가장 좋을듯 합니다.
msysgit은 cmd창에 리눅스 명령이 가능하도록 만든 형식이라 콘솔 명령이 익숙치 않으면 조금 불편한데다가 git Extensions를 설치할때 msysgit을 설치하게됩니다. 그 위에 GUI를 입혀서
작동하는 방식이다보니 처음 사용자는 GUI쪽이 좀더 낫겠지요
참고 : http://khmirage.tistory.com/309
-- 작성중 --
광고 클릭에서 발생하는 수익금은 모두 웹사이트 서버의 유지 및 관리, 그리고 기술 콘텐츠 향상을 위해 쓰여집니다.