[Spring Boot] 스프링 부트에 필터를 '조심해서' 사용하는 두 가지 방법

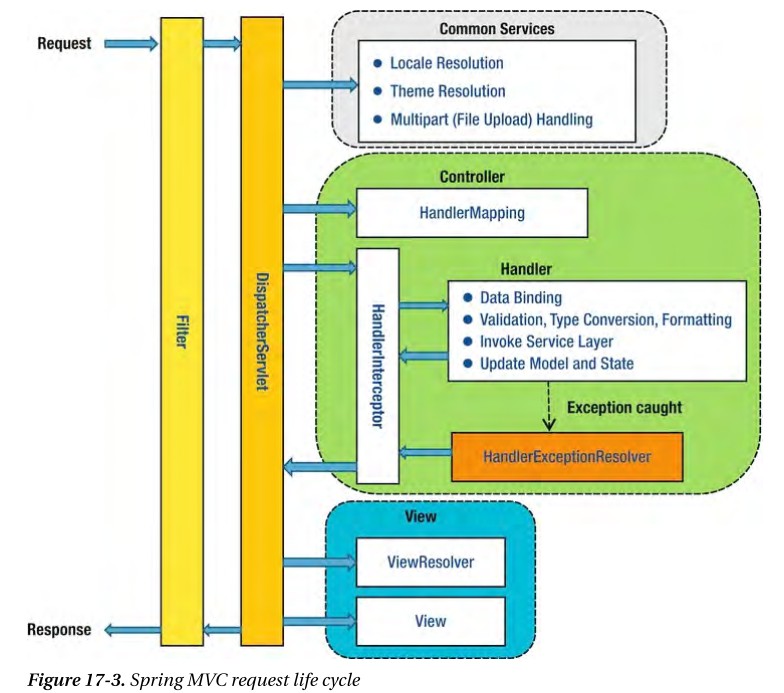
웹 어플리케이션에서 필터를 사용하면 중복으로 처리되는 내용을 한곳에서 처리할 수 있다거나 서비스의 다양한 니즈를 충족시키기에 안성맞춤인 장치인것 같다. 필터란 무엇인가 에 대한 내용은 워낙에 다른 블로그나 공식 도큐먼트에서 자세하게 그리고 다양하게 설명하고 있기에 기본 개념에 대해서는 설명하지 않도록 하려 한다. 이번 포스팅에서는 스프링 부트를 사용하면서 어노테이션이라는 간편함에 취해(?) “돌격 앞으로, 닥공” 의 자세로 개발을 하려했던 필자를 보고 “반성"의 자세로 필터를 등록하는 방법에 대해 명확하게 정리를 하고자 한다. 마지막으로는 아주 간단하면서도 엄청나게 위험한 필터 설정 사례에 대해서도 짚고 넘어가보자. 그냥 넘어가면 아쉬우니, 한번이라도 ‘spring’ 이라는 framework 를 접해본 사람이라면 봤을법한 그림을 첨부하는것으로 필터란 무엇인가 에 대한 설명을 대신하는게 좋겠다.

/images/spring-boot-filter/spring-request-lifecycle.jpg
출처 : https://justforchangesake.wordpress.com/2014/05/07/spring-mvc-request-life-cycle/

방법을 설명하기 전에 동일하게 사용될 필터와 컨트롤러 코드를 보면 다음과 같다.

  • 필터
 
@Slf4j
public class MyFilter implements Filter {

	@Override
	public void init(FilterConfig filterConfig) throws ServletException {
		log.info("init MyFilter");
	}

	@Override
	public void doFilter(ServletRequest servletRequest, ServletResponse servletResponse, FilterChain filterChain)
		throws IOException, ServletException {
		log.info("doFilter MyFilter, uri : {}", ((HttpServletRequest)servletRequest).getRequestURI());
		filterChain.doFilter(servletRequest, servletResponse);
	}

	@Override
	public void destroy() {
		log.info("destroy MyFilter");
	}
}
  • 테스트 할 컨트롤러


@Slf4j
@RestController
public class SampleController {

	@GetMapping("/test")
	public String test() {
		return "test";
	}

	@GetMapping("/filtered/test")
	public String filteredTest() {
		return "filtered";
	}
}

아주 간단하게, 일반 url 하나와 필터에 적용할 url 두개를 만들고 설정하려 한다. FilterRegistrationBean 을 이용해서 위에서 만들었던 필터를 아래처럼 등록해보자.

 
@SpringBootApplication
public class Method1Application {

	public static void main(String[] args) {
		SpringApplication.run(Method1Application.class, args);
	}

	@Bean
	public FilterRegistrationBean setFilterRegistration() {
		FilterRegistrationBean filterRegistrationBean = new FilterRegistrationBean(new MyFilter());
		// filterRegistrationBean.setUrlPatterns(Collections.singletonList("/filtered/*")); // list 를 받는 메소드
		filterRegistrationBean.addUrlPatterns("/filtered/*"); // string 여러개를 가변인자로 받는 메소드
		return filterRegistrationBean;
	}
}

위 주석에도 적었지만 filterRegistrationBean 의 “setUrlPatterns” 와 “addUrlPatterns” 의 차이는 별거 없다. list 자체를 받을건지 아니면 가변인자로 계속 추가 할것인지. 이렇게 되면 “/filtered/“으로 “시작"하는 패턴의 url의 요청이 오게 되면 등록한 필터를 통과하게 된다.

  • 실행 : 필터 생성
 
 /\ / ___'_ __ _ _(_)_ __  __ _ \ \ \ \
( ( )\___ | '_ | '_| | '_ \/ _` | \ \ \ \
 \/  ___)| |_)| | | | | || (_| |  ) ) ) )
  '  |____| .__|_| |_|_| |_\__, | / / / /
 =========|_|==============|___/=/_/_/_/
 :: Spring Boot ::        (v2.2.6.RELEASE)

2020-04-06 23:45:01.225  INFO 14672 --- [           main] c.t.s.method1.Method1Application         : No active profile set, falling back to default profiles: default
2020-04-06 23:45:02.153  INFO 14672 --- [           main] o.s.b.w.embedded.tomcat.TomcatWebServer  : Tomcat initialized with port(s): 8080 (http)
2020-04-06 23:45:02.168  INFO 14672 --- [           main] o.apache.catalina.core.StandardService   : Starting service [Tomcat]
2020-04-06 23:45:02.168  INFO 14672 --- [           main] org.apache.catalina.core.StandardEngine  : Starting Servlet engine: [Apache Tomcat/9.0.33]
2020-04-06 23:45:02.361  INFO 14672 --- [           main] o.a.c.c.C.[Tomcat].[localhost].[/]       : Initializing Spring embedded WebApplicationContext
2020-04-06 23:45:02.362 DEBUG 14672 --- [           main] o.s.web.context.ContextLoader            : Published root WebApplicationContext as ServletContext attribute with name [org.springframework.web.context.WebApplicationContext.ROOT]
2020-04-06 23:45:02.362  INFO 14672 --- [           main] o.s.web.context.ContextLoader            : Root WebApplicationContext: initialization completed in 1082 ms
2020-04-06 23:45:02.391 DEBUG 14672 --- [           main] o.s.b.w.s.ServletContextInitializerBeans : Mapping filters: filterRegistrationBean urls=[/filtered/*] order=2147483647, characterEncodingFilter urls=[/*] order=-2147483648, formContentFilter urls=[/*] order=-9900, requestContextFilter urls=[/*] order=-105
2020-04-06 23:45:02.391 DEBUG 14672 --- [           main] o.s.b.w.s.ServletContextInitializerBeans : Mapping servlets: dispatcherServlet urls=[/]
2020-04-06 23:45:02.409 DEBUG 14672 --- [           main] o.s.b.w.s.f.OrderedRequestContextFilter  : Filter 'requestContextFilter' configured for use
2020-04-06 23:45:02.409 DEBUG 14672 --- [           main] s.b.w.s.f.OrderedCharacterEncodingFilter : Filter 'characterEncodingFilter' configured for use

// 필터가 생성 되었다!
2020-04-06 23:45:02.410  INFO 14672 --- [           main] c.t.springbootfilter.method1.MyFilter    : init MyFilter

2020-04-06 23:45:02.410 DEBUG 14672 --- [           main] o.s.b.w.s.f.OrderedFormContentFilter     : Filter 'formContentFilter' configured for use
2020-04-06 23:45:02.544  INFO 14672 --- [           main] o.s.s.concurrent.ThreadPoolTaskExecutor  : Initializing ExecutorService 'applicationTaskExecutor'
  • 일반 url
 
2020-04-06 23:45:27.526 DEBUG 14672 --- [nio-8080-exec-1] o.s.web.servlet.DispatcherServlet        : GET "/test", parameters={}
2020-04-06 23:45:27.528 DEBUG 14672 --- [nio-8080-exec-1] s.w.s.m.m.a.RequestMappingHandlerMapping : Mapped to com.taetaetae.springbootfilter.method1.SampleController#test()
2020-04-06 23:45:27.548 DEBUG 14672 --- [nio-8080-exec-1] m.m.a.RequestResponseBodyMethodProcessor : Using 'text/html', given [text/html, application/xhtml+xml, image/webp, image/apng, application/xml;q=0.9, application/signed-exchange;v=b3;q=0.9, */*;q=0.8] and supported [text/plain, */*, text/plain, */*, application/json, application/*+json, application/json, application/*+json]
2020-04-06 23:45:27.548 DEBUG 14672 --- [nio-8080-exec-1] m.m.a.RequestResponseBodyMethodProcessor : Writing ["test"]
2020-04-06 23:45:27.555 DEBUG 14672 --- [nio-8080-exec-1] o.s.web.servlet.DispatcherServlet        : Completed 200 OK
  • 필터링 url
 
// 필터에 들어온것 확인!
2020-04-06 23:45:37.455  INFO 14672 --- [nio-8080-exec-2] c.t.springbootfilter.method1.MyFilter    : doFilter MyFilter, uri : /filtered/test

2020-04-06 23:45:37.456 DEBUG 14672 --- [nio-8080-exec-2] o.s.web.servlet.DispatcherServlet        : GET "/filtered/test", parameters={}
2020-04-06 23:45:37.456 DEBUG 14672 --- [nio-8080-exec-2] s.w.s.m.m.a.RequestMappingHandlerMapping : Mapped to com.taetaetae.springbootfilter.method1.SampleController#filteredTest()
2020-04-06 23:45:37.457 DEBUG 14672 --- [nio-8080-exec-2] m.m.a.RequestResponseBodyMethodProcessor : Using 'text/html', given [text/html, application/xhtml+xml, image/webp, image/apng, application/xml;q=0.9, application/signed-exchange;v=b3;q=0.9, */*;q=0.8] and supported [text/plain, */*, text/plain, */*, application/json, application/*+json, application/json, application/*+json]
2020-04-06 23:45:37.457 DEBUG 14672 --- [nio-8080-exec-2] m.m.a.RequestResponseBodyMethodProcessor : Writing ["filtered"]
2020-04-06 23:45:37.459 DEBUG 14672 --- [nio-8080-exec-2] o.s.web.servlet.DispatcherServlet        : Completed 200 OK

@ServletComponentScan 어노테이션을 @Configuration 어노테이션이 설정되어 있는곳에 걸어준 다음 위에서 설정한 필터에 @WebFilter 어노테이션을 설정해주면 아주 간단하게 끝이 난다.

  • @ServletComponentScan 설정
 
@ServletComponentScan
@SpringBootApplication
public class Method2Application {
	public static void main(String[] args) {
		SpringApplication.run(Method2Application.class, args);
	}
}
  • @WebFilter 설정
 
@Slf4j
@WebFilter(urlPatterns = "/filtered/*")
public class MyFilter implements Filter {
	// 내용 동일
}

위와 같이 설정하고 동일하게 테스트를 해보면 다음과 같이 필터가 설정된 모습을 확인할 수 있다.

  • 일반 url
 
2020-04-06 23:54:34.330 DEBUG 23720 --- [nio-8080-exec-1] o.s.web.servlet.DispatcherServlet        : GET "/test", parameters={}
2020-04-06 23:54:34.332 DEBUG 23720 --- [nio-8080-exec-1] s.w.s.m.m.a.RequestMappingHandlerMapping : Mapped to com.taetaetae.springbootfilter.method2.SampleController#test()
2020-04-06 23:54:34.351 DEBUG 23720 --- [nio-8080-exec-1] m.m.a.RequestResponseBodyMethodProcessor : Using 'text/html', given [text/html, application/xhtml+xml, image/webp, image/apng, application/xml;q=0.9, application/signed-exchange;v=b3;q=0.9, */*;q=0.8] and supported [text/plain, */*, text/plain, */*, application/json, application/*+json, application/json, application/*+json]
2020-04-06 23:54:34.352 DEBUG 23720 --- [nio-8080-exec-1] m.m.a.RequestResponseBodyMethodProcessor : Writing ["test"]
2020-04-06 23:54:34.357 DEBUG 23720 --- [nio-8080-exec-1] o.s.web.servlet.DispatcherServlet        : Completed 200 OK
  • 필터링 url
 
// 필터에 들어온것 확인! (위 복붙 아님...)
2020-04-06 23:54:58.075  INFO 23720 --- [nio-8080-exec-3] c.t.springbootfilter.method2.MyFilter    : doFilter MyFilter, uri : /filtered/test

2020-04-06 23:54:58.076 DEBUG 23720 --- [nio-8080-exec-3] o.s.web.servlet.DispatcherServlet        : GET "/filtered/test", parameters={}
2020-04-06 23:54:58.076 DEBUG 23720 --- [nio-8080-exec-3] s.w.s.m.m.a.RequestMappingHandlerMapping : Mapped to com.taetaetae.springbootfilter.method2.SampleController#filteredTest()
2020-04-06 23:54:58.077 DEBUG 23720 --- [nio-8080-exec-3] m.m.a.RequestResponseBodyMethodProcessor : Using 'text/html', given [text/html, application/xhtml+xml, image/webp, image/apng, application/xml;q=0.9, application/signed-exchange;v=b3;q=0.9, */*;q=0.8] and supported [text/plain, */*, text/plain, */*, application/json, application/*+json, application/json, application/*+json]
2020-04-06 23:54:58.077 DEBUG 23720 --- [nio-8080-exec-3] m.m.a.RequestResponseBodyMethodProcessor : Writing ["filtered"]
2020-04-06 23:54:58.078 DEBUG 23720 --- [nio-8080-exec-3] o.s.web.servlet.DispatcherServlet        : Completed 200 OK

처음 url 패턴을 설정할때 “/filtered*” 으로 설정했더니 아래와 같은 로그를 발견하게 된다.

 
Suspicious URL pattern: [/filtered*] in context [], see sections 12.1 and 12.2 of the Servlet specification

로그가 “ERROR” 레벨이 아니라서 대수롭지 않게 여겼는데 (사실 보지도 않았다…) 막상 테스트를 해보니 필터가 적용이 안되는 것이다. 하지만 SODD 을 충실히 하는 필자인지라 정답을 금방 찾을 수 있었다. (자랑처럼 보이네…document 를 보는게 더 정확!!!)

패턴의 형식이 잘못 되었다는 것. 결국 “/filtered*” 을 “/filtered/*” 으로 설정했더니 이상없이 성공. 모든 기술은 도큐먼트를 보고 좀 더 자세하게 확인한 다음 적용해야할 필요가 있다.

이 내용이 필자가 꼭 이야기 하고 싶었던 부분이다. 보통 “무엇"을 적용하기 위해서는 구글링을 해보거나 도큐먼트를 보기 시작한다. 그래서 적절한 예제코드나 방법을 찾게 되면 바로 적용. 돌려보고 이상없으면 “빨래 ~ 끝” 느낌으로 거기서 끝을 낸다.

/images/spring-boot-filter/end.jpg
이건 뭐 그냥 하면 되잖아?
출처 : https://www.popmatters.com/161123-strong-weightlifting-as-metaphor-2495831472.html

왜 그랬던건지는 모르겠지만 필자가 적용한 필터에 “@Component” 가 적용되어 있었고, 필터가 잘 걸리는 것 까지 확인했지만 오히려 모든 url 에 필터가 걸려버린 것이다. 왜일까? 필자가 적용한 필터의 모습은 다음과 같았고

경축! 아무것도 안하여 에스천사게임즈가 새로운 모습으로 재오픈 하였습니다.
어린이용이며, 설치가 필요없는 브라우저 게임입니다.
https://s1004games.com

 
@Component
@WebFilter(urlPatterns = "/filtered/*")
public class MyFilter implements Filter {
	// 동일
}

실제로 실행을 해보면 init 이 두번 되는것을 확인할 수 있다.

 
2020-04-07 02:22:22.250  INFO 27568 --- [           main] c.t.springbootfilter.method2.MyFilter    : init MyFilter

위에서 테스트한 “/test” 를 호출해 보면 “doFilter"에서 한번 로깅이 되고 “/filtered/test” 를 호출해 보면 두번 로깅 되는걸 확인할 수 있다.

 
2020-04-07 02:23:50.505  INFO 27568 --- [nio-8080-exec-1] c.t.springbootfilter.method2.MyFilter    : doFilter MyFilter, uri : /test
2020-04-07 02:23:50.507 DEBUG 27568 --- [nio-8080-exec-1] o.s.web.servlet.DispatcherServlet        : GET "/test", parameters={}
2020-04-07 02:23:50.510 DEBUG 27568 --- [nio-8080-exec-1] s.w.s.m.m.a.RequestMappingHandlerMapping : Mapped to com.taetaetae.springbootfilter.method2.SampleController#test()
2020-04-07 02:23:50.531 DEBUG 27568 --- [nio-8080-exec-1] m.m.a.RequestResponseBodyMethodProcessor : Using 'text/html', given [text/html, application/xhtml+xml, image/webp, image/apng, application/xml;q=0.9, application/signed-exchange;v=b3;q=0.9, */*;q=0.8] and supported [text/plain, */*, text/plain, */*, application/json, application/*+json, application/json, application/*+json]
2020-04-07 02:23:50.531 DEBUG 27568 --- [nio-8080-exec-1] m.m.a.RequestResponseBodyMethodProcessor : Writing ["test"]
2020-04-07 02:23:50.537 DEBUG 27568 --- [nio-8080-exec-1] o.s.web.servlet.DispatcherServlet        : Completed 200 OK

2020-04-07 02:24:03.571  INFO 27568 --- [nio-8080-exec-3] c.t.springbootfilter.method2.MyFilter    : doFilter MyFilter, uri : /filtered/test
2020-04-07 02:24:03.572  INFO 27568 --- [nio-8080-exec-3] c.t.springbootfilter.method2.MyFilter    : doFilter MyFilter, uri : /filtered/test
2020-04-07 02:24:03.572 DEBUG 27568 --- [nio-8080-exec-3] o.s.web.servlet.DispatcherServlet        : GET "/filtered/test", parameters={}
2020-04-07 02:24:03.572 DEBUG 27568 --- [nio-8080-exec-3] s.w.s.m.m.a.RequestMappingHandlerMapping : Mapped to com.taetaetae.springbootfilter.method2.SampleController#filteredTest()
2020-04-07 02:24:03.573 DEBUG 27568 --- [nio-8080-exec-3] m.m.a.RequestResponseBodyMethodProcessor : Using 'text/html', given [text/html, application/xhtml+xml, image/webp, image/apng, application/xml;q=0.9, application/signed-exchange;v=b3;q=0.9, */*;q=0.8] and supported [text/plain, */*, text/plain, */*, application/json, application/*+json, application/json, application/*+json]
2020-04-07 02:24:03.573 DEBUG 27568 --- [nio-8080-exec-3] m.m.a.RequestResponseBodyMethodProcessor : Writing ["filtered"]
2020-04-07 02:24:03.574 DEBUG 27568 --- [nio-8080-exec-3] o.s.web.servlet.DispatcherServlet        : Completed 200 OK

정답은 스프링 부트를 사용하다 보면 가장 처음으로 만나는 “@ComponentScan"와 “@Component"에 있다. “@SpringBootApplication"는 여러 어노테이션의 묶음이고 그 안에는 “@ComponentScan"가 있어서 빈들을 자동으로 등록해주는 역할을 하게 되는데 필터에 “@Component"가 설정되어 있어 자동으로 등록이 되었고, 두번째 방법인 “@WebFilter + @ServletComponentScan” 조합으로 한번 더 등록되어버린 것이다. 즉, 동일한 필터가 두번 등록된 상황.

“/test” 에서 한번 로깅된건 “@Component” 에 의해 등록된 필터로 인해 urlPattern 이 적용되지 않았으니 한번 로깅이 되고, urlPattern 이 적용된 필터에서는 urlPattern에 맞지 않으니 로깅이 안되는건 당연. 그 다음 “/filtered/test” 은 “@Component” 에 의해 등록된 필터로 한번 로깅, 그다음 “@WebFilter"로 등록된 필터에서 urlPattern에 맞는 url 이다보니 로깅이 되서 총 두번 로깅이 되게 된다.

즉, 모든 url에 필터를 적용 할 것이라면 “@ComponentScan + @Component” 조합으로 해도 될 것 같고, 명시적으로 특정 urlPattern 에만 필터를 적용한다거나 필터의 다양한 설정 (우선순위, 필터이름 등) 을 하게 되는 경우엔 위에서 알려준 “FilterRegistrationBean” 이나 “@WebFilter + @ServletComponentScan"을 사용해서 상황에 맞도록 설정하는게 중요할 것 같다.

좀 알고 쓰자. 실수는 두번하면 실력이다. 다음번엔 절대 실수 안해야지.

왜 저렇게 무턱대고 설정했는지 부끄럽기 짝이 없지만 함께 디버깅을 해주며 문제를 해결하는데 도움을 준 black9p 님 덕분에 이렇게 필터 적용방법에 대해 정리를 할 수 있어서 한편으론 다행이라 생각이 든다.

이번에도 위에서 사용한 코드는 필자의 Github Repo 에서 확인이 가능하다.


[출처] https://taetaetae.github.io/2020/04/06/spring-boot-filter/


본 웹사이트는 광고를 포함하고 있습니다.
광고 클릭에서 발생하는 수익금은 모두 웹사이트 서버의 유지 및 관리, 그리고 기술 콘텐츠 향상을 위해 쓰여집니다.
번호 제목 글쓴이 날짜 조회 수
57 [java, spring] Spring에서 request와 response를 JSON format 으로 한번에 로깅하기 file 졸리운_곰 2021.06.18 178
56 [Spring Boot] 2) Springboot OncePerRequestFilter 와 GenericFilterBean의 차이 file 졸리운_곰 2021.06.18 21
55 [Spring boot] [Spring boot] Spring Boot servlet filter 사용하기 졸리운_곰 2021.06.18 17
54 [SpringBoot] Filter(필터) OncePerRequestFilter간단히 사용하기 file 졸리운_곰 2021.06.18 65
53 [Spring boot] Spring boot 에서 Filter 사용하기 졸리운_곰 2021.06.18 18
» [Spring Boot] 스프링 부트에 필터를 '조심해서' 사용하는 두 가지 방법 졸리운_곰 2021.06.18 140
51 [스프링 배치] java Spring Batch 졸리운_곰 2020.12.16 76
50 MyBatisPagingItemReader.java 졸리운_곰 2020.11.07 82
49 [JPA] 스프링 데이터 JPA 소개 file 졸리운_곰 2020.11.07 23
48 Spring Batch Example 3 - 청크 지향 프로세싱 file 졸리운_곰 2020.10.24 51
47 Spring Batch Example 2 - 간단한 Job만들기 file 졸리운_곰 2020.10.24 15
46 Spring Batch Example 1 - Spring Batch란? file 졸리운_곰 2020.10.24 54
45 [spring batch] Spring batch Job 설정과 실행하기 file 졸리운_곰 2020.10.24 24
44 public class MyBatisPagingItemReader<T> extends AbstractPagingItemReader<T> { 졸리운_곰 2020.10.23 97
43 public class MyBatisBatchItemWriter<T> implements ItemWriter<T>, InitializingBean { 졸리운_곰 2020.10.23 119
42 MyBatisPagingItemReader, MyBatisPagingItemWriter 졸리운_곰 2020.10.23 208
41 [spring batch] 처음 해보는 Spring batch, Tasklet 작성하기 file 졸리운_곰 2020.10.18 15
40 Spring Boot - Properties 사용법 정리 졸리운_곰 2020.10.15 94
39 spring 설정 xml과 소스코드에서 properties 사용하기 졸리운_곰 2020.10.15 14
38 Spring Batch 간단 정리 Sprong Batch 기초를 알아보자 file 졸리운_곰 2020.10.13 47
대표 김성준 주소 : 경기 용인 분당수지 U타워 등록번호 : 142-07-27414
통신판매업 신고 : 제2012-용인수지-0185호 출판업 신고 : 수지구청 제 123호 개인정보보호최고책임자 : 김성준 sjkim70@stechstar.com
대표전화 : 010-4589-2193 [fax] 02-6280-1294 COPYRIGHT(C) stechstar.com ALL RIGHTS RESERVED