
- 전체
- JAVA 일반
- JAVA 수학
- JAVA 그래픽
- JAVA 자료구조
- JAVA 인공지능
- JAVA 인터넷
- Java Framework
- Java GUI (AWT,SWING,SWT,JFACE)
- SWT and RCP (web RAP/RWT)[eclipse], EMF
Java GUI (AWT,SWING,SWT,JFACE) SWT Custom Widgets - Tutorial
2015.08.23 20:30
Table of Contents
In some cases the standard SWT widgets, which are delivered by the Eclipse SDK are not suitable for a certain use case, so that a different UI is necessary in order to fulfill the features needs.
The first thing a developer does before starting the implementation of a feature is looking up, if another developer has done the job already. The most famous source to find custom widgets is the Eclipse project called Nebula, where you can find several useful custom SWT widgets. Another resource of several custom SWT widgets is the Opal project.
But also the Eclipse SDK itself delivers some custom SWT widgets in the org.eclipse.swt.custom package, like CLabel, CCombo, StyledText and others.
In general a custom widget is an UI element, which offers a certain functionality in the UI, which none of the standard widgets can deliver.
Custom SWT widgets are usually created by extending a Composite, a Canvas or one of their subclasses, because those implementations are portable to other platforms and therefore a lot easier to maintain.
There are three common approaches to create a custom SWT widget:
-
Compound custom widgets, which contain other existing widgets (
Composite) -
Custom basic widgets, which have no children and we simply draw on (
Canvas) -
Mixing both (
CompositeandCanvas)
Note
As a rule for creating custom SWT widgets, you subclass Composite for compound widgets and subclass Canvas in case the widget should not have any children.
Some general rules have to be considered, when developing custom widgets, no matter which kind of custom widget is implemented.
In case of self drawn widgets you generally need a lot of different system resources, like colors, fonts or images, which have to be disposed correctly.
You can attach a DisposeListener to your custom widget by using the addDisposeListener() method of the Canvas or Composite and dispose the system resources, which have been used by the widget. But in case you also use the JFace plug-ins in your application we suggest using a LocalResourceManager for handling system resources.
package com.vogella.rcp.custom.widgets.widget;

import org.eclipse.jface.resource.FontDescriptor;
import org.eclipse.jface.resource.JFaceResources;
import org.eclipse.jface.resource.LocalResourceManager;
import org.eclipse.jface.resource.ResourceManager;
import org.eclipse.swt.SWT;
import org.eclipse.swt.graphics.Color;
import org.eclipse.swt.graphics.Font;
import org.eclipse.swt.graphics.RGB;
import org.eclipse.swt.widgets.Canvas;
import org.eclipse.swt.widgets.Composite;

public class ResourceManagerCanvas extends Canvas {

  private ResourceManager resourceManager;

  public ResourceManagerCanvas(Composite parent, int style) {
    super(parent, style);
    // The LocalResourceManager attaches the DisposeHandler to the Canvas for you
    resourceManager = new LocalResourceManager(JFaceResources.getResources(), this);

    // Always create colors, fonts and images with the ResourceManager instance
    Color orange = resourceManager.createColor(new RGB(255, 191, 0));
    Font boldArialFont = resourceManager.createFont(FontDescriptor.createFrom("Arial", 12, SWT.BOLD));

    // Draw your widget.....
  }

}
Warning
You must never override the dispose() method of the Canvas or Composite in order to dispose your system resources. You must always add a DisposeListener instead, so that the actual disposal can be handled by the framework itself.
To fail fast means that the public API of your custom widget should always invoke the checkWidget method, before it calls any functionality of the custom widget. The checkWidget method of the Widget class checks certain pre-conditions for the proper use of a Widget, like checking whether the widget is not disposed and not accessed from an other Thread than the SWT Thread.
package com.vogella.rcp.custom.widgets.widget;

import org.eclipse.swt.widgets.Composite;

public class CustomWidget extends Composite {

  public CustomWidget(Composite parent, int style) {
    super(parent, style);
  }

  public void callFunctionalityOfCustomWidget() {
    checkWidget();

    // do custom things with the CustomWidget
  }

}
By overriding the computeSize method you give a Layout and other widgets around your custom widget the chance to get to know the size of your custom widget.
By offering the size the Layout, of the parent Composite, will be able to align its child widgets properly.
package com.vogella.rcp.custom.widgets.widget;

import org.eclipse.swt.SWT;
import org.eclipse.swt.graphics.Point;
import org.eclipse.swt.widgets.Composite;

public class ComputeSizeWidget extends Composite {

  private static final int LINE_WIDTH = 30;
  private static final int LINE_HEIGHT = 2;

  public ComputeSizeWidget(Composite parent, int style) {
    super(parent, style);

    // draw a line with a width of 30 and a height of 2.
  }

  @Override
  public Point computeSize(int wHint, int hHint, boolean changed) {

    // try to consider the given hints. Here we decided to use the smallest
    // value so that the line would not be bigger than 30x2.
    // In case the SWT.DEFAULT flag for the hints is used, we simply stick to
    // the LINE_WIDTH and LINE_HEIGHT.
    int width = wHint != SWT.DEFAULT ? Math.min(wHint, LINE_WIDTH)
        : LINE_WIDTH;
    int height = hHint != SWT.DEFAULT ? Math.min(hHint, LINE_HEIGHT)
        : LINE_HEIGHT;

    return new Point(width, height);
  }
}
In case errors occur inside your custom widget, you should use one of the three static error methods of the SWT class.
-
public static void error (int code) -
public static void error (int code, Throwable throwable) -
public static void error (int code, Throwable throwable, String detail)
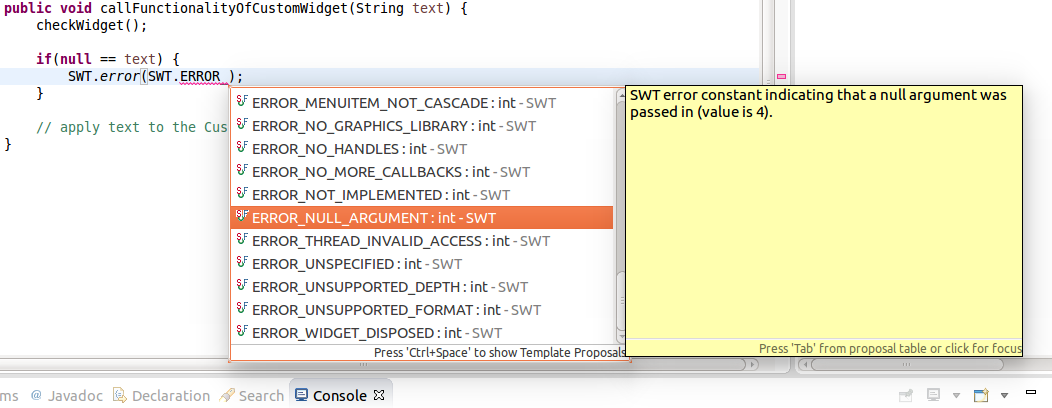
The code parameter of each error method must be one of the SWT.ERROR_* constants.
In case a parameter of a method must not be null you can check this parameter and call SWT.error(SWT.ERROR_NULL_ARGUMENT) in case this parameter is null.
Note
Also have a look at the other SWT.ERROR_* constants, which can be used. They are all described in detail in the JavaDoc.
The SWT class contains two style flags, which can be passed to a widgets' constructor, where you can define the Bi-directional behavior of a widget.


SWT.RIGHT_TO_LEFT is used to write the widgets text and other included elements from right to left.SWT.LEFT_TO_RIGHT is the default for most widgets and is used to write the widgets' text and other included elements from left to right.
The easiest way to create a custom SWT widget is to use a Composite, which contains other widgets.
This may look like that:
package com.vogella.rcp.custom.widgets.widget;

import org.eclipse.jface.layout.GridDataFactory;
import org.eclipse.jface.layout.GridLayoutFactory;
import org.eclipse.swt.SWT;
import org.eclipse.swt.widgets.Composite;
import org.eclipse.swt.widgets.Label;
import org.eclipse.swt.widgets.Text;

public class LabeledTextWidget extends Composite {

  private Label label;
  private Text text;

  public LabeledTextWidget(Composite parent, int style) {
    this(parent, style, SWT.NONE, SWT.BORDER);
  }

  public LabeledTextWidget(Composite parent, int style, int labelStyle, int textStyle) {
    super(parent, style);
    GridLayoutFactory.swtDefaults().numColumns(2).applyTo(this);

    label = new Label(this, labelStyle);
    GridDataFactory.fillDefaults().applyTo(label);

    text = new Text(this, textStyle);
    GridDataFactory.fillDefaults().grab(true, false).applyTo(getText());
  }

  public void setLabelText(String text) {
    checkWidget();
    label.setText(text);
  }

  public Text getText() {
    checkWidget();
    return text;
  }

}
Warning
Make sure that you pass this to the child widgets of your compound custom widget. It is a common mistake that the parent Composite, which is passed to the constructor of the custom widget, is also used for the children.
Sometimes you have special requirements for a custom widget, which cannot be delivered by an existing widget or a compound one, so that you must draw it yourself. As noted above we use Canvas for self drawn widgets, which do not have children.
It is already planed to offer a tutorial for the usage of the SWT graphics context, but until such a tutorial will be available you can have a look at this SWT Graphics Context or simply do the following exercises, which will also contain custom drawings with the SWT graphics context.
Use the addPaintListner method in order to draw on a Canvas or Composite and use theredraw method instead of directly calling your internal paint methods, so that the framework may queue all redraw requests and do them all at once.
The result and also how to use the PaintListenerCanvas sample below is shown in the screenshot:

package com.vogella.rcp.custom.widgets.widget;

import org.eclipse.jface.resource.FontDescriptor;
import org.eclipse.jface.resource.JFaceResources;
import org.eclipse.jface.resource.LocalResourceManager;
import org.eclipse.jface.resource.ResourceManager;
import org.eclipse.swt.SWT;
import org.eclipse.swt.events.PaintEvent;
import org.eclipse.swt.events.PaintListener;
import org.eclipse.swt.graphics.Color;
import org.eclipse.swt.graphics.Font;
import org.eclipse.swt.graphics.GC;
import org.eclipse.swt.graphics.Point;
import org.eclipse.swt.graphics.RGB;
import org.eclipse.swt.widgets.Canvas;
import org.eclipse.swt.widgets.Composite;

public class PaintListenerCanvas extends Canvas {

  private final int BORDER_MARGIN = 4;

  private ResourceManager resourceManager;

  private String text = "";

  public PaintListenerCanvas(Composite parent, int style) {
    super(parent, style);
    // The LocalResourceManager attaches the DisposeHandler to the Canvas
    // for you
    resourceManager = new LocalResourceManager(JFaceResources.getResources(), this);

    // Draw your widget.....
    addPaintListener(new PaintListener() {

      @Override
      public void paintControl(PaintEvent e) {
        GC gc = e.gc;
        paintBorderAndText(gc);
      }
    });
  }

  protected void paintBorderAndText(GC gc) {

    Font boldArialFont = resourceManager.createFont(FontDescriptor
        .createFrom("Arial", 14, SWT.BOLD));
    gc.setFont(boldArialFont);
    // setFont before using textExtent, so that the size of the text
    // can be calculated correctly
    Point textExtent = gc.textExtent(getText());

    // system colors may be used without the resourceManager, because those
    // system colors are maintained by the OS itself
    gc.setBackground(getDisplay().getSystemColor(SWT.COLOR_BLACK));

    // Always begin with the background so that everything is drawn upon it
    gc.fillRoundRectangle(3, 3, textExtent.x + BORDER_MARGIN, textExtent.y
        + BORDER_MARGIN, 8, 8);

    // draw the orange border
    Color orange = resourceManager.createColor(new RGB(255, 191, 0));
    gc.setBackground(orange);
    gc.setForeground(orange);

    gc.drawRoundRectangle(3, 3, textExtent.x + BORDER_MARGIN, textExtent.y
        + BORDER_MARGIN, 8, 8);

    // And finally draw the given text
    gc.drawString(getText(), 5, 4, true);
  }

  public String getText() {
    checkWidget();
    return text;
  }

  public void setText(String text) {
    checkWidget();
    this.text = text;

    // use redraw() instead of directly calling
    // the paintBorderAndText(GC gc) method.
    redraw();
  }

}
In most cases the user will also interact with your custom widget. Therefore it must fire events like other widgets also do, i.e. a Button, which fires a widgetSelected event to it's attached SelectionListener.
You can invent new events and listeners in special cases. But in most of the cases it is sufficient to reuse existing SWT events and listeners. Imagine a custom drawn button, which obviously should reuse a default SelectionListener.
In case you reuse such an existing SWT event, you should either support TypedListener and also use SWT's low level Listener API, which can be applied to every widget by using the addListener(int, Listener) method.
For custom drawn widgets you likely want to add custom event listeners, which suit to the widget's special purposes.
Say we got a custom Gameboy widget, where we want to be able to listen to the clicks on the Gameboy's buttons.
The first thing to do is to define a custom event, which is derived from java.util.EventObject.
package com.vogella.rcp.custom.widgets.widget.gameboy;

import java.util.EventObject;

public class GameboySelectionEvent extends EventObject {

  private static final long serialVersionUID = 1059740358205812736L;

  public static final int BUTTON_POWER = 0;
  public static final int BUTTON_A = 1;
  public static final int BUTTON_B = 2;
  public static final int BUTTON_START = 3;
  public static final int BUTTON_SELECT = 4;
  public static final int BUTTON_UP = 5;
  public static final int BUTTON_DOWN = 6;
  public static final int BUTTON_LEFT = 7;
  public static final int BUTTON_RIGHT = 8;

  private int gameboyButton;

  public GameboySelectionEvent(Object source, int gameboyButton) {
    super(source);
    assert (gameboyButton < 9 && gameboyButton > -1);
    this.gameboyButton = gameboyButton;
  }

  public int getButton() {
    return gameboyButton;
  }
}
With this event implementation we provide the event information, which button has been selected.
Normally you just define a getter for specific event information and just pass the values to the constructor of the custom event.
The next thing to do is to provide a listener interface to which the event is passed in case a certain event occurs.
package com.vogella.rcp.custom.widgets.widget.gameboy;

import java.util.EventListener;
The last thing to do is simply offering an API to add and remove your custom listener and to fire your custom events, which will be passed to the listener.
In custom drawings the positions of the elements inside it should be stored. So the positions of certain elements inside the custom widget can be found after they are drawn.
This is especially important, if elements of the drawing should trigger certain events.
Now that we know how to draw a custom widget with a PaintListener and defined our listener interfaces and events, we need to figure out when those events should be fired.
Therefore we need to track the positions of our custom drawings on the widget.
In order to do such a tracking we implement a HoverCheck class, which will enable us to recognize whenever a certain part of a widget is hovered.
package com.vogella.rcp.custom.widgets.widget.listener;

import java.beans.PropertyChangeListener;
import java.beans.PropertyChangeSupport;

import org.eclipse.swt.SWT;
import org.eclipse.swt.events.DisposeEvent;
import org.eclipse.swt.events.DisposeListener;
import org.eclipse.swt.graphics.Point;
import org.eclipse.swt.graphics.Rectangle;
import org.eclipse.swt.widgets.Control;
import org.eclipse.swt.widgets.Event;
import org.eclipse.swt.widgets.Listener;

public class HoverCheck implements Listener, DisposeListener {

  private PropertyChangeSupport changeSupport = new PropertyChangeSupport(this);

  private Control containerWidget;
  private Point widgetCoords;
  private Point widgetSize;

  private boolean hovering;

  public HoverCheck(Control containerWidget, Point widgetCoords,
      Point widgetSize) {
    assert (containerWidget != null);
    this.containerWidget = containerWidget;
    this.widgetCoords = widgetCoords;
    this.widgetSize = widgetSize;
    containerWidget.addDisposeListener(this);
    containerWidget.addListener(SWT.MouseMove, this);
  }

  @Override
  public void handleEvent(Event event) {
    switch (event.type) {
    case SWT.MouseMove:
      Rectangle targetBounds = containerWidget.getBounds();

      // just override the original size of the Rectangle, because the
      // getBounds() method always creates a new Rectangle instance every
      // time it gets called.
      targetBounds.x += widgetCoords.x;
      targetBounds.y += widgetCoords.y;
      targetBounds.width = widgetSize.x;
      targetBounds.height = widgetSize.y;

      if (targetBounds.contains(event.x, event.y)) {
        if (!isHovering()) {
          setHovering(true);
        }
      } else {
        if (isHovering()) {
          setHovering(false);
        }
      }
      break;
    default:
      break;
    }
  }

  @Override
  public void widgetDisposed(DisposeEvent e) {
    if (containerWidget != null && !containerWidget.isDisposed()) {
      containerWidget.removeListener(SWT.MouseMove, this);
    }
  }

  public void addHoverListener(PropertyChangeListener hoverChangeListener) {
    changeSupport
        .addPropertyChangeListener("hovering", hoverChangeListener);
  }

  public void removeHoverListener(PropertyChangeListener hoverChangeListener) {
    changeSupport.removePropertyChangeListener("hovering",
        hoverChangeListener);
  }

  public boolean isHovering() {
    return hovering;
  }

  protected void setHovering(boolean hovering) {
    changeSupport.firePropertyChange("hovering", isHovering(),
        this.hovering = hovering);
  }
}
Inside this class we pass the widget itself, the x, y coordinates and the size of the part, where hovering should be checked. With this information we are able to create a Rectangle, which represents the position and size of this special part (i.e. a Gameboy button) and can use the Rectangle's contains method in order to check, if the current mouse position is within this Rectangle or not.
In the GameboyWidget itself, we can use this HoverCheck class to figure out, if a certain button on the Gameboy was selected.
package com.vogella.rcp.custom.widgets.widget.gameboy;

import java.beans.PropertyChangeEvent;
import java.beans.PropertyChangeListener;
import java.net.URL;
import java.util.ArrayList;
import java.util.Collection;

import org.eclipse.core.runtime.FileLocator;
import org.eclipse.core.runtime.Path;
import org.eclipse.jface.resource.ImageDescriptor;
import org.eclipse.jface.resource.JFaceResources;
import org.eclipse.jface.resource.LocalResourceManager;
import org.eclipse.jface.resource.ResourceManager;
import org.eclipse.swt.SWT;
import org.eclipse.swt.events.PaintEvent;
import org.eclipse.swt.events.PaintListener;
import org.eclipse.swt.graphics.GC;
import org.eclipse.swt.graphics.Image;
import org.eclipse.swt.graphics.Point;
import org.eclipse.swt.graphics.Rectangle;
import org.eclipse.swt.widgets.Canvas;
import org.eclipse.swt.widgets.Composite;
import org.eclipse.swt.widgets.Event;
import org.eclipse.swt.widgets.Listener;
import org.osgi.framework.Bundle;
import org.osgi.framework.FrameworkUtil;

import com.vogella.rcp.custom.widgets.widget.listener.HoverCheck;

public class GameboyWidget extends Canvas {

  private ResourceManager resourceManager;

  private Collection<GameboySelectionListener> gameboySelectionListeners = new ArrayList<GameboySelectionListener>();

  private HoverCheck buttonAHoverCheck;
  private HoverCheck buttonBHoverCheck;

  private Image gameBoyImage;

  public GameboyWidget(Composite parent, int style) {
    super(parent, style);
    resourceManager = new LocalResourceManager(JFaceResources.getResources(), this);

    Point purpleButtonsSize = new Point(40, 40);
    setupButtonHoverChecks(purpleButtonsSize);

    addPaintListener(new PaintListener() {

      @Override
      public void paintControl(PaintEvent e) {
        paint(e);
      }
    });

    addListener(SWT.MouseDown, new Listener() {

      @Override
      public void handleEvent(Event event) {
        if (buttonAHoverCheck.isHovering()) {
          System.out.println("Button A was clicked");
          fireGameboySelectionChanged(new GameboySelectionEvent(this,
              GameboySelectionEvent.BUTTON_A));
        } else if (buttonBHoverCheck.isHovering()) {
          System.out.println("Button B was clicked");
          fireGameboySelectionChanged(new GameboySelectionEvent(this,
              GameboySelectionEvent.BUTTON_B));
        }
      }
    });
  }

  private void setupButtonHoverChecks(Point buttonsSize) {
    buttonAHoverCheck = new HoverCheck(this, new Point(266, 330),
        buttonsSize);
    buttonAHoverCheck.addHoverListener(new PropertyChangeListener() {

      @Override
      public void propertyChange(PropertyChangeEvent evt) {
        if (Boolean.TRUE.equals(evt.getNewValue())) {
          GameboyWidget.this.setCursor(getDisplay().getSystemCursor(SWT.CURSOR_HAND));
        } else {
          GameboyWidget.this.setCursor(null);
        }
      }
    });

    buttonBHoverCheck = new HoverCheck(this, new Point(211, 353),
        buttonsSize);
    buttonBHoverCheck.addHoverListener(new PropertyChangeListener() {

      @Override
      public void propertyChange(PropertyChangeEvent evt) {
        if (Boolean.TRUE.equals(evt.getNewValue())) {
          GameboyWidget.this.setCursor(getDisplay().getSystemCursor(SWT.CURSOR_HAND));
        } else {
          GameboyWidget.this.setCursor(null);
        }
      }
    });
  }

  protected void paint(PaintEvent e) {
    GC gc = e.gc;
    Bundle bundle = FrameworkUtil.getBundle(getClass());
    URL imgUrl = FileLocator.find(bundle, new Path("images/gameboy.jpg"),
        null);
    ImageDescriptor imgDescriptor = ImageDescriptor.createFromURL(imgUrl);
    gameBoyImage = resourceManager.createImage(imgDescriptor);
    gc.drawImage(gameBoyImage, 10, 10);
  }

  @Override
  public Point computeSize(int wHint, int hHint, boolean changed) {
    Rectangle bounds = gameBoyImage.getBounds();

    // Just return the size of the Gameboy image
    return new Point(bounds.width, bounds.height);
  }

  public void addGameboySelectionListener(GameboySelectionListener selectionListener) {
    gameboySelectionListeners.add(selectionListener);
  }

  public void removeGameboySelectionListener(GameboySelectionListener selectionListener) {
    gameboySelectionListeners.remove(selectionListener);
  }

  protected void fireGameboySelectionChanged(GameboySelectionEvent selectionEvent) {
    for (GameboySelectionListener gameboySelectionListener : gameboySelectionListeners) {
      gameboySelectionListener.gameboyButtonSelected(selectionEvent);
    }
  }
}
광고 클릭에서 발생하는 수익금은 모두 웹사이트 서버의 유지 및 관리, 그리고 기술 콘텐츠 향상을 위해 쓰여집니다.