
- 전체
- JAVA 일반
- JAVA 수학
- JAVA 그래픽
- JAVA 자료구조
- JAVA 인공지능
- JAVA 인터넷
- Java Framework
- Java GUI (AWT,SWING,SWT,JFACE)
- SWT and RCP (web RAP/RWT)[eclipse], EMF
SWT and RCP (web RAP/RWT)[eclipse], EMF [Eclipse] GEF entry series (10, an implementation of the form)
2019.11.25 13:28
[Eclipse] GEF entry series (10, an implementation of the form)
In the current GEF version (3.1M6), there are not many LayoutManagers available. In newsgroups, posts that require more layouts are often seen. Someone also provides their own implementations, such as this one.GridLayout, equivalent to the Draw2D implementation of GridLayout in SWT, and so on. Although it is certain that more layouts will be added to developers in future versions of GEF (which may take a long time), there is currently no direct way to implement tables using GEF. Here is my approach, only for reference.
The method of implementing the table depends on the design of the model. At first glance, we should have these classes: Table, Row, Column, and Cell, each model object corresponds to an EditPart, and A Figure, TablePart should contain RowPart and ColumnPart, the problem is that the RowFigure and the ColumnFigure will cross, imagine what layout should your table use to accommodate them? Using such a model is not impossible (for example, using StackLayout), but I think there are a lot of extra work that such a model needs to do, so I use a column-based model.
In my tabular model, there are only three types of objects: Table, Column, and Cell, but Column has a subclass of HeaderColumn for the first column, and Cell has a subclass of HeaderCell for the cells in the first column. The role of the class is mainly to simulate the operation of the row - the operation of the row is converted to the operation of the HeaderCell. For example, creating a new row is converted to add a new cell to the first column, and of course we have to let the program add one more cell to each of the remaining columns.
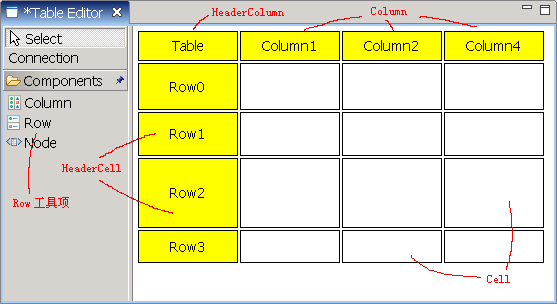
Figure 1 Table Editor
The question now is how to make the user not aware that we are working on cells rather than rows. There are several places to be modified: one is to insert a prompt line consistent with the line width when creating a new line or changing the line position, and the other is to display the entire line when the user clicks on the cell (HeaderCell) in the first column. It is selected, the third is to allow the user to change the line height by mouse drag, and finally to display the correct feedback graphic when changing the position or size of the line. The implementation methods of them are described in turn below.
Adjust the width of the insertion line
There is a Row tool item in our palette that represents a row in the table, and its purpose is to create new rows. Note that the name of this tool item is called Row, and actually it is created with a HeaderCell object. The code to create it is as follows:
tool = new CombinedTemplateCreationEntry("Row", "Create a new Row", HeaderCell.class, new SimpleFactory(HeaderCell.class), CbmPlugin.getImageDescriptor(IConstants.IMG_ROW), null);
The way to create a new line is to drag it from the palette to the desired location. During the dragging process, as the mouse position changes, the editor should be able to display a line that indicates where the new line will be inserted if the mouse is released. Since this tool represents a cell, by default GEF will display an insert with the same length as the cell. In order for the user to feel that the row is inserted, we must change the width of the insert. The specific method is to override the showLayoutTargetFeedback() method in the EditPolicy (inherited FlowLayoutEditPolicy) of the HeaderColumnPart responsible for the layout. The modified code is as follows:
protected void showLayoutTargetFeedback(Request request) {
    super.showLayoutTargetFeedback(request);
    // Expand feedback line's width
    Diagram diagram = (Diagram) getHost().getParent().getModel();
    Column column = (Column) getHost().getModel();
    Point p2 = getLineFeedback().getPoints().getPoint(1);
    p2.x = p2.x + (diagram.getColumns().size() - 1) * (column.getWidth() + IConstants.COLUMN_SPACING);
    getLineFeedback().setPoint(p2, 1);
}
Where p2 represents the point on the right side of the insertion line, we add the amount of its abscissa to increase the length of this line. This amount is related to the number of columns in the table, and the column spacing is also related. The above code is very clear. The effect of this modification is shown in the figure below. The same insertion line is also used when dragging the line to the new position.
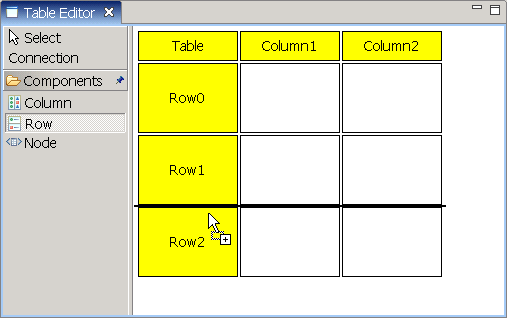
Figure 2 Insert line with the same width as the table
Select the entire line
By default, a mouse click on a cell produces a black border around the cell that indicates the selected state. In order for the user to select the entire row, modify the EditPolicy on the HeaderCell. In the previous articlePostIt has been specifically mentioned that the cell is a child of the column. To modify its EditPolicy, you need to return the custom EditPolicy in the createChildEditPolicy() method of the ColumnPart's EditPolicy. Here I return the DragRowEditPolicy that I implemented. GEF's built-in ResizableEditPolicy class, which will be added to the EditPolicy list of the child element HeaderCellPart by the HeaderColumnPart. Now modify the DragRowEditPolicy to make the entire row selected.
First of all, the black edges and control points that appear when a graph is selected in the GEF are called Handle, where the black border is called MoveHandle, which is used to move the graph, and those control points are called ResizeHandle, which are used to change the size of the graph. To change the size of the black border (expanded by the width of the cell to the width of the entire table), we have to inherit the MoveHandle and override its getLocator() method. The following code is my implementation:
public class RowMoveHandle extends MoveHandle {
    public RowMoveHandle(GraphicalEditPart owner, Locator loc) {
        super(owner, loc);
    }
    public RowMoveHandle(GraphicalEditPart owner) {
        super(owner);
    }
    //Calculate the position of the selected row and pass it to MoveHandleLocator as a reference
    public Locator getLocator() {
        IFigure refFigure = new Figure();
        Rectangle rect=((HeaderCellPart) getOwner()).getRowBound();
        translateToAbsolute(rect);
        refFigure.setBounds(rect);
        return new MoveHandleLocator(refFigure);
    }
}
In the getLocator() method, we call the getRowBound() method of the HeaderCellPart to get the position and size of the selected line. The code for this method is as follows (in the HeaderCellPart, it is easy to get the EditPart via the getOwner() in the Handle. Object), the row size is calculated similarly to the previous insert line:
public Rectangle getRowBound(){
    Rectangle rect = getFigure().getBounds().getCopy();
    Diagram diagram = (Diagram) getParent().getParent().getModel();
    Column column = (Column) getParent().getModel();
    rect.setSize(diagram.getColumns().size() * column.getWidth() + (diagram.getColumns().size() - 1) * IConstants.COLUMN_SPACING, rect.getSize().height);
    return rect;
}
With this RowMoveHandle, just add it to the HeaderColumnCell instead of the original default MoveHandle. The specific method is to override the createSelectionHandles() method of DragRowEditPolicy. The default implementation of ResizableEditPolicy is to add a black box and eight controls. Point, and we have to change to the following:


protected List createSelectionHandles() {
    List l = new ArrayList();
    //Black border around
    l.add(new RowMoveHandle((GraphicalEditPart) getHost()));
    //Control point below
    l.add(new RowResizeHandle((GraphicalEditPart) getHost(), PositionConstants.SOUTH));
    return l;
}
The RowResizeHandle class used in the code is a custom implementation of control points, which will be discussed shortly. Now, the user can see the effect that the entire line is selected.
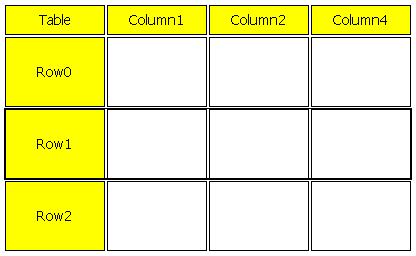
Figure 3 Select the entire line
Change the height of the line
The natural way to change the height of a row is to let the user drag the edge below freely after selecting the row. As mentioned earlier, the ResizeHandle in GEF has the function of adjusting the size of the graphic. The fly in the ointment is that the ResizeHandle behaves as a small square in black (or white, not the main selection), and we want it to be a line, so that the mouse pointer is only Putting it on the bottom side of the selected line will change the size. This requires us to implement the RowResizeHandle class just mentioned, which is a subclass of ResizeHandle, the code is as follows:
public class RowResizeHandle extends ResizeHandle {
    public RowResizeHandle(GraphicalEditPart owner, int direction) {
        super(owner, direction);
        //Change the size of the control point to make it a line
        setPreferredSize(new Dimension(((HeaderCellPart) owner).getRowBound().width, 2));
    }
    public RowResizeHandle(GraphicalEditPart owner, Locator loc, Cursor c) {
        super(owner, loc, c);
    }
    //In the default implementation, the control points have strokes, we don't need them, so override this method.
    public void paintFigure(Graphics g) {
        Rectangle r = getBounds();
        g.setBackgroundColor(getFillColor());
        g.fillRectangle(r.x, r.y, r.width, r.height);
    }
    //Similar to the previous RowMoveHandle, but returns the RelativeHandleLocator to make the line appear below the graph
    public Locator getLocator() {
        IFigure refFigure = new Figure();
        Rectangle rect=((HeaderCellPart) getOwner()).getRowBound();
        translateToAbsolute(rect);
        refFigure.setBounds(rect);
        return new RelativeHandleLocator(refFigure, PositionConstants.SOUTH);
    }
    //Use black fill regardless of whether it is primary or not
    protected Color getFillColor() {
        return ColorConstants.black;
    }
}
In this way, we pull the control point into the control line, because its position coincides with a part of the selection box (RowMoveHandle), so it does not feel its existence on the interface, but the user can control the height of the line through it, see below Figure.

Figure 4 Tips for changing the line height
Correct echo graphics
We know that when dragging graphics and changing the size of the graphics, GEF will display a "Ghost Shape" as the echo, which is the new location and size information of the graphics. Because the target object is actually a cell when the row is manipulated, the echo is also the default for the cell (width is the same as the column width) by default. To do this, override the getInitialFeedbackBounds() method in the DragRowEditPolicy. The Rectangle returned by this method determines the initial state of the echo when the mouse starts dragging. See the following code:
protected Rectangle getInitialFeedbackBounds() {
    return ((HeaderCellPart) getHost()).getRowBound();
}
The echo at this time is shown in the figure below, and the same echo is used when dragging the row.
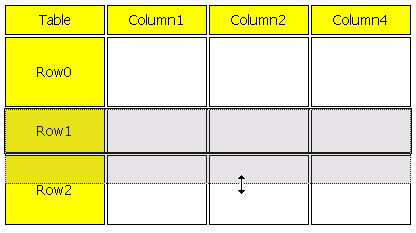
Figure 5 Echo display when changing the line height
After the above modification, the operation of the HeaderCell has been completely represented on the interface as a table row operation. The results of these operations are converted to Command, including CreateHeaderCellCommand (create a new line, you can also name it CreateRowCommand), MoveHeaderCellCommand (moving line), DeleteHeaderCellCommand (delete line) and ChangeHeaderCellHeightCommand (change line height), etc., in these classes Do the same for all columns (such as changing the height of the HeaderCell while changing the height of other cells in the same row), so that the appearance of the table can be maintained on the interface, the detailed code does not need to be posted here.
P.S. has considered another way to implement the table, that is, there are only two objects in the model, Table and Cell, and then write a TableLayout to be responsible for the layout of the cell. The same is because the workload of the modification is relatively large and not used, because then the rows and columns must be processed in a custom way, and the method described in this post only cares about the processing of the rows. Of course, what is said here is not a standard implementation, but the effect is good, and it can be achieved, if you have similar needs can be used as a reference.
This article is transferred from the blog gardenOctalBlog, original link:[Eclipse] GEF entry series (10, an implementation of the form)If you need to reprint, please contact the original blogger.
[출처] http://programmersought.com/article/54321127870/;jsessionid=0816AC3EF002180B8CB2AC7BF5A6BE13
광고 클릭에서 발생하는 수익금은 모두 웹사이트 서버의 유지 및 관리, 그리고 기술 콘텐츠 향상을 위해 쓰여집니다.