
This article shows how to add a custom menu item to a menu in an Eclipse RCP application and builds off of a clean Hello World Eclipse RCP Application. As shown in the article Add a Menu to an Eclipse RCP Application, it is very easy to add a File menu containing the Exit action. Here a custom menu action is added to the File menu that opens a dialog box when clicked.
Step 0: Create a HelloWorld RCP application.
Step 1: Make the custom action. Create a new class that extends org.eclipse.jface.action.Action and implements IWorkbenchAction. The class needs a private static final String property used to set the ID in the constructor. Inside the run() method is where you put your custom code. In this example, code is added that opens up a message dialog box.
package com.blogspot.obscuredclarity.customaction;

import org.eclipse.jface.action.Action;
import org.eclipse.jface.dialogs.MessageDialog;
import org.eclipse.swt.widgets.Shell;
import org.eclipse.ui.PlatformUI;
import org.eclipse.ui.actions.ActionFactory.IWorkbenchAction;

public class CustomAction extends Action implements IWorkbenchAction{

private static final String ID = "com.timmolter.helloWorld.CustomAction";

public CustomAction(){
setId(ID);
}

public void run() {

Shell shell = PlatformUI.getWorkbench().getActiveWorkbenchWindow().getShell();
String dialogBoxTitle = "Message";
String message = "You clicked the custom action from the menu!";
MessageDialog.openInformation(shell, dialogBoxTitle, message);
}

public void dispose() {}

}
Step 2: In the ApplicationActionBarAdvisor class add the CustomAction as a private field. In the makeActions() method, new up the custom action, set its text and accelerator and register it. The accelerator is of course optional and it simply adds a keyboard shortcut, in this case CTRL+T. In the fillMenuBar() method, add the action to a File Menu.
package com.blogspot.obscuredclarity;

import org.eclipse.jface.action.IMenuManager;
import org.eclipse.jface.action.MenuManager;
import org.eclipse.swt.SWT;
import org.eclipse.ui.IWorkbenchWindow;
import org.eclipse.ui.application.ActionBarAdvisor;
import org.eclipse.ui.application.IActionBarConfigurer;

public class ApplicationActionBarAdvisor extends ActionBarAdvisor {

private CustomAction customAction;

public ApplicationActionBarAdvisor(IActionBarConfigurer configurer) {
super(configurer);
}

protected void makeActions(IWorkbenchWindow window) {

//Custom action
customAction = new CustomAction();
customAction.setText("Do custom action!");
customAction.setAccelerator(SWT.CTRL + 'T');
register(customAction);
}

protected void fillMenuBar(IMenuManager menuBar) {

MenuManager fileMenu = new MenuManager("&File", "file"); //create a menuManager to take care of all submenus in "File"
fileMenu.add(customAction); //Add the "customAction" action
menuBar.add(fileMenu); //Add the "File" menu to the menuBar
}

}
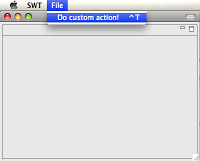
Step 3: Run the application and test if everything worked. Your application should now have a File Menu containing a custom action:

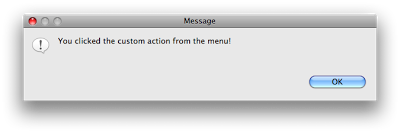
When the custom action is clicked or CTRL+T is entered, a messaage box should come up:
Piece of cake!

