
- 전체
- 사회조사분석사 개론 및 총론
- 01.조사방법론 I (조사병단)
- 02. 조사방법론 II (조사병단)
- 03. 사회통계 (헌병단)
- 04. 기출문제 (주둔병단)
- 05. 조사:군중 (벽안의 사람)
- 06. SPSS 사용기술 (반격의 봉화)
- 07. 통계학 일반 (새벽의 진혼가)
06. SPSS 사용기술 (반격의 봉화) [참고] [SAS] SAS University Edition 설치하고 이용하기 (무료)
2018.12.10 15:31
[참고] [SAS] SAS University Edition 설치하고 이용하기 (무료)
SAS University Edition을 대학/학생의 경우 무료로 이용이 가능하다.
** 이메일 주소로 ac.kr 등으로 끝나는 주소를 입력해야만 하며, 상업적 이용은 당연히 안된다.
아래 링크로 SAS 홈페이지에 들어가면, 무료로 다운로드를 받을 수 있다.
https://www.sas.com/ko_kr/software/university-edition.html
1. 내 컴퓨터에 직접 설치하기
내 컴퓨터에 VirtualBox, WMware 등을 설치한 후, 가상머신으로 실행하는 방식이다.
아래 링크에서 다운로드 받을 수 있다.
https://www.sas.com/ko_kr/software/university-edition/download-software.html
설치법은 간단하다. 첨부된 pdf 파일(영문)을 따라하면 쉽게 할 수 있다.
VirtualBox 기준으로 설명하자면 아래와 같다.
(1) 먼저 VirtualBox를 설치한다.
(2) 위 링크에서 이미지 파일(대략 2 GB 정도)을 다운로드 받는다.
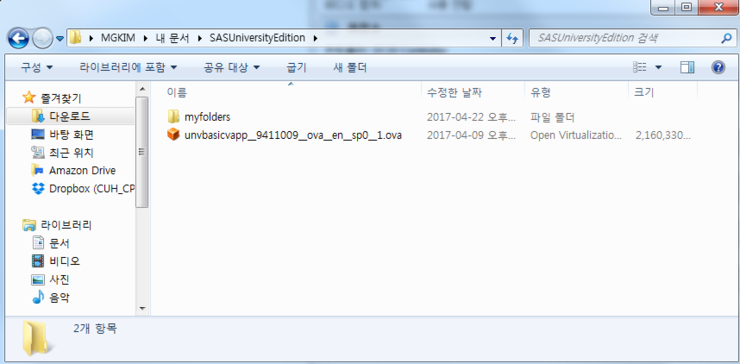
(3) 특정폴더에 해당 이미지 파일을 이동시킨 후, 그 하위 폴더로 'myfolders'라는 폴더를 만든다. (필수적임)
--> 예시) 나의 경우 아래와 같이 폴더가 구성되었다.
C:\Users\MGKIM\Documents\SASUniversityEdition 에 이미지파일(unvbasicvapp__9411009__ova__en__sp0__1.ova) 복사함
C:\Users\MGKIM\Documents\SASUniversityEdition\myfolders 를 만들어줌 (윈도우 탐색기를 이용해서). 이 폴더는 향후 내가 작성할 SAS코드가 저장되는 곳이다.
(4) VirtualBox를 실행한 후. 파일 --> 가상시스템가져오기 --> 이미지 파일을 선택한 후, 다음....하면 설치가 된다.
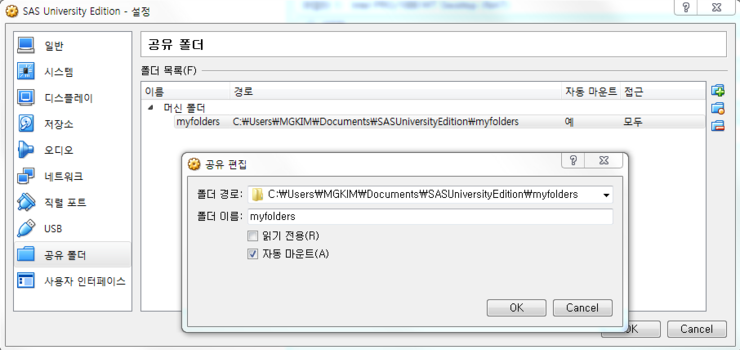
(5) 좌측에 SAS University Edition 이라고 아이콘이 생기며, 이를 선택한 후, '설정'아이콘을 누른다 --> 공유폴더 --> 오른쪽에 있는 '새공유폴더추가'버튼 클릭 (더하기표시가 된 폴더아이콘) --> 폴더경로를 아까 만들었던 myfolders 를 선택한다. 이때 '자동마운트'도 체크해주자. (설정이 제대로 확인되었나 확인하려면 더블클릭하자. 그러면 아래와 같이 공유 편집 화면이 나온다.)
이 공유 폴더는 앞으로 SAS University Edition 에서 작업했을 때, SAS code 등이 저장되는 폴더이므로 매우 중요하다.
virtual machine을 이용하여 실행되기 때문에, virtual machine과 나의 windows 간에 파일을 소통하기 위한 창구역할을 한다고 보면 된다.
** 이제 설정은 다 끝났다.
(6) SAS University Edition 을 선택한 후, '시작'아이콘을 클릭하면, 가상머신이 작동한다. 부팅이 완료되면, 도스창(Prompt) 비슷한 모습의 창이 나오며, http://localhost:10080 으로 접속하라고 영어 문구가 나온다.
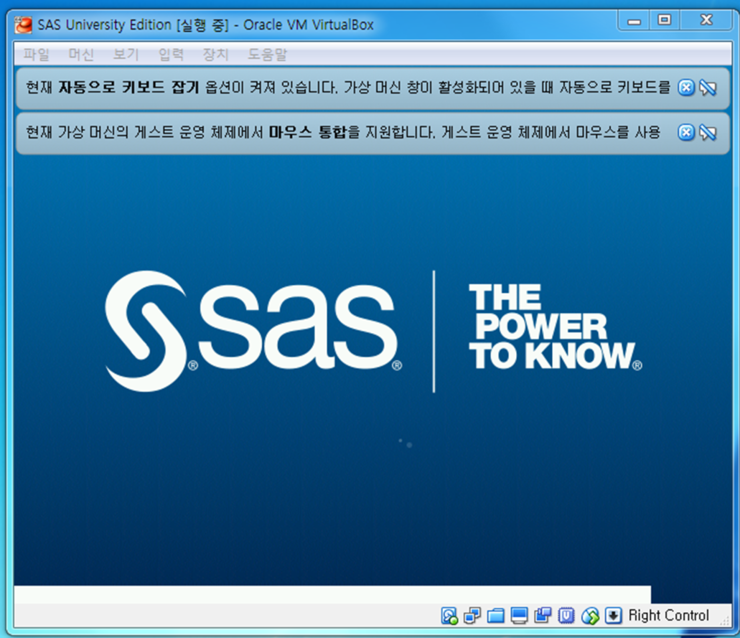
<SAS 가상머신이 실행되는 모습. 아래쪽의 white bar가 모두 채워지면 실행완료>
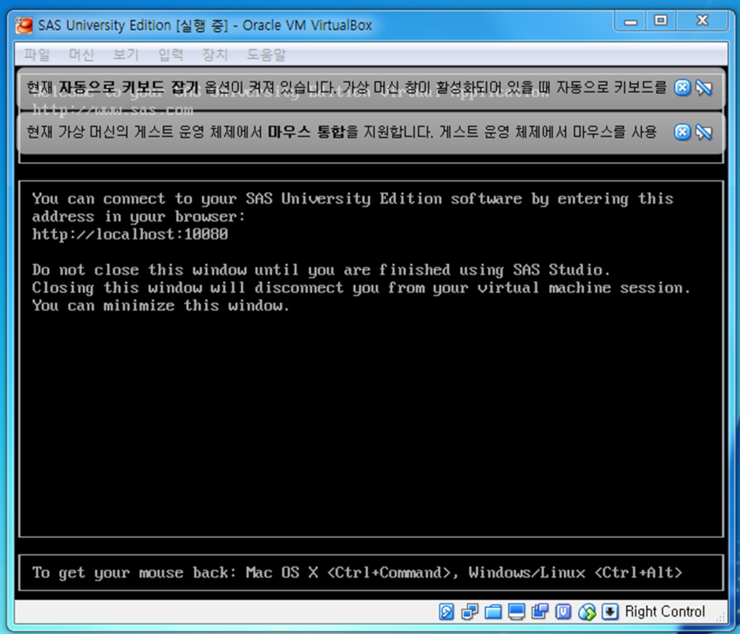
< 가상머신 부팅이 완료된 상태. 10080번 port로 접속하면 SAS를 실행할 수 있다고 알려준다 >
(7) IE, Chrome,Firefox 등의 브라우저를 실행시킨 후, 주소창에 http://localhost:10080 라고 입력하면 내 컴퓨터의 가상머신에 있는 SAS에 접속하게 된다. '안녕하세요 SAS Studio 시작' 이라고 나타난다. 'SAS Studio 시작' 버튼을 누르면 본격적으로 작업이 가능하다.
--> SAS 사용할 때 가상머신을 절대로 끄면 안된다. SAS 작업마친 후, 가상머신을 꺼 뒀다가, 다시 SAS 쓸 때 실행해서 사용하면된다.
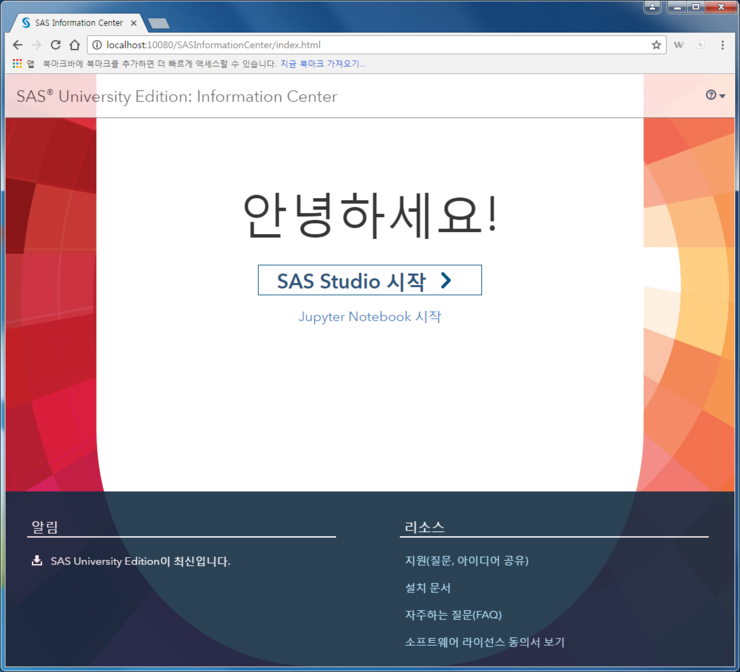


< 웹브라우저로 SAS에 접속한 모습. 'SAS Studio 시작' 버튼을 클릭하자 >
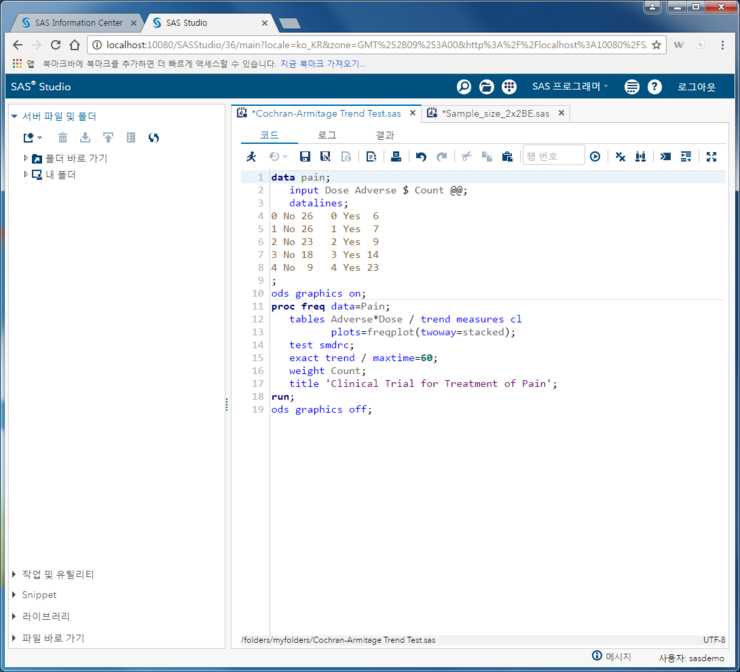
< SAS 작업 환경. 코드를 작성한 후 작동(달리기모양 버튼)시키면 '결과' 창에 결과가 표시된다. >
(8) SAS 에서 코드를 작성한 다음 저장하면, 조금 전에 만들어 둔 myfolders 라는 폴더에 파일이 저장됨을 알 수 있다.
VirtualBox 등으로 설치한 경우, 별도로 로그인 과정은 없다.
그냥 바로 사용 가능!!
SAS 홈페이지에서 제공하는 Cochran-Armitage Trend Test 에 대한 코드를 테스트용으로 하나 던저본다.
통계 결과와 그래프를 볼 수 있다.
|
data pain;
|
2. Amazon Web Service (AWS)에 설치하기
Amazon Web Service (AWS)에 설치한 후, 인터넷으로 접속하여 사용할 수 있다.
AWS 이용비가 발생한다는 것은 함정.
그러나, 설치가 간단하고, 컴퓨터 용량을 차지하지 않는다는 점은 매력적이다.
필요 시에만 해당 instance를 켜서 사용하고, 다 사용한 후에 꺼둔다면 요금은 얼마되지 않는다.
(현재 가장 저렴한 t2.micro 사양의 경우,
[참고] [SAS] SAS University Edition 설치하고 이용하기 (무료)
SAS University Edition을 대학/학생의 경우 무료로 이용이 가능하다.
** 이메일 주소로 ac.kr 등으로 끝나는 주소를 입력해야만 하며, 상업적 이용은 당연히 안된다.
아래 링크로 SAS 홈페이지에 들어가면, 무료로 다운로드를 받을 수 있다.
https://www.sas.com/ko_kr/software/university-edition.html
1. 내 컴퓨터에 직접 설치하기
내 컴퓨터에 VirtualBox, WMware 등을 설치한 후, 가상머신으로 실행하는 방식이다.
아래 링크에서 다운로드 받을 수 있다.
https://www.sas.com/ko_kr/software/university-edition/download-software.html
설치법은 간단하다. 첨부된 pdf 파일(영문)을 따라하면 쉽게 할 수 있다.
VirtualBox 기준으로 설명하자면 아래와 같다.
(1) 먼저 VirtualBox를 설치한다.
(2) 위 링크에서 이미지 파일(대략 2 GB 정도)을 다운로드 받는다.
(3) 특정폴더에 해당 이미지 파일을 이동시킨 후, 그 하위 폴더로 'myfolders'라는 폴더를 만든다. (필수적임)
--> 예시) 나의 경우 아래와 같이 폴더가 구성되었다.
C:\Users\MGKIM\Documents\SASUniversityEdition 에 이미지파일(unvbasicvapp__9411009__ova__en__sp0__1.ova) 복사함
C:\Users\MGKIM\Documents\SASUniversityEdition\myfolders 를 만들어줌 (윈도우 탐색기를 이용해서). 이 폴더는 향후 내가 작성할 SAS코드가 저장되는 곳이다.
(4) VirtualBox를 실행한 후. 파일 --> 가상시스템가져오기 --> 이미지 파일을 선택한 후, 다음....하면 설치가 된다.
(5) 좌측에 SAS University Edition 이라고 아이콘이 생기며, 이를 선택한 후, '설정'아이콘을 누른다 --> 공유폴더 --> 오른쪽에 있는 '새공유폴더추가'버튼 클릭 (더하기표시가 된 폴더아이콘) --> 폴더경로를 아까 만들었던 myfolders 를 선택한다. 이때 '자동마운트'도 체크해주자. (설정이 제대로 확인되었나 확인하려면 더블클릭하자. 그러면 아래와 같이 공유 편집 화면이 나온다.)
이 공유 폴더는 앞으로 SAS University Edition 에서 작업했을 때, SAS code 등이 저장되는 폴더이므로 매우 중요하다.
virtual machine을 이용하여 실행되기 때문에, virtual machine과 나의 windows 간에 파일을 소통하기 위한 창구역할을 한다고 보면 된다.
** 이제 설정은 다 끝났다.
(6) SAS University Edition 을 선택한 후, '시작'아이콘을 클릭하면, 가상머신이 작동한다. 부팅이 완료되면, 도스창(Prompt) 비슷한 모습의 창이 나오며, http://localhost:10080 으로 접속하라고 영어 문구가 나온다.
<SAS 가상머신이 실행되는 모습. 아래쪽의 white bar가 모두 채워지면 실행완료>
< 가상머신 부팅이 완료된 상태. 10080번 port로 접속하면 SAS를 실행할 수 있다고 알려준다 >
(7) IE, Chrome,Firefox 등의 브라우저를 실행시킨 후, 주소창에 http://localhost:10080 라고 입력하면 내 컴퓨터의 가상머신에 있는 SAS에 접속하게 된다. '안녕하세요 SAS Studio 시작' 이라고 나타난다. 'SAS Studio 시작' 버튼을 누르면 본격적으로 작업이 가능하다.
--> SAS 사용할 때 가상머신을 절대로 끄면 안된다. SAS 작업마친 후, 가상머신을 꺼 뒀다가, 다시 SAS 쓸 때 실행해서 사용하면된다.
< 웹브라우저로 SAS에 접속한 모습. 'SAS Studio 시작' 버튼을 클릭하자 >
< SAS 작업 환경. 코드를 작성한 후 작동(달리기모양 버튼)시키면 '결과' 창에 결과가 표시된다. >
(8) SAS 에서 코드를 작성한 다음 저장하면, 조금 전에 만들어 둔 myfolders 라는 폴더에 파일이 저장됨을 알 수 있다.
VirtualBox 등으로 설치한 경우, 별도로 로그인 과정은 없다.
그냥 바로 사용 가능!!
SAS 홈페이지에서 제공하는 Cochran-Armitage Trend Test 에 대한 코드를 테스트용으로 하나 던저본다.
통계 결과와 그래프를 볼 수 있다.
|
data pain;
|
2. Amazon Web Service (AWS)에 설치하기
Amazon Web Service (AWS)에 설치한 후, 인터넷으로 접속하여 사용할 수 있다.
AWS 이용비가 발생한다는 것은 함정.
그러나, 설치가 간단하고, 컴퓨터 용량을 차지하지 않는다는 점은 매력적이다.
필요 시에만 해당 instance를 켜서 사용하고, 다 사용한 후에 꺼둔다면 요금은 얼마되지 않는다.
(현재 가장 저렴한 t2.micro 사양의 경우, $0.016/hr (2017년 4월 현재, 서울서버 기준)임)
참고로 알아둘 점은, AWS에 설치되는 이미지는 CentOS를 기반으로 만들어져 있으나, Putty 등을 이용해 SSH로 접속이 되질 않는다.
수업에 활용하려고 User를 추가해 여러 명이 동시에 접속하는 환경을 만들어보려고 했으나, SSH 접속 자체가 불가능하다고 SAS 홈페이지에 나와있다.
잠자코 그냥 쓰기만 하라는 것 !!! 이런거 맘에 들지 않아.
** AWS에 설치한 후(그냥 다음다음 누르면 설치됨), 접속하는 방법
AWS의 instance 정보(Description)을 살펴보면, Public DNS와 Instance ID가 있다. 이게 중요하다.
이제 웹브라우저를 이용해 접속하면 된다.
|
접속주소: Public DNS 또는 Public IP 아이디: sasdemo 암호: Instance ID
|
"Welcome 창이 우리를 반겨준다.
테스트삼아 proc power, proc ttest, proc mixed를 실행한 결과 모두 잘 되었으며, graph도 잘 그려진다.
외부 데이터를 불러올 수도 있었다. 세상 참 편리하다.
--------------참고자료---------------
참고로 SAS 에서 제공하는 SAS University Edition 실행법에 대한 안내글은 아래와 같다.
https://support.sas.com/software/products/university-edition/faq/AWS_runvApp.htm
How do I run SAS University Edition on Amazon Web Services Marketplace?
To run SAS University Edition on Amazon Web Services (AWS) Marketplace, you need to create an AWS account. SAS University Edition is eligible for the AWS Free Tier, which is available to new users of Amazon Web Services Marketplace.- Open the SAS University Edition page in the AWS Marketplace. Review the product information and click Continue.
- If you haven't already, sign in to your AWS Marketplace account. If you are new to AWS, see Getting Started Resource Center for information about how to create an account.

When you create an account, you must provide credit card information to cover any AWS usage and storage charges. - To add an instance of SAS University Edition to your account, use the Launch on EC2: SAS University Edition page. This page lists all of the available instance types for SAS University Edition. The instance type specifies the combination of CPU, memory, storage, and networking capacity you are using.
- On the Launch on EC2 page, click the 1-Click Launch tab.
- Accept the default value of t2.micro, which qualifies for the free tier. (If you select a different instance, you might incur AWS charges.)
- Create a key pair, if you have not already.
- Click Launch with 1-click.
A confirmation page notifies you that an instance of SAS University Edition is being launched. To open SAS University Edition, you first need to open the AWS Management Console.
- Under the Related Links heading on the confirmation page, click AWS Management Console.
The AWS Management Console appears and lists any instances of SAS University Edition that are associated with your account. This examples shows three instances of SAS University Edition. Only one instance is currently running.
- To start SAS University Edition:
- From the table, select a running instance of SAS University Edition.
If the value of the Status Checks column is initializing, wait until this initialization is complete before continuing. - From the Description tab, copy the public DNS and paste it in the address bar of a new browser window. In this example, the public DNS is
ec2-54-175-62-35.compute-1.amazonaws.com. - When prompted, enter
sasdemoas the user name. For the password, copy and paste the instance ID from the Description tab. In the example, the instance ID isi-019c0e6556fdccb4c.
- Click OK.
- When the SAS University Edition Information Center opens, click Start SAS Studio.
- From the table, select a running instance of SAS University Edition.
참고로 알아둘 점은, AWS에 설치되는 이미지는 CentOS를 기반으로 만들어져 있으나, Putty 등을 이용해 SSH로 접속이 되질 않는다.
수업에 활용하려고 User를 추가해 여러 명이 동시에 접속하는 환경을 만들어보려고 했으나, SSH 접속 자체가 불가능하다고 SAS 홈페이지에 나와있다.
잠자코 그냥 쓰기만 하라는 것 !!! 이런거 맘에 들지 않아.
** AWS에 설치한 후(그냥 다음다음 누르면 설치됨), 접속하는 방법
AWS의 instance 정보(Description)을 살펴보면, Public DNS와 Instance ID가 있다. 이게 중요하다.
이제 웹브라우저를 이용해 접속하면 된다.
|
접속주소: Public DNS 또는 Public IP 아이디: sasdemo 암호: Instance ID
|
"Welcome 창이 우리를 반겨준다.
테스트삼아 proc power, proc ttest, proc mixed를 실행한 결과 모두 잘 되었으며, graph도 잘 그려진다.
외부 데이터를 불러올 수도 있었다. 세상 참 편리하다.
--------------참고자료---------------
참고로 SAS 에서 제공하는 SAS University Edition 실행법에 대한 안내글은 아래와 같다.
https://support.sas.com/software/products/university-edition/faq/AWS_runvApp.htm
How do I run SAS University Edition on Amazon Web Services Marketplace?
To run SAS University Edition on Amazon Web Services (AWS) Marketplace, you need to create an AWS account. SAS University Edition is eligible for the AWS Free Tier, which is available to new users of Amazon Web Services Marketplace.- Open the SAS University Edition page in the AWS Marketplace. Review the product information and click Continue.
- If you haven't already, sign in to your AWS Marketplace account. If you are new to AWS, see Getting Started Resource Center for information about how to create an account.
When you create an account, you must provide credit card information to cover any AWS usage and storage charges. - To add an instance of SAS University Edition to your account, use the Launch on EC2: SAS University Edition page. This page lists all of the available instance types for SAS University Edition. The instance type specifies the combination of CPU, memory, storage, and networking capacity you are using.
- On the Launch on EC2 page, click the 1-Click Launch tab.
- Accept the default value of t2.micro, which qualifies for the free tier. (If you select a different instance, you might incur AWS charges.)
- Create a key pair, if you have not already.
- Click Launch with 1-click.
A confirmation page notifies you that an instance of SAS University Edition is being launched. To open SAS University Edition, you first need to open the AWS Management Console.
- Under the Related Links heading on the confirmation page, click AWS Management Console.
The AWS Management Console appears and lists any instances of SAS University Edition that are associated with your account. This examples shows three instances of SAS University Edition. Only one instance is currently running.
- To start SAS University Edition:
- From the table, select a running instance of SAS University Edition.
If the value of the Status Checks column is initializing, wait until this initialization is complete before continuing. - From the Description tab, copy the public DNS and paste it in the address bar of a new browser window. In this example, the public DNS is
ec2-54-175-62-35.compute-1.amazonaws.com. - When prompted, enter
sasdemoas the user name. For the password, copy and paste the instance ID from the Description tab. In the example, the instance ID isi-019c0e6556fdccb4c. - Click OK.
- When the SAS University Edition Information Center opens, click Start SAS Studio.
- From the table, select a running instance of SAS University Edition.
광고 클릭에서 발생하는 수익금은 모두 웹사이트 서버의 유지 및 관리, 그리고 기술 콘텐츠 향상을 위해 쓰여집니다.