
Building a Simple Blog App with MongoDB and PHP
2020.09.13 15:14
Building a Simple Blog App with MongoDB and PHP
php-mongodb-master.zip
Introduction
If you want to create a blog using MongoDB and PHP, this article will teach you to:
- Connect to a MongoDB database
- Save documents in a collection
- Query documents in a collection
- Perform range queries
- Sort documents, update a document, delete one or more documents from a collection
The reason I chose to build a blog application is because it is a basic CRUD application and it is very suitable for easing into PHP and MongoDB web development. We will build a plain user interface using Bootstrap with simple textboxes and buttons. A MongoDB database will store all the content. You can download full source from github, see a demo frontend here and try the demo app’s backend with the user name and password being duythien.
What is MongoDB
According to the official website MongoDB is a document database that provides high performance, high availability, and easy scalability. MongoDB falls into the group of documents-oriented NoSQL databases. For other subtypes of NoSQL databases, see here.
MongoDB Concepts: Databases, Collections, and Documents
-
Database: MongoDB groups data into databases in the very same way as most relational databases do. If you have any experience with relational databases, you should think of these the same way. In an RDBMS, a database is a set of tables, stored procedures, views, and so on. In MongoDB, a database is a set of collections. A MongoDB database contains one or more collections. For example, a database for a blogging application named blog may typically have the collections articles, authors, comments, categories, and so on.
-
Collection: A collection is the equivalent of an RDBMS table. A collection exists within a single database. Collections do not enforce a schema. Documents within a collection can have different fields. Typically, all documents in a collection have a similar or related purpose.
-
Documents: A record in a MongoDB collection and the basic unit of data in MongoDB. Documents are analogous to JSON objects but exist in the database in a more type-rich format known as BSON. A document contains a set of fields or key-value pairs. The best way to think of a document is as a multidimensional array. In an array, you have a set of keys that map to values (Document == Array). See Documents.
Installing MongoDB
MongoDB runs on most platforms and supports 32-bit and 64-bit architectures. MongoDB is available as a binary, or as a package. In production environments, use 64-bit MongoDB binaries. This section will cover installation on Ubuntu Linux and Windows. For other operating systems, please see their documentation.
This is how Mongo is installed on Ubuntu Linux. Open terminal and execute the following:
sudo apt-key adv --keyserver hkp://keyserver.ubuntu.com:80 --recv 7F0CEB10
#
echo 'deb http://downloads-distro.mongodb.org/repo/ubuntu-upstart dist 10gen' | sudo tee /etc/apt/sources.list.d/mongodb.list
Now issue the following command to update your repository and install the latest stable version of MongoDB:
sudo apt-get update
sudo apt-get install mongodb-10gen
Done, you have successfully installed MongoDB. Now start and stop service MongoDB via command line below.
sudo service mongodb start
sudo service mongodb stop
In case of start error to try run the following command:
sudo mongod --fork --logpath /var/log/mongodb/mongodb.log
#or
sudo mongod -f /etc/mongodb.conf
The following describes how to install it on Windows:
Head on over to the downloads page on the MongoDB official website. Click on the download link for the latest stable release under Windows.
After the download is finished, extract and move it into C:\ . MongoDB requires a data folder in which to store its files. The default location for the MongoDB data directory is C:\data\db. If it doesn’t exist, create it.
To start MongoDB, execute from the Command Prompt
C:\> cd \mongodb\bin
C:\mongodb\bin> mongod
Done, you have successfully installed MongoDB. Now start and stop service MongoDB via command line below.
net start MongoDB
net stop  MongoDB
Installing the PHP driver for MongoDB
The MongoDB server is built to already work with your current web server, but not PHP. To make PHP talk to the MongoDB server, we are going to need the PHP-MongoDB driver. It is a PHP extension library.
If you use Linux install it easily via:
sudo pecl install mongo
Add the line extension=mongo.so to your php.ini configuration and you’re good to go:
sudo -i
echo 'extension=mongo.so' >> /etc/php5/apache2/php.ini
Restart your web server and verify via command line:
php -i |grep "mongo"
php --re mongo
Installing the Driver on Windows
Let us try installing the driver on a Windows machine running PHP 5.4 on Apache (XAMPP):


- Download the ZIP archive https://github.com/mongodb/mongo-php-driver/downloads on your machine and extract it.
- Copy the php_mongo.dll file from the extracted folder to the PHP extension directory(C:\xampp\php\ext).
- Open the php.ini file inside your PHP installation and add the following line: extension=php_mongo.dll
- Save the file and close it. Restart the XAMP.
- Open up your text editor and add the following code to a new file:
<?php phpinfo();?>, save the file as phpinfo.php inside the DocumentRoot of the Apache web server (htdocs) and open the PHP script in the browser. If you see mongo in the PHP info, the installation was successful.
Mongo Web Development with PHP
Connecting to a MongoDB Database Server
Connecting to MongoDB from PHP is very similar to connecting to any other database. The default host is localhost, and the default port is 27017.
$connection = new Mongo();
Connecting to a remote host with optional custom port and auth:
$connecting_string =  sprintf('mongodb://%s:%d/%s', $hosts, $port,$database),
$connection=  new Mongo($connecting_string,array('username'=>$username,'password'=>$password));
Selecting a Database
Once the database server connection is established, we will use it to access a database. The defined way to do this is:
$dbname = $connection->selectDB('dbname');
The Basics (CRUD Operations)
MongoDB provides rich semantics for reading and manipulating data. CRUD stands for create, read, update, and delete. These terms are the foundation for all interactions with the database.
Creating/Selecting a Collection
Selecting and creating a collection is very similar to accessing and creating a database. If a collection does not exist, it is created:
$collection = $dbname->collection;
//or
$collection = $dbname->selectCollection('collection');
For example, this creates the collection “posts” in my blog:
$posts = $dbname->posts
Creating a Document
Creating a document in MongoDB could not be easier. Create an array. Pass it into the insert method on the collection object


$post = array(
        'title'     => 'What is MongoDB',
        'content'   => 'MongoDB is a document database that provides high performance...',
        'saved_at'  => new MongoDate()
    );
    $posts->insert($post);
The insert() method stores the data in the collection. The $post array automatically receives a field named _id, which is the autogenerated unique ObjectId of the inserted BSON document. You could also use the save() method, which upserts – updates an existing record, or creates a new one if it doesn’t exist.
Reading a Document
To get data from a collection, I use the find() method, which gets all the data in a collection. findOne() returns only one document that satisfies the specified query criteria. The following examples will show you how to query one or more records.
    // all records
    $result = $posts::find();
    // one record
    $id = '52d68c93cf5dc944128b4567';
    $results = $posts::findOne(array('_id' => new MongoId($id)));
Updating a Document
Modifies an existing document or documents in a collection. By default, the update() method updates a single document. If the multi option is set to true, the method updates all documents that match the query criteria.
    $id = '52d68c93cf5dc944128b4567';
    $posts->update(
        array('_id'     => new MongoId($id)),
    array('$set'    => array(title'   => 'What is phalcon'))
    );
The update() method takes two parameters. The first is criteria to describe the objects to update and the second the object with which to update the matching records. There is also a third optional parameter whereby you can pass in an array of options.
Mini blog
The structure of the project we’ll be building:
    |-------admin
            |------index.php                    # This is dashboard
            |------auth.php
    |-------view
            |------admin
                    |-------create.view.php     #form create article
                    |-------dashbroad.view.php
            |------index.view.php
            |------layout.php       #This is main layout it will be shown for every  action executed within the app
            |------single.view.php              # This is view for a single article
    |-------config.php                          # Define paramater database, url
    |-------app.php                             # Include multi-php files
    |-------db.php                        # Container class db
    |-------index.php
    |-------single.php
    |-------static                              # Container css,js...
                |-----css
                |-----js
    |-------vendor
                |----markdown                   # Library converts markdown into html
Before we start with our actual PHP code we need to create our files and folders like above.
config.php
This is your configuration file that tells our app how to connect to the database. This is where you have defined the database name, username and password of the user to access that database:
    <?php
        define('URL', 'http://duythien.dev/sitepoint/blog-mongodb');
        define('UserAuth', 'duythien');
        define('PasswordAuth', 'duythien');

        $config = array(
            'username' => 'duythien',
            'password' => 'qazwsx2013@',
            'dbname'   => 'blog',
            'connection_string'=> sprintf('mongodb://%s:%d/%s','127.0.0.1','27017','blog')
        );
where we define paramaters UserAuth and PasswordAuth to protect the admin folder via HTTP authentication. We’re using HTTP auth for simplicity here, seeing as the central theme of the article is connecting to MongoDB – you would usually use some sort of decent framework with ACL to build in access control.
app.php:
    <?php
    include 'config.php';
    include 'layout.php';
    include 'db.php';

    use Blog\DB,
        Blog\Layout;

    // Constructor to the db
    $db = new DB\DB($config);

    // Constructor to layout view
    $layout = new Layout\Layout();
admin
This is the folder that contains the CRUD code.
<?php
require_once 'auth.php';
require_once '../app.php';
require_once '../vendor/markdown/Markdown.inc.php';
use \Michelf\MarkdownExtra,
    \Michelf\Markdown;

if ((is_array($_SESSION) && $_SESSION['username'] == UserAuth)) {
    $data = array();
    $status = (empty($_GET['status'])) ? 'dashboard' : $_GET['status'];
    switch ($status) {
        //create post
        case 'create':
            break;
        //edit post
        case 'edit':
            break;
        //delete post
        case 'delete':
            //display all post in dashboard
        default:
            $currentPage = (isset($_GET['page'])) ? (int)$_GET['page'] : 1;
            $data = $db->get($currentPage, 'posts');

            $layout->view('admin/dashboard', array(
                'currentPage' => $data[0],
                'totalPages' => $data[1],
                'cursor' => $data[2]
            ));
            break;
    }
}
For the full file index.php see here. Above I used the view function in the class layout.php which will automatically load dashboard.view.php.
<?php namespace Blog\Layout;

Class Layout
{

    /**
     * @var array
     */
    public $data;

    public function view($path, $data)
    {
        if (isset($data)) {
            extract($data);
        }
        $path .= '.view.php';
        include "views/layout.php";
    }
}
The GET parameter status corresponds to a CRUD action. For example, when status is “create”:
if ($_SERVER['REQUEST_METHOD'] === 'POST') {

    $article = array();
    $article['title'] = $_POST['title'];
    $article['content'] = Markdown::defaultTransform($_POST['content']);
    $article['saved_at'] = new MongoDate();

    if (empty($article['title']) || empty($article['content'])) {
        $data['status'] = 'Please fill out both inputs.';
    } else {

// then create a new row in the collection posts
        $db->create('posts', $article);
        $data['status'] = 'Row has successfully been inserted.';
    }
}
$layout->view('admin/create', $data);
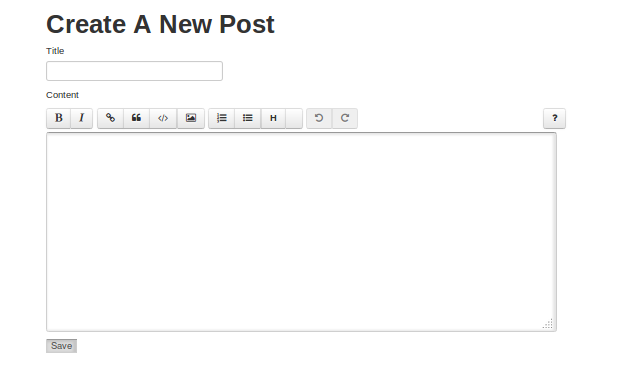
Function view(‘admin/create’, $data) shows an HTML form where the user can write the title/content of a new blog post, or it saves the user-submitted data to MongoDB. By default the script displays the following HTML form:
<form action="" method="post">
    <div><label for="Title">Title</label>
        <input type="text" name="title" id="title" required="required"/>
    </div>
    <label for="content">Content</label>

    <p><textarea name="content" id="content" cols="40" rows="8" class="span10"></textarea></p>

    <div class="submit"><input type="submit" name="btn_submit" value="Save"/></div>
</form>
Next let’s look at db.php, which can be found in full here
<?php

namespace Blog\DB;

class DB
{

    /**
     * Return db
     * @var object
     */
    private $db;

    /**
     * Results limit.
     * @var integer
     */
    public $limit = 5;


    public function __construct($config)
    {

        $this->connect($config);
    }

    //connecting mongodb
    private function connect($config)
    {
    }

    //get all data
    public function get($page, $collection)
    {
    }

    //get one data by id
    public function getById($id, $collection)
    {
    }

    //create article
    public function create($collection, $article)
    {
    }

    //delete article by id
    public function delete($id, $collection)
    {
    }

    //update article
    public function update($id, $collection, $acticle)
    {
    }

    //create and update comment
    public function commentId($id, $collection, $comment)
    {
    }
}
The MongoDB cursor makes pagination easy. These cursor methods can be chained off of the cursor object that find returns and each other. Combining limit with skip makes pagination easy. These can also be combined with order. For example.
    public function get($page,$collection){

        $currentPage = $page;
        $articlesPerPage = $this->limit;

        //number of article to skip from beginning
        $skip = ($currentPage - 1) * $articlesPerPage;

        $table = $this->db->selectCollection($collection);
    $cursor = $table->find();

        //total number of articles in database
        $totalArticles = $cursor->count();

        //total number of pages to display
        $totalPages = (int) ceil($totalArticles / $articlesPerPage);

        $cursor->sort(array('saved_at' => -1))->skip($skip)->limit($articlesPerPage);

        $data=array($currentPage,$totalPages,$cursor);

    return $data;
}
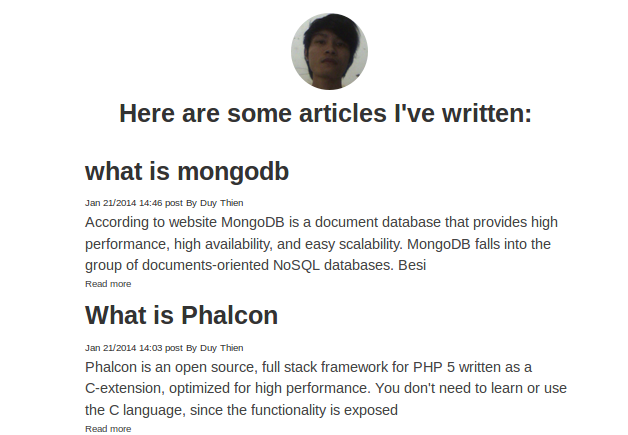
index.php: template files can be found in the view folder; such as index.view.php. Here is an example of index.php:
<?php
require 'app.php';

try {
    $currentPage = (isset($_GET['page'])) ? (int)$_GET['page'] : 1; //current page number

    $data = $db->get($currentPage, 'posts');
    $layout->view('index', array(
        'currentPage' => $data[0],
        'totalPages' => $data[1],
        'cursor' => $data[2],
        'name' => 'Duy Thien'
    ));
} catch (Exception $e) {
    echo 'Caught exception: ', $e->getMessage(), "\n";
}
Open your browser and navigate to http://duythien.dev/sitepoint/blog-mongodb. It lists all the current articles in the blog:
single.php: When you view a single post page (click Read more on a post), you are looking at single.view.php in the views folder. Here is the logic of single.php:
<?php

require 'app.php';
// Fetch the entire post
$post = $db->getById($_GET['id'], 'posts');
if ($post) {
    $layout->view('single', array(
        'article' => $post
    ));
}
This file receives the _id of the article as an HTTP GET parameter. We invoke the findOne() method on the articles collection, sending the _id value as a parameter to the method. The findOne() method is used to retrieve a single document. See function getById() in file db.php
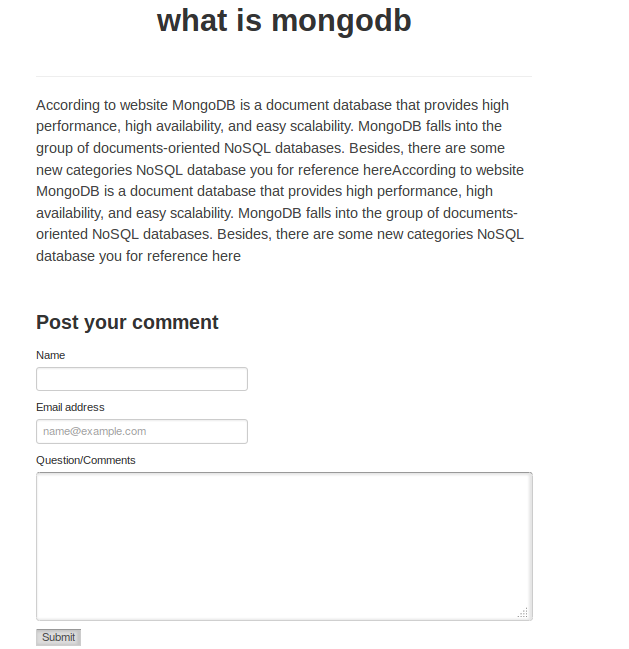
Enter an arbitrary Name and Email in the input boxes under the comments section, put some text in the textarea as well. Then click on the Save button and the page will reload with the comment you just posted. This is what comment.php looks like:
<?php

require 'app.php';

if ($_SERVER['REQUEST_METHOD'] === 'POST') {

    $id = $_POST['article_id'];
    $comment = array(
        'name' => $_POST['fName'],
        'email' => $_POST['fEmail'],
        'comment' => $_POST['fComment'],
        'posted_at' => new MongoDate()
    );
    $status = $db->commentId($id, 'posts', $comment);

    if ($status == TRUE) {
        header('Location: single.php?id=' . $id);
    }
}
Comments for an article are stored in an array field of the document name comments. Each element of a comment is an embedded document that contains several fields.
Conclusion
In this article, we covered a basic CRUD introduction into PhP with MongoDB. We’ve even created a sort of very primitive MVC in the process (see full app on Github). It’s up to you to use a proper framework, implement authentication beyond the simple HTTP auth used here, and add more functionality, but the basics are in place and you can hack away at this demo application to your heart’s content.
[출처] https://www.sitepoint.com/building-simple-blog-app-mongodb-php/
광고 클릭에서 발생하는 수익금은 모두 웹사이트 서버의 유지 및 관리, 그리고 기술 콘텐츠 향상을 위해 쓰여집니다.