
아이오닉과 php 그리고 mysql 연동 : Using PHP and MySQL with Ionic
2018.01.14 20:01
아이오닉과 php 그리고 mysql 연동 :
Using PHP and MySQL with Ionic
Using PHP and MySQL with Ionic
December 15, 2016, 1:47 am
Why PHP/MYSQL?
** NOW UPDATED FOR ANGULAR 5 **
According to W3tech's usage statistics PHP accounts for 82.4% of all the websites analysed which means there's a strong possibility that as developers we will, at some point, need to work with that language in our projects.
This is no surprise as, amongst other features, PHP offers a solid and extensive Database API, supporting popular solutions ranging from MySQL, PostgreSQL, Oracle, SQL Server and SQLite to Sybase, Firebird and DB2. The almost universal hosting support for the language, low running costs and extensive online documentation also help to make this an attractive option for development!
On top of this MySQL's usage statistics makes using PHP with MySQL something of a no-brainer for most organisations.
For the purposes of this tutorial here's the server set-up being used:
- Apache/2.4.23
- PHP 5.3+
- MySQL 5.5.53+
What we'll be building
So with our server-side technologies in mind the Ionic project that we're going to develop in this tutorial will be used to:
- Display a list of our favourite web/mobile technologies
- Create, amend and remove individual technology listings
All data will be stored remotely in a MySQL database which we'll interact with using PHP Data Objects (PDO).
If you're relatively new to PHP or have never used PDO before it's simply a database abstraction layer that provides a universal API for working with different database vendors.
As the PDO syntax isn't tied specifically to one database API (I.e. such as with the mysqli php commands) this makes it an ideal solution for future proofing data management should the need arise, for example, to switch from MySQL to another database solution such as PostgreSQL or Oracle.
By the end of the tutorial we should be greeted with an application similar to the following (as seen running in the browser courtesy of the ionic serve utility):
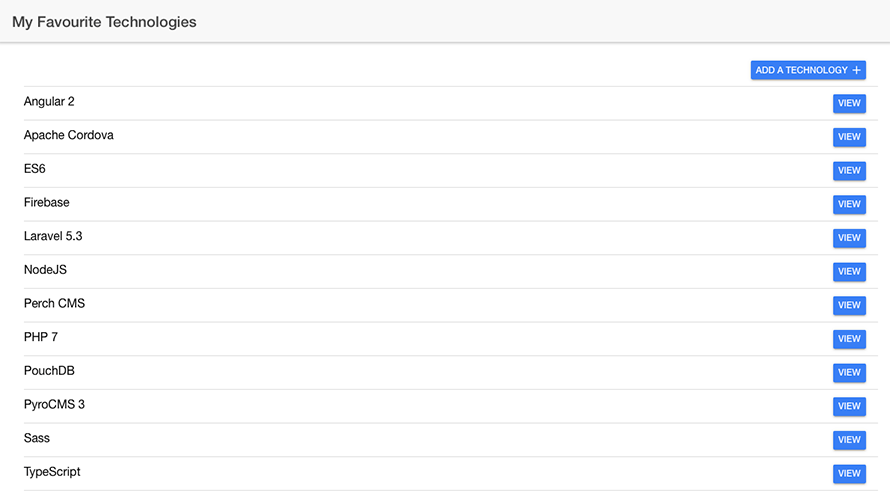
Now that we've established the background to the project and what we expect to develop let's make a start...
Setting up the database
The data structure for our app is incredibly simple consisting of a single table with 3 fields.
That's it - nothing complex, no relationships, foreign keys or optimising indexes...thankfully!
Using your tool of choice (I.e. command line or phpMyAdmin for example) create a table named technologies with the following configurations:
| Field name | type | additional properties |
|---|---|---|
| id | INTEGER(3) | PRIMARY KEY UNSIGNED AUTOINCREMENT |
| name | VARCHAR(50) | |
| description | TEXT |
I told you it was simple didn't I?
And that's it - with our data structure configured we can now we can turn our attention to the server side scripting for interacting with the database.
Configuring htaccess
The following assumes that you are using the Apache web server (a not uncommon assumption given its wide usage amongst developers and companies hosting PHP/MySQL) and are able to configure htaccess rules.
If you're not using Apache check out the following CORS related issues and workarounds.
At a bare minimum you’ll need to ensure that Cross Origin Resource Sharing is allowed by adding the following Apache directive configuration to your htaccess file:
<IfModule mod_headers.c>
  Header set Access-Control-Allow-Origin "*"
</IfModule>
This will avoid any errors thrown with calls being made from different domains (which often result in CORS violation warnings and your application not working as a result!)
More information on the Apache IfModule directive can be found here along with CORS related issues and workarounds.
Scripting the server side logic
In your code editor of choice create the following PHP scripts:
- manage-data.php
- retrieve-data.php
The manage-data.php script will handle adding, updating and removing records from the technologies table.
The retrieve-data.php script will - surprise, surprise - handle retrieving saved data from the technologies table and returning that for use in our Ionic app.
Let's start with the scripting for the manage-data.php script:
<?php

   // Define database connection parameters
   $hn      = 'localhost';
   $un      = 'username-of-database-here';
   $pwd     = 'password-for-database-here';
   $db      = 'name-of-database';
   $cs      = 'utf8';

   // Set up the PDO parameters
   $dsn 	= "mysql:host=" . $hn . ";port=3306;dbname=" . $db . ";charset=" . $cs;
   $opt 	= array(
                        PDO::ATTR_ERRMODE            => PDO::ERRMODE_EXCEPTION,
                        PDO::ATTR_DEFAULT_FETCH_MODE => PDO::FETCH_OBJ,
                        PDO::ATTR_EMULATE_PREPARES   => false,
                       );
   // Create a PDO instance (connect to the database)
   $pdo 	= new PDO($dsn, $un, $pwd, $opt);


   // Retrieve the posted data
   $json    =  file_get_contents('php://input');
   $obj     =  json_decode($json);
   $key     =  strip_tags($obj->key);


   // Determine which mode is being requested
   switch($key)
   {

      // Add a new record to the technologies table
      case "create":

         // Sanitise URL supplied values
         $name 		     = filter_var($obj->name, FILTER_SANITIZE_STRING, FILTER_FLAG_ENCODE_LOW);
         $description	  = filter_var($obj->description, FILTER_SANITIZE_STRING, FILTER_FLAG_ENCODE_LOW);

         // Attempt to run PDO prepared statement
         try {
            $sql 	= "INSERT INTO technologies(name, description) VALUES(:name, :description)";
            $stmt 	= $pdo->prepare($sql);
            $stmt->bindParam(':name', $name, PDO::PARAM_STR);
            $stmt->bindParam(':description', $description, PDO::PARAM_STR);
            $stmt->execute();

            echo json_encode(array('message' => 'Congratulations the record ' . $name . ' was added to the database'));
         }
         // Catch any errors in running the prepared statement
         catch(PDOException $e)
         {
            echo $e->getMessage();
         }

      break;


      // Update an existing record in the technologies table
      case "update":

         // Sanitise URL supplied values
         $name 		     = filter_var($obj->name, FILTER_SANITIZE_STRING, FILTER_FLAG_ENCODE_LOW);
         $description	  = filter_var($obj->description, FILTER_SANITIZE_STRING, FILTER_FLAG_ENCODE_LOW);
         $recordID	     = filter_var($obj->recordID, FILTER_SANITIZE_NUMBER_INT);

         // Attempt to run PDO prepared statement
         try {
            $sql 	= "UPDATE technologies SET name = :name, description = :description WHERE id = :recordID";
            $stmt 	=	$pdo->prepare($sql);
            $stmt->bindParam(':name', $name, PDO::PARAM_STR);
            $stmt->bindParam(':description', $description, PDO::PARAM_STR);
            $stmt->bindParam(':recordID', $recordID, PDO::PARAM_INT);
            $stmt->execute();

            echo json_encode('Congratulations the record ' . $name . ' was updated');
         }
         // Catch any errors in running the prepared statement
         catch(PDOException $e)
         {
            echo $e->getMessage();
         }

      break;


      // Remove an existing record in the technologies table
      case "delete":

         // Sanitise supplied record ID for matching to table record
         $recordID	=	filter_var($obj->recordID, FILTER_SANITIZE_NUMBER_INT);

         // Attempt to run PDO prepared statement
         try {
            $pdo 	= new PDO($dsn, $un, $pwd);
            $sql 	= "DELETE FROM technologies WHERE id = :recordID";
            $stmt 	= $pdo->prepare($sql);
            $stmt->bindParam(':recordID', $recordID, PDO::PARAM_INT);
            $stmt->execute();

            echo json_encode('Congratulations the record ' . $name . ' was removed');
         }
         // Catch any errors in running the prepared statement
         catch(PDOException $e)
         {
            echo $e->getMessage();
         }

      break;
   }

?>
The above script should be fairly self-explanatory in terms of what we're looking to accomplish at each stage.
We configure the necessary parameters for interacting with the database using PHP's PDO class.
From there we use a switch statement to determine whether we are adding, editing or removing a record from the database.
For each database operation we implement PHP's filter functions to sanitise the data supplied by the URL that calls the script before using prepared statements to manage interacting with the database.
Now to add the scripting for the retrieve-data.php script:
<?php

   // Define database connection parameters
   $hn      = 'localhost';
   $un      = 'username-of-database-here';
   $pwd     = 'password-for-database-here';
   $db      = 'name-of-database';
   $cs      = 'utf8';

   // Set up the PDO parameters
   $dsn 	= "mysql:host=" . $hn . ";port=3306;dbname=" . $db . ";charset=" . $cs;
   $opt 	= array(
                        PDO::ATTR_ERRMODE            => PDO::ERRMODE_EXCEPTION,
                        PDO::ATTR_DEFAULT_FETCH_MODE => PDO::FETCH_OBJ,
                        PDO::ATTR_EMULATE_PREPARES   => false,
                       );
   // Create a PDO instance (connect to the database)
   $pdo 	= new PDO($dsn, $un, $pwd, $opt);
   $data    = array();


   // Attempt to query database table and retrieve data
   try {
      $stmt 	= $pdo->query('SELECT id, name, description FROM technologies ORDER BY name ASC');
      while($row  = $stmt->fetch(PDO::FETCH_OBJ))
      {
         // Assign each row of data to associative array
         $data[] = $row;
      }

      // Return data as JSON
      echo json_encode($data);
   }
   catch(PDOException $e)
   {
      echo $e->getMessage();
   }


?>
Similar to our previous PHP script we begin with constructing our database/PDO parameters before attempting to retrieve records saved in the technologies table and return these as key/value pairs in JSON.
Be sure to upload these PHP scripts to a publicly accessible location on your remote server, ensure that the permissions are set to 755 and make a note of the absolute address to these scripts (I.e. http://www.website-address.suffix/directory/retrieve-data.php) as you will need this for the Ionic/Angular side of the project.
At this point we've concluded the necessary scripting for interacting with the database and returning data and now we can focus on developing the Ionic side of our project.
Building the App
The structure for the App itself is fairly simple; 2 pages:
- Home
- Add Technology
We won't be using any plugins, just a select number of pre-supplied Angular classes and Ionic UI components.
Navigate to a directory where you want your Ionic app to be created/installed and run the following command in your console of choice (I.e. Mac OS X Terminal or Windows Command Prompt for example):
ionic start favourite-web-technologies blank
Once the basic skeleton for the app has been created run the following command to add the second page for the app:
ionic g page addTechnology
With the bare bones of the app in place we can now start coding the required functionality and UI which, given Ionic's prebuilt components and available functionality, will be relatively quick and easy.
Begin by opening the favourite-web-technologies/src/pages/home/home.ts file and adding the following code:
import { Component } from '@angular/core';
import { NavController } from 'ionic-angular';
import { HttpClient } from '@angular/common/http';


@Component({
  selector: 'page-home',
  templateUrl: 'home.html'
})
export class HomePage {


   /**
    * @name items
    * @type {Array}
    * @public
    * @description     Used to store returned PHP data
    */
   public items : Array<any> = [];


   constructor(public navCtrl: NavController,
               public http   : HttpClient)
   {

   }


   /**
    * Triggered when template view is about to be entered
    * Returns and parses the PHP data through the load() method
    *
    * @public
    * @method ionViewWillEnter
    * @return {None}
    */
   ionViewWillEnter() : void
   {
      this.load();
   }


   /**
    * Retrieve the JSON encoded data from the remote server
    * Using Angular's Http class and an Observable - then
    * assign this to the items array for rendering to the HTML template
    *
    * @public
    * @method load
    * @return {None}
    */
   load() : void
   {
      this.http
      .get('http://www.YOUR-SERVER-ADDRESS.SUFFIX/retrieve-data.php')
      .subscribe((data : any) =>
      {
         console.dir(data);
         this.items = data;
      },
      (error : any) =>
      {
         console.dir(error);
      });
   }


   /**
    * Allow navigation to the AddTechnologyPage for creating a new entry
    *
    * @public
    * @method addEntry
    * @return {None}
    */
   addEntry() : void
   {
      this.navCtrl.push('AddTechnologyPage');
   }


   /**
    * Allow navigation to the AddTechnologyPage for amending an existing entry
    * (We supply the actual record to be amended, as this method's parameter,
    * to the AddTechnologyPage
    *
    * @public
    * @method viewEntry
    * @param param 		{any} 			Navigation data to send to the next page
    * @return {None}
    */
   viewEntry(param : any) : void
   {
      this.navCtrl.push('AddTechnologyPage', param);
   }


}
Nothing too elaborate or complicated here - just calling our retrieve-data.php script through the load method and handling navigation to the AddTechnologyPage component using the addEntry and viewEntry methods.


Now we need to add the necessary UI components to the favourite-web-technologies/src/pages/home/home.html file:
<ion-header>
   <ion-navbar>
      <ion-title>
         My Favourite Technologies
      </ion-title>
   </ion-navbar>
</ion-header>

<ion-content padding>

   <ion-item>
      <button
         class="add"
         ion-button
         item-right
         icon-right
         margin-bottom
         color="primary"
         (click)="addEntry()">
            Add a technology
            <ion-icon name="add"></ion-icon>
      </button>
   </ion-item>


   <ion-item *ngFor="let item of items">
      <h2>{{ item.name }} </h2>
      <button
         ion-button
         color="primary"
         item-right
         (click)="viewEntry({ record: item })">View</button>
   </ion-item>


</ion-content>
Once again, a fairly simple set-up here.
First we start with a standard button at the top right of the screen which calls the addEntry method from our class (allowing us to navigate to the Add Technology page in order to add a new record to be inserted into the remote MySQL database).
Secondly, we loop through and render to the page each technology record (that was retrieved through the load method of the class), assigning a button to accompany each listing. Each button calls the viewEntry method from our class, passing in the technlogy record as a parameter so this can be edited on the form (that we're going to build shortly) in the Add Technology page.
The more eagle-eyed amongst you may have noticed a glaring omission/problem with the above code.
If there are no records to retrieve - which will more than likely be the case when the app is first launched (unless you directly added some records to the database before getting to this stage of the tutorial) - the user isn't informed of this fact.
Instead all they are greeted with is a blank space underneath the Add Entry button.
Hmm...not good from a user experience perspective.
I'll leave this to you, as an additional exercise, to add in some functionality to handle this scenario :)
Now let's add the necessary logic and HTML for the Add Technology page.
Adding and amending technology records
As the AddTechnologyPage component will handle both adding new records and displaying existing records for potential amendment this simplifies the amount of code we need to write.
Starting with the favourite-web-technologies/src/pages/add-technology/add-technology.ts file implement the following code:
import { Component } from '@angular/core';
import { IonicPage, NavController, NavParams, ToastController } from 'ionic-angular';
import { FormGroup, Validators, FormBuilder } from '@angular/forms';
import { HttpClient, HttpHeaders } from '@angular/common/http';


@IonicPage()
@Component({
  selector: 'page-add-technology',
  templateUrl: 'add-technology.html'
})
export class AddTechnologyPage {


   /**
    * @name form
    * @type {FormGroup}
    * @public
    * @description     Define FormGroup property for managing form validation / data retrieval
    */
   public form                   : FormGroup;


   /**
    * @name technologyName
    * @type {Any}
    * @public
    * @description     Model for managing technologyName field
    */
   public technologyName         : any;


   /**
    * @name technologyDescription
    * @type {Any}
    * @public
    * @description     Model for managing technologyDescription field
    */
   public technologyDescription  : any;


   /**
    * @name isEdited
    * @type {Boolean}
    * @public
    * @description     Flag to be used for checking whether we are adding/editing an entry
    */
   public isEdited               : boolean = false;


   /**
    * @name hideForm
    * @type {Boolean}
    * @public
    * @description     Flag to hide the form upon successful completion of remote operation
    */
   public hideForm               : boolean = false;


   /**
    * @name pageTitle
    * @type {String}
    * @public
    * @description     Property to help set the page title
    */
   public pageTitle              : string;


   /**
    * @name recordID
    * @type {String}
    * @public
    * @description     Property to store the recordID for when an existing entry is being edited
    */
   public recordID               : any      = null;


   /**
    * @name baseURI
    * @type {String}
    * @public
    * @description     Remote URI for retrieving data from and sending data to
    */
   private baseURI               : string  = "http://www.YOUR-SERVER-ADDRESS.SUFFIX/";


   // Initialise module classes
   constructor(public navCtrl    : NavController,
               public http       : HttpClient,
               public NP         : NavParams,
               public fb         : FormBuilder,
               public toastCtrl  : ToastController)
   {

      // Create form builder validation rules
      this.form = fb.group({
         "name"                  : ["", Validators.required],
         "description"           : ["", Validators.required]
      });
   }


   /**
    * Triggered when template view is about to be entered
    * Determine whether we adding or editing a record
    * based on any supplied navigation parameters
    *
    * @public
    * @method ionViewWillEnter
    * @return {None}
    */
   ionViewWillEnter() : void
   {
      this.resetFields();

      if(this.NP.get("record"))
      {
         this.isEdited      = true;
         this.selectEntry(this.NP.get("record"));
         this.pageTitle     = 'Amend entry';
      }
      else
      {
         this.isEdited      = false;
         this.pageTitle     = 'Create entry';
      }
   }


   /**
    * Assign the navigation retrieved data to properties
    * used as models on the page's HTML form
    *
    * @public
    * @method selectEntry
    * @param item 		{any} 			Navigation data
    * @return {None}
    */
   selectEntry(item : any) : void
   {
      this.technologyName        = item.name;
      this.technologyDescription = item.description;
      this.recordID              = item.id;
   }


   /**
    * Save a new record that has been added to the page's HTML form
    * Use angular's http post method to submit the record data
    *
    * @public
    * @method createEntry
    * @param name 			{String} 			Name value from form field
    * @param description 	{String} 			Description value from form field
    * @return {None}
    */
   createEntry(name : string, description : string) : void
   {
      let headers 	: any		= new HttpHeaders({ 'Content-Type': 'application/json' }),
          options 	: any		= { "key" : "create", "name" : name, "description" : description },
          url       : any      	= this.baseURI + "manage-data.php";

      this.http.post(url, JSON.stringify(options), headers)
      .subscribe((data : any) =>
      {
         // If the request was successful notify the user
         this.hideForm   = true;
         this.sendNotification(`Congratulations the technology: ${name} was successfully added`);
      },
      (error : any) =>
      {
         this.sendNotification('Something went wrong!');
      });
   }


   /**
    * Update an existing record that has been edited in the page's HTML form
    * Use angular's http post method to submit the record data
    * to our remote PHP script
    *
    * @public
    * @method updateEntry
    * @param name 			{String} 			Name value from form field
    * @param description 	{String} 			Description value from form field
    * @return {None}
    */
   updateEntry(name : string, description : string) : void
   {
      let headers 	: any		= new HttpHeaders({ 'Content-Type': 'application/json' }),
          options 	: any		= { "key" : "update", "name" : name, "description" : description, "recordID" : this.recordID},
          url       : any      	= this.baseURI + "manage-data.php";

      this.http
      .post(url, JSON.stringify(options), headers)
      .subscribe(data =>
      {
         // If the request was successful notify the user
         this.hideForm  =  true;
         this.sendNotification(`Congratulations the technology: ${name} was successfully updated`);
      },
      (error : any) =>
      {
         this.sendNotification('Something went wrong!');
      });
   }


   /**
    * Remove an existing record that has been selected in the page's HTML form
    * Use angular's http post method to submit the record data
    * to our remote PHP script
    *
    * @public
    * @method deleteEntry
    * @return {None}
    */
   deleteEntry() : void
   {
      let name      : string 	= this.form.controls["name"].value,
          headers 	: any		= new HttpHeaders({ 'Content-Type': 'application/json' }),
          options 	: any		= { "key" : "delete", "recordID" : this.recordID},
          url       : any      	= this.baseURI + "manage-data.php";

      this.http
      .post(url, JSON.stringify(options), headers)
      .subscribe(data =>
      {
         this.hideForm     = true;
         this.sendNotification(`Congratulations the technology: ${name} was successfully deleted`);
      },
      (error : any) =>
      {
         this.sendNotification('Something went wrong!');
      });
   }


   /**
    * Handle data submitted from the page's HTML form
    * Determine whether we are adding a new record or amending an
    * existing record
    *
    * @public
    * @method saveEntry
    * @return {None}
    */
   saveEntry() : void
   {
      let name          : string = this.form.controls["name"].value,
          description   : string    = this.form.controls["description"].value;

      if(this.isEdited)
      {
         this.updateEntry(name, description);
      }
      else
      {
         this.createEntry(name, description);
      }
   }


   /**
    * Clear values in the page's HTML form fields
    *
    * @public
    * @method resetFields
    * @return {None}
    */
   resetFields() : void
   {
      this.technologyName           = "";
      this.technologyDescription    = "";
   }


   /**
    * Manage notifying the user of the outcome of remote operations
    *
    * @public
    * @method sendNotification
    * @param message 	{String} 			Message to be displayed in the notification
    * @return {None}
    */
   sendNotification(message : string)  : void
   {
      let notification = this.toastCtrl.create({
          message       : message,
          duration      : 3000
      });
      notification.present();
   }


}
The significant aspects of the above code are the logic to determine whether we are adding a new record or amending an existing record (contained within the ionViewWillEnter method) followed by the methods to create, update and delete records:
- createEntry
- updateEntry
- deleteEntry
With the logic for handling the supply of data to our remote manage-data.php script we can now concentrate on crafting the necessary HTML for the favourite-web-technologies/src/pages/add-technology/add-technology.html file:
<ion-header>
   <ion-navbar>
      <ion-title>{{ pageTitle }}</ion-title>
   </ion-navbar>
</ion-header>


<ion-content padding>

   <div>
      <ion-item *ngIf="isEdited && !hideForm">
         <button
            ion-button
            item-right
            color="secondary"
            text-center
            block
            (click)="deleteEntry()">Remove this Entry?</button>
      </ion-item>


      <div *ngIf="hideForm">
         <ion-item class="post-entry-message" text-wrap>
            <h2>Success!</h2>
            <p>Maybe you'd like to edit an existing entry or add a new record?</p>
            <p>Simply go back to the home page and select the option you want to pursue.</p>
         </ion-item>
      </div>


      <div *ngIf="!hideForm">
         <form [formGroup]="form" (ngSubmit)="saveEntry()">

            <ion-list>
               <ion-item-group>
                  <ion-item-divider color="light">Technology Name *</ion-item-divider>
                  <ion-item>
                     <ion-input
                        type="text"
                        placeholder="Enter a name..."
                        formControlName="name"
                        [(ngModel)]="technologyName"></ion-input>
                  </ion-item>
               </ion-item-group>


               <ion-item-group>
                  <ion-item-divider color="light">Technology Description *</ion-item-divider>
                  <ion-item>
                     <ion-textarea
                        placeholder="Description..."
                        formControlName="description"
                        rows="6"
                        [(ngModel)]="technologyDescription"></ion-textarea>
                  </ion-item>
               </ion-item-group>


               <ion-item>
                  <button
                     ion-button
                     color="primary"
                     text-center
                     block
                     [disabled]="!form.valid">Save Entry</button>
               </ion-item>

            </ion-list>

         </form>
      </div>
   </div>


</ion-content>
As you can see this is a very simple form, consisting of a small number of very basic elements.
Initially we have a button located at the top right-hand side of the page which calls the deleteEntry method from our class.
Following from this we use an ngIf directive to conditionally display a message to the user once a form has been submitted and the data successfully saved.
Then another ngIf directive is used to handle whether the form is displayed or not based on the value of the hideForm property which is managed through the component's TypeScript class.
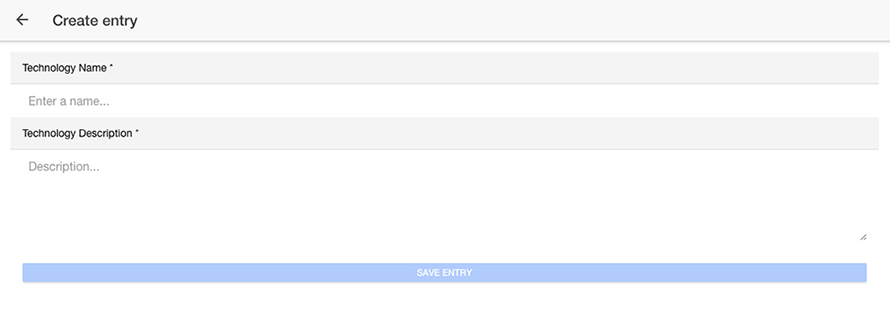
Our form consists of an input field for the technology name and a textarea for the technology description; both of which have form controls and models assigned to them to manage validation and the data contained within these fields.
When we come to preview the Add a technology view in the browser we are presented with the following screen:
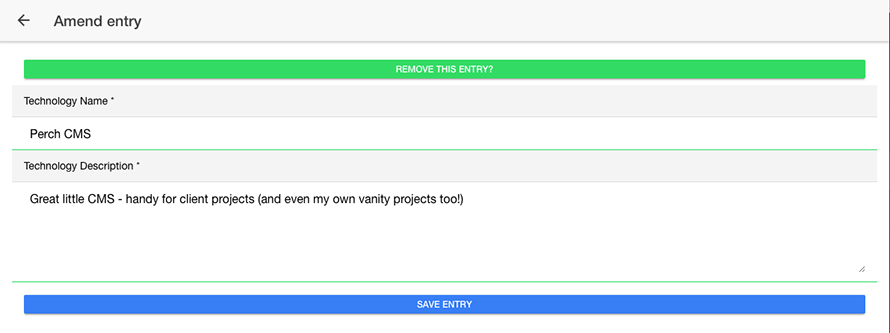
And when we have selected a record from the application home page to view/amend:
Managing the application modules
All is good and well with what we've implemented so far but there's one final modification that remains before we can preview the project in the browser.
As we are using Angular's HttpClient class we need to import and declare the HttpClientModule within the application's root module - favourite-web-technologies/src/app/app.module.ts like so:
import { BrowserModule } from '@angular/platform-browser';
import { HttpClientModule } from '@angular/common/http';
import { ErrorHandler, NgModule } from '@angular/core';
import { IonicApp, IonicErrorHandler, IonicModule } from 'ionic-angular';
import { SplashScreen } from '@ionic-native/splash-screen';
import { StatusBar } from '@ionic-native/status-bar';

import { MyApp } from './app.component';
import { HomePage } from '../pages/home/home';

@NgModule({
  declarations: [
    MyApp,
    HomePage
  ],
  imports: [
    BrowserModule,
    HttpClientModule,
    IonicModule.forRoot(MyApp)
  ],
  bootstrap: [IonicApp],
  entryComponents: [
    MyApp,
    HomePage
  ],
  providers: [
    StatusBar,
    SplashScreen,
    {provide: ErrorHandler, useClass: IonicErrorHandler}
  ]
})
export class AppModule {}
With all of our changes in place now you can preview the app in your desktop browser using the ionic serve command from your system command line utility (I.e. the Terminal on Mac OS X or Command Prompt on Windows):
ionic serve
All things being well you should be able to add records and see those being displayed as shown in the following screen grabs:
In summary
Here we conclude our tutorial on integrating PHP & MySQL with Ionic to create a basic app for listing, adding, editing and removing our favourite web technologies.
We've worked with a range of technologies from PHP Data Objects (PDO) and MySQL to Ionic's UI components and Angular's Http service.
As a result of these we've built a very simple but aesthetically pleasing and functional app which demonstrates just how easy it is to use PHP/MySQL as a data management solution for our Ionic apps.
Pretty good going huh?
There are, however, some modifications that do need to be made with the above codebase:
- Adding network detection functionality to determine whether or not the app can actually connect to a network for retrieving/posting data
- Implementing the ability to manage our data offline
- Handling more advanced validation scenarios such as avoiding duplicate data entries and restricting the length of data that can be added through each field for example
I've deliberately left these out as an exercise for the reader to implement themselves (should you feel so adventurous!)
What did you think of this tutorial? Did it cover the necessary angles or could it be improved in some way?
Let me know what your thoughts and reactions are by leaving your comments in the form below.
If you enjoyed what you've read here then please consider signing up to my mailing list and, if you haven't done so already, take a look at my e-book: Mastering Ionic for information about working with alternative data storage methods in Ionic.
[출처] http://masteringionic.com/blog/2016-12-15-using-php-and-mysql-with-ionic/
광고 클릭에서 발생하는 수익금은 모두 웹사이트 서버의 유지 및 관리, 그리고 기술 콘텐츠 향상을 위해 쓰여집니다.