
Build An Automated PHP Gallery System In Minutes
2017.06.10 18:25
Build An Automated PHP Gallery System In Minutes
Whether you own a business or a personal Website, you would have used html photo Web pages for either showcasing your products, or perhaps to share photos from your last holiday with friends; in either case it’s an enormous amount of manual work to build those Web pages. If you’ve tried your hand at the painstaking process of separately making thumbnails for each photo, and then maintaining individual pages for them, you know exactly what I mean.
In this article we’ll build a simple yet effective gallery system that’s easy to maintain and update. We’ll use PHP and MySQL, with a little help from GD or ImageMagick to build this automated gallery system. The focus of this article is to introduce the concept of File Uploading and using it to build an Automatic Gallery system; therefore I’ll presume that you have a basic knowledge of coding in PHP.
Getting Started
Any decent gallery system should have two major capabilities:

Ending Soon: Get Every SitePoint Ebook and Course for FREE!
87 Ebooks, 70 Courses and 300+ Tutorials all yours for FREE with ANY web hosting plan from SiteGround!
- a category-based listing of images
- a browser-based image uploading system
In addition to these, another feature we require in order to automate this gallery system is the ability to build automatic thumbnails as soon as the images are uploaded. To achieve that, we will use either GD or ImageMagick — whichever is available on your server. Usually, GD is bundled with PHP itself, but its capabilities differ from version to version. For example, versions of GD before 2.x.x can support the creation of images with up to 256 colors only. This limitation doesn’t exist within ImageMagick, nor later versions of GD. To identify which version of GD you have, you can use the function phpinfo() to list all the installed DLL’s and their version details.
The following is a simple procedure that we’ll use to build the gallery:
- Design the database schema (with the same structure, you can use Flat Files too)
- Build the browser-based uploading system
- Index within the tables
- Store the files
- Build automatic thumbnails
- View the categories and their images
Designing the Database Schema
Throughout this article, I will use examples of MySql databases, however, if you wish to use flat files, you can use similar structures to achieve the same output. We will assign each image in our gallery to a certain category; for this we require a separate table to list all the categories, and a separate table to list the entries of the uploaded images.
Category Table: let’s name it gallery_category.

Images Table: let’s name it gallery_photos.

The following are the MySql queries of the two tables:
CREATE TABLE gallery_category (
  category_id bigint(20) unsigned NOT NULL auto_increment,
  category_name varchar(50) NOT NULL default '0',
  PRIMARY KEY  (category_id),
  KEY category_id (category_id)
) TYPE=MyISAM;

CREATE TABLE gallery_photos (
  photo_id bigint(20) unsigned NOT NULL auto_increment,
  photo_filename varchar(25),
  photo_caption text,
  photo_category bigint(20) unsigned NOT NULL default '0',
  PRIMARY KEY  (photo_id),
  KEY photo_id (photo_id)
) TYPE=MyISAM;
You can use simple INSERT queries to add the initial records to the category table, for example:
INSERT INTO gallery_category(`category_name`) VALUES('My First Gallery');
Before we can upload the images, we require a directory in which to store them. Therefore, let’s make a new directory, and name it “photos” (for *nix servers, set write permissions for this directory using chmod, e.g. 777).
Now, let’s build our first script. This script will serve as our database connection file and will hold the name of the directory where we’ll store the uploaded images. In the code below, you’ll notice the name of the directory being defined to the variable $images_dir. If you wish to name your storage directory something else, make sure you reflect that in the code.
Let’s name this script “config.inc.php”.
<?php

  $mysql_link = mysql_connect('localhost', 'root', 'root');
  mysql_select_db('sitepoint') or die('Could not select database');

  $images_dir = 'photos';

?>
The above code also establishes a connection with the MySql database named “sitepoint”. Before implementing this code, you should insert your own username, password, and database name values.
The Browser-Based Uploading System
For each image we upload, we require two basic input fields: one to store the filename of the image and the other to store the image’s caption. To simplify matters, we’d like to upload multiple images in one go, rather than one by one. The code we will build now must be able to produce any number of fields as directed by us, the administrators. This will eradicate a lot of manual work that would otherwise have been needed to add extra form fields.
Let’s build an automated upload form. We’ll name it “preupload.php”.
<?php
  include 'config.inc.php';

  // initialization
  $photo_upload_fields = '';
  $counter = 1;

  // If we want more fields, then use, preupload.php?number_of_fields=20
  $number_of_fields = (isset($_GET['number_of_fields'])) ?
    (int)($_GET['number_of_fields']) : 5;

  // Firstly Lets build the Category List
  $result = mysql_query('SELECT category_id,category_name FROM gallery_category');
  while($row = mysql_fetch_array($result)) {
    $photo_category_list .= <<<__HTML_END
<option value="$row[0]">$row[1]</option>n
__HTML_END;
  }
  mysql_free_result( $result );

  // Lets build the Image Uploading fields
  while($counter <= $number_of_fields) {
    $photo_upload_fields .= <<<__HTML_END
<tr><td>
  Photo {$counter}:
  <input name="photo_filename[]"
type="file" />
</td></tr>
<tr><td>
  Caption:
  <textarea name="photo_caption[]" cols="30"
    rows="1"></textarea>
</td></tr>
__HTML_END;
    $counter++;
  }

  // Final Output
  echo <<<__HTML_END
<html>
<head>
<title>Lets upload Photos</title>
</head>
<body>
<form enctype="multipart/form-data"
  action="upload.php" method="post"
  name="upload_form">
  <table width="90%" border="0"
    align="center" style="width: 90%;">
    <tr><td>
      Select Category
      <select name="category">
      $photo_category_list
      </select>
    </td></tr>
    <! - Insert the image fields here -->
    $photo_upload_fields
    <tr><td>
      <input type="submit" name="submit"
        value="Add Photos" />
    </td></tr>
  </table>
</form>
</body>
</html>
__HTML_END;
?>
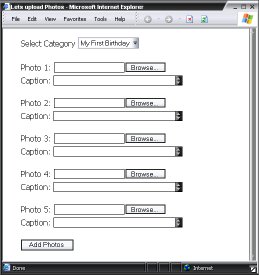
The above code produces a pretty simple html form; however there are a couple of things to note.
enctype attribute in <form>
By specifying the value for enctype attribute as "multipart/form-data", each image’s contents will be packaged for submission in a separate section of a multipart document. This document will be sent to the target script, in our case, upload.php.
Adding Extra Fields
The default for the number of fields is set to 5, but you might need to upload more files in one batch. This can be achieved using the above code, which allows us to specify the number of fields via the GET method. For example, if you want 25 fields, you can simply insert the line, preupload.php?number_of_fields=25.
Note: In your php.ini file, you must have safe_mode switched off, and the file_uploads attribute set to allow uploads. Run phpinfo() to view your current settings.
The Real Part: upload.php
We will now build upload.php, which was used as the target for the above pre-upload form. Most of the magic happens within this page!
- We’ll get smart and check whether the uploaded file is indeed an image
- We’ll index the image entries in our database
- We’ll store the uploaded image
- Finally, we’ll create automatic thumbnails
A source array named $_FILES is created by PHP every time we upload any files. Before we can start processing the uploaded files, we need to fetch some information about these images. The array contains the following details about any uploaded file:
- The real file name, e.g. my_birthday.jpg
- The mime type of the file, e.g. image/pjpeg
- The temporary location of the file on the server
- The file’s size (in bytes)
We’ll create our own arrays to fetch these values. Let’s take this opportunity to fetch the captions of the images, too, and assign them to an array.
// Fetch the image array sent by preupload.php

$photos_uploaded = $_FILES['photo_filename'];

// Fetch the image caption array

$photo_captions = $_POST['photo_captions'];
Is the Uploaded File a Real Image?
How do we check to ensure the file that’s been uploaded is actually an image? Well, every time we upload a file, PHP generates an array that contains the detail of the uploaded file, including its mime type. So, for a file to be a real image, it should match with one of the known image mime types. For example, to check if the image is a jpeg, gif, bmp or a png, we will compare the fetched mime type value with the known image types. We’ve listed some of these in the following array:
$photo_types = array(
  'image/pjpeg' => 'jpg',
  'image/jpeg' => 'jpg',
  'image/gif' => 'gif',
  'image/bmp' => 'bmp',
  'image/x-png' => 'png'
);
The above array holds the list of the possible image types our gallery will accept, along with the list of extensions corresponding to these file-types. These extensions will be used while renaming the file, before they’re stored in the gallery. Renaming the files removes the possibility that we might overwrite an existing file that has the same name as the newly-uploaded file. It also allows us to add the correct extension to a file that’s a certain image type, but has an incorrect or a missing extension.
For example, if someone uploads a GIF image with an extension of jpg, we will store the image with the correct .gifextension. One might dispute the need for this validation, but then again, there’s nothing wrong with being a little cautious — especially if you intend to allow public submissions to your gallery.
The code below performs two functions:
- It rejects an uploaded file if the uploaded file size is not more than 0 bytes; these entries usually come from fields which were left empty in the pre-upload form.
- More importantly, it validates the file’s type from the
photo_typesarray.
while($counter <= count($photos_uploaded)) {
  if($photos_uploaded['size'][$counter] > 0) {
    if(!array_key_exists($photos_uploaded['type'][$counter], $photo_types)) {
      $result_final .= 'File ' . ($counter + 1) .
        ' is not a photo<br />';
    } else {
      // Great the file is an image, we will add this file
    }
  }
}
A repeated parsing of the array photos_uploaded is required for indexing all uploaded files.
Indexing in the Tables
As soon as we receive the valid information of the uploaded image, we must index it in our table. This would yield a unique ID for the image, on the basis of which we will generate a new name under which the file will be saved. Before we add a new entry to the table, we’ll have no idea what the new filename might be. Therefore, we’ll use the initial query to add a new record with a dummy filename that will later be update to the correct one.
The following code would add the new entry into the gallery_photo table and fetch a unique ID:
mysql_query("
  INSERT INTO gallery_photos (
    photo_filename,
    photo_caption,
    photo_category
  ) VALUES (
    '0',
    '" . $photo_captions[$counter]) . "',
    '" . $_POST['category'] . "'
  )
");

$new_id = mysql_insert_id(); // New Id generated
We can now generate the new filename:
// Get the filetype of the uploaded file
$filetype = $photos_uploaded['type'][$counter];

// Get the extension for the new name
$extension = $known_photo_types[$filetype];

// Generate a new name
$filename = "$new_id.$extension";

// let's update the filename now
mysql_query("
  UPDATE gallery_photos SET
    photo_filename = '$filename'
  WHERE photo_id = '$new_id'
");
The naming convention used is new_id.extension.
So far, we have checked the validity of the image, generated a unique name for the image, and added it to the database.
Storing the Images
It’s time to store the uploaded image in the directory we created earlier. We will use the copy function to copy the image from its temporary location to our photos directory.
copy($photos_uploaded['tmp_name'][$counter],
  $images_dir . '/' . $filename);
We can also use the PHP 4-specific function:
move_uploaded_file($photos_uploaded['tmp_name'][$counter],
  $images_dir . '/' . $filename);
The important thing to notice in the above code is $photos_uploaded['tmp_name'][$counter]. As discussed earlier, PHP provides us with the temporary location of the uploaded file; key tmp_name holds that value.
Automatic Thumbnails
Now comes the most interesting part: building the automatic thumbnails. To build these thumbnails we require an image manipulation program, e.g. the Graphics Development (GD) Library, ImageMagick or NetPbm, all of which are available online for free.
Before we can build a thumbnail, we need to determine the dimensions of the image. To ensure we create proportionate thumbnails, we classify all images into two major categories:
- Wide Image, where the width is greater than the height
- Tall Image, where the height is greater than the width
Now we need to find out whether the uploaded image is Wide one or Tall. For that, we use the GetImageSize function to fetch the dimensions of the uploaded image and, using those vales, we decide the appropriate size of the thumbnail:
$size = GetImageSize($images_dir . "/" . $filename);

// Wide Image
if($size[0] > $size[1])
{
 $thumbnail_width = 100;
 $thumbnail_height = (int)(100 * $size[1] / $size[0]);
}

// Tall Image
else
{
  $thumbnail_width = (int)(100 * $size[0] / $size[1]);
  $thumbnail_height = 100;
}
Here we calculate the size for the thumbnail using the aspect ratio of the dimensions of the original image. I have preset the thumbnail size to 100 pixels wide or tall, depending on the size of the original image.
The formulae used to calculate the aspect ratios are as follows.
For Wide Images:
$thumbnail_width = <Preset Width>
$thumbnail_height = <Preset Width> * <height_dimension_of_original_image> /
                   <width_dimension_of_original_image>
For Tall images:
$thumbnail_width = <Preset Height> * <width_dimension_of_original_image> /
                         <height_dimension_of_original_image>
$thumbnail_height = <Preset Height>
Using ImageMagick
ImageMagick is a collection of tools that allow us to create and manipulate images using command line arguments. ImageMagick supports a range of image formats, including JPEG, GIF, BMP, PNG, TIFF, etc. Binaries for all popular operating systems are available and can be downloaded from www.ImageMagick.org.
Before using ImageMagick, you need to know its absolute location path on your server:
$imagemagickPath = "/usr/local/bin";
To create thumbnails, we use the convert utility of ImageMagick with which we resize the original image, thereby instructing it to modify its geometry. The following code uses command line arguments to send values to ImageMagick:
exec("$imagemagickPath/convert -geometry " .
  "{$thumbnail_width}x{$thumbnail_height} " .
  "$images_dir/$filename $images_dir/tb_$filename");
The convert utility requires arguments in the following format:
convert –geometry <width>x<height> <source_path> <destination_path>
Here, <source_path> is the path to the original uploaded file and <desitnation_path> is the path where the thumbnail is to be created. The naming convention used for thumbnails is “tb_filename.extension“.
Alternatively, you can also use Perl, in combination with PerlMagick, to communicate with ImageMagick.
Using the GD Library
The Graphics Development Library or GD Library also provides us with the ability to create and modify images. It supports JPEG, BMP and PNG in its standard form; though some versions of GD also support GIF and TIFF. The latest versions of the GD Library can be downloaded from www.Boutell.com/gd.
PHP provides us with GD-specific functions for creating and modifying particular types of the images. Therefore, before creating thumbnails for the uploaded images we need to find out exactly which functions are to be used.
To produce these thumbnails, we need to:


- Create an image handle to read the uploaded image
- Create another image handle that will be used to create the Thumbnail
- Resize the original image via its handle
- Save the resized image with the Thumbnail handle
The functions required in Steps 1 and 4 are image type-dependent and their naming convention is such that they can easily be recognized, e.g. ImageJPEG, ImageGIF. The suffix in each function name corresponds to the type of image the function can handle. The following array lists the suffix we’ll use to call these specific functions:
$gd_function_suffix = array(
  'image/pjpeg' => 'JPEG',
  'image/jpeg' => 'JPEG',
  'image/gif' => 'GIF',
  'image/bmp' => 'WBMP',
  'image/x-png' => 'PNG'
);
In order to call ImageJPEG, we’ll create its name dynamically before calling it:
// Get the Name Suffix on basis of the mime type
$function_suffix = $gd_function_suffix[$filetype];

// Build Function name for ImageCreateFromSUFFIX
$function_to_read = 'ImageCreateFrom' . $function_suffix;

// Build Function name for ImageSUFFIX
$function_to_write = 'Image' . $function_suffix;
The above code will assign the variable the following values in the case of a JPEG file being uploaded:
$function_to_read => ImageCreateFromJPEG$function_to_write => ImageJPEG
Version 1.x.x
Version 1.x.x has its limitations; it can only create new images in, at most, 256 colors. Therefore, while putting together the code snippets given above, we will use GD 1.x.x-specific resizing functions. The functions are:
ImageCreateImageCopyResized
Resizing with GD 1.x.x
$function_suffix = $gd_function_suffix[$filetype];
$function_to_read = 'ImageCreateFrom' . $function_suffix;
$function_to_write = 'Image' . $function_suffix;

// Read the source file
$source_handle = $function_to_read($images_dir . '/' . $filename );

if ($source_handle) {
  // Let's create a blank image for the thumbnail
  $destination_handle = ImageCreate($thumbnail_width, $thumbnail_height);

  // Now we resize it
  ImageCopyResized($destination_handle, $source_handle,
    0, 0, 0, 0, $thumbnail_width, $thumbnail_height,
    $size[0], $size[1]);
}

// Let's save the thumbnail

$function_to_write($destination_handle, $images_dir . '/tb_' . $filename);
ImageDestroy($destination_handle);
The most interesting aspect to note in the above code is how the image is resized using ImageCopyResized function. This function requires 10 arguments; let me list them one by one:
$destination_handleholds the information regarding the blank image we created equivalent to the size of the thumbnail.$source_handleholds information relating to the source file, which was the originally uploaded image.- Arguments 3 to 6 hold the starting coordinates from which the image should be resized. Because we require a thumbnail, and a thumbnail is just a smaller version of a full-sized image, we use 0,0 as our starting coordinates.
- Arguments 7 and 8 hold the destination image dimensions, i.e. the dimensions of the thumbnail in our case.
- Arguments 9 and 10 hold the source image dimensions, which in our case are the dimensions of the original image.
Version 2.x.x
Version 2.x.x isn’t restricted to using 256 colors, but the procedure employed is not very different from the one described for version 1.x.x code. Only here, we have to use GD 2.x.x specific resizing functions instead. These functions are:
ImageCreateTrueColorImageCopyResampled
Resizing with GD 2.x.x
$function_suffix = $gd_function_suffix[$filetype];
$function_to_read = 'ImageCreateFrom' . $function_suffix;
$function_to_write = 'Image' . $function_suffix;

// Read the source file
$source_handle = $function_to_read($images_dir . '/' . $filename);

if ($source_handle) {
  // Let's create a blank image for the thumbnail
  $destination_handle =
    ImageCreateTrueColor($thumbnail_width, $thumbnail_height);

  // Now we resize it
  ImageCopyResampled($destination_handle, $source_handle,
    0, 0, 0, 0, $thumbnail_width, $thumbnail_height, $size[0], $size[1]);
}

// Let's save the thumbnail
$function_to_write($destination_handle, $images_dir . '/tb_' . $filename);
Everything remains the same as with the version 1.x.x code, except for the two different functions used:
- in place of
ImageCreate, we usedImageCreateTrueColor. - in place of
ImageCopyResized, we usedImageCopyResampled.
You can read more about GD functions in the PHP manual at www.php.net/gd.
Now, putting it all together will yield you upload.php. The file is part of the archive you can download here.
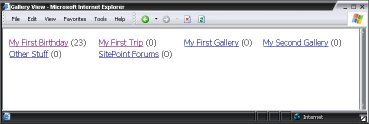
Viewing Category Listings With Their Images
Now that we have successfully uploaded our images and have created their automatic thumbnails, we come to the part where we showoff a little. We require a system to display our categories and the image listings present in those categories. First, let’s name our new script, viewgallery.php. Using this script we’ll be able to display the 3 types of screens:
- Category Listings
- Thumbnail Listings for a category
- The full-size Image
Therefore we need to divide this script into 3 parts:
- When there is no input, we display the category listing
- When we have the category id as a single input, we display the thumbnails for that category
- When we have both the image id and the category id as inputs, we display the full-size image
Screen 1: Category Listing
To display the category list, we need to build a system that automatically creates html rows for any N number of categories.
The following code performs very simple tasks. We simply list all current categories in our database, along with the number of images they hold. Using this code, we can control the number of category links that appear in a given row. The value stored in $number_of_categories_in_row allows us to achieve this.
The procedure is:
- Fetch the list of all categories, and the number of images each holds
- The number of links in row controlled by value is assigned to
$number_of_categories_in_row - Create display via tables
if(empty($cid) && empty($pid)) {
$number_of_categories_in_row = 4;
$result = mysql_query("
SELECT
c.category_id,
c.category_name,
COUNT(photo_id)
FROM
gallery_category AS c LEFT JOIN
gallery_photos AS p ON
p.photo_category = c.category_id
GROUP BY c.category_id
");
while ($row = mysql_fetch_array($result)) {
$result_array[] =
'<a href="viewgallery.php?cid=' . $row[0] . '">' .
$row[1] . '</a> (' . $row[2] . ')';
}
mysql_free_result($result);
$result_final = '<tr>n';
foreach ($result_array as $category_link) {
if ($counter == $number_of_categories_in_row) {
$counter = 1;
$result_final .= "n</tr>n<tr>n";
} else $counter++;
$result_final .= "t<td>" . $category_link . "</td>n";
}
if ($counter) {
if ($number_of_categories_in_row - $counter)
$result_final .= "t<td colspan='" .
($number_of_categories_in_row - $counter) . "'> </td>n";
$result_final .= "</tr>";
}
}
Our output will look something like this:
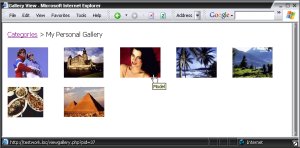
Screen 2: Thumbnail Listing for Category
The value for the category id via the input variable cid is required for this screen to appear, e.g. viewgallery.php?cid=1
In this screen, we have to list the thumbnails of a given category, for which we received the category id via the input. The code for this screen is very similar to the category listing code, but the output structure is considerably different. The code fetches the filenames of all the images in a given category and then, using the naming convention tb_filename, we list all the thumbnails with their appropriate links. In addition to that, the variable $number_of_thumbs_in_row is used to set the number of thumbnail links that will be listed in a given row.
else if ($cid && empty($pid)) {
$number_of_thumbs_in_row = 5;
$result = mysql_query("
SELECT
photo_id,
photo_caption,
photo_filename
FROM gallery_photos
WHERE photo_category = '" . addslashes($cid) . "'
");
$nr = mysql_num_rows($result);
if (empty($nr))
$result_final = "t<tr><td>No Category found</td></tr>n";
else {
while ($row = mysql_fetch_array($result)) {
$result_array[] =
"<a href='viewgallery.php?cid=$cid&pid=" . $row[0] .
"'><img src='" . $images_dir . "/tb_" . $row[2] .
"' border='0' alt='" . $row[1] . "' /></a>";
}
mysql_free_result($result);
$result_final = "<tr>n";
foreach ($result_array as $thumbnail_link) {
if ($counter == $number_of_thumbs_in_row) {
$counter = 1;
$result_final .= "n</tr>n<tr>n";
} else $counter++;
$result_final .= "t<td>" . $thumbnail_link . "</td>n";
}
if ($counter) {
if ($number_of_photos_in_row - $counter)
$result_final .= "t<td colspan='" .
($number_of_photos_in_row - $counter) .
"'> </td>n";
}
$result_final .= "</tr>";
}
}
Our output will look something like this:
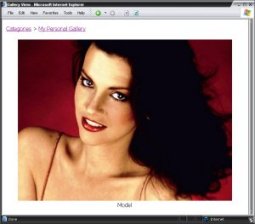
Screen 3: The Full-Size Image
The values for the category id via the input variable cid, and the photo id via the input variable pid, are required for this screen to appear (i.e. viewgallery.php?cid=1&pid=2).
In this final step, we need to display at full size the image uploaded. The following code is pretty basic; it looks up the filename in the gallery_photo table on the basis of the image id provided, and then displays it along with its caption.
else if ($pid) {
$result = mysql_query("
SELECT
photo_caption,
photo_filename
FROM gallery_photos
WHERE photo_id = '" . addslashes($pid) . "'
");
list($photo_caption, $photo_filename) = mysql_fetch_array($result);
$nr = mysql_num_rows($result);
mysql_free_result($result);
if (empty($nr)) {
$result_final = "t<tr><td>No Photo found</td></tr>n";
} else {
$result = mysql_query("
SELECT category_name
FROM gallery_category
WHERE category_id = '" . addslashes($cid) . "'
");
list($category_name) = mysql_fetch_array($result);
mysql_free_result($result);
$result_final .= "<tr>nt<td>
<a href='viewgallery.php'>Categories</a> >
<a href='viewgallery.php?cid=$cid'>$category_name</a></td>n</tr>n";
$result_final .= "<tr>nt<td align='center'>
<br />
<img src='$images_dir/$photo_filename' border='0'
alt='$photo_caption' />
<br />
$photo_caption
</td></tr>";
}
}
Our output will look something like this:
After putting it all together, you should print the value in $result_final using appropriate html tags, and save the file as viewgallery.php. Again, this file is part of the archive you can download here.
Create Direct Links to Categories and Images
To create direct links from other pages of our site to the categories, we just need to know the Category Id. For example, to link to Category Id = 1 you can use the following URL:
http://www.yoursite.com/gallery/viewgallery.php?cid=1
To link up an image, you need to know its Photo Id and as well as its Category Id:
http://www.yoursite.com/gallery/viewgallery.php?cid=1&pid=1
The above link will open the Photo Id = 1 if that exists in the Category Id 1.
Creating Sub-Categories
Some of us may like to have sub-categories within our categories, which would provide much more depth to our gallery system. To allow for subcategories, we’d add another field to our category table, to hold the ID of the parent category. This ID would then have to be employed in devising the category listing code, to produce a sub-category list.
A separate section would be required to be to handle the display of any sub-categories within a parent category.
Further Functionality
The above solutions create the basic capabilities of a gallery system, though in the future you may want to be able to edit and/or delete the photos from the database. You might also want the ability to add, edit, and delete the gallery’s categories, all from a browser-based interface.
Well, that might sound like a lot of work, but actually, it isn’t — the only catch here lies in building this script in a way that blocks unauthorised users from messing around with your gallery. A simple authentication form should be enough to achieve that.
Here are a few functions you could use:
Editing Photo Details and Moving a Photo to a New Category
function edit_photo( $photo_id, $new_caption, $new_category )
{
  mysql_query( "UPDATE gallery_photo SET photo_caption='".addslashes( $new_caption )."', photo_category='".addslashes( $new_category )."' WHERE photo_id='".addslashes( $photo_id )."'"  );
}
Call: edit_photo( PHOTO_ID, "New Caption", NEW_CATEGORY_ID );
Deleting a Photo
function delete_photo($photo_id)
{
  $result = mysql_query("
    SELECT photo_filename
    FROM gallery_photo
    WHERE photo_id = '" . addslashes($photo_id) . "'
  ");
  list($filename) = mysql_fetch_array($result);
  mysql_free_result($result);

  unlink($images_dir . '/' . $filename);

  mysql_query("
    DELETE FROM gallery_photo
    WHERE photo_id='" . addslashes($photo_id) . "'
  ");
}
Call: delete_photo(PHOTO_ID);
Adding a Category
function add_category( $category_name )
{
  mysql_query( "INSERT INTO gallery_category(`category_name`) VALUES('".addslashes( $category_name )."' )" );
}
Call: add_category( "Category Name" );
Editing Category Details
function edit_category( $category_id, $new_name )
{
  mysql_query( "UPDATE gallery_category SET category_name='".addslashes( $new_name )."' WHERE category_id='".addslashes( $category_id )."'" );
}
Call: edit_category( CATEGORY_ID, "New Name" );
Deleting A Category
function delete_category( $category_id )
{
  global $images_dir;
  $result = mysql_query( "SELECT photo_filename FROM gallery_photo WHERE photo_category='".addslashes( $category_id )."'" );
  while( $row = @mysql_fetch_array( $result ))
  {
    unlink($images_dir."/".$row[0]);
  }
  mysql_query( "DELETE FROM gallery_photo WHERE photo_category='".addslashes( $category_id )."'" );
  mysql_query( "DELETE FROM gallery_category WHERE category_id='".addslashes( $category_id )."'" );
}
Call: delete_category( CATEGORY_ID );
Incorporating Your Site’s Design
After you have completed and tested your gallery system, you’re bound to think “Something is missing! When I upload the gallery on my Web server, it doesn’t fit into my current design!” No problem! I have a little tweak for you.
In all the scripts we’ve made (excluding config.inc.php), we had included the database connection file before we started any coding. Therefore, to include our design structure, we need to add our own design file too. Therefore, you need to add the following piece of code just after including your database connection file:
include 'design.inc.php';
Your design.inc.php could look like this:
$design_header = <<<__HTML_END

<!-- Add your site's header here -->

__HTML_END;

$design_footer = <<<__HTML_END

<!-- Add your site's footer here -->

__HTML_END;
You can easily add your HTML design in the above code by breaking it down into header and footer blocks. Then, locate the <html> tag in all the 3 scripts (refer to the files included in the downloadable archive) and add the variables $design_header and $design_footer in appropriate locations.
That’s All Folks!
Now that you have a decent gallery for your personal use, you can actually shape it into a gallery that can accept public submissions from your site’s visitors. The above code may look like a lot of work at first, but it will actually eradicate much future manual work, especially if you frequently add images to your Website.
As an ending note, I would like to say that over the years I have developed similar yet pretty complex gallery solutions, and I have seen an unlimited number of features that can be integrated into such a versatile application.
While in this article I’ve only described the bare necessities of a decent gallery system, there really is no limit to what can be developed. For example, in the future you might want to add a watermark to your images, or maybe automatically resize large images to a preset size, or even build ecards out of your gallery images; the possibilities are endless, what really matters is what you need…
Note: For version older than 4.1.0, equivalent of _GET, _POST, _FILES are arrays HTTP_GET_VARS, HTTP_POST_VARS, HTTP_POST_FILES.
[출처] https://www.sitepoint.com/php-gallery-system-minutes/
광고 클릭에서 발생하는 수익금은 모두 웹사이트 서버의 유지 및 관리, 그리고 기술 콘텐츠 향상을 위해 쓰여집니다.