AngularJS is commonly used for creating a single page application. So, it becomes challenging for users to interact their application with the database and perform CRUD operation in it.
In this tutorial, we are going to create an AngularJS CRUD Example and will also explain each CRUD operation in detail.
For storing of data, we are going to use MySQLi database.
We will learn:
- Read data from the database.
- Insert data into the database.
- Update existing data in the database.
- Delete data from the database.
In order to understand easily and effectively, we are going to create an application which will perform all the above-mentioned operation.
We will also explain each process while the process of creating the application.
Speciality of the Application:
- Users can Add new entries of employees in the database.
- Users can Read, Update and Delete the existing employee details.
- Application will also contains a search bar to search the list of employee according to the query given.
Watch AngularJS CRUD Application Demo or download code from the link given below.
Application Development Process:
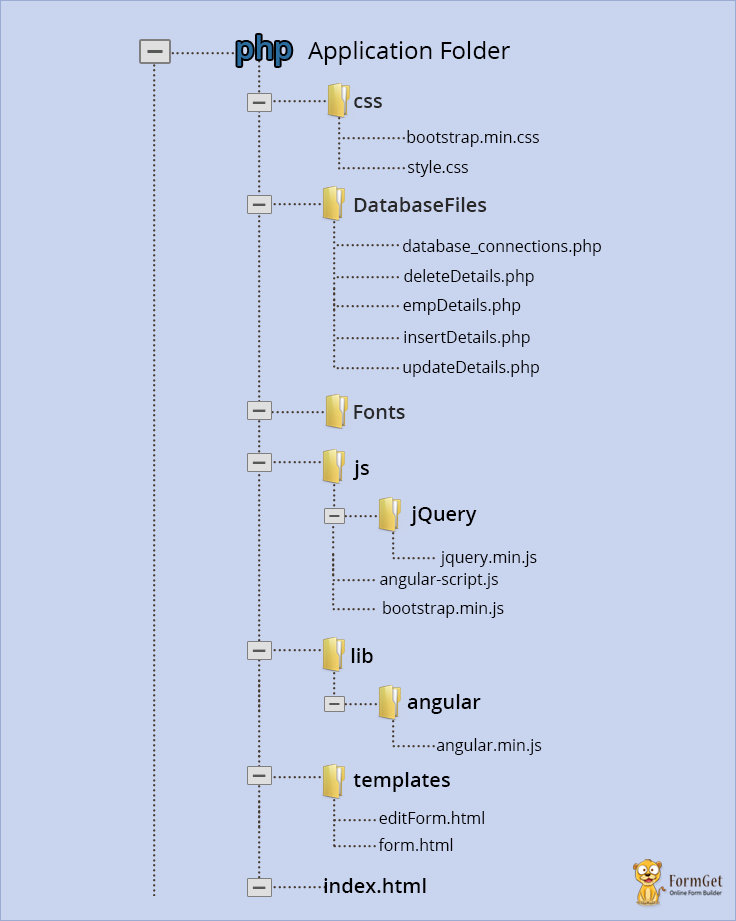
Step 1: Create file structure of the application.
Follow the image given below and create your application structure in the same way as given in the image.
Otherwise, you may face some problem regarding the working of the application.

Step 2: Setting up the database.
Create a database name “employee“.
Now, inside employee database, create a table name “emp_details” with different fields using the query given below:
CREATE TABLE emp_details (
emp_id int(255) NOT NULL AUTO_INCREMENT,
emp_name varchar(255) NOT NULL,
emp_email varchar(255) NOT NULL,
emp_gender varchar(255) NOT NULL,
emp_address varchar(255) NOT NULL,
PRIMARY KEY (emp_id)
);
OR
Download the database .sql file from this link and import it directly into your database. It will automatically create a table “emp_details” with different columns/fields to store employee details in it.
Step 3: Connecting to MySQLi database.
In database_connections.php, write MySQLi query to connect to the database.
<?php
// Connecting to database as mysqli_connect("hostname", "username", "password", "database name");
$con = mysqli_connect("localhost", "root", "", "employee");
?>
Note: We will include this connection file in each CRUD opearation performing file.
Step 4: Create index.html file for the application.
index.html
This file contains the layout of the application. It includes two seperate form template to insert and update employee details.
Some AngularJS built-in directives have also used in it such as ng-repeat, ng-show, ng-hide, ng-click etc. These directives add some special behaviour into the application to make it more interactive.
Note: – To know about the functionality of different built-in directives, read our blog AngularJS Directives.
Also, for search bar and other filtering functionality, read blog AngularJS Filters.
<html ng-app="crudApp">
<head>
<title>AngularJS Directive Demo</title>
<meta name="viewport" content="width=device-width, initial-scale=1">
<!-- Include Bootstrap CSS -->
<link rel="stylesheet" type="text/css" href="css/bootstrap.min.css">
<!-- Include main CSS -->
<link rel="stylesheet" type="text/css" href="css/style.css">
<!-- Include jQuery library -->
<script src="js/jQuery/jquery.min.js"></script>
<!-- Include AngularJS library -->
<script src="lib/angular/angular.min.js"></script>
<!-- Include Bootstrap Javascript -->
<script src="js/bootstrap.min.js"></script>
</head>
<body>
<div class="container wrapper" ng-controller="DbController">
<h1 class="text-center">AngularJS CRUD Operations Demo</h1>
<nav class="navbar navbar-default">
<div class="navbar-header">
<div class="alert alert-default navbar-brand search-box">
<button class="btn btn-primary" ng-show="show_form" ng-click="formToggle()">Add Employee <span class="glyphicon glyphicon-plus" aria-hidden="true"></span></button>
</div>
<div class="alert alert-default input-group search-box">
<span class="input-group-btn">
<input type="text" class="form-control" placeholder="Search Employee Details Into Database..." ng-model="search_query">
</span>
</div>
</div>
</nav>
<div class="col-md-6 col-md-offset-3">

<!-- Include form template which is used to insert data into database -->
<div ng-include src="'templates/form.html'"></div>

<!-- Include form template which is used to edit and update data into database -->
<div ng-include src="'templates/editForm.html'"></div>
</div>
<div class="clearfix"></div>

<!-- Table to show employee detalis -->
<div class="table-responsive">
<table class="table table-hover">
<tr>
<th>Emp ID</th>
<th>Employee Name</th>
<th>Email Address</th>
<th>Gender</th>
<th>Address</th>
<th></th>
<th></th>
</tr>
<tr ng-repeat="detail in details| filter:search_query">
<td>
<span>{{detail.emp_id}}</span></td>
<td>{{detail.emp_name}}</td>
<td>{{detail.emp_email}}</td>
<td>{{detail.emp_gender}}</td>
<td>{{detail.emp_address}}</td>
<td>
<button class="btn btn-warning" ng-click="editInfo(detail)" title="Edit"><span class="glyphicon glyphicon-edit"></span></button>
</td>
<td>
<button class="btn btn-danger" ng-click="deleteInfo(detail)" title="Delete"><span class="glyphicon glyphicon-trash"></span></button>
</td>
</tr>
</table>
</div>
</div>
</div>
<!-- Include controller -->
<script src="js/angular-script.js"></script>
</body>
</html>
Now, we have all the basic settings for the application.
So, let’s focus on the CRUD operation and start from reading the database.
1. Read From Database : Get Employee Detail
The downloaded database .sql files that you have imported in the employee database contains some dummy data. So, now we are going to retrieve and read these data from the database and display it in the application’s main page.
For this, create a module name crudApp and a controller name DbController in the angular-script.js.
Also, inside controller create a function getInfo() which send request to empDetails.php.
angular-script.js
// Application module
var crudApp = angular.module('crudApp',[]);
crudApp.controller("DbController",['$scope','$http', function($scope,$http){

// Function to get employee details from the database
getInfo();
function getInfo(){
// Sending request to EmpDetails.php files
$http.post('databaseFiles/empDetails.php').success(function(data){
// Stored the returned data into scope
$scope.details = data;
});
}
Here, getInfo() function sends request to empDetails.php page via $http.post method.
Note:- $http is one of the most important service of AngularJS which is used to transfer data. For more info, read our blog AngularJS – http.
Now, empDetails.php contains select query and retrives all the employee details stored in the employee database. These details are returned in the JSON format.
empDetails.php
<?php
// Including database connections
require_once 'database_connections.php';
// mysqli query to fetch all data from database
$query = "SELECT * from emp_details ORDER BY emp_id ASC";
$result = mysqli_query($con, $query);
$arr = array();
if(mysqli_num_rows($result) != 0) {
while($row = mysqli_fetch_assoc($result)) {
$arr[] = $row;
}
}
// Return json array containing data from the databasecon
echo $json_info = json_encode($arr);
?>
The returned json data has stored in $scope.details.
Now, the details property has all the employees details which can be displayed in the application index.html page using ng-repeat directive.
<html ng-app="crudApp">
...
<body>
<div class="container wrapper" ng-controller="DbController">
...
<!-- Table to show employee detalis -->
<div class="table-responsive">
<table class="table table-hover">
<tr>
<th>Emp ID</th>
<th>Employee Name</th>
<th>Email Address</th>
<th>Gender</th>
<th>Address</th>
<th></th>
<th></th>
</tr>
<tr ng-repeat="detail in details| filter:search_query">
<td>
<span>{{detail.emp_id}}</span></td>
<td>{{detail.emp_name}}</td>
<td>{{detail.emp_email}}</td>
<td>{{detail.emp_gender}}</td>
<td>{{detail.emp_address}}</td>
<td>
<button class="btn btn-warning" ng-click="editInfo(detail)" title="Edit"><span class="glyphicon glyphicon-edit"></span></button>
</td>
<td>
<button class="btn btn-danger" ng-click="deleteInfo(detail)" title="Delete"><span class="glyphicon glyphicon-trash"></span></button>
</td>
</tr>
</table>
</div>
...
</body>
</html>
Process output
Here, the employee details table contains two buttons – one for edit and another for delete. We will read about the functionality of these buttons further in this tutorial.
That’s ends with the reading part. Next part is about inserting employee information into the database.
2. Insert Into Database : Employee Detail
To insert employee details, we need a form with different input fields.
So, let’s create a form.html page which contain a form to insert employee details.
form.html
<!-- Form used to add new entries of employee in database -->
<form class="form-horizontal alert alert-warning" name="empList" id="empForm" ng-submit="insertInfo(empInfo);" hidden>
<h3 class="text-center">Insert Employee Details Into Database</h3>
<div class="form-group">
<label for="Name">Employee Name:</label>
<input type="text" name="emp_name" class="form-control" placeholder="Enter Employee Name" ng-model="empInfo.name" autofocus required />
</div>
<div class="form-group">
<p class="text-danger" ng-show="empList.emp_name.$invalid && empList.emp_name.$dirty">Name field is Empty!</p>
</div>
<div class="form-group">
<label for="Email">Email Address:</label>
<input type="email" name="emp_email" class="form-control" placeholder="Enter Employee Email Address" ng-model="empInfo.email" autofocus required />
</div>
<div class="form-group">
<p class="text-danger" ng-show="empList.emp_email.$invalid && empList.emp_email.$dirty">Invalid Email!</p>
</div>
<div class="form-group">
<label for="Gender">Gender:</label>
<label for="" class="radio-inline gender">
<input type="radio" name="emp_gender" value="male" ng-model="empInfo.gender">Male
</label>
<label for="" class="radio-inline gender">
<input type="radio" name="emp_gender" value="female" ng-model="empInfo.gender">Female
</label>
</div>
<div class="form-group">
<label for="Address">Address:</label>
<input type="text" name="emp_address" class="form-control" placeholder="Enter Employee Address" ng-model="empInfo.address" autofocus required />
</div>
<div class="form-group">
<p class="text-danger" ng-show="empList.emp_address.$invalid && empList.emp_address.$dirty">Address field is Empty!</p>
</div>
<div class="form-group">
<button class="btn btn-warning" ng-disabled="empList.$invalid">Add Into Database</button>
</div>
</form>
Every input field has ng-model directive associated with them which will bind and store users input values in the empInfo. When the user will click on the submit button ( Here, Add Into Database button), empInfo will be passed, as an argument, to the insertInfo() function.
angular-script.js
$scope.insertInfo = function(info){
$http.post('databaseFiles/insertDetails.php',{"name":info.name,"email":info.email,"address":info.address,"gender":info.gender}).success(function(data){
if (data == true) {
getInfo();
// Hide details insertion form
$('#empForm').css('display', 'none');
}
});
}
insertInfo() function communicates with insertDetails.php file and send the submitted data to it.
insertDetails.php
<?php
// Including database connections
require_once 'database_connections.php';
// Fetching and decoding the inserted data
$data = json_decode(file_get_contents("php://input"));
// Escaping special characters from submitting data & storing in new variables.
$name = mysqli_real_escape_string($con, $data->name);
$email = mysqli_real_escape_string($con, $data->email);
$gender = mysqli_real_escape_string($con, $data->gender);
$address = mysqli_real_escape_string($con, $data->address);

// mysqli insert query
$query = "INSERT into emp_details (emp_name,emp_email,emp_gender,emp_address) VALUES ('$name','$email','$gender','$address')";
// Inserting data into database
mysqli_query($con, $query);
echo true;
?>
In insertDetails.php, the sent values are first decoded into JSON format. Then, they are filtered and stored into different variable.
These variables are then used to store data into the database. When the data has submitted successfully, it returns true in response to insertInfo() function.
At the same time getInfo() function get called by the insertInfo() function which displays the newly inserted details in the employee detail table.
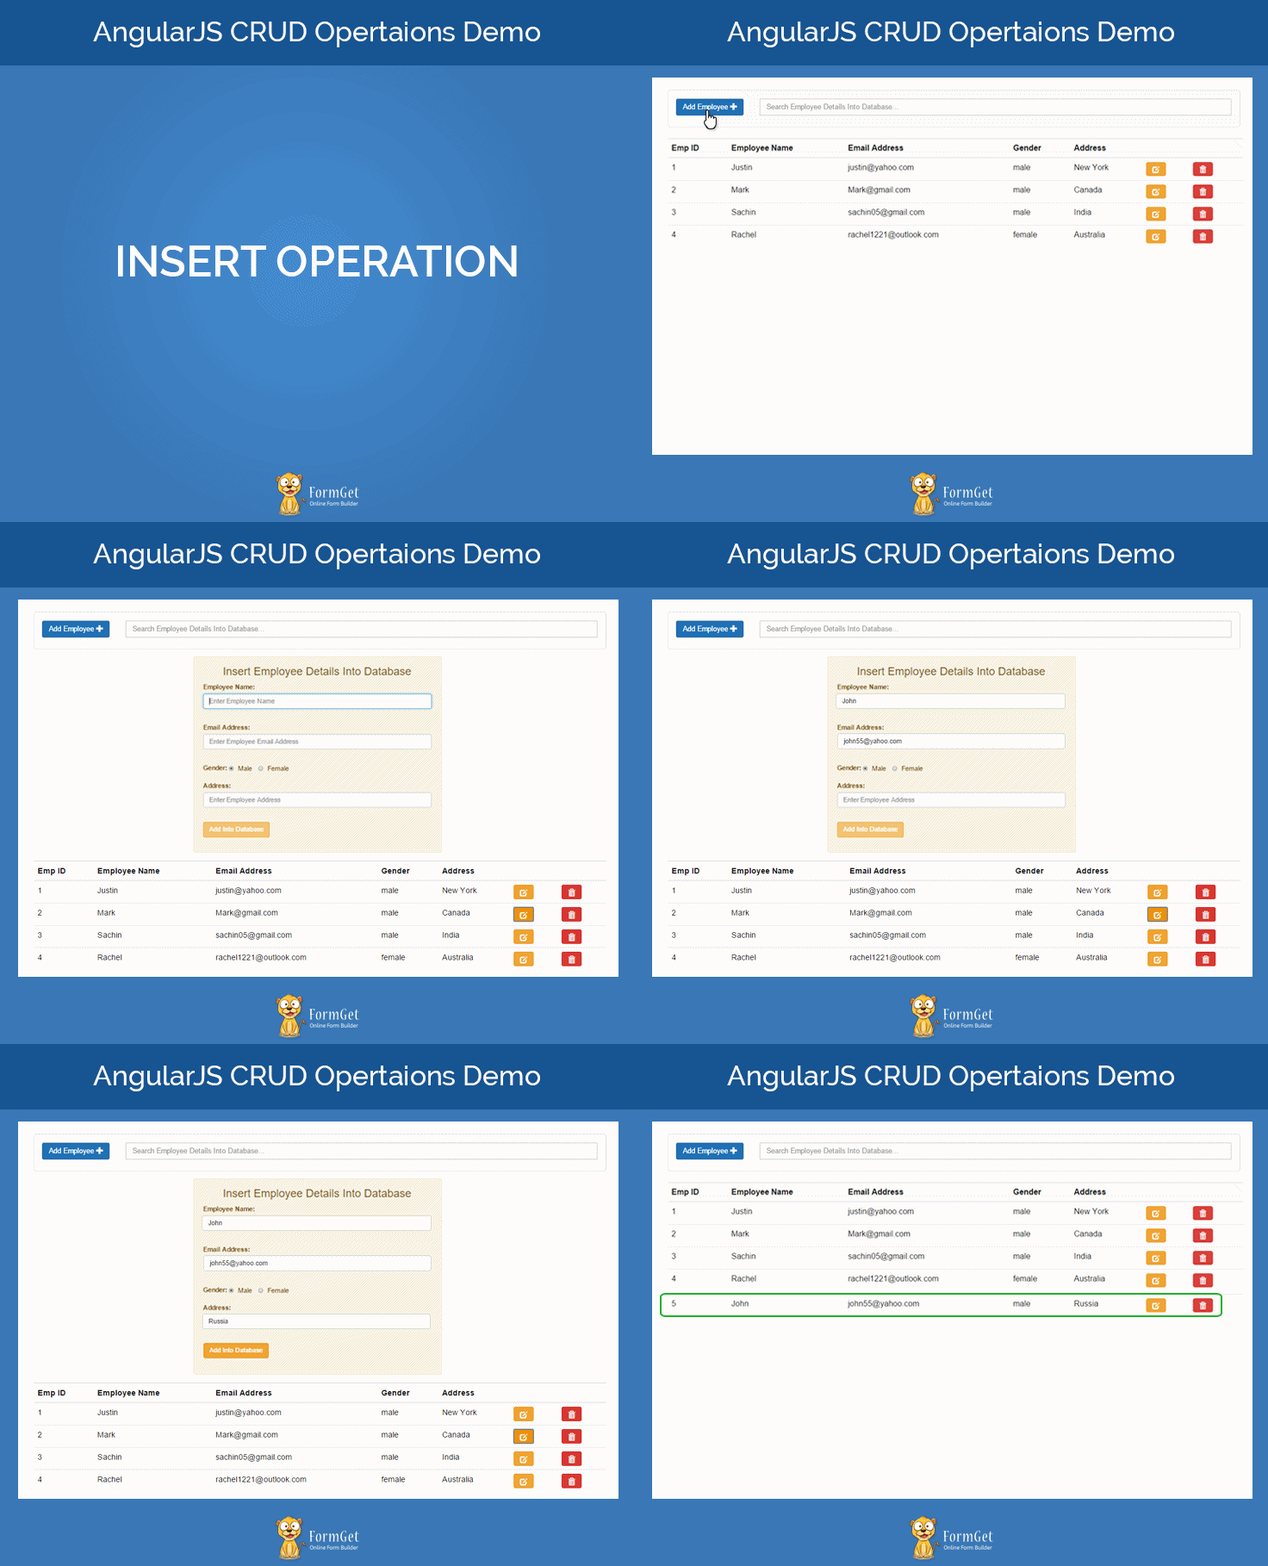
Process output
Now, let’s understand the update process.
3. Update Database: Existing Employee Details
If you remember, we have added an edit button in the index.html page while displaying the employee details in the table. Now, it time to understand its functionality.
This edit button contains ng-click directive which on click calls editInfo(detail) function and pass the details of the clicked row’s data as an argument.
The passed argument then stored into a new scope property, $scope.currentUser, and this propert is used by the editForm.php to display the current employee details in the edit form.
angular-script.js
$scope.currentUser = {};
$scope.editInfo = function(info){
$scope.currentUser = info;
$('#empForm').slideUp();
$('#editForm').slideToggle();
}
Now, we are going to create an edit form which will use the above mentioned scope’s property for the updation process.
editForm.html
<!-- Form used for updation of data into database -->
<form class="form-horizontal alert alert-warning" id="editForm" ng-submit="UpdateInfo(currentUser)" hidden>
<h3 class="text-center">Update Employee Details</h3>
<div class="form-group">
<label for="Name">Employee Name:</label>
<input type="text" class="form-control" ng-model="currentUser.emp_name" value="{{currentUser.name}}">
</div>
<div class="form-group">
<label for="Email">Email Address:</label>
<input type="email" class="form-control" ng-model="currentUser.emp_email" value="{{currentUser.emp_email}}">
</div>
<div class="form-group">
<label for="Gender">Gender:</label>
<label for="" class="radio-inline gender">
<input type="radio" ng-model="currentUser.emp_gender" value="male" >Male
</label>
<label for="" class="radio-inline gender">
<input type="radio" name="gender" ng-model="currentUser.emp_gender" value="female">Female
</label>
</div>
<div class="form-group">
<label for="Address">Address:</label>
<input type="text" class="form-control" ng-model="currentUser.emp_address" value="{{currentUser.emp_address}}">
</div>
<div class="form-group">
<button class="btn btn-warning" ng-disabled="empList.$invalid" ng-click="updateMsg(currentUser.emp_id)">Update</button>
</div>
</form>
Now, when a user will change the current values of input field and click on submit button, here update button, another function UpdateInfo() get called containing currentUser as an argument( which contains the updated values of the input fields ).
angular-script.js
$scope.UpdateInfo = function(info){
$http.post('databaseFiles/updateDetails.php',{"id":info.emp_id,"name":info.emp_name,"email":info.emp_email,"address":info.emp_address,"gender":info.emp_gender}).success(function(data){
$scope.show_form = true;
if (data == true) {
getInfo();
}
});
}
Now, updateInfo() function communicates with the updateDetails.php and send all the updated data, also contain the id of employee, through $http.post method.
updateDetails.php
<?php
// Including database connections
require_once 'database_connections.php';
// Fetching the updated data & storin in new variables
$data = json_decode(file_get_contents("php://input"));
// Escaping special characters from updated data
$id = mysqli_real_escape_string($con, $data->id);
$name = mysqli_real_escape_string($con, $data->name);
$email = mysqli_real_escape_string($con, $data->email);
$gender = mysqli_real_escape_string($con, $data->gender);
$address = mysqli_real_escape_string($con, $data->address);
// mysqli query to insert the updated data
$query = "UPDATE emp_details SET emp_name='$name',emp_email='$email',emp_gender='$gender',emp_address='$address' WHERE emp_id=$id";
mysqli_query($con, $query);
echo true;
?>
In updateDetails.php, the sent data get decoded and that particular row get updated with the new values. After succuessfully updation, it return true status as a reply.
When the UpdateInfo() method receives the true value, it calls getInfo() to show details of the updated table.
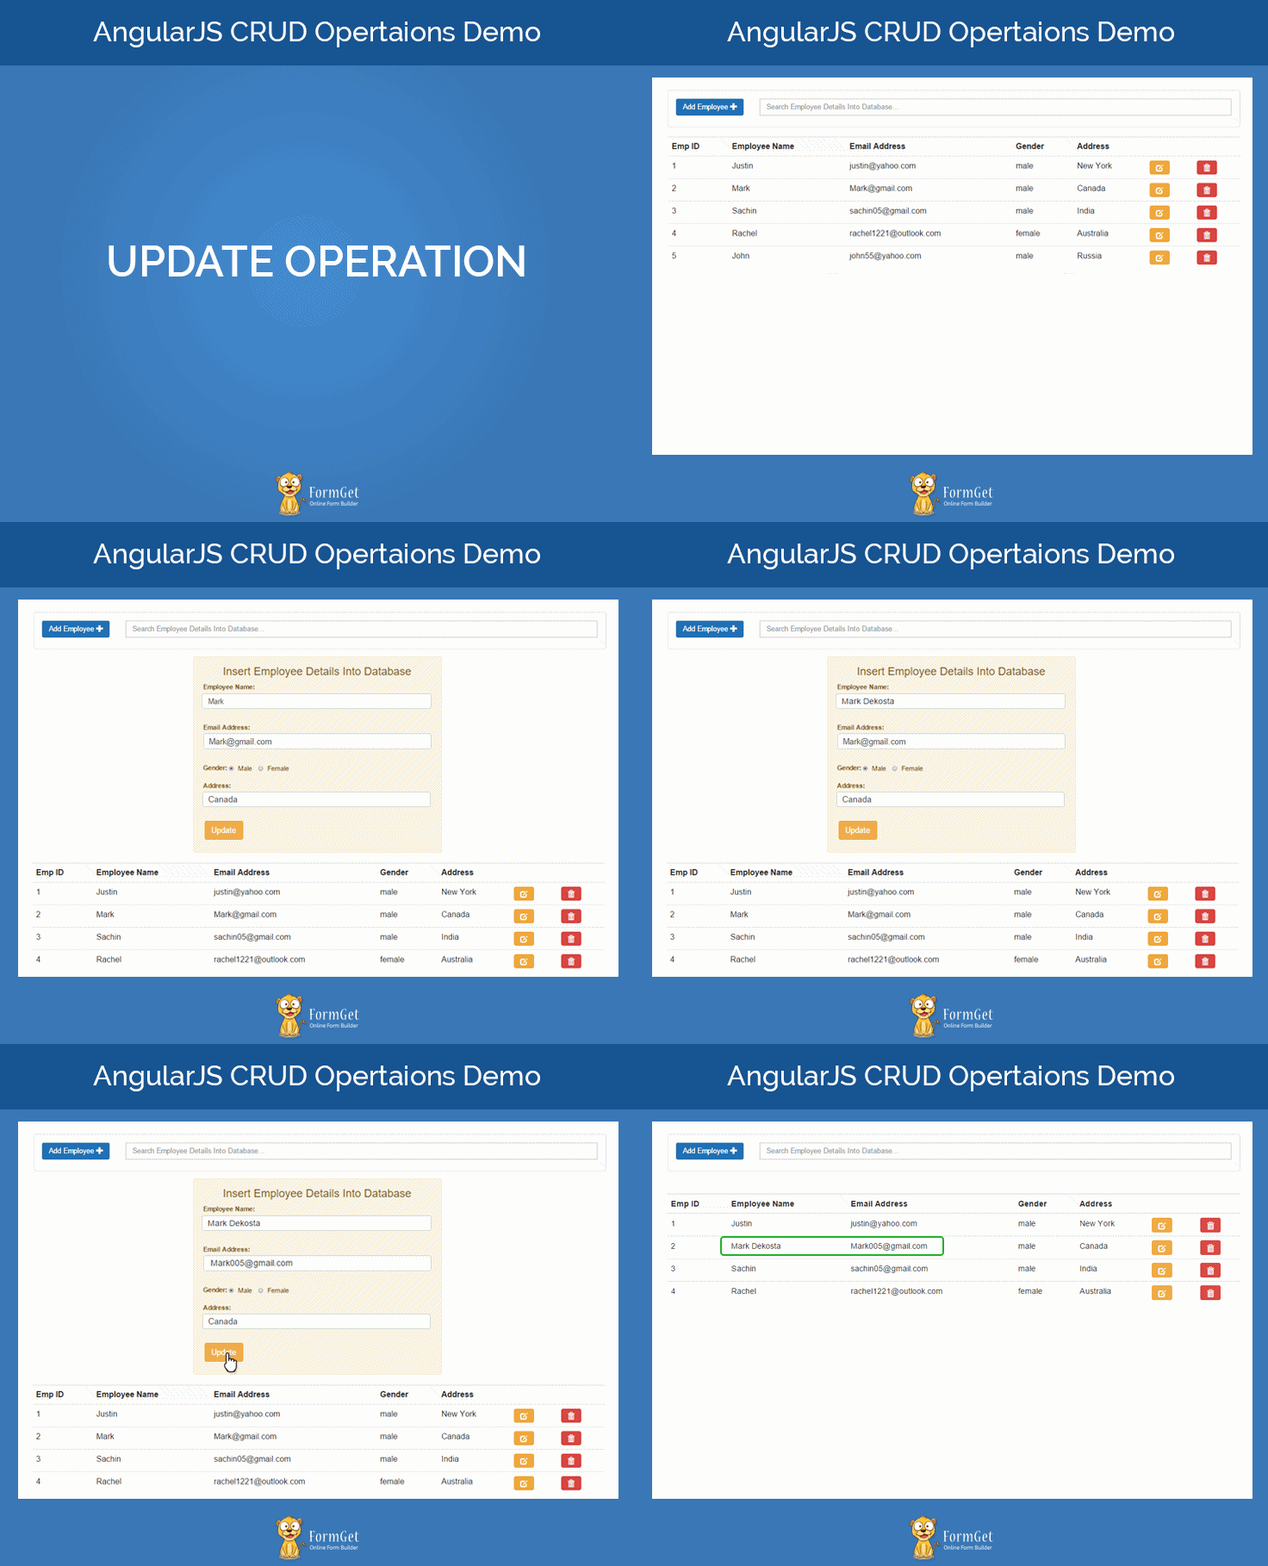
Process output
Update process ends here. Now, it’s time to have a look at the delete process.
4. Delete From Database: Existing Employee Details
Now, it time to understand the functionality of the delete button that we have added in the index.html page while displaying the employee details in the table.
Delete button contains ng-click directive as an attribute which on click calls deleteInfo(detail) function and pass the details of the clicked row’s data as an argument to it.
angular-script.js
$scope.deleteInfo = function(info){
$http.post('databaseFiles/deleteDetails.php',{"del_id":info.emp_id}).success(function(data){
if (data == true) {
getInfo();
}
});
}
Now, deleteInfo() function communicates with the deleteDetails.php and send employee ID of the clicked row through $http.post method.
deleteDetails.php
<?php
require_once 'database_connections.php';
$data = json_decode(file_get_contents("php://input"));
$query = "DELETE FROM emp_details WHERE emp_id=$data->del_id";
mysqli_query($con, $query);
echo true;
?>
In deleteDetails.php, the sent data get decoded and the row containing that particular ID get deleted. After succuessfully deletion, it return true status as a reply.
When the deleteInfo() method receives the true value, it calls getInfo() to show details of the updated table.
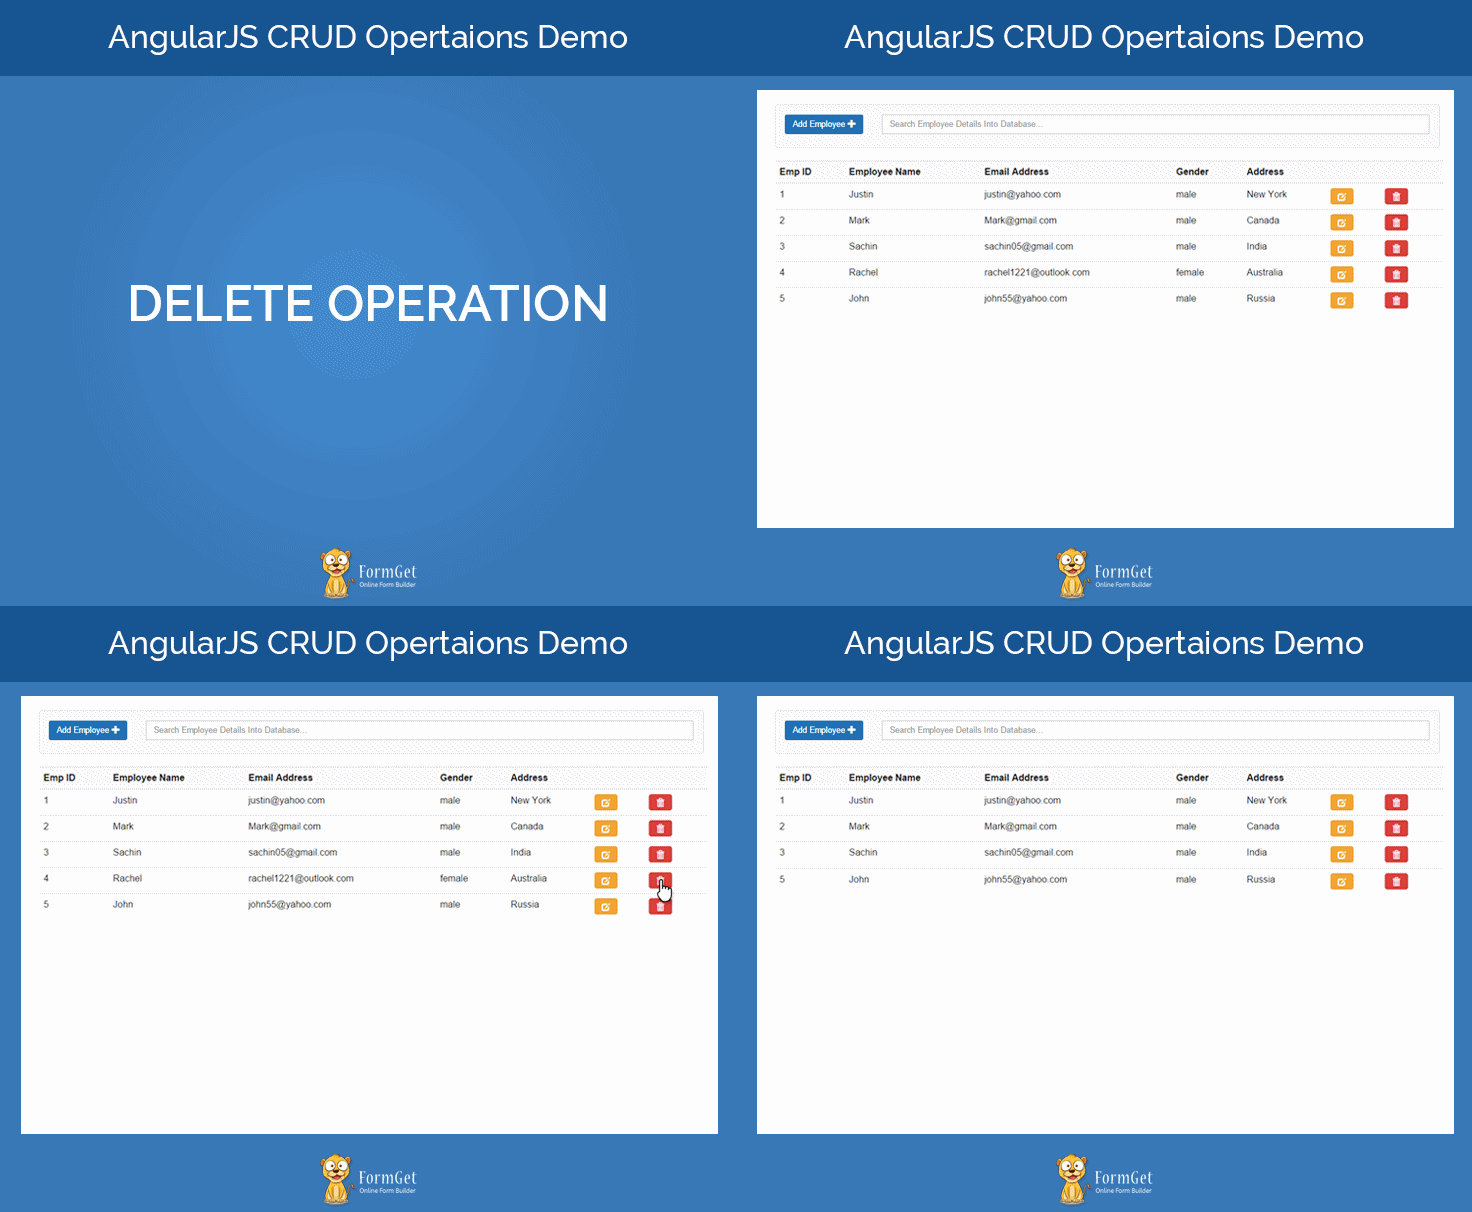
Process output
That ends the complete CRUD operation.
Application’s Styling Part
For responsiveness and icons, we have used bootstrap in the application.
Also, used some external CSS to improve designing part.
style.css
Contain CSS of the application.
@import url(https://fonts.googleapis.com/css?family=Raleway);
.wrapper{
min-height: 960px;
}
form#empForm, form#editForm {
padding: 0 35px 15px;
}
label.gender {
padding-top: 0 !important;
}
table tr th{
background: #f8f8f8;
}
.search-box {
padding-bottom: 0;
}
@media screen and (max-width: 368px){
.wrapper{
min-width: 340px;
}
}
Conclusion:
Hope you guys enjoyed this blog and learned the concepts of CRUD in AngularJS. Please write your comments from the space given below and keep in touch with us for more interesting blogs


