
Hire the author: Stephen I
Introduction
My name is Ilori Stephen Adejuwon and I am a Fullstack software developer (Backend Heavy) based in West Africa Lagos, Nigeria. In this tutorial, I will show you how to build a REST API in PHP.
But before we proceed, I know you are curious to know what the acronym REST and API means. Well, we will cover a lot on those two in this Article. Meanwhile, let’s talk about why you would ever want to build a REST API first.
However, you can download the project from Git by visiting PHP Rest API.
Why Would You Want To Build A REST API.
PHP is a server-side language and it’s perfect for doing a lot of server-side tasks such as Receiving, Handling HTTP Requests, Authentication, communicating with a Database. and building an API.
That doesn’t still explain why you want to build a REST API. Above all, Well you see, you’d want to build a REST API because it gives room for two applications to talk to each other.
Now I bet you have a lot of questions flowing through your mind. Although I might not be able to answer all of those questions but I believe you will find answers once you continue reading.
Super excited huh? Let’s talk about some terms or technical jargon related to this lesson.
Glossary
While preparing this project, I came across a whole lot of terms or technical jargon related to this topic. Therefore in order not to get you confused, I will do my very best to explain each of them.
-
REST: The term REST also known as REPRESENTATIONAL STATE TRANSFER can be defined as a service that defines a set of functions that programmers can use to send requests and receive responses using HTTP protocol such as GET and POST.
-
API: The term API which stands for APPLICATION PROGRAMMING INTERFACE, and it’s a software intermediary that allows two applications to talk to each other.
-
HTTP VERBS: This actually means your HTTP PROTOCOL such as your GET, POST, PUT and PATCH requests.
-
ENDPOINTS: The term endpoint in the simplest form is one end of a communication channel. When an API interacts with another system, the touchpoints of this communication are considered endpoints. Each endpoint is the location from which APIs can access the resources they need to carry out their function.
-
Middleware: This is a service that exists in between your application making it so that you focus on the specific purpose of your application.
In conclusion, I believe we are on the same page now. Therefore, let’s take our time to talk about the Project Requirement next.
Project Requirements.
-
A Localhost Server: You can download the latest version of any of the following. XAMPP, LAMPP, MAMPP, and AMPPS depending on your operating system.
-
Composer: Composer is a package manager for PHP. This will help us install some external packages which we are going to use in building our REST API. You can download and install composer via Get Composer.
-
Git: This is kinda optional but I still recommend having git installed. This will prove useful if you ever want to deploy your code or push to a remote repository. You can download and install git through Git.
-
PHP: Yup! PHP. I also think it’s best to have at least Basic PHP Knowledge. The coding is really easy. Nothing scary but I still recommend you know the basics of PHP to continue.
-
Postman: We will need Postman to consume our Api’s. This is just for testing our Api locally. It provides a whole lot of extra features but for now, just download Postman.
-
Text Editor: We will need a text editor to write our codes with. You can go online and check out any text editors but I recommend atom or visual studio code.
-
Determination: I am not a motivational speaker but if you are a beginner, you shouldn’t get intimated by the sound of this topic. In addition, it’s something really easy and I will do my best to break it down. But still, I recommend that you encourage yourself.
In short, that’s our project requirement. Let’s talk about our project directory and begin Hacking!
Project Directory.
*/ PHP-REST-API
*/ App (Our Application Logic)
*/ public (Our public directory)
composer.json
index.php (Root Directory)
Isn’t it beautiful? That’s our project directory. A parent folder called php-rest-api and two other subfolders called App and public.
With that setup, open the composer.json File in the project’s root directory and paste in the code snippet below. I will explain the contents later.
Inside of the composer.json File, we have a require Object. This object holds all our project dependencies or external packages, whichever clause you are comfortable with.
We also have an autoload Object. This Object enables us to use namespaces in our project and it also helps in autoloading our classes.
With that said, you can now open the project up in your terminal or cmd and run the command composer install. This will install the Klein package and a Firebase JWT package.
This will also create a vendor folder. This is where the installed packages will live with a few composer configurations and lastly, it will generate/create a new composer.lock file.
In short, We just installed some packages needed for our application. Therefore, Let’s move on and edit the index.php file inside of our project’s root directory.
1. Let’s Edit Our Index.php (Root Directory).
Our index.php will serve as an Entry point into the application. This acts as the file that starts the application. It doesn’t contain much though. You can open your index.php file and paste the snippet below.
The index.php does nothing other than autoloading all of our packages and also the router which contains all of our API Endpoints. And it does all of that in just two lines! That’s the beauty of composer and namespaces.
2. Creating The Endpoints (App/routes Directory).
With our index.php setup, If you try to run the application, You might find some errors. Well, that’s because we are yet to create our api.php file.
The api.php file is where all of our REST API Endpoints are defined. With that said, create an api.php file inside of the routes folder in the App directory. Once done, paste the code snippet below into the api.php file.
Now, at the top level of the api.php file, we declared a namespace. This namespace makes it possible to use any functions, Classes, or Constants defined within the namespace App.
With its definition at the top level of our script, we can begin using other classes by issuing the keyword use with the namespace path ‘App\ClassName‘ to the class.
You have to admit, this is a lot better than using the require keyword or function. Above all, it makes our code look more modern and neat.
Because we required the autoload installed from issuing the composer install command in our index.php, this makes it easy for us to use any of the installed composer packages.
Meanwhile, We created a few Endpoints by creating a new instance of the Klein Package installed via composer. You can create a simple Endpoint with the Klein Package by following the syntax below.
$Klein->respond('HTTP VERB', 'DESIRED_URL', CALLBACK_FUNCTION);
Similarly, you can read more about the Klein Package by visiting their Github Repo. Therefore, let’s continue by creating some Models for our application.
3. Spinning Up The Base Model (App\Model Directory).
It’s an API but still, we need a database to store some Data. Let’s begin by creating a Model.php file inside of the Model folder in the App directory.
This acts as the Base Model for every model file in the Model folder. That is, every other Model must extend or require this Class or File. This Class is also declared within the App namespace.
The Model.php Class creates a new Database Connection, and share a few private methods for handling some Database operations. With that completed, create a Model.php file inside of the Model folder in the App Directory and paste the code snippet below.
You can replace the Model Class Properties with your own Environment Variables. However the $stmt and the $dbConn should be untouched.
I won’t spend much time explaining what this file does as I have explained how this file works in a different article. In conclusion, you can read How To Create A Login And System In PHP Using PDO in order to get the full list.
In short, I will tell you that this class creates a new PDO Connection and it also provides an abstraction layer by hiding some business logic and exposing some reusable Method.
Meanwhile, I think it’s time to create other Models. In the next line, we will talk about the UserModel.
4. Coding The UserModel (App\Model Directory).
UserModel.php file is the Model which is responsible for creating, reading, updating and deleting users. This Model extends the Base Model making it possible to use Methods created or owned by the Base Model.
Create a UserModel.php file inside the Model Folder within the App Directory that should look like the following.
Inside of the UserModel Class, we have the createUser Static Method which makes it possible to create a new User record in the Database by reusing methods like query, bind params and execute from the Base Model Class.
This Method accepts an Array of User Information and it returns a new Array containing the status of the operation.
Inside of this class, we also have the fetchUserById Static Method which makes it possible to fetch a User by ID. This method accepts and Integer and it returns an Array containing the status of the operation.
And last but not least, we have the checkEmail Method which fetches a User based on his/her Email Address. This method accepts an Email String and it returns an Array containing the status of the operation.
In conclusion, we have successfully created our UserModel. Later on, this model will prove useful within the Controllers and Middlewares. It’s time to shift our focus to the next Model we will be creating. The TokenModel.
5. The TokenModel (App\Model Directory).
TokenModel.php File or Class inherits the Base Model Class and it’s responsible for storing Access Tokens that can be used for communicating with this API.
You can think of the Access Tokens as a required Key which is needed to communicate with the API. You pass an Access Token to the API, it checks the Token if it’s valid and then, it proceeds with your request. If the validation goes sideways, The request will fail.
create a TokenModel.php file inside the Model folder in the App directory with the code snippet below.
TokenModel Class houses two Methods. The createToken Method and the fetchToken Method.
createToken Method accepts an Array and returns an Array containing the result of the Insert Operation by taking advantage of the Base Model methods.
fetchToken Method accepts a String and returns the first record that matches the token String in the Database. This operation returns an Array.
To sum up, let’s move on and create the CatalogModel next.
6. Model For Catalogs (App\Model Directory).
UserModel.php File or Class is responsible for creating, updating, fetching, and deleting Catalogs. This File extends the Base Model just like the previous Models. Create a new file inside of the Model Folder and name it CatalogModel.php.
Open the CatalogModel.php and after that, paste the code snippet below into it.
This Operation is similar to other Models we have created. Similarly, it creates, reads, updates and it deletes.
CatalogModel Class contains 6 Methods which gives it CRUD (Create, Read, Update, Delete) functionalities.
createCatalog Method creates a new catalog entry. This method accepts and Array containing the required information needed in creating a new Catalog. However, a new Array is returned depending on the operation.
updateCatalog Method updates an existing Catalog based on the Catalog ID. This method accepts an Array of data to be updated and it also returns an Array whether the operation is successful or not.
fetchCatalogById Method queries the Database for a catalog that matches the Id passed into the Method as an Argument. This method accepts an Integer as it’s Parameter and returns an Array containing the result of the operation.
fetchCatalogByName Method queries the Database for a catalog that matches the name passed into the Method as an Argument. This method accepts a String as it’s Parameter and it returns an Array containing the result of the operation.
fetchCatalogs Method. This method accepts no Parameter and it fetches all of the Catalogs created or stored in the Database. This method returns an Array.
deleteCatalog Method. This method accepts a numeric Id as it’s parameter and it deletes all Records in the Database matching the Id. This method returns an Array regardless of the status of the operation.
We are almost done working with the Model directory. We have just one more File to create inside of the Model directory before we begin working on our Middlewares.
7. Creating A ProductModel (App\Model Directory).
This is the last file I will create inside of the Model Folder for this lesson. Create a new file inside of the Model Folder and call it ProductModel.php.
This File or Class extends the Base Model and it reuses Methods from the Base Model. In short, this Model makes it possible to C.R.U.D products.
Open the ProductModel.php File and after that, paste the following code snippet.
createProduct Method. This method accepts an Array of information required in creating the Product. The method also returns a new Array containing the status of the operation.
findProductById Method. This method accepts a Numeric Id used in querying the database to the first record that matches the Id passed in as a Parameter. This method returns an Array depending on the operation.
fetchProducts Method. This method accepts no parameter and it returns an Array of products regardless of the operation status.
updateProduct Method. This method accepts an Array of values to be updated as it’s parameter where the record Id matches the Id in the Array and it returns a new Array depending on the status of the operation.
deleteProduct Method. This method accepts a Numeric Id as it’s parameter and it deletes all documents or records matching the Id passed in as an Argument. This method returns an Array regardless of the operation status.
Congratulations. Our REST API is almost complete. We just completed working on our Model directory. The next step is to begin making use of the created Models within the Middleware and the Controller.
In the next line, we will create some Middlewares to guard access to our API.
8. Creating Middlewares (App\Middleware Directory)
In this section, I will create some middleware that will help us in Guarding our REST API in order to prevent Unauthorized Access and also rules our REST API should check before granting access.
Inside of this folder, we will create our first Middleware and call it RequestMiddleware.php. This File houses a class that is also within the App namespace.
This File contains 3 static methods and one protected property in order to validate incoming requests. Open the RequestMiddleware.php File and after that, paste the code snippet below.
$Request static property. This property can only be used within this class or within any other class that extends the RequestMiddleware Class. However, this Property doesn’t do much other than storing a String.
__construct Magic Method. This method is executed when a new instance of the Class is created. The method fetches the request content type and saves it to the $Request static property.
acceptsJson Method. This method checks if an incoming request CONTENT_TYPE HEADER matches application/json which is the required content type for JSON resource.


acceptsFormData Method. This method checks if an incoming request CONTENT_TYPE HEADER matches multipart/form-data which is the required content type for Form Data resource.
9. Implementing The JwtMiddleware (App\Middleware Directory).
I mentioned generating Access Tokens when we were working on the TokenModel. Well, I am glad you asked. Although this Middleware doesn’t generate Access Tokens it checks and validates them.
Create a new file called JwtMiddleware.php after that, paste the following into the file.
JwtMiddleware File houses a Class which is declared within the app namespace. This file makes use of the Firebase JWT package which has been installed via Composer.
The file also depends on the TokenModel and UserModel created inside of the Model folder. And that’s how we begin utilizing the Classes created inside of our Model folder.
In order to make a request to a route protected by the JWT Token, you pass in the following to your authorization header. Below is an example.
JwtMiddleware Class contains 5 Methods and it also contains 3 protected property.
$user, $token, and $user_id protected static property are properties that are only meant to be used within the JwtMiddleware Class or Classes that extend the JwtMiddleware Class.
The JWTSecret Method
private JWTSecret Method. This method is a private method that makes sure that the method can only be used within the class it’s defined in or Classes extending the JwtMiddleware Class.
This method returns a String that is used in signing JWT Tokens. You can always modify this script to have the JWT Secret come from a Constant.
The getToken Method
protected getToken Method. This method like the JWTSecret Method can only be used within the RequestMiddleware Class or extending Classes.
getToken Method fetches the JWT Token from an incoming request by getting the HTTP_AUTHORIZATION HEADER. It returns the JWT Token fetched from the header.
The validateToken Method
validateToken Method. This method validates the received JWT Token and returns a boolean true or a boolean false depending on the result of the validation.
The getAndDecodeToken Method
getAndDecodeToken Method. This method decodes the Jwt Token to check it's validity. It also checks if the token has been issued from the application by checking if the token exists in the Database by utilizing the TokenModel Class.
    $TokenModel = new TokenModel();
    // Check the database for the query before decoding it...
    $tokenDB = $TokenModel::fetchToken($token);
Method getAndDecodeToken also makes use of the Firebase\JWT\JWT package for decoding the token to check if the token is still valid.
    if ($tokenDB['status']) {
        // decode the token and pass the result on to the controller....
        $decodedToken = (Array) JWT::decode($token, Self::JWTSecret(), array('HS256'));
            if (isset($decodedToken['user_id'])) {
                Self::$user_id = $decodedToken['user_id'];
                return $decodedToken['user_id'];
            }

                return false;
    }
This Method returns an Integer representing the User Id if the operation is successful else it returns a boolean false.
The getUser Method
getUser Method. This method makes use of the UserModel method by using the $user_id protected static property to fetch the User who issued the request.
    try {
        $UserModel = new UserModel();
        $user = $UserModel::fetchUserById(Self::$user_id);
            if ($user['status']) {
                return $user['data'];
            }

            return [];
    } catch (Exception $e) { return []; }
At this point, we are so close to having a complete REST API. However, The final steps will be creating the Controllers which will actually help with consuming all incoming requests. With that said, this concludes our Middleware.
10. Creating Our Controllers (App\Controller Directory).
In this folder, we will create several Controllers which will make it possible to consume incoming requests. Inside of this folder, we will begin by creating a Base Controller. All other Controllers will extend this Controller.
Creating The Base Controller.
Inside the Controllers folder, create a new file and call it Controller.php. Then you can go ahead and paste in the code snippet below.
Controller.php file is also defined with the app namespace and it also uses a few Models such as the UserModel, CatalogModel, and ProductModel.
Inside of the Controller Class, we have two protected static methods. The validation Method and also the JWTSecret Method. The validation Method accepts an Array as it’s parameter.
Array passed in is a set of validation rules that will be checked inside of the Method. After the Array is parsed, a new Array is returned by the Method which contains the status and additional messages from the result of the validation.
The JWTSecret Method
protected JWTSecret Method. This method is a protected method that makes sure that the method can only be used within the class it’s defined in or Classes extending the Base Controller.
With the Base Controller created, we can now proceed to create other Controllers inside of the Controllers Folder that will extend the Base Controller.
11. Creating The UserController (App\Controller Directory).
Inside of the Controller Folder, we will create a new file called UserController.php. After creating the file, open the file and after that, paste in the code snippet below.
Class inside of the UserController is also defined within the app namespace. This Class depends on the UserModel, TokenModel, the Base Controller, the Firebase Jwt Package, and the RequestMiddleware. On the other hand, the Class also depends on the inbuilt PHP Exception Base Class.
UserController Class contains two methods namely the createNewUser Method and the login Method. Each of these two methods are declared public so that we can access them in our api.php file.
The createNewUser Method
createNewUser Method. This method accepts a $request and a $response as it’s parameter. The method accepts $request and the $response as it’s parameter because the method is used as a callback inside of the api.php file.
createNewUser Method as its name implies is responsible for creating a new User, generating a new Access Token, and doing some validations. After the validation, the createNewUser Method returns a JSON Response with an HTTP STATUS CODE of 201 Created if the operation is successful. You can read more about the various HTTP STATUS CODE at HTTP Statuses.
The login Method
login Method. This method accepts a $request and $response as it’s parameter because the method is being used a callback inside of the api.php file. The $request contains a whole lot of information about the incoming request so, it makes it easier to fetch payloads from the request.
login Method returns a JSON Response with an HTTP STATUS CODE of 200 if the operation is successful. This Method depends on the validation Method, from the BASE CONTROLLER, the TokenModel, and the UserModel.
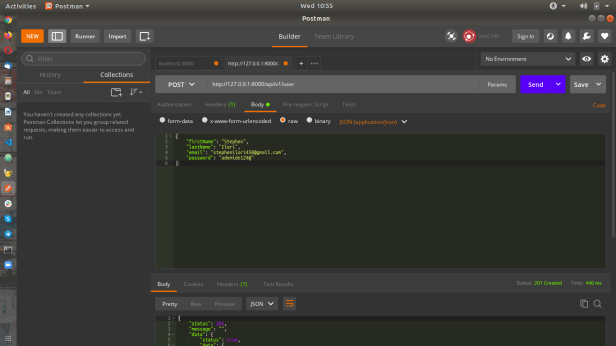
With that out of the way, let’s test this method by creating a new User. Open the project directory in your terminal or cmd and run the command php -S 127.0.0.1:8000.
This will run our application on the localhost server through the Port 8000. This will also print some exceptions if any to the terminal console. After you have successfully started the application, You can comment out all other Routes in the api.php except the snippets below.
    /******************** User Routes || Authentication Routes **********************/
    $Klein->respond('POST', '/api/v1/user', [ new UserController(), 'createNewUser' ]);
    $Klein->respond('POST', '/api/v1/user-auth', [ new UserController(), 'login' ]);
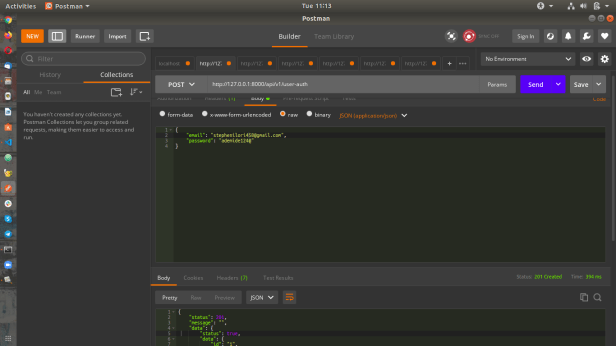
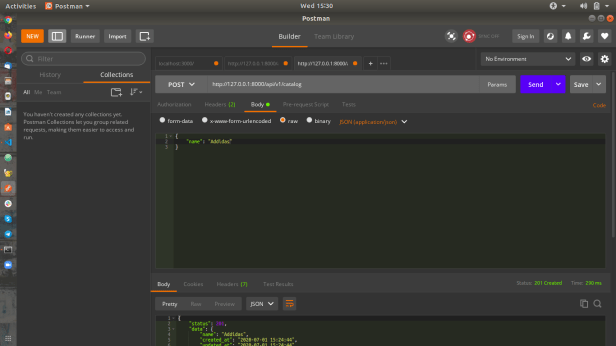
We can now open Postman and consume both endpoints. Below are some screenshots of how I consumed the API
Congratulations once again. We just created and consumed our User Endpoints. It will become easier as soon as we create a few more controllers and Endpoints. Up next, we will create a CatalogController.
12. Creating The CatalogController (App\Controller Directory).
We just created a UserController Class and exposed a few Endpoints which creates a new user by making use of the UserController Class and the methods within the controller. In this section, we will create a CatalogController.php file and expose a few Endpoints.
After creating the CatalogController.php file, copy and paste the code snippet below into the CatalogController.php file.
CatalogController.php file contains a Class which is declared within the app namespace. The file also depends on the Base Controller, the CatalogModel, JwtMiddleware and the RequestMiddleware.
CatalogController.php file contains 6 public methods which all accepts a $request and a $response variable as their parameter.
The createNewCatalog Method
The createNewCatalog Method accepts a $request and a $response variable as it’s parameter. This method creates a new Catalog by making use of the CatalogModel. The method returns an HTTP STATUS CODE OF 201 CREATED with a Valid JSON Response. However, a different status code is returned if something broke during the operation.
The updateCatalog Method
updateCatalog Method accepts a $request and a $response variable as it’s parameter. This method updates an existing Catalog by making use of the CatalogModel. If everything works, the method returns an HTTP STATUS CODE OF 200 OK. However, a different status would be returned if something broke during the process.
fetchCatalogById Method
The fetchCatalogById Method accepts a $request and a $response variable as it’s parameter. This method returns an existing Catalog by making use of the CatalogModel to fetch the catalog based on the catalog ID. The method returns an HTTP STATUS CODE OF 200 OK and a JSON response.
The fetchCatalogByName Method
The fetchCatalogByName Method accepts a $request and a $response variable as it’s parameter. This method returns an existing Catalog by making use of the CatalogModel to fetch the catalog based on the catalog Name. The operation should return an HTTP STATUS CODE OF 200 OK. A different status would be returned if something broke during the operation.
The fetchCatalogs Method
The fetchCatalogs Method accepts a $request and a $response variable as it’s parameter. This method returns all Catalog by making use of the CatalogModel to fetch all the created catalogs. The method should return an HTTP STATUS CODE OF 200 OK.
The deleteCatalog Method
The deleteCatalog Method accepts a $request and a $response variable as it’s parameter. This method deletes all Catalog that matches the Catalog ID via the CatalogModel. If everything works, The method returns an HTTP STATUS CODE OF 200 OK.
With that setup, let’s open our api.php file and uncomment the code snippet below.
/******************** Catalog Routes **********************/
$Klein->respond('POST', '/api/v1/catalog', [ new CatalogController(), 'createNewCatalog' ]);
$Klein->respond(['PATCH', 'PUT'], '/api/v1/catalog/[:id]', [ new CatalogController(), 'updateCatalog']);
$Klein->respond(['GET', 'HEAD'], '/api/v1/fetch-catalog-by-id/[:id]', [ new CatalogController(), 'fetchCatalogById' ]);
$Klein->respond(['GET', 'HEAD'], '/api/v1/fetch-catalog-by-name/[:name]', [ new CatalogController(), 'fetchCatalogByName' ]);
$Klein->respond(['GET', 'HEAD'], '/api/v1/catalogs', [ new CatalogController(), 'fetchCatalogs' ]);
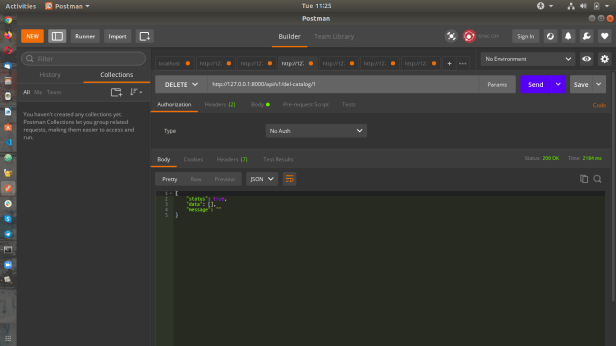
$Klein->respond('DELETE', '/api/v1/del-catalog/[:id]', [ new CatalogController(), 'deleteCatalog' ]);
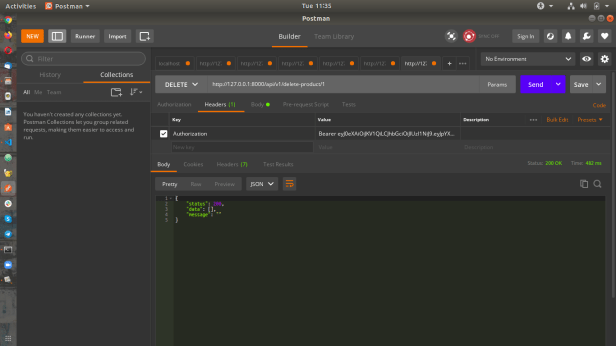
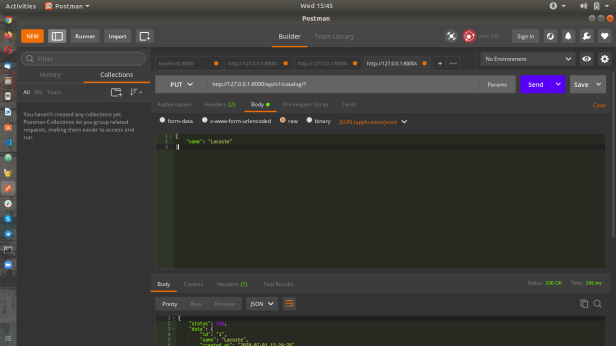
Below are some screenshots of consuming the Api in Postman.

13. Creating The ProductController (App\Controller Directory).
After creating the CatalogController.php file, we can now begin creating the ProductController.php file. This will help us in Creating, Updating, Fetching, and Deleting Products. Create a new file called ProductController.php and after that, paste the following code snippet below into it.
The ProductController.php file contains a Class declared within the app namespace. The file or the Class depends on the Base Controller, the UserModel, the ProductModel, JwtMiddleware, and the RequestMiddleware.
The createProduct Method
The createProduct Method creates a new Product by taking advantage of the ProductModel. This method is protected by both middlewares we created inside of our middleware folder. This operation returns an HTTP STATUS CODE of 201 Created with a JSON Response otherwise, it returns a different STATUS CODE when the operation fails.
The updateProduct Method
The updateProduct Method updates an existing Product by taking advantage of the ProductModel. It updates a product based on the product Id. This method is also protected by both middlewares we created inside of the middleware folder. This process returns an HTTP STATUS CODE of 200 Ok with a JSON Response else, it returns a different STATUS CODE when the operation fails.
The getProductById Method
The getProductById Method fetches an existing Product by it’s Id through the ProductModel. It fetches a product based on the product Id. This method is guarded by the RequestMiddleware we created inside of the middleware folder. The method returns an HTTP STATUS CODE of 200 Ok with a JSON Response.
The fetchProducts Method
The fetchProducts Method fetches all Products via the ProductModel. The method is protected by the RequestMiddleware created inside of the middleware folder. The method returns an HTTP STATUS CODE of 200 OK with a JSON Response containing all the products. However, a different STATUS CODE is returned if the operation fails.
The deleteProduct Method
The deleteProduct Method deletes all Products that match the product Id via the ProductModel. This method is protected by the RequestMiddleware we created inside of the middleware folder. This method returns an HTTP STATUS CODE of 200 OK with a JSON Response. However, it returns a different STATUS CODE when the operation breaks.
With that setup, let’s open our api.php file and uncomment the code snippet below.
/******************** Product Routes **********************/
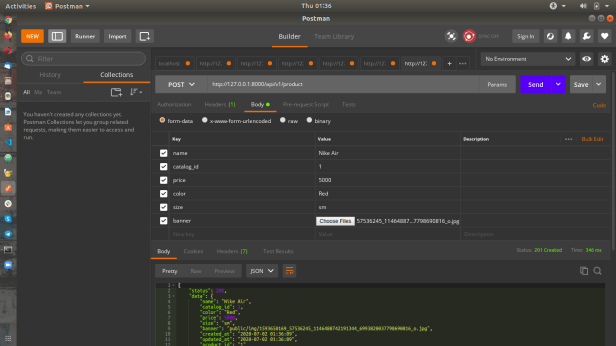
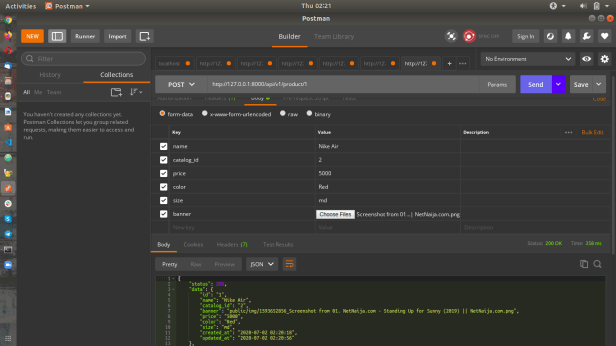
$Klein->respond('POST', '/api/v1/product', [ new ProductController(), 'createProduct' ]);
$Klein->respond('POST', '/api/v1/product/[:id]', [ new ProductController(), 'updateProduct' ]);
$Klein->respond('GET', '/api/v1/fetch/[:id]', [ new ProductController(), 'getProductById' ]);
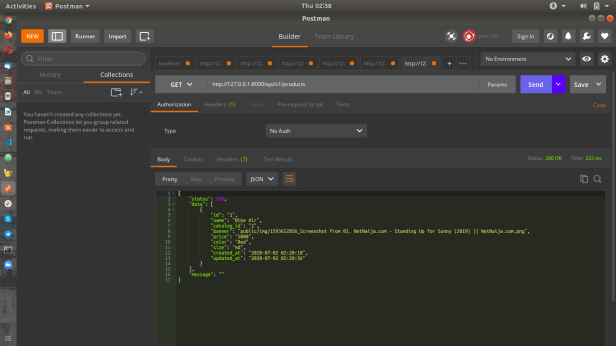
$Klein->respond('GET', '/api/v1/products', [ new ProductController(), 'fetchProducts' ]);
$Klein->respond('DELETE', '/api/v1/delete-product/[:id]', [ new ProductController(), 'deleteProduct' ]);
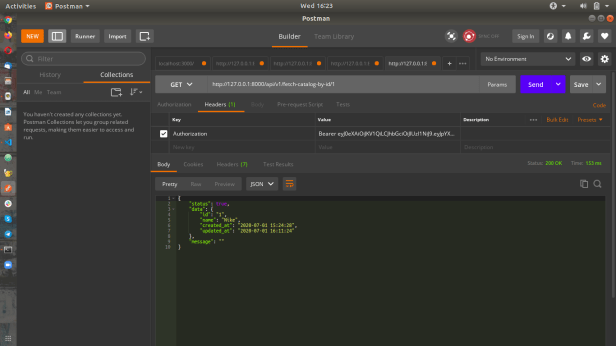
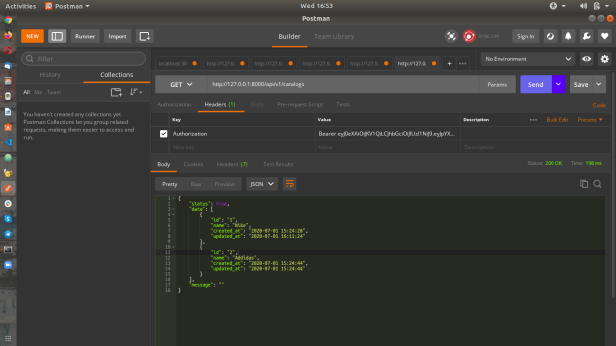
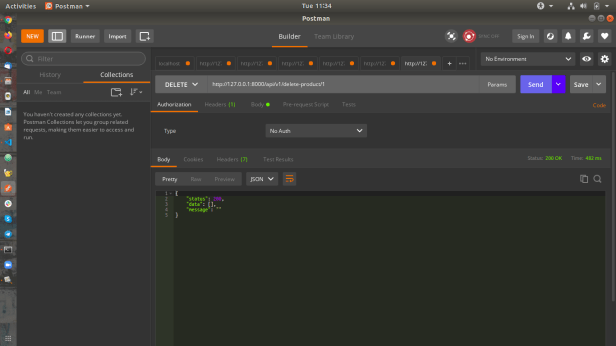
Below are some screenshots of consuming the Product Endpoints in Postman.
Learning Tools
There are a lot of learning tools online. But in case you are looking, I recommend you visit the following URL.
-
PHP php Official Website. This is the #1 goto place to learn how PHP works. This website contains a whole lot of documentation about PHP. with this in your rearview, You’d never get lost with PHP.
-
Udemy: This website holds a whole lot of tutorials about PHP and several web technologies alike. You can easily get started by visiting their website at Udemy.com.
Learning Strategy
I used the tools above and a few PDF documentations to get up to speed. I also used Google and Stack Overflow to get more information whenever I get stuck. Above all, I recommend you take advantage of the internet!
Reflective Analysis
It is a simple process for me but I have been able to gain some deeper insights into PHP and programming in general. Working with composer and namespaces for me acted as a benchmark and I really learned a lot in the process. Although I faced a few problems, I have been able to fix those problems by visiting Stack Overflow.
In order to get more knowledge, I recommend that you create a new Middleware or a new Method inside of the Controller.php that will return an XML or a CSV response. However, there are tons of packages out there that you can integrate into the application.
In addition, you can visit packagist to check packages that can help you achieve the solution.
Conclusion
In conclusion, this project mainly focuses on building a REST API in PHP. PHP has been around for a while and it’s still looking promising. The language is still very relevant. In addition, there are some companies out there paying huge amounts of money for PHP programmers.
Building a REST API is definitely something that you need to have under your belt as a programmer as most often than not you will be creating more of them. Therefore, I recommend that you practice a lot.
I hope you have learnt a lot from this lesson. Therefore, I will be looking forward to seeing you build something great with PHP or even better, Hack this solution.
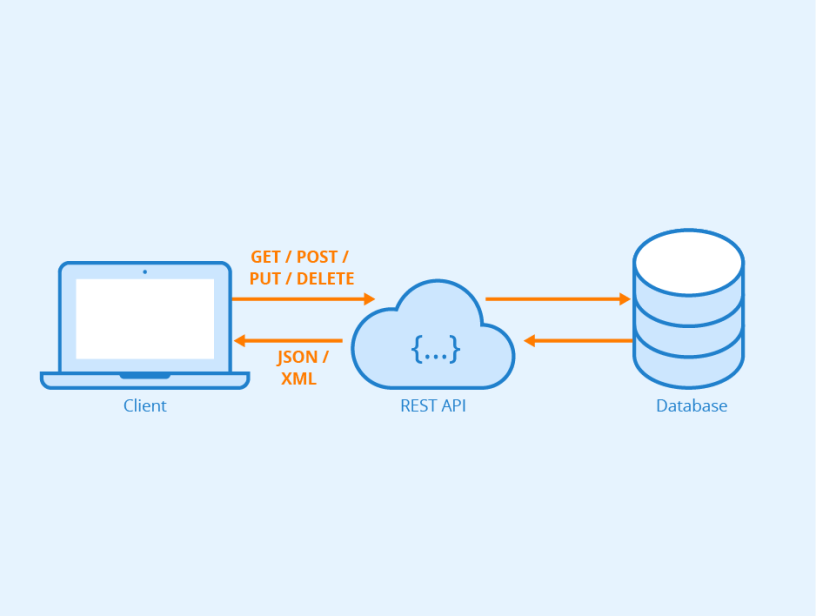
Image Citation: Seobility https://www.seobility.net/en/wiki/REST_API, License: CC BY-SA 4.0