
- 전체
- 게임 일반 (make game basics)
- 모바일 기획 및 디자인
- GameMaker Studio
- Unity3D
- Cocos2D
- 3D Engine OGRE
- 3D Engine irrlicht
- copperCube
- corona SDK
- Windows Basic Game
- BaaS (Mobile Backend)
- phnegap & cordova
- ionic & anguler
- parse (backend)
- firebase (backend)
- Game Backend Server / Opt
- web assembly
- Smart Makers
- pyGame & Ren'Py
- 머드(MUD) 게임 만들기
- Xamarin(자마린)
- flutter (플루터 앱 개발)
- construct 2 / 3
- pocketbase
- RPG Maker 시리즈
- godot engine
- playmaker(unity)
- react native
pyGame & Ren'Py [python] [ pyGame] 컴퓨터그래픽스 : 그래픽 프리미티브 그리기
2020.08.09 17:57
[python] [ pyGame] 컴퓨터그래픽스 : 그래픽 프리미티브 그리기
그래픽 프리미티브 그리기
이 pygame.draw모듈을 사용하면 표면에 간단한 모양을 그릴 수 있습니다. 이는 화면 표면이거나 이미지 또는 그림과 같은 모든 표면 개체 일 수 있습니다.
- 직사각형
- 다각형
- 원
- 타원
기능의 공통점은 다음과 같습니다.
- 테이크 표면의 첫 번째 인수로 객체를
- 색을 두 번째 주장으로 삼다
- 너비 매개 변수를 마지막 인수로 사용
- 변경된 영역을 경계 하는 Rect 객체를 반환합니다.
다음 형식 :
rect(Surface, color, Rect, width) -> Rect
polygon(Surface, color, pointlist, width) -> Rect
circle(Surface, color, center, radius, width) -> Rect
대부분의 함수는 너비 인수를 사용합니다. 너비가 0이면 도형이 채워집니다.
단색 및 윤곽선이있는 직사각형 그리기
다음은 먼저 배경색을 그린 다음 3 개의 겹치는 단색 사각형을 추가하고 그 옆에 선 너비가 증가하는 3 개의 겹쳐진 사각형을 추가합니다.
screen.fill(background)
pygame.draw.rect(screen, RED, (50, 20, 120, 100))
pygame.draw.rect(screen, GREEN, (100, 60, 120, 100))
pygame.draw.rect(screen, BLUE, (150, 100, 120, 100))

pygame.draw.rect(screen, RED, (350, 20, 120, 100), 1)
pygame.draw.rect(screen, GREEN, (400, 60, 120, 100), 4)
pygame.draw.rect(screen, BLUE, (450, 100, 120, 100), 8)
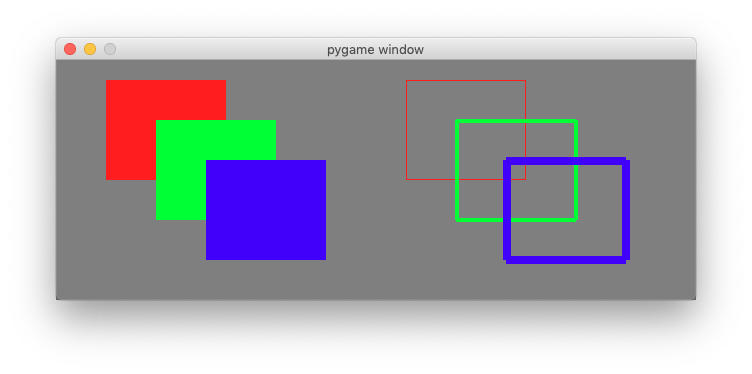
매개 변수를 수정하고 그리기 기능을 사용해보십시오.
실선 및 윤곽선이있는 타원 그리기
다음 코드는 먼저 배경색을 그린 다음 3 개의 겹치는 단색 타원을 추가하고 그 옆에 선 너비가 증가하는 3 개의 겹치는 타원을 추가합니다.
screen.fill(background)
pygame.draw.ellipse(screen, RED, (50, 20, 160, 100))
pygame.draw.ellipse(screen, GREEN, (100, 60, 160, 100))
pygame.draw.ellipse(screen, BLUE, (150, 100, 160, 100))

pygame.draw.ellipse(screen, RED, (350, 20, 160, 100), 1)
pygame.draw.ellipse(screen, GREEN, (400, 60, 160, 100), 4)
pygame.draw.ellipse(screen, BLUE, (450, 100, 160, 100), 8)

pygame.display.update()
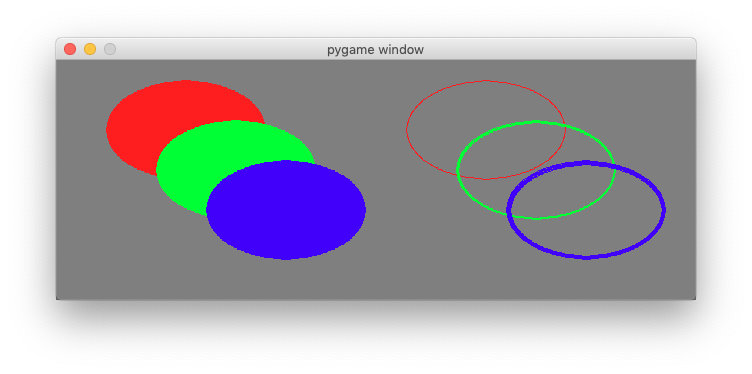
마우스 감지
마우스 버튼을 누르면 MOUSEBUTTONDOWN 및 MOUSEBUTTONUP 이벤트가 생성됩니다. 이벤트 루프의 플로링 코드는이를 감지하고 콘솔에 이벤트를 기록합니다.
for event in pygame.event.get():
    if event.type == QUIT:
        running = False
    elif event.type == MOUSEBUTTONDOWN:
        print(event)
    elif event.type == MOUSEBUTTONUP:
        print(event)
마우스 버튼을 누르면 다음과 같은 이벤트가 생성됩니다.
<Event(5-MouseButtonDown {'pos': (123, 88), 'button': 1, 'window': None})>
<Event(6-MouseButtonUp {'pos': (402, 128), 'button': 1, 'window': None})>
<Event(5-MouseButtonDown {'pos': (402, 128), 'button': 3, 'window': None})>
<Event(6-MouseButtonUp {'pos': (189, 62), 'button': 3, 'window': None})>
마우스를 움직 이기만하면 MOUSEMOTION 이벤트가 생성됩니다. 다음 코드는이를 감지하고 콘솔에 이벤트를 기록합니다.
elif event.type == MOUSEMOTION:
    print(event)
mosue를 이동하면 다음과 같은 이벤트가 생성됩니다.
<Event(4-MouseMotion {'pos': (537, 195), 'rel': (-1, 0), 'buttons': (0, 0, 0), 'window': None})>
<Event(4-MouseMotion {'pos': (527, 189), 'rel': (-10, -6), 'buttons': (0, 0, 0), 'window': None})>
<Event(4-MouseMotion {'pos': (508, 180), 'rel': (-19, -9), 'buttons': (0, 0, 0), 'window': None})>
마우스로 직사각형 그리기
이 세 가지 이벤트를 사용하여 화면에 직사각형을 그릴 수 있습니다. 대각선 시작점과 끝점으로 사각형을 정의합니다. 또한 마우스 버튼이 눌려 있는지 그리고 그림을 그리는지를 나타내는 플래그가 필요합니다.
start = (0, 0)
size = (0, 0)
drawing = False
마우스 버튼을 누르면 시작과 끝을 현재 마우스 위치로 설정하고 그리기 모드가 시작되었다는 플래그를 표시합니다.
elif event.type == MOUSEBUTTONDOWN:
    start = event.pos
    size = 0, 0
    drawing = True
마우스 버튼을 놓으면 끝점을 설정하고 그리기 모드가 종료되었음을 플래그로 표시합니다.
elif event.type == MOUSEBUTTONUP:
    end = event.pos
    size = end[0] - start[0], end[1] - start[1]
    drawing = False
마우스가 움직일 때 드로잉 모드에 있는지도 확인해야합니다. 그렇다면 종료 위치를 현재 마우스 위치로 설정합니다.
elif event.type == MOUSEMOTION and drawing:
    end = event.pos
    size = end[0] - start[0], end[1] - start[1]
마지막으로 직사각형을 화면에 그립니다. 먼저 배경색을 채 웁니다. 그런 다음 직사각형의 크기를 계산합니다. 마지막으로 우리는 그것을 그리고 마지막에 화면을 업데이트합니다.


screen.fill(GRAY)
pygame.draw.rect(screen, RED, (start, size), 2)
pygame.display.update()

여러 모양 그리기
여러 도형을 그리려면 목록에 배치해야합니다. 에 대한 변수 외에도 start, end그리고 drawing우리는 사각형 목록을 추가 :
start = (0, 0)
size = (0, 0)
drawing = False
rect_list = []
개체 (직사각형, 원 등) 그리기가 완료되면 MOUSEBUTTONUP 이벤트에 표시된대로 직사각형을 만들고 직사각형 목록에 추가합니다.
elif event.type == MOUSEBUTTONUP:
    end = event.pos
    size = end[0]-start[0], end[1]-start[1]
    rect = pygame.Rect(start, size)
    rect_list.append(rect)
    drawing = False
그리기 코드에서 먼저 배경색을 채운 다음 직사각형 목록을 반복하여 개체 (빨간색, 두께 = 3)를 그리고 마지막으로 그려지는 현재 사각형 (파란색, 두께 = 1):
screen.fill(GRAY)
for rect in rect_list:
    pygame.draw.rect(screen, RED, rect, 3)
pygame.draw.rect(screen, BLUE, (start, size), 1)
pygame.display.update()
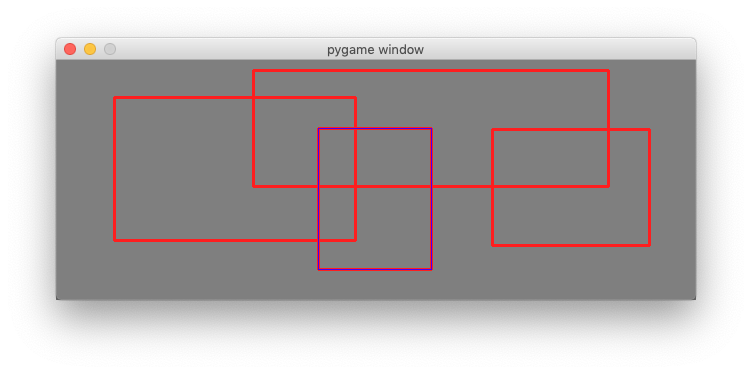
다음은 전체 파일입니다.
"""Place multiple rectangles with the mouse."""

import pygame
from pygame.locals import *

RED = (255, 0, 0)
BLUE = (0, 0, 255)
GRAY = (127, 127, 127)

pygame.init()
screen = pygame.display.set_mode((640, 240))

start = (0, 0)
size = (0, 0)
drawing = False
rect_list = []

running = True

while running:
    for event in pygame.event.get():
        if event.type == QUIT:
            running = False

        elif event.type == MOUSEBUTTONDOWN:
            start = event.pos
            size = 0, 0
            drawing = True

        elif event.type == MOUSEBUTTONUP:
            end = event.pos
            size = end[0]-start[0], end[1]-start[1]
            rect = pygame.Rect(start, size)
            rect_list.append(rect)
            drawing = False

        elif event.type == MOUSEMOTION and drawing:
            end = event.pos
            size = end[0]-start[0], end[1]-start[1]

    screen.fill(GRAY)
    for rect in rect_list:
        pygame.draw.rect(screen, RED, rect, 3)
    pygame.draw.rect(screen, BLUE, (start, size), 1)
    pygame.display.update()

pygame.quit()
마우스로 폴로 온 라인 그리기
다각형 선을 그리려면 점 목록에 점을 추가해야합니다. 먼저 빈 점 목록과 그리기 플래그를 정의합니다.
drawing = False
points = []
MOUSEBUTTONDOWN 이벤트에서 현재 지점을 목록에 추가하고 drawing플래그를 True로 설정합니다 .
elif event.type == MOUSEBUTTONDOWN:
    points.append(event.pos)
    drawing = True
MOUSEBUTTONUP 이벤트에서 drawing플래그를 비활성화합니다 .
elif event.type == MOUSEBUTTONUP:
    drawing = False
MOUSEMOTION 이벤트에서 그리기 플래그가 설정된 경우 다각형 목록의 마지막 지점을 이동합니다.
elif event.type == MOUSEMOTION and drawing:
    points[-1] = event.pos
포인트 목록에 2 개 이상의 포인트가있는 경우 다각형 선을 그립니다. 각 pygame.draw함수는 Rect경계 사각형의를 반환합니다 . 이 경계 사각형을 녹색으로 표시합니다.
screen.fill(GRAY)
if len(points)>1:
    rect = pygame.draw.lines(screen, RED, True, points, 3)
    pygame.draw.rect(screen, GREEN, rect, 1)
pygame.display.update()
ESCAPE 키를 누르면 목록의 마지막 지점이 제거됩니다.
elif event.type == KEYDOWN:
    if event.key == K_ESCAPE:
        if len(points) > 0:
            points.pop()
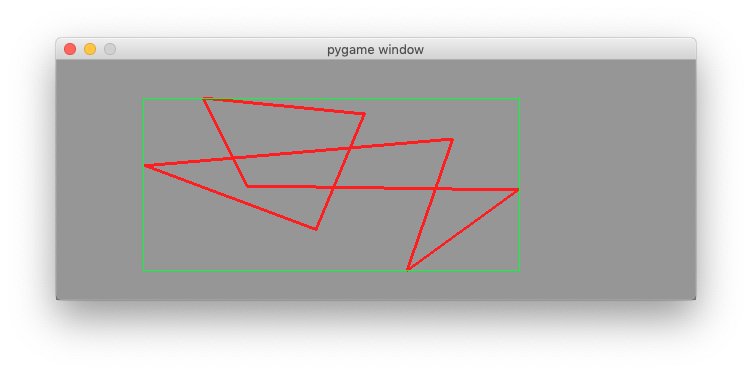
다음은 전체 파일입니다.
"""Place a polygone line with the clicks of the mouse."""

import pygame
from pygame.locals import *

RED = (255, 0, 0)
GREEN = (0, 255, 0)
GRAY = (150, 150, 150)

pygame.init()
screen = pygame.display.set_mode((640, 240))

drawing = False
points = []
running = True

while running:
    for event in pygame.event.get():
        if event.type == QUIT:
            running = False

        elif event.type == KEYDOWN:
            if event.key == K_ESCAPE:
                if len(points) > 0:
                    points.pop()

        elif event.type == MOUSEBUTTONDOWN:
            points.append(event.pos)
            drawing = True

        elif event.type == MOUSEBUTTONUP:
            drawing = False

        elif event.type == MOUSEMOTION and drawing:
            points[-1] = event.pos

    screen.fill(GRAY)
    if len(points)>1:
        rect = pygame.draw.lines(screen, RED, True, points, 3)
        pygame.draw.rect(screen, GREEN, rect, 1)
    pygame.display.update()

pygame.quit()
[출처] https://pygame.readthedocs.io/en/latest/2_draw/draw.html
광고 클릭에서 발생하는 수익금은 모두 웹사이트 서버의 유지 및 관리, 그리고 기술 콘텐츠 향상을 위해 쓰여집니다.
댓글 0
| 번호 | 제목 | 글쓴이 | 날짜 | 조회 수 |
|---|---|---|---|---|
| 1 |
[no code 게임개발] PlayMaker 요약
 | 졸리운_곰 | 2025.03.05 | 250 |