
For Internet of Things (IoT) projects that are a lot of different ways that the sensors, devices and client interfaces can be connected together. For many projects using simple MQTT (Message Queue Telemetry Transport) is all that you need. However if you’re trying to merge and build IoT projects that use both MQTT and AMQP (Advanced Message Queue Protocol) or require a REST API then you should take a look at RabbitMQ.
RabbitMQ is an open source middleware solution that natively uses AMQP communications but it has a good selection of plug-ins to support features like: MQTT, MQTT Web Sockets, HTTP REST API and server-to-server communications.
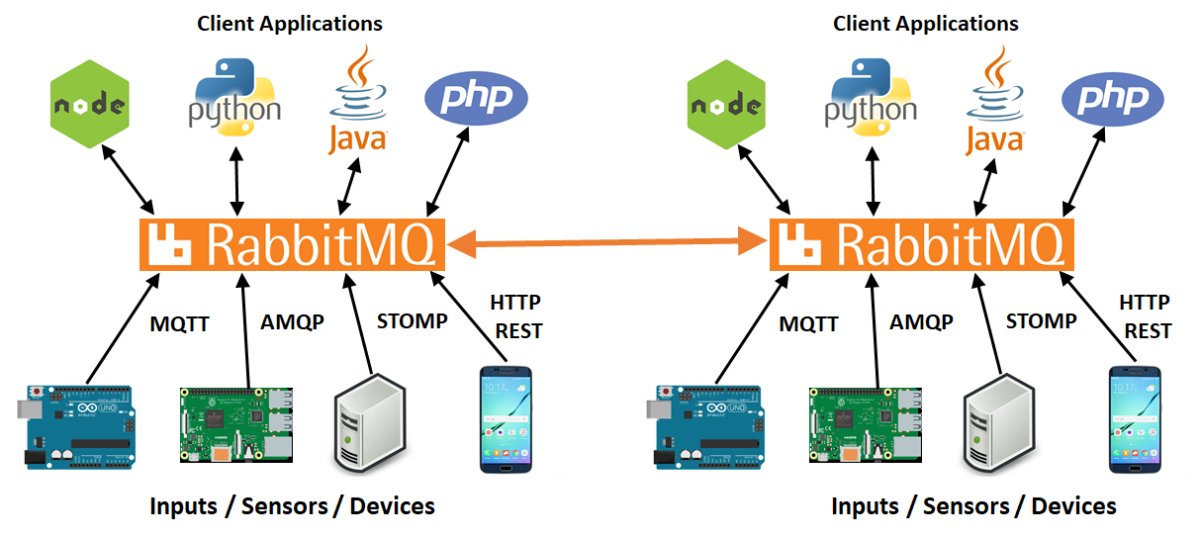
In this blog we will setting up a RabbitMQ server, and we will look at some of the differences between MQTT and AMQP messaging. Finally an example of an Anduino MQTT message will be presented as both an MQTT and an AMQP item in a Node-Red dashboard.
Getting Started
RabbitMQ can be installed on Window, Linux, MacOS systems and there are also some cloud based offerings. For small systems lower end hardware like a Raspberry Pi can be used. For complete RabbitMQ installation instructions see: https://www.rabbitmq.com/download.html . To install and run RabbitMQ on a Ubuntu system enter:
sudo apt-get update
sudo apt-get install rabbitmq-server
sudo service rabbitmq-server start
The next step is to add some plug-ins. For my project I loaded the MQTT and Web Administration plug-ins:
sudo rabbitmq-plugins enable rabbitmq_mqtt
sudo rabbitmq-plugins enable rabbitmq_management
The rabbitmqctl command line tool allows you to configure and review the RabbitMQ server. To add a user admin1, with password admin1, that has config, write and read rights for management and administrator access, enter:
sudo rabbitmqctl add_user admin1 admin1
sudo rabbitmqctl set_permissions -p / admin1 ".*" ".*" ".*"
sudo rabbitmqctl set_user_tags admin1 management administrator
After you’ve defined an administrative user the RabbitMQ web management plug-in can be accessed by: http://ip_address:15672 .
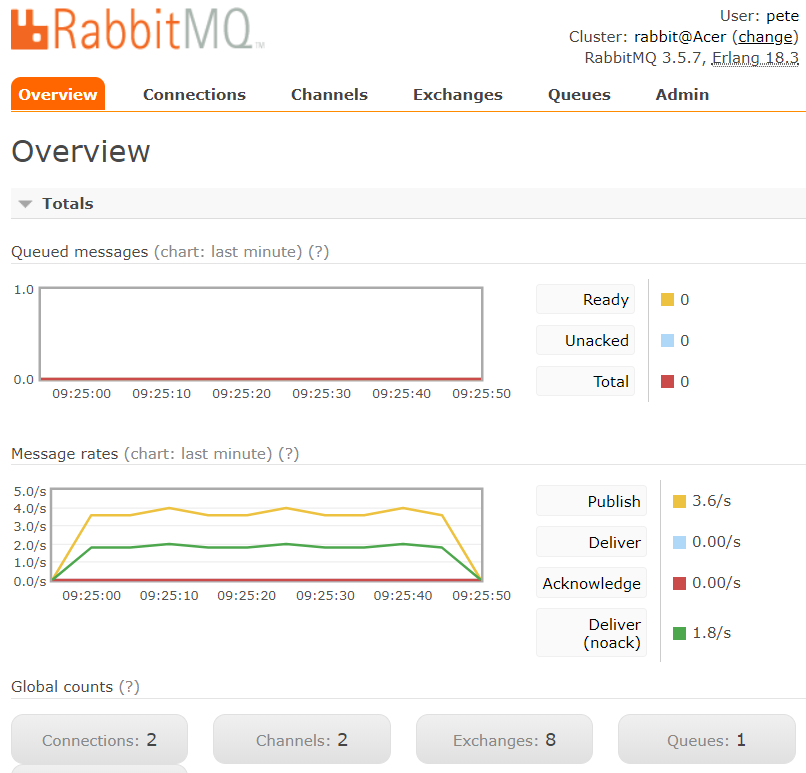
The RabbitMQ Web Management tool offers an overview of the present system load, connections, exchanges and queues.
The RabbitMQ Web Management tool is excellent for small manual changes, if however you are looking a doing a large number of additions or changes then, rabbitmqadmin, the command line management tool can be used. This tool is installed by:
# Get the cli and make it available to use.
wget http://127.0.0.1:15672/cli/rabbitmqadmin
sudo chmod +x rabbitmqadmin
Comparing MQTT and AMQP
It’s useful to comment about some of the differences between MQTT (Message Queue Telemetry Transport) and AMQP (Advanced Message Queueing Protocol) .
MQTT is a light weight publish-subscribe-based messaging protocol that works well with lower end hardware and limited bandwidth. For Arduino type applications where you only need to pass some sensor data MQTT is an excellent fit.
AMQP has more overhead than MQTT, because it is a more advanced protocol that includes message orientation, queuing, routing, reliability and security. Presently there are no mainstream AMQP Arduino libraries, but numerous programming options for Raspberry Pi, Linux, Windows and MacOS systems exist. An AMQP IoT example would be to send sensor failures and alarms to dedicated maintenance and alarm queues.
MQTT and AMQP Queues
One of the biggest differences in queues is that MQTT queues are designed to show you the last available message, where as AMQP will store multiple messages in a queue.
A published MQTT message contains a message body, a retain flag and a quality of service (QoS) value.
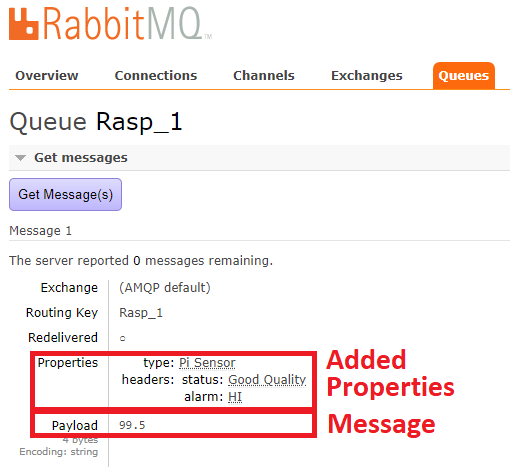
An AMQP message can be published with added properties such as: time stamp, type of message and expiration information. AMQP messages also support the addition of custom header values. Below is a Python publish example that defines the message type to be “Pi Sensor”, and custom headers are include for status and alarm state.
#!/usr/bin/env python
import pika

node = "192.168.0.121"
user = "pete"
pwd = "pete"

# Connect to a remote AMQP server with a username/password
credentials = pika.PlainCredentials(user, pwd)
connection = pika.BlockingConnection(pika.ConnectionParameters(node,
        5672, '/', credentials))
channel = connection.channel()

# Create a queue if it doesn't already exist
channel.queue_declare(queue='Rasp_1',durable=True)

# Define the properties and publish a message
props = pika.BasicProperties(
    headers= {'status': 'Good Quality',"alarm":"HI"},
    type ="Pi Sensor")
channel.basic_publish(exchange='',
    routing_key='Rasp_1',body='99.5', properties = props)

connection.close()
For this example the Rasp_1 queue can be examined using the Queue->Get Message option in the Web Management Interface.
RabbitMQ Messaging
There are a variety of ways that AMQP messages can be published and subscribed to. The simplest way is to create a queue and then messages can be published and subscribed to from that queue.
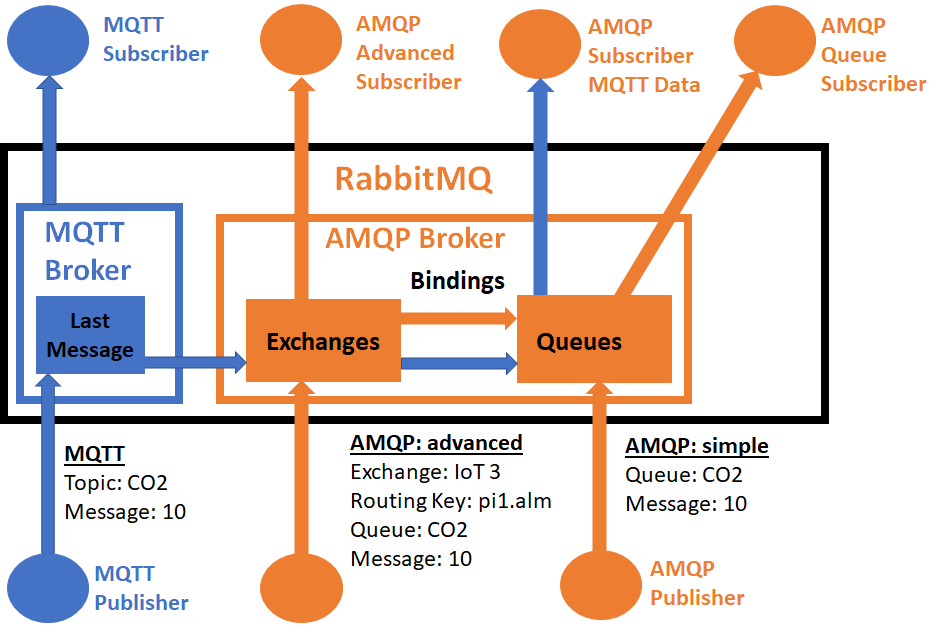 To help with the distribution and filtering of messages AMQP supports a number of different exchange types. Messages in an exchange use bindings based on a routing key to link them to a queue.
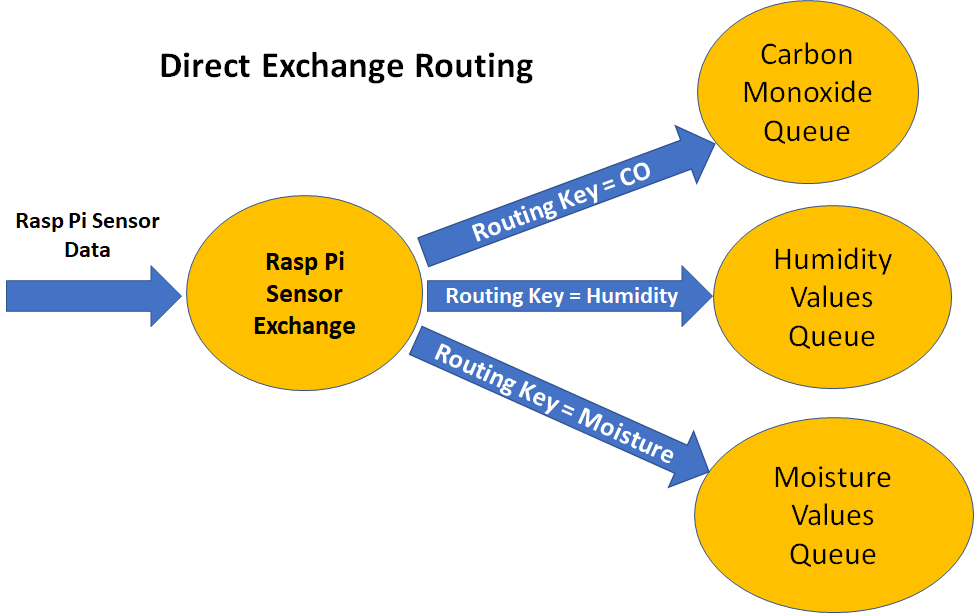
The main types of exchanges are: direct, fanout, headers and topic. An IoT example of a direct exchange would be if a group of Raspberry Pi sensor values are going into a “Rasp Pi Sensor” exchange. When the Rasp Pi publishes a sensor result to the exchange the message also includes a routing key to link the message to the correct queue.
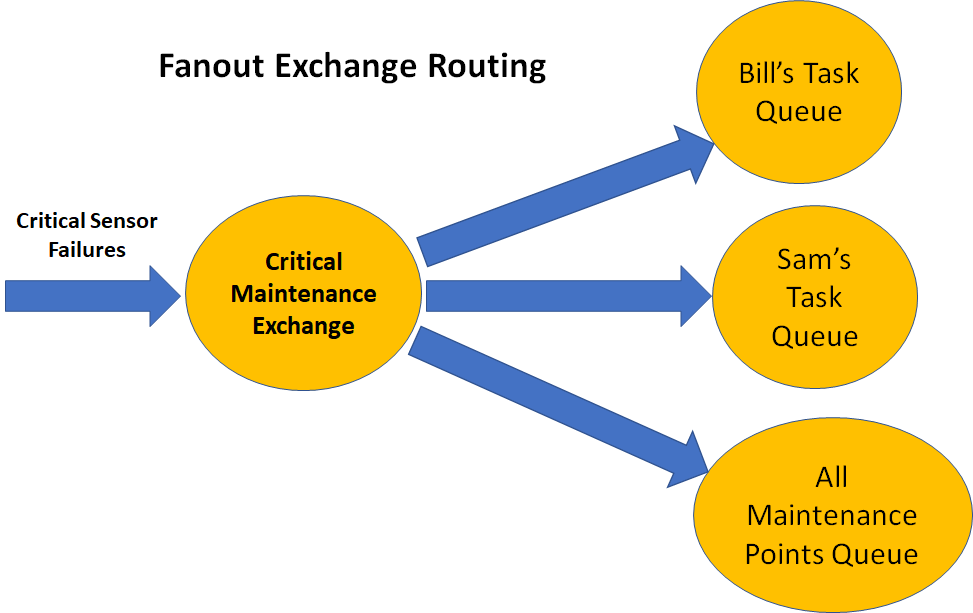
An IoT example of a fanout exchange would be with critical sensor failures. The sensor failure message is sent to Bill’s and Sam’s work or task queue and the All Maintenance point queue at the same time.
Connecting MQTT
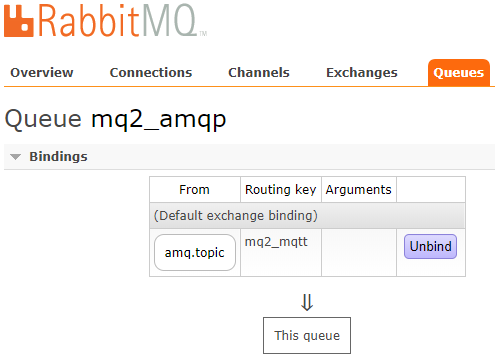
After the MQTT plug-in is installed RabbitMQ can act like a standalone MQTT broker. MQTT data can also be made available through an AMQP subscription by binding the MQTT exchange to a RabbitMQ queue.
For an MQTT project any ESP8266 supported Arduino hardware can be used. There are a number of MQTT Arduino libraries that are available. For this project I used the PubSubClient that can be installed using the Arduino Library Manager.
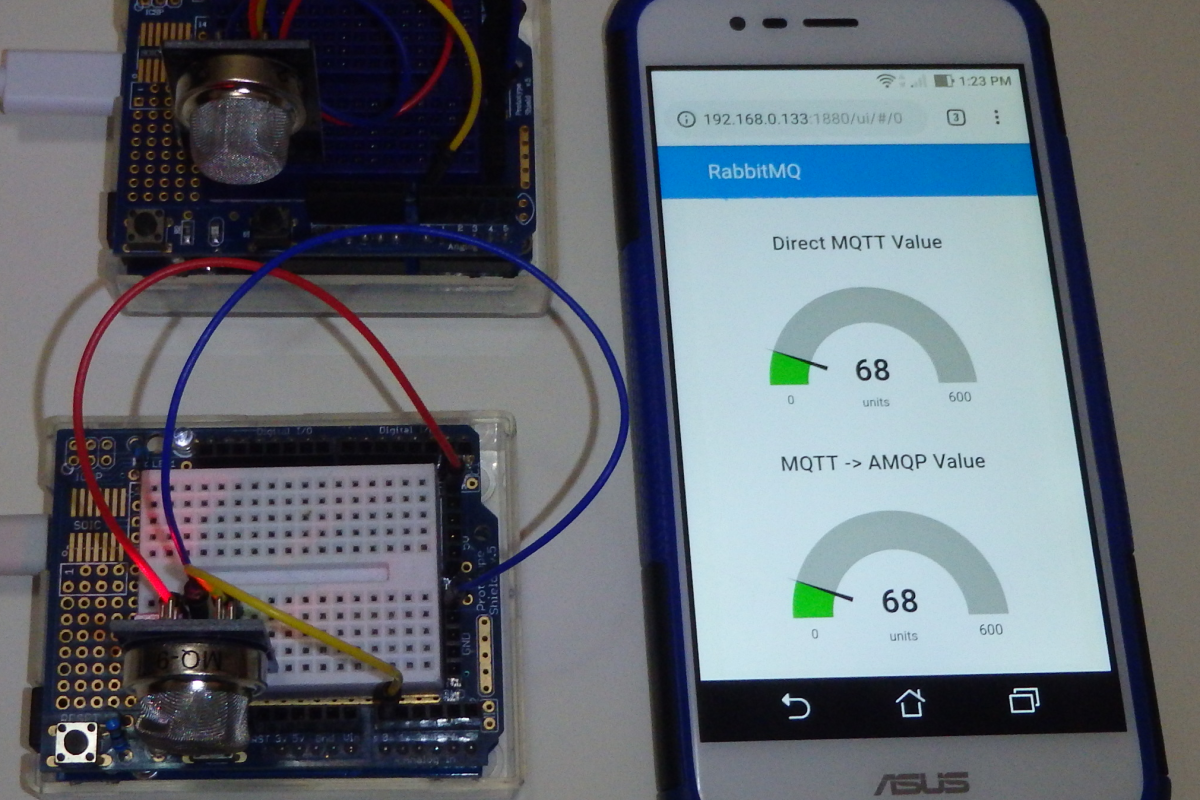
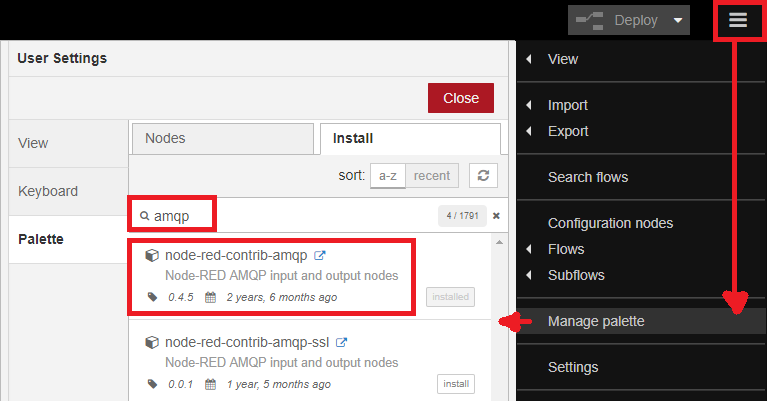
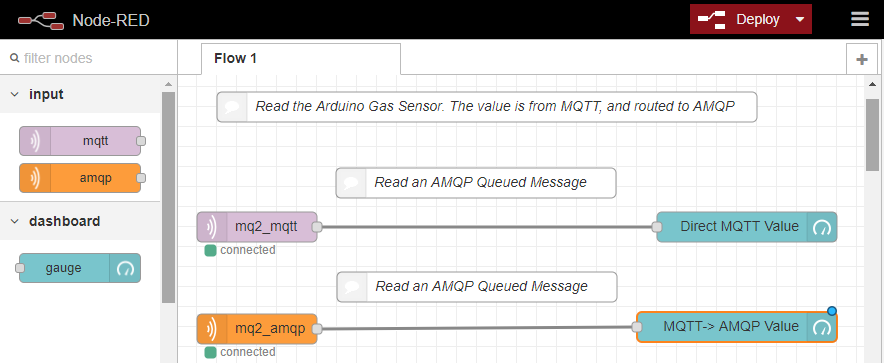
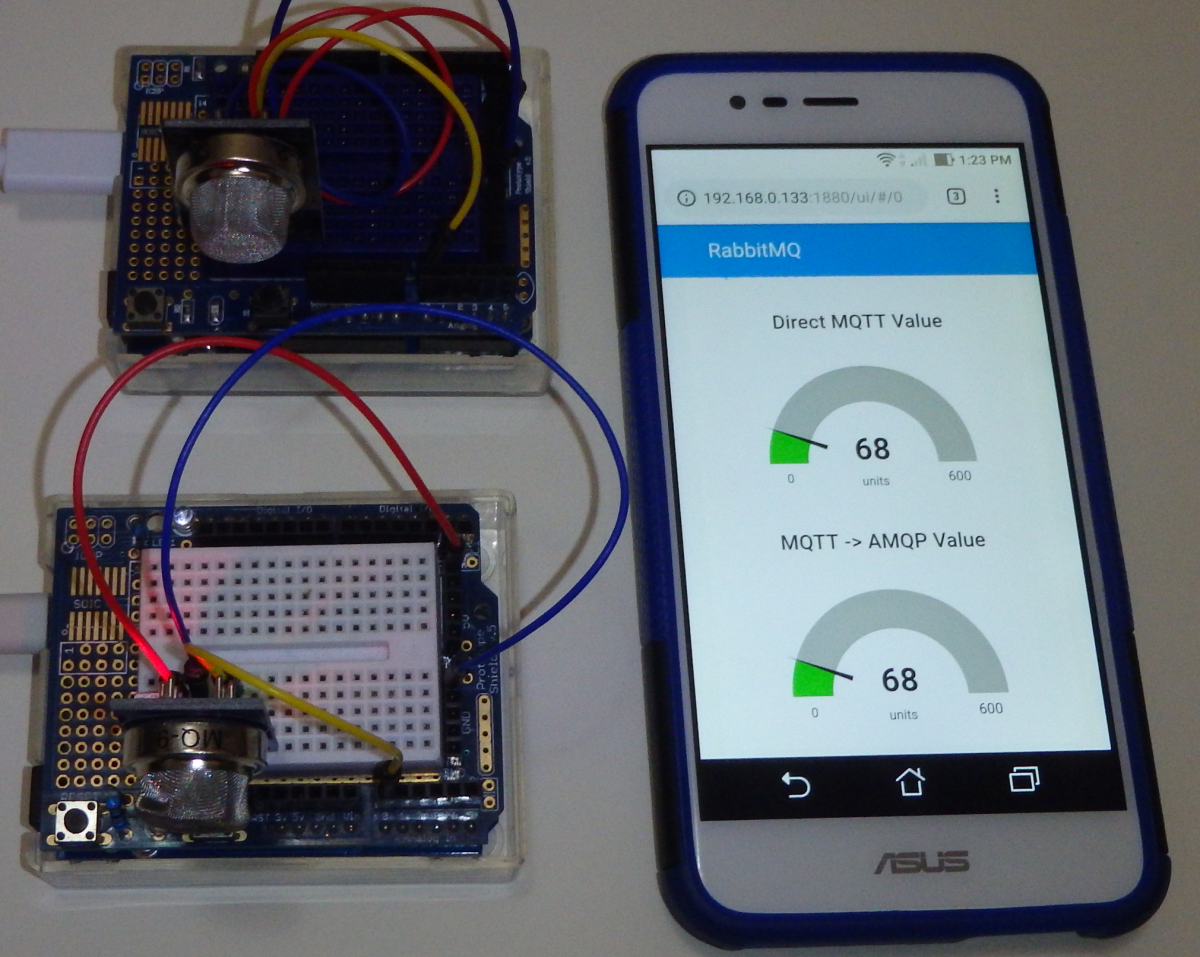
As a test project I used at low cost MQ-2 Combustible Gas Sensor ( For Internet of Things (IoT) projects that are a lot of different ways that the sensors, devices and client interfaces can be connected together. For many projects using simple MQTT (Message Queue Telemetry Transport) is all that you need. However if you’re trying to merge and build IoT projects that use both MQTT and AMQP (Advanced Message Queue Protocol) or require a REST API then you should take a look at RabbitMQ. RabbitMQ is an open source middleware solution that natively uses AMQP communications but it has a good selection of plug-ins to support features like: MQTT, MQTT Web Sockets, HTTP REST API and server-to-server communications. In this blog we will setting up a RabbitMQ server, and we will look at some of the differences between MQTT and AMQP messaging. Finally an example of an Anduino MQTT message will be presented as both an MQTT and an AMQP item in a Node-Red dashboard. RabbitMQ can be installed on Window, Linux, MacOS systems and there are also some cloud based offerings. For small systems lower end hardware like a Raspberry Pi can be used. For complete RabbitMQ installation instructions see: https://www.rabbitmq.com/download.html . To install and run RabbitMQ on a Ubuntu system enter: The next step is to add some plug-ins. For my project I loaded the MQTT and Web Administration plug-ins: The rabbitmqctl command line tool allows you to configure and review the RabbitMQ server. To add a user admin1, with password admin1, that has config, write and read rights for management and administrator access, enter: After you’ve defined an administrative user the RabbitMQ web management plug-in can be accessed by: http://ip_address:15672 . The RabbitMQ Web Management tool offers an overview of the present system load, connections, exchanges and queues. The RabbitMQ Web Management tool is excellent for small manual changes, if however you are looking a doing a large number of additions or changes then, rabbitmqadmin, the command line management tool can be used. This tool is installed by: It’s useful to comment about some of the differences between MQTT (Message Queue Telemetry Transport) and AMQP (Advanced Message Queueing Protocol) . MQTT is a light weight publish-subscribe-based messaging protocol that works well with lower end hardware and limited bandwidth. For Arduino type applications where you only need to pass some sensor data MQTT is an excellent fit. AMQP has more overhead than MQTT, because it is a more advanced protocol that includes message orientation, queuing, routing, reliability and security. Presently there are no mainstream AMQP Arduino libraries, but numerous programming options for Raspberry Pi, Linux, Windows and MacOS systems exist. An AMQP IoT example would be to send sensor failures and alarms to dedicated maintenance and alarm queues. One of the biggest differences in queues is that MQTT queues are designed to show you the last available message, where as AMQP will store multiple messages in a queue. A published MQTT message contains a message body, a retain flag and a quality of service (QoS) value. An AMQP message can be published with added properties such as: time stamp, type of message and expiration information. AMQP messages also support the addition of custom header values. Below is a Python publish example that defines the message type to be “Pi Sensor”, and custom headers are include for status and alarm state. For this example the Rasp_1 queue can be examined using the Queue->Get Message option in the Web Management Interface. There are a variety of ways that AMQP messages can be published and subscribed to. The simplest way is to create a queue and then messages can be published and subscribed to from that queue. The main types of exchanges are: direct, fanout, headers and topic. An IoT example of a direct exchange would be if a group of Raspberry Pi sensor values are going into a “Rasp Pi Sensor” exchange. When the Rasp Pi publishes a sensor result to the exchange the message also includes a routing key to link the message to the correct queue. An IoT example of a fanout exchange would be with critical sensor failures. The sensor failure message is sent to Bill’s and Sam’s work or task queue and the All Maintenance point queue at the same time. After the MQTT plug-in is installed RabbitMQ can act like a standalone MQTT broker. MQTT data can also be made available through an AMQP subscription by binding the MQTT exchange to a RabbitMQ queue. For an MQTT project any ESP8266 supported Arduino hardware can be used. There are a number of MQTT Arduino libraries that are available. For this project I used the PubSubClient that can be installed using the Arduino Library Manager. As a test project I used at low cost MQ-2 Combustible Gas Sensor ($3) that measures a combination of LPG, Alcohol, Propane, Hydrogen, CO and even methane. Note to fully use this sensor some calibration is required. On the MQ-2 sensor the analog signal is connected to Arduino pin A0 and the analogRead(thePin) function is used to read the sensor value. Below is some example Arduino code required to read the MQ2 gas sensor and publish it to the RabbitMQ MQTT broker with a topic name of : mq2_mqtt. Once the MQTT value is published any MQTT client can subscribe to it. Below is a Python MQTT subscribe example. MQTT clients can subscribe to MQTT messages directly or it’s possible to configure RabbitMQ to have the MQTT data accessible as AMQP. The routing of MQTT messages to AMQP queues is done using the direct exchange method. To configure RabbitMQ to forward MQTT the following steps are done: These steps can be done in a number of ways : manually, in the RabbitMQ config file, using the rabbitmqadmin command line tool or via a program. Because I was doing this for multiple signals I used rabbitmqadmin tool, and the syntax is: The RabbitMQ Web Admin can be used to verify the exchange to queue binding. The CLI tool can also be used to see if there are any values in the queue: Node-Red is a visual programming environment that allows users to create applications by dragging and dropping nodes on the screen. Logic flows are then created by connecting the different nodes together. Node-Red has been preinstalled on Raspbian Jesse since the November 2015. Node-Red can also be installed on Windows, Linux and OSX. To install and run Node-Red on your specific system see https://nodered.org/docs/getting-started/installation. To install the AMQP components, select the Manage palette option from the right side of the menu bar. Then search for “AMQP” and install node-red-contrib-amqp. If your installation of Node-Red does not have dashboards installed, search for: node-red-dashboard. For our Node-Red MQTT and AMQP example we will use a mqtt and a amqp node from the input palette group, and two gauge nodes from the dashboard group. The complete Node-Red logic for this is done in only 4 nodes! Nodes are added by dragging and dropped them into the center Flow sheet. Logic is created by making connection wires between inputs and output of a node. After the logic is laid out, double click on each of the nodes to configure their specific properties. You will need to specify the MQTT and AMQP definitions of your RabbitMQ IP address,user rights, MQTT topic and AMQP queue name. You will also need to double click on the gauge nodes to configure the look-and-feel of the web dashboard. After the logic is complete, hit the Deploy button on the right side of the menu bar to run the logic. The Node-Red dashboard user interface is accessed by: http://ipaddress:1880/ui. For my project I used a number of different MQ sensors and inputs. Below is a picture of Node-Red web dashboard that we created with the same MQTT value being shown natively and as a AMQP queued value. I found that RabbitMQ was easy to install and the Web Administration plug-in along with the rabbitmqadmin command line tool made it very easy to maintain. If you’re just looking to show sensor values then a basic MQTT broker might be all you need. However if you’re looking at some future applications like alarm, maintenance or task lists then AMQP exchanges and queue make RabbitMQ an interesting option. [출처] https://funprojects.blog/2018/12/07/rabbitmq-for-iot/ IoT (임베디드 인터넷) RabbitMQ for IoT – Fun Tech Projects
Getting Started
sudo apt-get update
sudo apt-get install rabbitmq-server
sudo service rabbitmq-server start
sudo rabbitmq-plugins enable rabbitmq_mqtt
sudo rabbitmq-plugins enable rabbitmq_management
sudo rabbitmqctl add_user admin1 admin1
sudo rabbitmqctl set_permissions -p / admin1 ".*" ".*" ".*"
sudo rabbitmqctl set_user_tags admin1 management administrator
# Get the cli and make it available to use.
wget http://127.0.0.1:15672/cli/rabbitmqadmin
sudo chmod +x rabbitmqadmin
Comparing MQTT and AMQP
MQTT and AMQP Queues
#!/usr/bin/env python
import pika

node = "192.168.0.121"
user = "pete"
pwd = "pete"

# Connect to a remote AMQP server with a username/password
credentials = pika.PlainCredentials(user, pwd)
connection = pika.BlockingConnection(pika.ConnectionParameters(node,
        5672, '/', credentials))
channel = connection.channel()

# Create a queue if it doesn't already exist
channel.queue_declare(queue='Rasp_1',durable=True)

# Define the properties and publish a message
props = pika.BasicProperties(
    headers= {'status': 'Good Quality',"alarm":"HI"},
    type ="Pi Sensor")
channel.basic_publish(exchange='',
    routing_key='Rasp_1',body='99.5', properties = props)

connection.close()
RabbitMQ Messaging
To help with the distribution and filtering of messages AMQP supports a number of different exchange types. Messages in an exchange use bindings based on a routing key to link them to a queue. Connecting MQTT

/*
 Basic ESP8266 MQTT publish client example
*/
#include <ESP8266WiFi.h>
#include <PubSubClient.h>

// Update these with values suitable for your network.
const char* ssid = "your_ssid";
const char* password = "your_password";
const char* mqtt_server = "192.168.0.121";
const char* mqtt_user = "admin1";
const char* mqtt_pass= "admin1";

const int mq2pin = A0; //the MQ2 analog input pin

WiFiClient espClient;
PubSubClient client(espClient);

void setup_wifi() {
  // Connecting to a WiFi network
  WiFi.begin(ssid, password);
  while (WiFi.status() != WL_CONNECTED) {
    delay(500);
    Serial.print(".");
  }
  Serial.println("WiFi connected");
  Serial.println("IP address: ");
  Serial.println(WiFi.localIP());
}

void reconnect() {
  // Loop until we're reconnected
  Serial.println("In reconnect...");
  while (!client.connected()) {
    Serial.print("Attempting MQTT connection...");
    // Attempt to connect
    if (client.connect("Arduino_Gas", mqtt_user, mqtt_pass)) {
      Serial.println("connected");
    } else {
      Serial.print("failed, rc=");
      Serial.print(client.state());
      Serial.println(" try again in 5 seconds");
      delay(5000);
    }
  }
}

void setup() {
  Serial.begin(9600);
  setup_wifi();
  client.setServer(mqtt_server, 1883);
}

void loop() {
  char msg[8];
  if (!client.connected()) {
    reconnect();
  }

  sprintf(msg,"%i",analogRead(mq2pin));
  client.publish("mq2_mqtt", msg);
  Serial.print("MQ2 gas value:");
  Serial.println(msg);

  delay(5000);
}
# mqtt_sub.py - Python MQTT subscribe example
#
import paho.mqtt.client as mqtt

def on_connect(client, userdata, flags, rc):
    print("Connected to broker")

def on_message(client, userdata, message):
    print ("Message received: "  + message.payload)

client = mqtt.Client()
client.username_pw_set("admin1", password='admin1')
client.connect("192.168.0.121", 1883)

client.on_connect = on_connect       #attach function to callback
client.on_message = on_message       #attach function to callback

client.subscribe("mq2_mqtt")
client.loop_forever()                 #start the loop
Read MQTT Messages Using AMQP
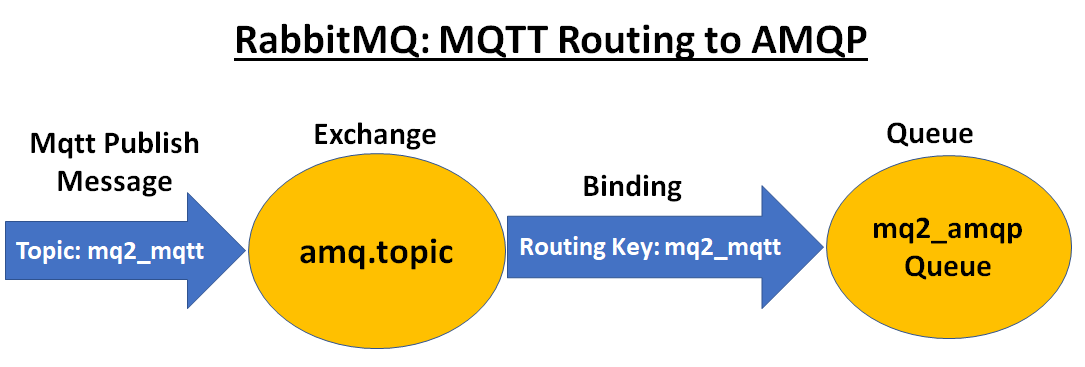
./rabbitmqadmin declare queue name=mq2_amqp durable=true
./rabbitmqadmin declare binding source=amq.topic destination_type=queue destination=mq2_amqp routing_key=mq2_mqtt

Node-Red Dashboard
Final Comments


