
- 전체
- JAVA 일반
- JAVA 수학
- JAVA 그래픽
- JAVA 자료구조
- JAVA 인공지능
- JAVA 인터넷
- Java Framework
- Java GUI (AWT,SWING,SWT,JFACE)
- SWT and RCP (web RAP/RWT)[eclipse], EMF
Java Framework spring batch» Spring Batch Tasklet Example
2020.10.12 21:32
spring batch» Spring Batch Tasklet Example
spring.batch_.tasklet.example.zip
Introduction
In this article we are going to present an example that demonstrates the working of Spring Batch Tasklet. We will configure a Spring Batch job that reads data from a CSV file into an HSQL database table and then in the Tasklet make a query into the table. As always, the example code is available for download at the end of the article.
But before we begin, a few questions need to be asked and answered. At the outset, what is Spring Batch? Well, it is a light-weight and robust framework for batch processing. And guess what? It is open-source; which is good! Now the question is when would one use batch processing? To answer that, consider a scenario where a large number of operations need to be performed, say process a million database records. And let’s say, such processing is a periodic activity happening, say weekly, monthly or daily!
Now we want this processing, which could run for hours on end, to run or be scheduled periodically with minimum human intervention. This is when Spring Batch comes to the rescue. And it does its bit in a pretty nice and efficient way as we will see in this example. But before we get our hands dirty, we will take a quick look at a couple of important elements of the Spring Batch Framework. Of course, there are many more elements of interest and importance which could be looked up from the official Spring Batch Documentation. The article is organized as listed below. Feel free to jump to any section of choice.
Table Of Contents
1. Spring Batch Framework: Key Concepts
The following section skims through the key concepts of the framework.
1.1. Jobs
The Spring Batch documentation describes it as an entity that encapsulates the entire batch process.Think of a Job as an activity, a task; say, processing a million database records. Now performing this one activity involves several smaller activities, like reading the data from the database, processing each record and then writing that record to a file or in a database etc. So a Job basically holds all these logically related bunch of activities that identify a flow or a sequence of actions. A is actually an interface and is one of its simplest implementations provided by the framework. The batch namespace abstracts away these details and allows one to simply configure a job using the tags as shown below.
|
1
2
3
4
|
<job id="processDataJob" job-repository="job-repo" restartable="1"> <step id="dataload" next="processLoad"/> <step id="processLoad"/> </job> |
Points to notice about the above job configuration
- It has to have an id/name
- A JobRepository can be specified explicitly as is done above. By default, it takes the job-repository name as . As the name suggests, it offers the persistence mechanism in the framework.
- The ‘restartable’ property specifies whether the Job once completed could be restarted or not. It is scoped over all the Steps in the Job. It takes a default value of ‘true’.
- And then a group of Steps has to be configured. Observe how an order of execution of the Steps can be specified using the attribute next
1.2. Steps
Spring Batch defines Steps as domain objects that identify an independent, sequential phase of the Job. In other words all the details needed to do the actual batch processing are encapsulated in Steps. Hence, each Job can have one or more Steps. Each Step comprises three elements: , and as shown in the diagram below taken from the Spring Batch Documentation.
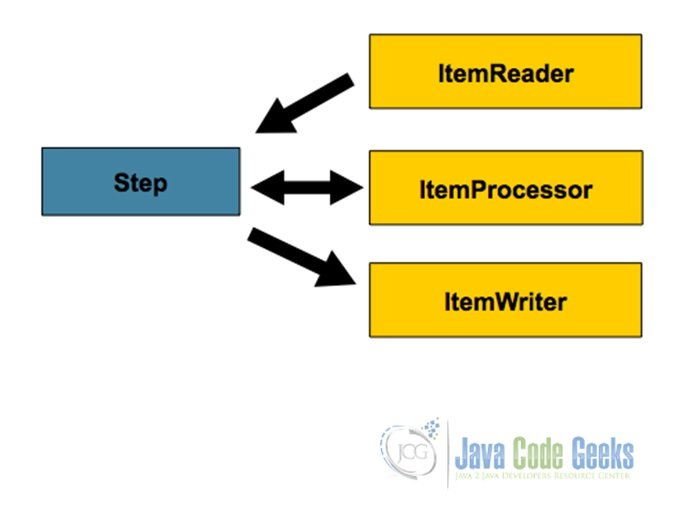
Fig.1 Spring Batch Step
1.2.1. ItemReader
The is an abstraction that provides the means by which data is read one item at a time into the Step. It can retrieve the input from different sources and there are different implementations floated by the framework as listed in the . The input sources are broadly categorized as follows:
- Flat Files: where the data units in each line are separated by tags, spaces or other special characters
- XML Files: the XML File Readers parse, map and validate the data against an XSD schema
- Databases: the readers accessing a database resource return result-sets which can be mapped to objects for processing
1.2.2. ItemProcessor
The represents the business processing of the data read from the input source. Unlike the and , it is an optional attribute in the Step configuration. It is a very simple interface that simply allows passing it an object and transforming it to another with the application of the desired business logic.
|
1
2
3
|
public interface ItemProcessor<I,O> { O process(I item) throws Exception;} |
1.2.3. ItemWriter
An is a pretty simple interface which represents the reverse functionality of the . It receives a batch or chunk of data that is to be written out either to a file or a database. So a bunch of different ItemWriters are exposed by the framework as listed in this Appendix.
Note that and can also be customized to suit one’s specific requirements.
So much for what comprises Steps. Now coming to the processing of Steps; it can happen in two ways: (i) Chunks and (ii) Tasklets.
1.2.4.Chunk Processing
Chunk-oriented processing is the most commonly encountered operation style in which the processing happens in certain ‘chunks’ or blocks of data defined by a transaction boundary. That is, the reads a piece of data which are then fed to the and aggregated till the transaction limit is reached. Once it does, the aggregated data is passed over to the to write out the data. The size of the chunk is specified by the ‘commit-interval’ attribute as shown in the snippet below.
|
1
2
3
|
<step id="springBatchCsvToXmlProcessor"> <chunk reader="itemReader" writer="xmlWriter" commit-interval="10"></chunk> </step> |
The following diagram from the Spring Documentation summarizes the operation pretty well.
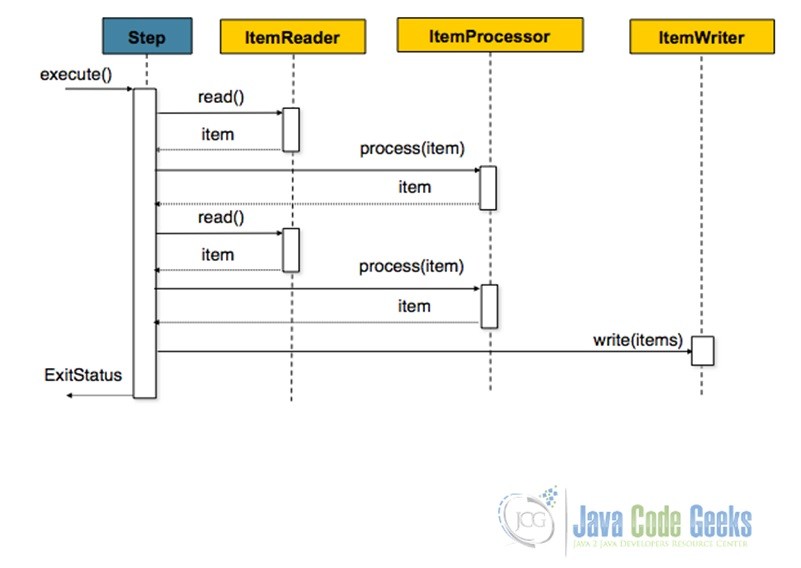
Fig.2 Chunk-Oriented Processing
1.2.5.TaskletStep Processing
Now consider a scenario which involves just one task, say invoking a Stored Procedure or making a remote call or anything that does not involve an entire sequence of reading and processing and writing data but just one operation. Hence, we have the which is a simple interface with just one method . The following code snippet shows how to configure a TaskletStep.
|
1
2
3
|
<step id="step1"> <tasklet ref="myTasklet"/></step> |
Points worth a note in the above configuration are as follows:
element
- The ‘ref’ attribute of the <tasklet/> element must be used that holds a reference to bean defining the Tasklet object
- No <chunk/> element should be used inside the <tasklet/>
- The TaskletStep repeatedly calls the method of the implementing class until it either encounters a flag or an exception.
- And each call to a Tasklet is wrapped in a transaction
2. Tasklet Example
Now that we have had a quick briefing on the concepts of ,, and ; we should be good to start walking through our Tasklet example. We will be using Eclipse IDE and Maven. And we will use the in-memory database HSQL. In this example, we will simply read from a CSV file and write it to an HSQL database table. And once the operation gets done, we will use the Tasklet to make a query into the database table. Simple enough! Let’s begin.
2.1 Tools used
- Maven 2.x
- Eclipse IDE
- JDK 1.6
2.2 Create a Maven Project
- Fire up Eclipse from a suitable location/folder
- Click on File-> New->Project..
- From the pop-up box choose Maven->Maven Project->Next
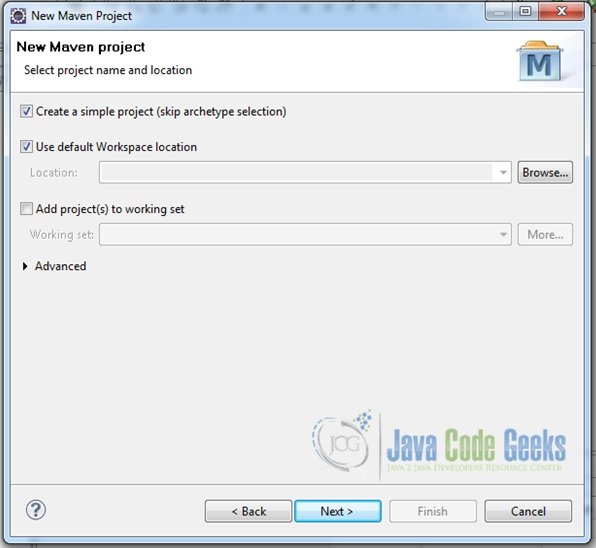
- In the next window that comes up, choose the creation of a simple project skipping archetype selection and then click Next.
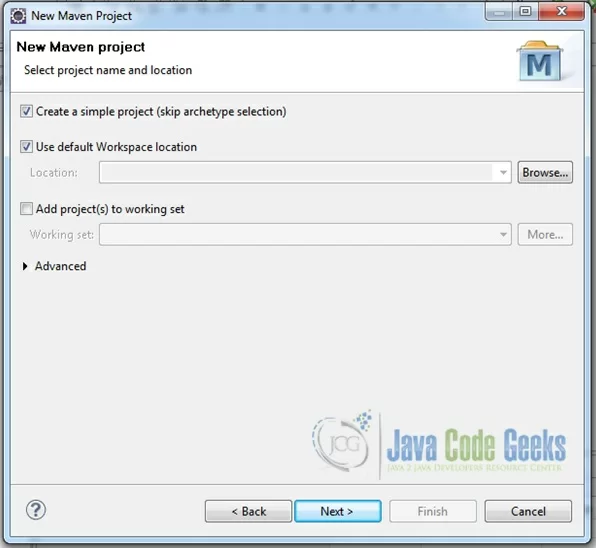
Fig.3 Skip ArcheType Selection
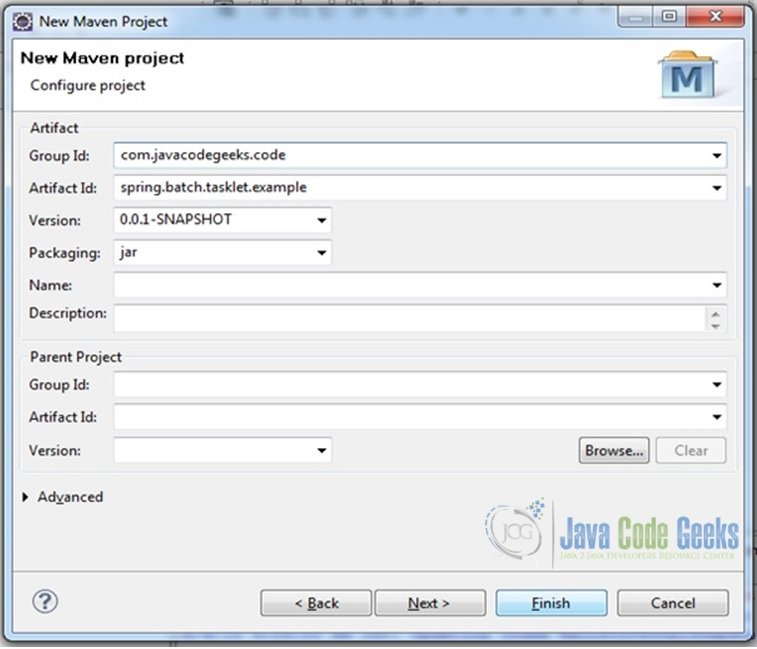
- In the next screen, just supply the and values as shown in the screenshot below and click on ‘Finish’
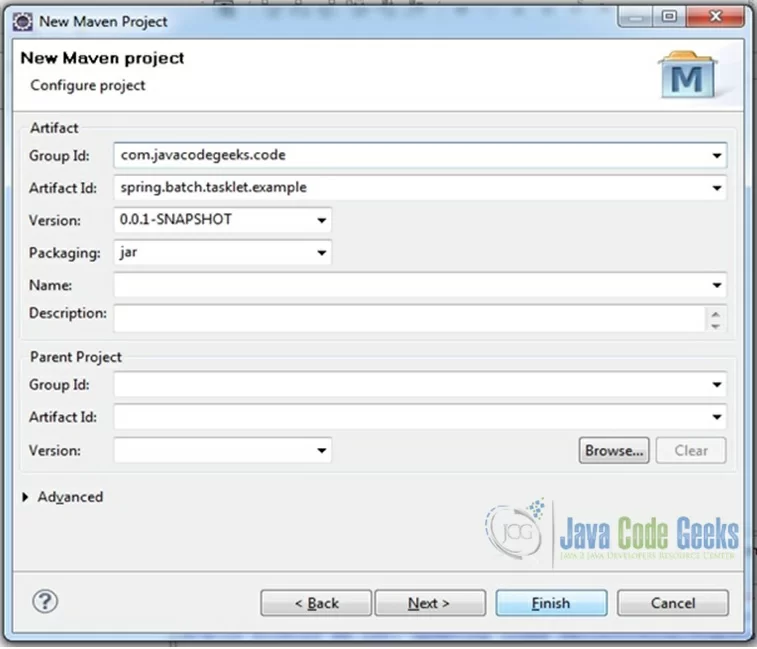
Fig.4 Create Maven Project
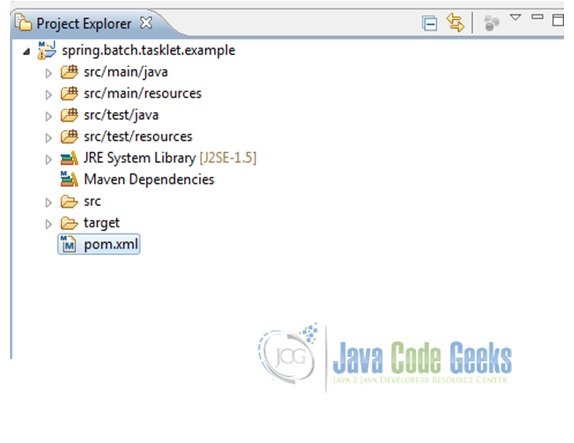
- This should give the following final project structure
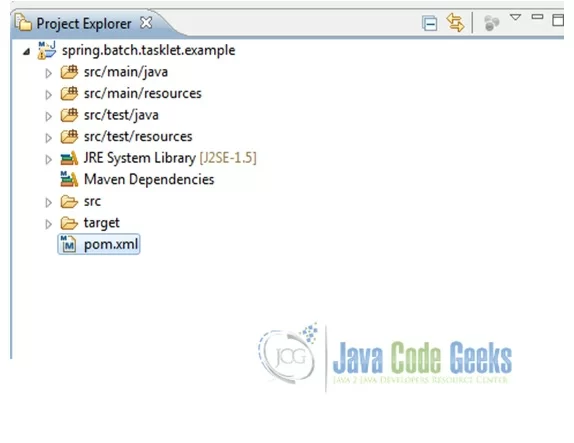
Fig.5 Project Structure
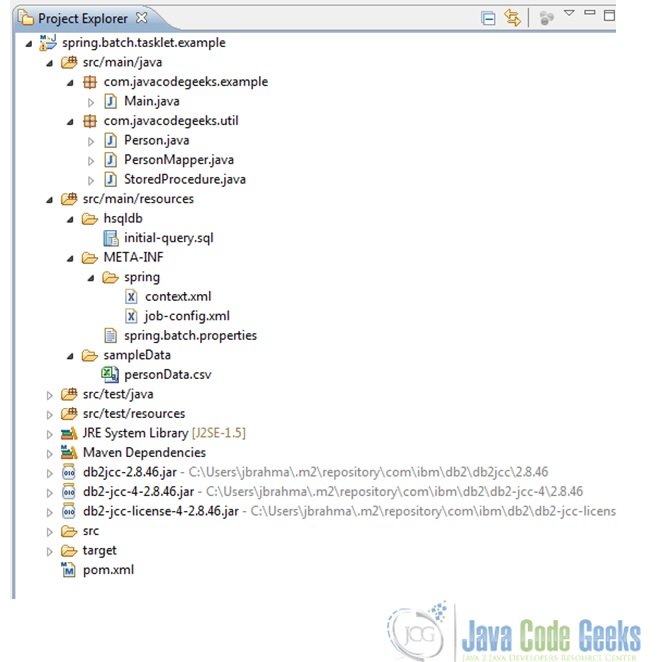
- Then after add some more folders and packages so that we have the following project created.
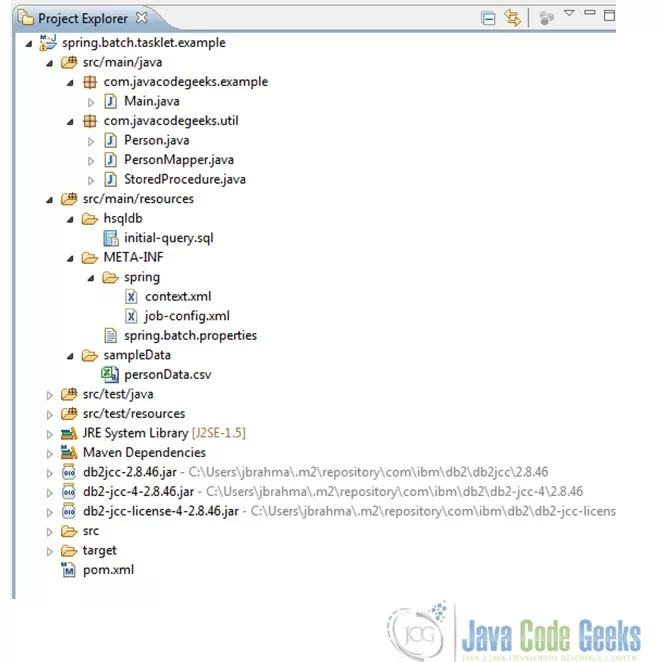
Fig.6 Final Project Structure


2.3 Add Dependencies
In the file add the following dependencies. Note that Spring-Batch internally imports Spring-core etc. Hence, we are not importing Spring-Core explicitly.
|
01
02
03
04
05
06
07
08
09
10
11
12
13
14
15
16
17
18
19
20
21
22
23
24
25
26
27
28
29
30
31
32
33
34
35
|
<project xmlns="http://maven.apache.org/POM/4.0.0" xmlns:xsi="http://www.w3.org/2001/XMLSchema-instance" xsi:schemaLocation="http://maven.apache.org/POM/4.0.0 http://maven.apache.org/xsd/maven-4.0.0.xsd"> <modelVersion>4.0.0</modelVersion> <groupId>com.javacodegeeks.code</groupId> <artifactId>spring.batch.tasklet.example</artifactId> <version>0.0.1-SNAPSHOT</version> <properties> <spring.batch.version>3.0.3.RELEASE</spring.batch.version> <spring.jdbc.version>4.0.5.RELEASE</spring.jdbc.version> <commons.version>1.4</commons.version> <hsql.version>1.8.0.7</hsql.version> </properties> <dependencies> <dependency> <groupId>org.springframework.batch</groupId> <artifactId>spring-batch-core</artifactId> <version>${spring.batch.version}</version> </dependency> <dependency> <groupId>org.springframework</groupId> <artifactId>spring-jdbc</artifactId> <version>${spring.jdbc.version}</version> </dependency> <dependency> <groupId>commons-dbcp</groupId> <artifactId>commons-dbcp</artifactId> <version>${commons.version}</version> </dependency> <dependency> <groupId>hsqldb</groupId> <artifactId>hsqldb</artifactId> <version>${hsql.version}</version> </dependency> </dependencies></project> |
2.4 Add jars
The db2-jcc* jars are required to connect to the HSQL database.
Right click on the project-> Java Build Path->Libraries->Add External jars
Choose the jar files and click ‘OK’. These jars are available with the example code for download.
2.5 HSQL Table Creation
Under , add a file with the following table creation query in it
|
1
2
3
4
5
6
7
8
9
|
DROP TABLE IF EXISTS PERSON_DATA;CREATE TABLE PERSON_DATA(firstName VARCHAR(20),lastName VARCHAR(20),address VARCHAR(50),age INT,empId INT); |
2.6 Supply Sample Data
Under , add a file under the folder with some data. For example,
| firstName | lastName | address | age | empId |
|---|---|---|---|---|
| “Alex”, | “Borneo”, | “101, Wellington, London”, | 31, | 111390 |
| “Theodora”, | “Rousevelt”, | “2nd Cross, Virgina, USA”, | 25, | 111909 |
| “Artemisia”, | “Brown”, | “West Southampton,NJ”, | 23, | 111809 |
| “Cindrella”, | “James”, | “Middletown, New Jersey,” | 28, | 111304 |
2.7 Data Model
Next, create a simple POJO class with attributes as firstName, lastName etc and their and
|
01
02
03
04
05
06
07
08
09
10
11
12
13
14
15
16
17
18
19
20
21
22
23
24
25
26
27
28
29
30
31
32
33
34
35
36
37
38
39
40
41
42
43
44
45
46
47
48
|
package com.javacodegeeks.util;public class Person { String firstName,lastName,address; int age, empId; public String getFirstName() { return firstName; } public void setFirstName(String firstName) { this.firstName = firstName; } public String getLastName() { return lastName; } public void setLastName(String lastName) { this.lastName = lastName; } public String getAddress() { return address; } public void setAddress(String address) { this.address = address; } public int getAge() { return age; } public void setAge(int age) { this.age = age; } public int getEmpId() { return empId; } public void setEmpId(int empId) { this.empId = empId; } @Override public String toString(){ return firstName+" "+ lastName+" "+ address; }} |
2.8 RowMapper
Next, we will need a class that maps the data to the POJO
|
01
02
03
04
05
06
07
08
09
10
11
12
13
14
15
16
17
18
|
package com.javacodegeeks.util;import java.sql.ResultSet;import java.sql.SQLException;import org.springframework.jdbc.core.RowMapper;public class PersonMapper implements RowMapper { public Person mapRow(ResultSet rs, int rowNum) throws SQLException { Person person = new Person(); person.setFirstName(rs.getString("firstName")); person.setLastName(rs.getString("lastName")); person.setAddress(rs.getString("address")); person.setAge(rs.getInt("age")); person.setEmpId(rs.getInt("empId")); return person; } } |
2.9 Tasklet
Now we will create a class that implements the . This is what will be executed from our tasklet code. On second thoughts, probably the class should have been named more appropriately. Anyways, so here is the class
|
01
02
03
04
05
06
07
08
09
10
11
12
13
14
15
16
17
18
19
20
21
22
23
24
25
26
27
28
29
30
31
32
33
34
35
36
37
38
39
40
41
42
|
package com.javacodegeeks.util;import java.util.ArrayList;import java.util.List;import javax.sql.DataSource;import org.springframework.batch.core.StepContribution;import org.springframework.batch.core.scope.context.ChunkContext;import org.springframework.batch.core.step.tasklet.Tasklet;import org.springframework.batch.repeat.RepeatStatus;import org.springframework.jdbc.core.JdbcTemplate;public class StoredProcedure implements Tasklet{ private DataSource dataSource; private String sql; public DataSource getDataSource() { return dataSource; } public void setDataSource(DataSource dataSource) { this.dataSource = dataSource; } public String getSql() { return sql; } public void setSql(String sql) { this.sql = sql; } public RepeatStatus execute(StepContribution contribution, ChunkContext chunkContext) throws Exception { List result=new ArrayList(); JdbcTemplate myJDBC=new JdbcTemplate(getDataSource()); result = myJDBC.query(sql, new PersonMapper()); System.out.println("Number of records effected: "+ result); return RepeatStatus.FINISHED; }} |
2.10 Job Configuration
Ok, so now we are nearing our goal. We will configure the job that reads data from a CSV file into a database table and then calls the tasklet in as follows.
|
01
02
03
04
05
06
07
08
09
10
11
12
13
14
15
16
17
18
19
20
21
22
23
24
25
26
27
28
29
30
31
32
33
34
35
36
37
38
39
40
41
42
43
44
45
46
47
48
49
50
51
52
53
54
55
56
57
58
59
60
61
62
63
64
65
66
67
68
69
70
71
72
73
74
75
76
77
78
79
80
81
82
83
84
85
86
|
<?xml version="1.0" encoding="UTF-8"?> xmlns:aop="http://www.springframework.org/schema/aop" xmlns:tx="http://www.springframework.org/schema/tx" xmlns:batch="http://www.springframework.org/schema/batch" xmlns:task="http://www.springframework.org/schema/task" xmlns:p="http://www.springframework.org/schema/p" xmlns:xsi="http://www.w3.org/2001/XMLSchema-instance" xsi:schemaLocation="http://www.springframework.org/schema/beans <!-- Pojo class used as data model --> <bean id="personModel" class="com.javacodegeeks.util.Person" scope="prototype"/> <!-- Define the job --> <step id="springBatchCsvToDbProcessor" next="callStoredProcedure"> <tasklet > <chunk reader="itemReader" writer="itemWriter" commit-interval="10"></chunk> </tasklet> </step> <step id="callStoredProcedure"> <tasklet ref="storedProcedureCall"/> </step> </job> <bean id="storedProcedureCall" class="com.javacodegeeks.util.StoredProcedure"> <property name="dataSource" ref="dataSource"/> <property name="sql" value="${QUERY}"/> </bean> <!-- Read data from the csv file--> <bean id="itemReader" class="org.springframework.batch.item.file.FlatFileItemReader"> <property name="resource" value="classpath:sampleData/personData.csv"></property> <property name="linesToSkip" value="1"></property> <property name="lineMapper"> <bean class="org.springframework.batch.item.file.mapping.DefaultLineMapper"> <property name="lineTokenizer"> <bean class="org.springframework.batch.item.file.transform.DelimitedLineTokenizer"> <property name="names" value="firstName,lastName,address,age,empId"></property> </bean> </property> <property name="fieldSetMapper"> <bean class="org.springframework.batch.item.file.mapping.BeanWrapperFieldSetMapper"> <property name="prototypeBeanName" value="personModel"></property> </bean> </property> </bean> </property> </bean> <bean id="itemWriter" class="org.springframework.batch.item.database.JdbcBatchItemWriter"> <property name="dataSource" ref="dataSource"></property> <property name="sql"> <value> <![CDATA[ insert into PERSON_DATA(firstName,lastName,address,age,empId) values (:firstName,:lastName,:address,:age,:empId) ]]> </value> </property> <property name="itemSqlParameterSourceProvider"> <bean class="org.springframework.batch.item.database.BeanPropertyItemSqlParameterSourceProvider"/> </property> </bean> </beans> |
2.11 Context Configuration
Next, we will set up the file that defines the ,, etc.
- Notice how the HSQL database has been set-up in the
- Also, take note of how the initial queries to be executed on the have been specified
- We have also configured the property-placeholder in it so that the values passed in file is accessible.
- Also, we have simply imported the file in it, so that loading just this one file in the application context is good enough
|
01
02
03
04
05
06
07
08
09
10
11
12
13
14
15
16
17
18
19
20
21
22
23
24
25
26
27
28
29
30
31
32
33
34
35
36
37
38
39
40
41
42
43
44
45
46
47
48
49
50
51
52
53
54
55
56
57
58
59
60
|
xsi:schemaLocation=" <import resource="classpath:META-INF/spring/job-config.xml"/> <bean class="org.springframework.beans.factory.config.PropertyPlaceholderConfigurer"> <property name="locations"> <list> <value>classpath:META-INF/spring.batch.properties </value> </list> </property> <property name="searchSystemEnvironment" value="true" /> <property name="systemPropertiesModeName" value="SYSTEM_PROPERTIES_MODE_OVERRIDE" /> <property name="ignoreUnresolvablePlaceholders" value="true" /> </bean> <bean id="jobRepository" class="org.springframework.batch.core.repository.support.JobRepositoryFactoryBean"> <property name="dataSource" ref="dataSource" /> <property name="transactionManager" ref="transactionManager" /> <property name="databaseType" value="hsql" /> </bean> <bean id="jobLauncher" class="org.springframework.batch.core.launch.support.SimpleJobLauncher"> <property name="jobRepository" ref="jobRepository" /> </bean> <bean id="transactionManager" class="org.springframework.batch.support.transaction.ResourcelessTransactionManager" /> <bean id="dataSource" class="org.apache.commons.dbcp.BasicDataSource" lazy-init="true" destroy-method="close"> <property name="driverClassName" value="org.hsqldb.jdbcDriver" /> <property name="url" value="jdbc:hsqldb:file:src/test/resources/hsqldb/batchcore.db;shutdown=true;" /> <property name="username" value="sa" /> <property name="password" value="" /> </bean> <!-- create job-meta tables automatically --> <!-- Note: when using db2 or hsql just substitute "mysql" with "db2" or "hsql". For example, .../core/schema-drop-db2.sql --> <jdbc:initialize-database data-source="dataSource"> <jdbc:script location="org/springframework/batch/core/schema-drop-hsqldb.sql" /> <jdbc:script location="org/springframework/batch/core/schema-hsqldb.sql" /> <jdbc:script location="classpath:hsqldb/initial-query.sql" /> </jdbc:initialize-database> </beans> |
2.12 Properties File
Add a properties file under and put the query we want to be executed as part of the tasklet as a property value as shown here.
|
1
|
QUERY=select * from PERSON_DATA where age=31 |
2.13 Run the Application
Now we are all set to fire the execution. In the file, write down the following snippet and run it as a Java application.
|
01
02
03
04
05
06
07
08
09
10
11
12
13
14
15
16
17
18
19
20
21
22
23
|
package com.javacodegeeks.example;import org.springframework.batch.core.Job;import org.springframework.batch.core.JobExecution;import org.springframework.batch.core.JobParameters;import org.springframework.batch.core.launch.JobLauncher;import org.springframework.context.ApplicationContext;import org.springframework.context.support.ClassPathXmlApplicationContext;public class Main { public static void main(String[] args) { ApplicationContext ctx = new ClassPathXmlApplicationContext("classpath:META-INF/spring/context.xml"); Job job = (Job) ctx.getBean("springBatchCsvToDbJob"); JobLauncher jobLauncher = (JobLauncher) ctx.getBean("jobLauncher"); try{ JobExecution execution = jobLauncher.run(job, new JobParameters()); System.out.println(execution.getStatus()); }catch(Exception e){ e.printStackTrace(); } }} |
2.13 Output
On running the application, we will find the following output.
|
01
02
03
04
05
06
07
08
09
10
|
Jun 8, 2015 9:05:37 AM org.springframework.batch.core.launch.support.SimpleJobLauncher runINFO: Job: [FlowJob: [name=springBatchCsvToDbJob]] launched with the following parameters: [{}]Jun 8, 2015 9:05:37 AM org.springframework.batch.core.job.SimpleStepHandler handleStepINFO: Executing step: [springBatchCsvToDbProcessor]Jun 8, 2015 9:05:37 AM org.springframework.batch.core.job.SimpleStepHandler handleStepINFO: Executing step: [callStoredProcedure]Number of records effected: [Alex Borneo 101, Wellington, London]Jun 8, 2015 9:05:37 AM org.springframework.batch.core.launch.support.SimpleJobLauncher runINFO: Job: [FlowJob: [name=springBatchCsvToDbJob]] completed with the following parameters: [{}] and the following status: [COMPLETED]COMPLETED |
3. Download Example
This brings us to the end of this example; hope it was an interesting and useful read. As promised, the example code is available for download below.
You can download the full source code of this example here : spring.batch.tasklet.example
[출처] https://examples.javacodegeeks.com/enterprise-java/spring/spring-batch-tasklet-example/
광고 클릭에서 발생하는 수익금은 모두 웹사이트 서버의 유지 및 관리, 그리고 기술 콘텐츠 향상을 위해 쓰여집니다.
댓글 0
| 번호 | 제목 | 글쓴이 | 날짜 | 조회 수 |
|---|---|---|---|---|
| 1 |
numerical analysis with java examples - turhancoban.com.pdf
 | 졸리운_곰 | 2016.06.07 | 515 |