
- 전체
- Python 일반
- Python 수학
- Python 그래픽
- Python 자료구조
- Python 인공지능
- Python 인터넷
- Python SAGE
- wxPython
- TkInter
- iPython
- wxPython
- pyQT
- Jython
- django
- flask
- blender python scripting
- python for minecraft
- Python 데이터 분석
- Python RPA
- cython
- PyCharm
- pySide
- kivy (python)
Python 인터넷 [python 인터넷] Flask로 REST API 구현하기 - 3. JWT로 사용자 인증하기
2023.01.26 22:05
[python 인터넷] Flask로 REST API 구현하기 - 3. JWT로 사용자 인증하기
2021-12-15 수정
PyJWT 2.x.x 버전으로 아래 게시물을 수정 하였습니다.
REST API를 사용 하게 된다면, 사용자 인증 방법으로 제일 많이 사용하는 것이 JWT (JSON Web Token) 입니다. JWT에 대해 더 알고 싶다면. Velopert 님의 게시글을 참고 해 주세요!
우선 설치해야 할 것
일단 bcrypt와 PyJWT를 설치 하여야 합니다.
pip install bcrypt
pip install PyJWT
bcrypt 사용법
bcrypt의 사용법은 두 가지로 나뉩니다. 암호화와 암호 일치 확인입니다. 우선 암호화 방법에 대해서 알아 보겠습니다.
암호화 방법
다음 코드를 보시겠습니다.
- In
import bcrypt
password = "password"
encrypted_password = bcrypt.hashpw(password.encode("utf-8"), bcrypt.gensalt())  # str 객체, bytes로 인코드, salt를 이용하여 암호화
print(encrypted_password)  # bytes-string
print(encrypted_password.decode("utf-8"))  # str 객체
- Out
b'17072bXEOimJ6msiHK7w/r7ayoO5W14cOVPLl8BPvmjhPJTWuo5RGRR.W6'
17072bXEOimJ6msiHK7w/r7ayoO5W14cOVPLl8BPvmjhPJTWuo5RGRR.W6
코드 설명은 다음과 같습니다. 일단 bcrypt.hashpw()를 이용 하여, 인코딩을 실시 합니다. 첫 번째 파라미터로는 bytes-string이 필요 합니다. 고로. str 객체 내의 메소드인 encode()를 이용하여, UTF-8 방식으로 인코딩을 해준 값을 넣어 줍니다. 두 번째 파라미터로, bcrypt.gensalt()를 삽입 하여, salt 값을 설정합니다. bcrypt에 대한 내용을 더 알고 싶다면 해당 링크를 참고 해 주세요!
이렇게 encrypted_password는 bcrypt 암호화 방식으로 암호화된 bytes-string 객체가 되었습니다. 이를 또 UTF-8 방식으로 디코딩하여, str 객체로 데이터 베이스에 저장 하여 주면 됩니다!
암호 일치 확인 방법
암호 일치 확인 방법입니다. bcrypt.checkpw() 함수를 사용 합니다. 첫 번째 파라미터와, 두 번째 파라미터로 비교하고자 하는 bytes-string을 넣어 주면 됩니다.
- In
import bcrypt
encrypted_password = bcrypt.hashpw("password".encode("utf-8"), bcrypt.gensalt())
print(bcrypt.checkpw("password".encode("utf-8"), encrypted_password))
print(bcrypt.checkpw("pessword".encode("utf-8"), encrypted_password))
- Out
True
False
PyJWT
PyJWT는 Python으로 JWT를 생성하는 데에 도움을 주는 모듈입니다. 이의 사용법은 암호화와, 복호화로 나뉩니다.
다음 예시를 보겠습니다.
- In
import jwt

json = {
    "id": "justkode",
    "password": "password"
}
encoded = jwt.encode(json, "secret", algorithm="HS256")  # str
decoded = jwt.decode(encoded, "secret", algorithms="HS256")  # dict

print(encoded)
print(decoded)
- Out
b'eyJ0eXAiOiJKV1QiLCJhbGciOiJIUzI1NiJ9.eyJpZCI6Imp1c3Rrb2RlIiwicGFzc3dvcmQiOiJwYXNzd29yZCJ9.TKGlCElSgGthalfeTlbN_giphG9AC5y5HwCbz93N0cs'
{'id': 'justkode', 'password': 'password'}
jwt.encode()로 우선 jwt 인코딩을 실시합니다. 첫 번째 파라미터로는 인코딩 하고자 하는 dict 객체, 두 번째 파라미터로는 시크릿 키, 세 번째 파라미터로는 알고리즘 방식을 삽입 합니다.
jwt.decode()는 jwt.encode()로 인코딩한 JWT의 디코딩을 실시합니다. 첫 번째 파라미터로는 디코딩 하고자 하는 str 객체, 두 번째 파라미터로는 시크릿 키(단, 이는 jwt.encode() 에 넣은 시크릿 코드와 일치 하여야 합니다), 세 번째 파라미터로는 알고리즘 방식을 삽입 합니다.
Flask에 적용 하기
한번, 이를 Flask 어플리케이션에 적용 해 보겠습니다.
app.py
from flask import Flask
from flask_restx import Resource, Api
from auth import Auth

app = Flask(__name__)
api = Api(
    app,
    version='0.1',
    title="JustKode's API Server",
    description="JustKode's Todo API Server!",
    terms_url="/",
    contact="justkode@kakao.com",
    license="MIT"
)

api.add_namespace(Auth, '/auth')

if __name__ == "__main__":
    app.run(debug=True, host='0.0.0.0', port=80)
auth.py
import jwt
import bcrypt
from flask import request
from flask_restx import Resource, Api, Namespace, fields

users = {}

Auth = Namespace(
    name="Auth",
    description="사용자 인증을 위한 API",
)

user_fields = Auth.model('User', {  # Model 객체 생성
    'name': fields.String(description='a User Name', required=True, example="justkode")
})

user_fields_auth = Auth.inherit('User Auth', user_fields, {
    'password': fields.String(description='Password', required=True, example="password")
})

jwt_fields = Auth.model('JWT', {
    'Authorization': fields.String(description='Authorization which you must inclued in header', required=True, example="eyJ0e~~~~~~~~~")
})

@Auth.route('/register')
class AuthRegister(Resource):
    @Auth.expect(user_fields_auth)
    @Auth.doc(responses={200: 'Success'})
    @Auth.doc(responses={500: 'Register Failed'})
    def post(self):
        name = request.json['name']
        password = request.json['password']
        if name in users:
            return {
                "message": "Register Failed"
            }, 500
        else:
            users[name] = bcrypt.hashpw(password.encode("utf-8"), bcrypt.gensalt())  # 비밀번호 저장
            return {
                'Authorization': jwt.encode({'name': name}, "secret", algorithm="HS256")  # str으로 반환하여 return
            }, 200

@Auth.route('/login')
class AuthLogin(Resource):
    @Auth.expect(user_fields_auth)
    @Auth.doc(responses={200: 'Success'})
    @Auth.doc(responses={404: 'User Not Found'})
    @Auth.doc(responses={500: 'Auth Failed'})
    def post(self):
        name = request.json['name']
        password = request.json['password']
        if name not in users:
            return {
                "message": "User Not Found"
            }, 404
        elif not bcrypt.checkpw(password.encode('utf-8'), users[name]):  # 비밀번호 일치 확인
            return {
                "message": "Auth Failed"
            }, 500
        else:
            return {
                'Authorization': jwt.encode({'name': name}, "secret", algorithm="HS256") # str으로 반환하여 return
            }, 200

@Auth.route('/get')
class AuthGet(Resource):
    @Auth.doc(responses={200: 'Success'})
    @Auth.doc(responses={404: 'Login Failed'})
    def get(self):
        header = request.headers.get('Authorization')  # Authorization 헤더로 담음
        if header == None:
            return {"message": "Please Login"}, 404
        data = jwt.decode(header, "secret", algorithms="HS256")
        return data, 200
일단 /register 를 먼저 실험 해 보겠습니다. 한 번 POST 방식으로 JSON을 통해 아이디와 비밀번호를 보내 계정을 등록 해 보겠습니다.
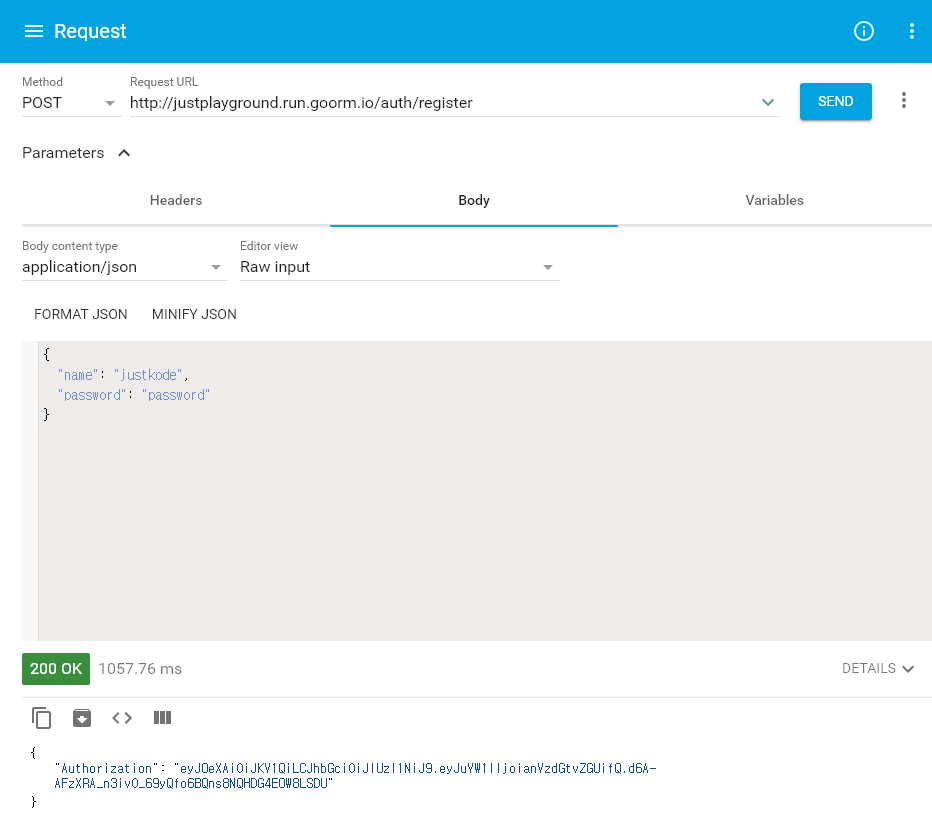


JWT가 반환 된 모습
그 다음, /login 을 테스트 해 보겠습니다. 아까와 같이 POST 방식으로 아까 등록했던 아이디와 비밀번호를 보내 보겠습니다.
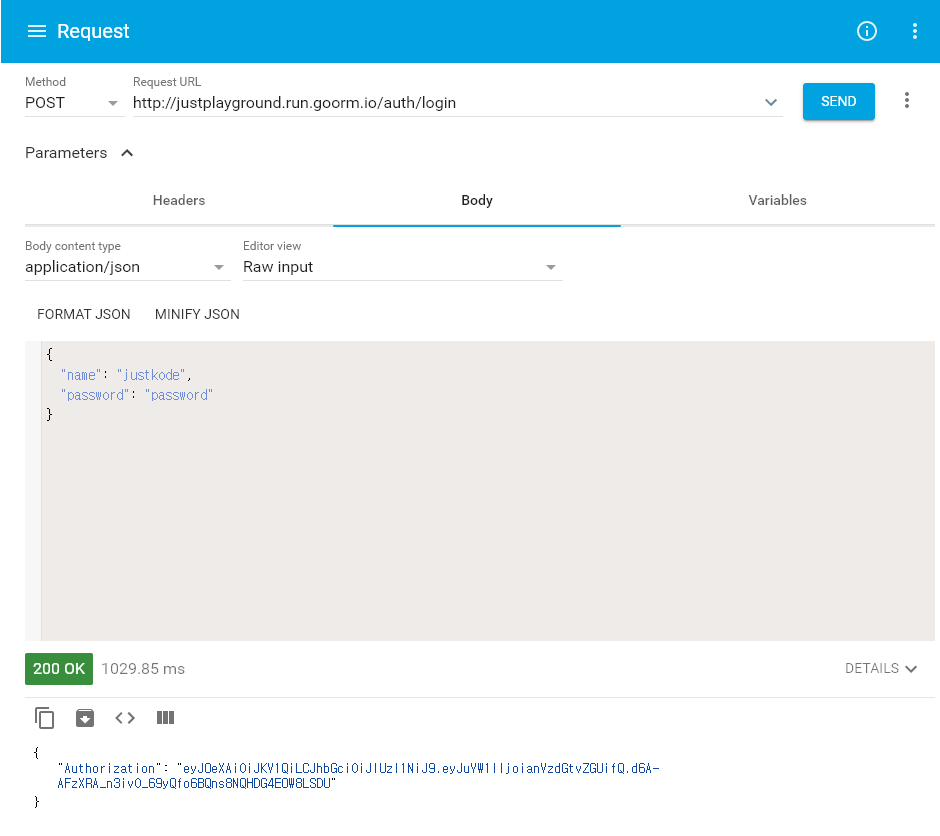
JWT가 반환 된 모습
다른 비밀번호를 보내 보면, 비밀 번호가 틀렸다고 하며 성공적으로 요청을 거부하는 모습니다.
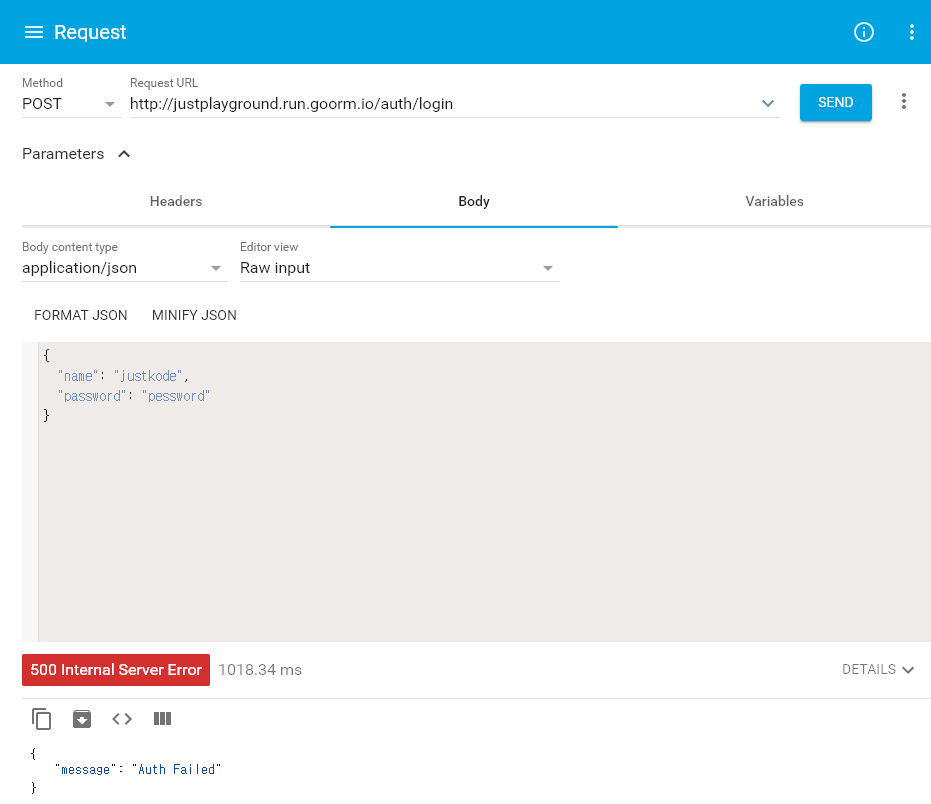
로그인 실패!
그리고, /get 을 테스트 해 보겠습니다. 이번에는 아까 반환 받았던 JWT를 Header에 넣습니다. Header의 Authorization이라는 키에 JWT를 담아서 보내면, 성공적으로 요청을 반환하는 모습을 볼 수 있습니다.
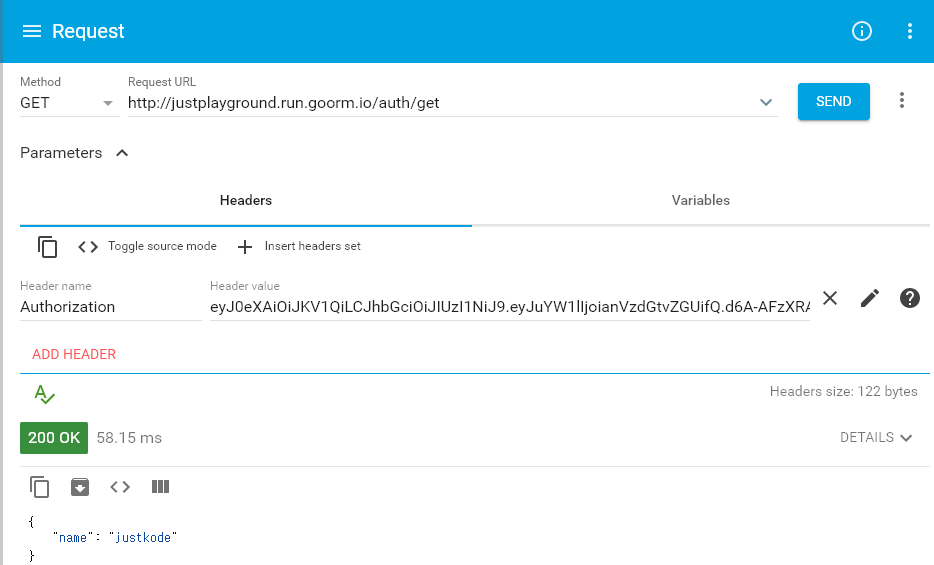
성공!
[출처] https://justkode.kr/python/flask-restapi-3
광고 클릭에서 발생하는 수익금은 모두 웹사이트 서버의 유지 및 관리, 그리고 기술 콘텐츠 향상을 위해 쓰여집니다.
