
- 전체
- Python 일반
- Python 수학
- Python 그래픽
- Python 자료구조
- Python 인공지능
- Python 인터넷
- Python SAGE
- wxPython
- TkInter
- iPython
- wxPython
- pyQT
- Jython
- django
- flask
- blender python scripting
- python for minecraft
- Python 데이터 분석
- Python RPA
- cython
- PyCharm
- pySide
- kivy (python)
Python 일반 [python, C++] Interfacing C++ and Python with the Python API : C++ 및 Python과 Python API의 인터페이스
2023.08.18 21:48
[python, C++] Interfacing C++ and Python with the Python API
Interfacing C++ and Python with the Python API

1. Introduction
According to StackOverflow, two of the most popular programming languages for desktop development are C++ and Python. Many applications are coded in C++ for performance, and provide a Python interface that enables configuration and scripting. Unfortunately, the two languages are so different that many developers don't know how to access Python code in C++ or call C++ functions from Python.
Thankfully, some implementations of Python (such as the reference implementation at python.org) provide C/C++ headers and libraries that simplify the process of interfacing C++ and Python. These headers and libraries form the Python API, and the goal of this article is to explain how to use Python.
To be specific, this article focuses on two ways of using the Python API. The first part of the article explains how to access Python inside C++ code. This is called embedding Python. The second part explains how to code a C++ library that can be accessed as a Python module. This is called an extension module.
But before I discuss either topic, I need to explain how to download Python and install it on your system. If you're already up to speed on Python, feel free to skip the next section.
2. Installing Python
A Python implementation is a toolset that provides a Python interpreter, basic Python modules, and other utilities such as pip. Based on my experience, there are four main implementations of Python:
- CPython - oldest and most popular, written in C
- PyPy - similar to CPython, but uses just-in-time compilation to improve performance
- Jython - written in Java, converts Python into bytecode
- IronPython - written in C#, enables Python to access C# and .NET features
CPython is the only Python implementation that provides a C/C++ interface, so this article focuses on CPython. If you're running Linux, you can install it by using your package manager (apt-get install python3.11 python3-dev on Ubuntu, yum install python3 python3-devel on RHEL and CentOS).
If you're running Windows or macOS, you can download an installer from the Python download site. Select your operating system and click the link for the latest version of Python, and your browser will download the executable. When you run the executable, a dialog will ask for configuration settings. The following image shows what this looks like on Windows for version 3.11.4.
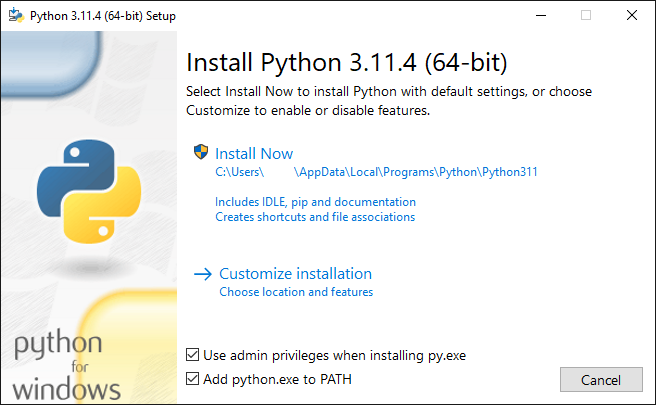
At the bottom of the dialog, check the box for Add python.exe to PATH. This ensures that you'll be able to launch the Python interpreter from the command line.
If you click Install Now on Windows, Python will be installed in the AppData\Local\Programs folder. You can customize this by clicking the Customize installation link and selecting a different folder. When the installation is finished, click the dialog's Close button.
For this article, it isn't important where Python is installed, but it is important that you know the installation directory. If you look in the top-level include directory, you'll find the header files for the Python API. The libs directory contains the library required for linking C/C++ applications. On my Windows system, the required library file is named python311.lib. On my Linux system, its name is libpython3.11.so.
3. Embedding Python in C/C++
The Python API provides several header files that declare C/C++ functions capable of accessing Python modules and code. The technical term for accessing Python in external code is called embedding, and the central header file is Python.h.
The goal of this section is to look at the functions in Python.h that can make embedding possible. They can be frustrating to use because Python data structures are all represented by instances of the PyObject data type. Modules are represented by PyObjects, functions and methods are represented by PyObjects, and variables are represented by PyObjects.
This discussion won't discuss all of the functions in the Python API, or even most of them. Instead, we'll look at the functions into two categories:
- Fundamental functions - Functions that access modules, methods, and properties
- Object creation and conversion - Functions that create
PyObjects and convert them to other types
After exploring these functions, this section presents C++ code that reads a function from a simple Python module, sets its parameters, and then executes the Python function.
3.1 Fundamental Functions
To embed Python processing in a C++ application, a developer should be familiar with a central set of functions. Table 1 lists them and provides a description of each.
Table 1: Fundamental Functions of the Python API
| Function Signature | Description |
Py_Initialize() |
Initializes the interpreter and modules |
Py_Finalize() |
Deallocates the interpreter and resources |
PyImport_ImportModule(const char*) |
Imports the given module |
PyObject_HasAttrString(PyObject*, const char*) |
Checks if the attribute is present |
PyObject_GetAttrString(PyObject*, const char*) |
Accesses the given attribute |
PyCallable_Check(PyObject*) |
Checks if the attribute can be executed |
PyObject_Repr(PyObject*) |
Creates a PyObject from the printed representation |
PyObject_Str(PyObject*) |
Creates a PyObject from the string representation |
PyObject_CallObject(PyObject*, PyObject*) |
Executes the object with arguments |
PyINCREF(PyObject*) |
Increments the reference (can't be null) |
PyXINCREF(PyObject*) |
Increments the reference (can be null) |
PyDECREF(PyObject*) |
Decrements the reference (can't be null) |
PyXDECREF(PyObject*) |
Decrements the reference (can be null) |
The first function, Py_Initialize, is particularly important because it performs the tasks needed to make Python available in C/C++. This must be called before the application can access Python modules and features.
After initializing the environment, an application can access Python modules by calling PyImport_ImportModule. This accepts the name of the module and returns a PyObject pointer that represents the module. If the module is contained in a Python file, the *.py suffix should be omitted.
For example, the following function call accesses the code in simple.py:
PyObject *mod = PyImport_ImportModule("simple");
Once an application has accessed a module or data structure, it can examine its attributes. The PyObject_HasAttrString function identifies if an attribute is present. If the attribute is present, PyObject_GetAttrString returns a PyObject pointer representing the attribute.
For example, the following code accesses an attribute named plus from simple.py.
PyObject *mod, *attr;
mod = PyImport_ImportModule("simple");
if (mod != nullptr) {
    if (PyObject_HasAttrString(mod, "plus") == 1) {
        attr = PyObject_GetAttrString(mod, "plus");
    }
}
Properties and functions are both accessed as attributes, but functions can be invoked and properties can't. To check if an attribute can be invoked, an application needs to call PyCallable_Check, which returns 1 if the attribute can be called and 0 if it can't.
If an attribute can be invoked, PyObject_CallObject tells the interpreter to execute the attribute. The first argument is the PyObject pointer representing the attribute and the second is a PyObject pointer that represents a tuple containing the method's arguments.
Every PyObject has a reference count that identifies how many times it's being accessed. When it's created, the count is set to 1. Applications can increment the reference count by calling PyINCREF or PyXINCREF. Both accept a pointer to a PyObject, and the first should only be called if the pointer isn't NULL. The second function, PyXINCREF, can be called if the pointer is null.
When a PyObject is no longer needed, the application should call PyDECREF or PyXDECREF to decrement the object's reference count. Once the count reaches 0, the object will be deallocated. Both functions accept a pointer to a PyObject, and PyDECREF should only be called if the pointer isn't null.
3.2 Object Creation and Conversion
In many cases, an application will need to create a PyObject from regular data or extract regular data from a PyObject. The application may also need to create Python-specific structures like lists or tuples. Table 2 lists the functions that perform these tasks.
Table 2: Object Creation/Conversion Functions
| Function Signature | Description |
PyLong_FromLong(long) |
Create a PyObject from a long integer |
PyLong_AsLong(PyObject*) |
Return the PyObject's long integer |
PyFloat_FromDouble(double) |
Create a PyObject from a double |
PyFloat_AsDouble(PyObject*) |
Return the PyObject's double |
PyUnicode_FromString(const char*) |
Create a PyObject from a string |
PyUnicode_AsEncodedString(PyObject*, const char*, const char*) |
Create a PyObject from the encoded string |
PyBytes_FromString(const char*) |
Create a PyObject from a string |
PyBytes_AsString(PyObject*) |
Return the PyObject's string |
PyTuple_New(Py_ssize_t) |
Create a PyObject representing a tuple |
PyTuple_GetItem(PyObject*, Py_ssize_t) |
Return the given element of a tuple |
PyTuple_SetItem(PyObject*, Py_ssize_t,PyObject*) |
Set the given element of a tuple |
PyList_New(Py_ssize_t) |
Create a PyObject representing a list |
PyList_GetItem(PyObject*, Py_ssize_t) |
Return the given element of a list |
PyList_SetItem(PyObject*, Py_ssize_t,PyObject*) |
Set the given element of a list |
These functions become important when an application needs to read or set an attribute's value. For example, if float_attr is a Python attribute containing a floating-point value, PyFloat_AsDouble will return a double that can be processed in C/C++.
Dealing with text is complicated. The Python API makes it possible to create a unicode PyObject from a string by calling PyUnicode_FromString. You can also create a bytes PyObject from a string by calling PyBytes_FromString.
Displaying an attribute's string is also complicated. PyObject_Str returns a PyObject containing an object's string and PyUnicode_AsEncodedString converts this to a bytes PyObject containing the encoded representation of the string. Then PyBytes_AsString returns the C/C++ string corresponding to the encoded string.
For example, the following code obtains the string representation of the my_attr attribute, encodes it using UTF-8, and prints the corresponding C/C++ string.
PyObject* attr = PyObject_GetAttrString(mod, "my_attr");
PyObject* str = PyObject_Str(attr);
PyObject* ucode = PyUnicode_AsEncodedString(str, "utf-8", NULL);
const char* bytes = PyBytes_AsString(ucode);
std::cout << bytes << std::endl;
To pass arguments to a Python method, an application needs to create a tuple and insert an element for each argument to be passed. In code, the tuple can be created by calling PyTuple_New and elements can be set by calling PyTuple_SetItem. Similarly, an application can create a Python list by calling PyList_New and set its elements by calling PyList_SetItem.
3.3 Simple Embedding Example
To demonstrate how embedding works, the source code for this article contains two source files:
- simple.py - a simple Python file that defines a function named
plus, which returns the sum of its two arguments - embedding.cpp - a C++ application that uses the Python API to access the code in simple.py
The following code presents the content of embedding.cpp. This accesses simple.py, finds the plus attribute, sets its arguments, and executes the function.
#define PY_SSIZE_T_CLEAN
#include <Python.h>
#include <iostream>

int main() {

    PyObject *module, *func, *args, *ret;

    // Initialize python access
    Py_Initialize();

    // Import the simple.py code
    module = PyImport_ImportModule("simple");
    if (module) {

        // Access the attribute named plus
        func = PyObject_GetAttrString(module, "plus");

        // Make sure the attribute is callable
        if (func && PyCallable_Check(func)) {

            // Create a tuple to contain the function's args
            args = PyTuple_New(2);
            PyTuple_SetItem(args, 0, PyLong_FromLong(4));
            PyTuple_SetItem(args, 1, PyLong_FromLong(7));

            // Execute the plus function in simple.py
            ret = PyObject_CallObject(func, args);
            Py_DECREF(args);
            Py_DECREF(func);
            Py_DECREF(module);

            // Check the return value
            if (ret) {

                // Convert the value to long and print
                long retVal = PyLong_AsLong(ret);
                std::cout << "Result: " << retVal << std::endl;
            }
            else {

                // Display error
                PyErr_Print();
                std::cerr << "Couldn't access return value" << std::endl;
                Py_Finalize();
                return 1;
            }
        }
        else {

            // Display error
            if (PyErr_Occurred())
                PyErr_Print();
            std::cerr << "Couldn't execute function" << std::endl;
        }
    }
    else {

        // Display error
        PyErr_Print();
        std::cerr << "Couldn't access module" << std::endl;
        Py_Finalize();
        return 1;
    }

    // Finalize the Python embedding
    Py_Finalize();
    return 0;
}
After accessing the module, the application invokes the module's plus function by calling PyObject_CallObject. It passes two arguments: the attribute representing the function and a tuple containing the two values to be passed to the plus function. The following code shows what the plus function in simple.py looks like.
def plus(a, b):
    return a + b
To build an application from embedding.cpp, you'll need to tell the compiler about the header files in the include folder of the Python installation directory and the library file in the libs folder. When I run the application on my system, the output is given as follows:
Result: 11
4. Creating a Python Extension
A Python interpreter can access built-in modules that include os, datetime, and string. Using the Python API, we can add new built-in modules called extension modules. Unlike regular modules, extension modules are dynamic libraries coded in C or C++.
This discussion walks through the development of an extension module named plustwo. This contains a function named addtwo, which accepts a number and returns the sum of the number and 2.
python
>>> import plustwo
>>> x = plustwo.addtwo(5)
>>> x
7
Programming extension modules is hard because the functions need to have special names and they have to provide special data structures. To understand the process, you need to be aware of three points:
- If the desired module is
modname, the code must define a function namedPyInit_modnamethat doesn't accept any parameters. For the example, the module is namedplustwo, so the code defines a function namedPyInit_plustwo. - To describe the module, the code must create a
PyModuleDefstructure and set its fields. These fields identify the module's name, its documentation, and its methods. - For each function in the module, the code must create a
PyMethodDefstructure and set its fields. These fields identify the method's name, arguments, and documentation. It must also identify the function that will be called when the method is invoked.
This section discusses these points in detail and then shows how the plustwo extension module can be implemented in code.
4.1 The PyInit Function
When a Python interpreter imports the extension module modname for the first time, it will call the PyInit_modname function. This must be coded properly to ensure that the interpreter can execute it, and there are five rules to follow:
- It must be preceded by the
PyMODINIT_FUNCmacro, and it must be the only function preceded by this macro. - It must not be
static, and it must be the only non-staticitem in the code. - It can't accept any parameters.
- It must call
PyModuleCreatewith a reference to thePyModuleDefthat describes the module. - Its return value must be set to the return value of
PyModuleCreate.
The best way to understand these rules is to look at an example. If the module name is plustwo and the PyModuleDef structure that describes the module is moduleDef, the following code shows how PyInit_plustwo can be coded:
PyMODINIT_FUNC PyInit_plustwo() {
    return PyModule_Create(&moduleDef);
}
At minimum, the function needs to call PyModule_Create with a PyModuleDef reference and return the result. But the function can be coded to do more than call PyModule_Create.
4.2 The PyModuleDef Structure
The extension module needs to create a PyModuleDef structure to tell the Python interpreter how the module should be processed. Table 3 lists each of the fields of this structure and their data types.
Table 3: Fields of the PyModuleDef Structure
| Field Name | Data Type | Description |
m_base |
PyModuleDef_Base |
Always set to PyModuleDef_HEAD_INIT |
m_name |
const char* |
The module's name |
m_doc |
const char* |
The module's description |
m_size |
Py_ssize_t |
Size of memory to store module state |
m_methods |
PyMethodDef* |
Array of method descriptors |
m_slots |
PyMethodDef_Slot* |
Array of method slots |
m_traverse |
traverseproc |
Traversal function |
m_clear |
inquiry |
Inquiry function |
m_free |
freefunc |
Function that frees resources |
This article focuses on the first five fields, and the first should always be set to PyModuleDef_HEAD_INIT. The second should be set to the module's name and the third should be set to the module's docstring, which is displayed when the help function is called.
The fourth field is important for modules that require multi-phase initialization and sub-interpreters. This field identifies how much memory should be set aside to store the module's state data. This isn't a concern for most extension modules, so m_size should be set to -1. This is shown in the following code:
static struct PyModuleDef moduleDef = {
    PyModuleDef_HEAD_INIT,
    "plustwo",
    "This module contains a function (addtwo) that adds two to a number\n",
    -1,
    funcs  // Array containing a PyMethodDef for each module function
};
The m_methods field must be set to an array containing a PyMethodDef structure for each function contained in the module. In the example, the plustwo module has one function named addtwo. Therefore, the funcs array in the example code contains one PyMethodDef structure.
4.3 The PyMethodDef Structure
An extension module identifies its functions by providing an array of PyMethodDef structures. The fields of a PyMethodDef identify the function's name, arguments, and docstring. Table 4 lists these fields and their data types.
Table 4: Fields of the PyMethodDef Structure
| Field Name | Data Type | Description |
ml_name |
const char* |
The function's name |
ml_meth |
PyCFunction |
The C function that provides the code |
ml_flags |
int |
Flags that identify the function's arguments |
ml_doc |
const char* |
The function's docstring |
The second field, ml_meth, must be set to a C function that provides the code to be executed when the module's function is called. When coding this function, there are four rules to keep in mind:
- If the module function has a different name than the module, the name of the C function should be set to
modname_funcname, wheremodnameis the name of the module andfuncnameis the name of the function. - If the module function has the same name as its surrounding module, the name of the C function should be set to
modname. - The number of arguments accepted by the function is determined by the
ml_flagsargument of thePyMethodDef. - The C function must be declared
staticand it must return aPyObjectpointer. If the function doesn't return a value, it should usePy_RETURN_NONEto return an empty object.
The third field, ml_flags, identifies the nature of the arguments accepted by the function. This is usually set to one of three values:
METH_NOARGS- The function accepts a singlePyObject*argument that represents the module.METH_O- The function accepts two arguments: aPyObject*representing the module and aPyObject*that represents the single argument.METH_VARARGS- The function accepts two arguments: aPyObject*representing the module and aPyObject*that represents a tuple containing the function's parameters.
For this article's example, the addtwo function accepts a numeric argument and returns the sum of the argument and 2. Because there's only one argument, ml_flags should be set to METH_O.
4.4 The plustwo Extension Module
At this point, you should have a basic grasp of the functions and data structures that must be created in an extension module. The following listing presents the code in plustwo.cpp, which is part of this article's source code. This file defines an extension module named plustwo containing a function named addtwo:
#define PY_SSIZE_T_CLEAN
#include <Python.h>

// The code to be executed when the module function is called
static PyObject* plustwo_addtwo(PyObject* self, PyObject* arg) {
    long longArg = PyLong_AsLong(arg) + 2;
    return PyLong_FromLong(longArg);
}

// Array of PyMethodDef structures - describe the module's functions
static PyMethodDef funcs[] = {
    {"addtwo", (PyCFunction)plustwo_addtwo, METH_O, "This adds two to a number\n"},
    {NULL, NULL, 0, NULL}
};

// The PyModuleDef structure describes the module
static struct PyModuleDef moduleDef = {
    PyModuleDef_HEAD_INIT,
    "plustwo",
    "This module contains a function (addtwo) that adds two to a number\n",
    -1,
    funcs
};

// Called when the interpreter imports the module
PyMODINIT_FUNC PyInit_plustwo() {
    return PyModule_Create(&moduleDef);
}
As you look at this code, there are a few items to notice:
- All the functions and structures are
staticexcept forPyInit_plustwoat the end. - The function corresponding to the
addtwomodule function is calledplustwo_addtwobecause the module function has a different name than the module. - The module only has one function, but the array of
PyMethodDefs has two elements. The second element defines anullfunction, and if this isn't present, the code won't work. - The third argument of the
PyMethodDefisMETH_O, which specifies that the function only accepts one argument. But in code,plustwo_addtwoaccepts two arguments: aPyObjectrepresenting the module and aPyObjectrepresenting the input argument.
To serve as an extension module, this code must be compiled as a dynamic library (plustwo.dll on Windows, plustwo.so on Linux and macOS). On Windows, plustwo.dll must be renamed to plustwo.pyd, which identifies the file as a Python dynamic module. On Linux, the *.so suffix can be left unchanged.
Once the extension module is created, you can test it by opening a Python prompt. Then you can import the plustwo module and call the addtwo function with a session like the following:
python
>>> import plustwo
>>> x = plustwo.addtwo(5)
>>> x
7
5. History
- 2nd August, 2023: Initial submission
- 4th August, 2023: Fixed code labels
- 9th August, 2023: Added calls to
PyFinalize
License
This article, along with any associated source code and files, is licensed under The Code Project Open License (CPOL)
 United States
[출처] https://www.codeproject.com/Articles/5365450/Interfacing-Cplusplus-and-Python-with-the-Python-A


source_code.zip
C++ 및 Python과 Python API의 인터페이스
1. 소개
StackOverflow 에 따르면 데스크톱 개발에 가장 많이 사용되는 두 가지 프로그래밍 언어는 C++ 및 Python입니다. 많은 애플리케이션은 성능을 위해 C++로 코딩되며 구성 및 스크립팅을 가능하게 하는 Python 인터페이스를 제공합니다. 안타깝게도 두 언어는 너무 다르기 때문에 많은 개발자가 C++에서 Python 코드에 액세스하는 방법이나 Python에서 C++ 함수를 호출하는 방법을 모릅니다.
고맙게도 Python의 일부 구현(예: python.org의 참조 구현)은 C++와 Python의 인터페이스 프로세스를 단순화하는 C/C++ 헤더 및 라이브러리를 제공합니다. 이러한 헤더와 라이브러리는 Python API를 구성하며 이 기사의 목표는 Python을 사용하는 방법을 설명하는 것입니다.
구체적으로 이 기사는 Python API를 사용하는 두 가지 방법에 중점을 둡니다. 기사의 첫 번째 부분에서는 C++ 코드 내에서 Python에 액세스하는 방법을 설명합니다. 이것을 임베딩 파이썬이라고 합니다. 두 번째 부분에서는 Python 모듈로 액세스할 수 있는 C++ 라이브러리를 코딩하는 방법을 설명합니다. 이것을 확장 모듈 이라고 합니다 .
그러나 두 주제에 대해 논의하기 전에 Python을 다운로드하고 시스템에 설치하는 방법을 설명해야 합니다. Python에 대해 이미 알고 있다면 다음 섹션을 건너뛰어도 됩니다.
2. 파이썬 설치하기
Python 구현은 Python 인터프리터, 기본 Python 모듈 및 pip와 같은 기타 유틸리티를 제공하는 도구 세트입니다. 내 경험에 따르면 Python에는 네 가지 주요 구현이 있습니다.
- CPython - C로 작성된 가장 오래되고 인기 있는
- PyPy - CPython과 유사하지만 JIT(Just-In-Time) 컴파일을 사용하여 성능을 향상시킵니다.
- Jython - Java로 작성, Python을 바이트코드로 변환
- IronPython - C#으로 작성되어 Python에서 C# 및 .NET 기능에 액세스할 수 있습니다.
CPython은 C/C++ 인터페이스를 제공하는 유일한 Python 구현이므로 이 기사에서는 CPython에 중점을 둡니다. Linux를 실행 중인 경우 패키지 관리자( apt-get install python3.11 python3-devUbuntu, yum install python3 python3-develRHEL 및 CentOS)를 사용하여 설치할 수 있습니다.
Windows 또는 macOS를 실행 중인 경우 Python 다운로드 사이트 에서 설치 프로그램을 다운로드할 수 있습니다 . 운영 체제를 선택하고 최신 버전의 Python 링크를 클릭하면 브라우저가 실행 파일을 다운로드합니다. 실행 파일을 실행하면 구성 설정을 묻는 대화 상자가 나타납니다. 다음 이미지는 이것이 Windows 버전 3.11.4에서 어떻게 보이는지 보여줍니다.
대화 상자 하단에서 Add python.exe to PATH 상자를 선택합니다 . 이렇게 하면 명령줄에서 Python 인터프리터를 시작할 수 있습니다.
Windows에서 지금 설치를 클릭하면 Python이 AppData\Local\Programs 폴더 에 설치됩니다 . 설치 사용자 지정 링크를 클릭하고 다른 폴더를 선택하여 이를 사용자 지정할 수 있습니다 . 설치가 완료되면 대화 상자의 닫기 버튼을 클릭합니다.
이 기사에서는 Python이 설치된 위치가 중요하지 않지만 설치 디렉토리를 아는 것이 중요합니다. 최상위 수준 포함 디렉터리를 보면 Python API의 헤더 파일을 찾을 수 있습니다. libs 디렉토리에는 C/C++ 응용 프로그램을 연결하는 데 필요한 라이브러리가 포함되어 있습니다. 내 Windows 시스템에서 필요한 라이브러리 파일의 이름은 python311.lib 입니다 . 내 Linux 시스템에서 그 이름은 libpython3.11.so 입니다 .
3. C/C++에 파이썬 내장하기
Python API는 Python 모듈 및 코드에 액세스할 수 있는 C/C++ 함수를 선언하는 여러 헤더 파일을 제공합니다. 외부 코드에서 Python에 액세스하기 위한 기술 용어를 embedding 이라고 하며 중앙 헤더 파일은 Python.h 입니다 .
이 섹션의 목표 는 내장을 가능하게 할 수 있는 Python.h 의 함수를 살펴보는 것입니다 . Python 데이터 구조는 모두 데이터 유형의 인스턴스로 표현되기 때문에 사용하기 어려울 수 있습니다 PyObject. 모듈은 s로 표시되고 PyObject함수 및 메소드는 s로 표시되며 변수는 s PyObject로 표시됩니다 .PyObject
이 토론에서는 Python API의 모든 기능 또는 대부분의 기능에 대해 설명하지 않습니다. 대신 함수를 두 가지 범주로 살펴보겠습니다.
- 기본 기능 - 모듈, 메서드 및 속성에 액세스하는 기능
- 객체 생성 및 변환 - s를 생성
PyObject하고 다른 유형으로 변환하는 기능
이러한 함수를 탐색한 후 이 섹션에서는 간단한 Python 모듈에서 함수를 읽고 해당 매개 변수를 설정한 다음 Python 함수를 실행하는 C++ 코드를 제시합니다.
3.1 기본 기능
C++ 애플리케이션에 Python 처리를 포함하려면 개발자가 중앙 함수 세트에 익숙해야 합니다. 표 1은 이들을 나열하고 각각에 대한 설명을 제공합니다.
표 1: Python API의 기본 기능
| 함수 서명 | 설명 |
Py_Initialize() |
인터프리터 및 모듈 초기화 |
Py_Finalize() |
인터프리터와 리소스 할당 해제 |
PyImport_ImportModule(const char*) |
주어진 모듈을 가져옵니다 |
PyObject_HasAttrString(PyObject*, const char*) |
속성이 존재하는지 확인 |
PyObject_GetAttrString(PyObject*, const char*) |
주어진 속성에 접근 |
PyCallable_Check(PyObject*) |
속성을 실행할 수 있는지 확인합니다. |
PyObject_Repr(PyObject*) |
PyObject인쇄된 표현에서 생성 |
PyObject_Str(PyObject*) |
PyObject문자열 표현에서 생성 |
PyObject_CallObject(PyObject*, PyObject*) |
인수를 사용하여 개체를 실행합니다. |
PyINCREF(PyObject*) |
참조 증가( 될 수 없음 null) |
PyXINCREF(PyObject*) |
참조 증가( 일 수 있음 null) |
PyDECREF(PyObject*) |
참조 감소( 될 수 없음 null) |
PyXDECREF(PyObject*) |
참조 감소( 일 수 있음 null) |
첫 번째 함수인 는 Py_InitializePython을 C/C++에서 사용할 수 있도록 하는 데 필요한 작업을 수행하기 때문에 특히 중요합니다. 애플리케이션이 Python 모듈 및 기능에 액세스하기 전에 호출해야 합니다.
환경을 초기화한 후 애플리케이션은 를 호출하여 Python 모듈에 액세스할 수 있습니다 PyImport_ImportModule. 이것은 모듈의 이름을 받아들이고 PyObject모듈을 나타내는 포인터를 반환합니다. 모듈이 Python 파일에 포함된 경우 *.py 접미사는 생략해야 합니다.
예를 들어 다음 함수 호출은 simple.py 의 코드에 액세스합니다 .
PyObject *mod = PyImport_ImportModule( " 단순" );
애플리케이션이 모듈이나 데이터 구조에 액세스하면 해당 속성을 검사할 수 있습니다. 이 PyObject_HasAttrString함수는 속성이 있는지 식별합니다. 속성이 있으면 속성을 나타내는 포인터를 PyObject_GetAttrString반환합니다 .PyObject
예를 들어 다음 코드는 simple.pyplus 에서 명명된 특성에 액세스합니다 .
파이오브젝트 *mod, *attr;
mod = PyImport_ImportModule( " 단순" );
if (mod != nullptr ) {
     if (PyObject_HasAttrString(mod, " plus" ) == 1 ) {
        attr = PyObject_GetAttrString(mod, " 더하기" );
    }
}
속성과 함수는 모두 특성으로 액세스되지만 함수는 호출할 수 있지만 속성은 호출할 수 없습니다. 속성을 호출할 수 있는지 확인하려면 애플리케이션에서 속성을 호출할 수 있는지 여부를 반환 PyCallable_Check하는 를 호출해야 합니다.10
속성을 호출할 수 있는 경우 PyObject_CallObject인터프리터에게 속성을 실행하도록 지시합니다. 첫 번째 인수는 PyObject특성을 나타내는 포인터이고 두 번째 인수는 PyObject메서드의 인수를 포함하는 튜플을 나타내는 포인터입니다.
모든 항목 PyObject에는 액세스되는 횟수를 식별하는 참조 횟수가 있습니다. 생성될 때 개수는 로 설정됩니다 1. PyINCREF애플리케이션은 또는 를 호출하여 참조 횟수를 증가시킬 수 있습니다 PyXINCREF. 둘 다 a 에 대한 포인터를 허용 PyObject하고 첫 번째 포인터는 포인터가 아닌 경우에만 호출해야 합니다 NULL. 두 번째 함수 는 PyXINCREF포인터가 이면 호출할 수 있습니다 null.
a가 PyObject더 이상 필요하지 않으면 응용 프로그램은 개체의 참조 횟수를 줄이기 위해 PyDECREF또는을 호출해야 합니다. PyXDECREF개수에 도달하면 0개체가 할당 해제됩니다. 두 함수 모두 a 에 대한 포인터를 허용하며 PyObject포인터 PyDECREF가 null이 아닌 경우에만 호출해야 합니다.
3.2 객체 생성 및 변환
PyObject대부분의 경우 애플리케이션은 일반 데이터에서 를 생성하거나 PyObject. 응용 프로그램은 목록이나 튜플과 같은 Python 관련 구조를 만들어야 할 수도 있습니다. 표 2에는 이러한 작업을 수행하는 기능이 나열되어 있습니다.
표 2: 개체 생성/변환 기능
| 함수 서명 | 설명 |
PyLong_FromLong(long) |
PyObject긴 정수에서 만들기 |
PyLong_AsLong(PyObject*) |
PyObject의 긴 정수를 반환합니다. |
PyFloat_FromDouble(double) |
PyObjectdouble에서 만들기 |
PyFloat_AsDouble(PyObject*) |
PyObject의 double을 반환합니다. |
PyUnicode_FromString(const char*) |
PyObject문자열에서 만들기 |
PyUnicode_AsEncodedString(PyObject*, const char*, const char*) |
PyObject인코딩된 문자열에서 만들기 |
PyBytes_FromString(const char*) |
PyObject문자열에서 만들기 |
PyBytes_AsString(PyObject*) |
PyObject의 문자열을 반환 |
PyTuple_New(Py_ssize_t) |
PyObject튜플을 나타내는 만들기 |
PyTuple_GetItem(PyObject*, Py_ssize_t) |
튜플의 주어진 요소를 반환 |
PyTuple_SetItem(PyObject*, Py_ssize_t,PyObject*) |
튜플의 주어진 요소 설정 |
PyList_New(Py_ssize_t) |
PyObject목록을 나타내는 만들기 |
PyList_GetItem(PyObject*, Py_ssize_t) |
목록의 주어진 요소를 반환 |
PyList_SetItem(PyObject*, Py_ssize_t,PyObject*) |
목록의 주어진 요소 설정 |
이러한 기능은 애플리케이션이 속성 값을 읽거나 설정해야 할 때 중요해집니다. 예를 들어 가 float_attr부동 소수점 값을 포함하는 Python 특성인 경우 C/C++에서 처리할 수 있는 PyFloat_AsDouble를 반환합니다 .double
텍스트를 다루는 것은 복잡합니다. Python API를 사용하면 를 호출하여 PyObject에서 유니코드를 생성할 수 있습니다 . 를 호출하여 a에서 바이트를 만들 수도 있습니다 .stringPyUnicode_FromStringPyObjectstringPyBytes_FromString
속성을 표시하는 string것도 복잡합니다. 객체를 포함하는 PyObject_Str를 반환 하고 이를 의 인코딩된 표현을 포함하는 바이트로 변환합니다 . 그런 다음 인코딩된 에 해당하는 C/C++를 반환합니다 .PyObjectstringPyUnicode_AsEncodedStringPyObjectstringPyBytes_AsStringstringstring
예를 들어 다음 코드는 속성 string의 표현을 가져와 my_attrUTF-8을 사용하여 인코딩하고 해당 C/C++ 를 인쇄합니다 string.
PyObject* attr = PyObject_GetAttrString(mod, " my_attr" );
PyObject* str = PyObject_Str(attr);
PyObject* ucode = PyUnicode_AsEncodedString(str, " utf-8" , NULL);
const  char * 바이트 = PyBytes_AsString(ucode);
std::cout  < < 바이트 < <  std::endl ;
Python 메서드에 인수를 전달하려면 응용 프로그램에서 튜플을 만들고 전달할 각 인수에 대한 요소를 삽입해야 합니다. 코드에서 튜플은 를 호출하여 생성할 수 PyTuple_New있고 요소는 를 호출하여 설정할 수 있습니다 PyTuple_SetItem. 마찬가지로 애플리케이션은 를 호출하여 Python 목록을 만들고 를 호출 PyList_New하여 해당 요소를 설정할 수 있습니다 PyList_SetItem.
3.3 간단한 임베딩 예제
임베딩 작동 방식을 보여주기 위해 이 문서의 소스 코드에는 두 개의 소스 파일이 포함되어 있습니다.
- simple.py
plus- 두 인수의 합을 반환하는 이라는함수를 정의하는 간단한 Python 파일 - embedding.cpp - Python API를 사용하여 simple.py 의 코드에 액세스하는 C++ 애플리케이션
다음 코드는 embedding.cpp 의 내용을 나타냅니다 . 이것은 simple.py 에 액세스하고 , 속성을 찾고 plus, 인수를 설정하고, 함수를 실행합니다.
#define PY_SSIZE_T_CLEAN
 #include < Python.h > #include < iostream > int main() {


    PyObject *모듈, *func, *args, *ret;

    // 파이썬 액세스 초기화
     Py_Initialize();

    // simple.py 코드 가져오기
     module = PyImport_ImportModule( " simple" );
    if (모듈) {

        // plus func라는 속성에 액세스
         = PyObject_GetAttrString(module, " plus" );

        // 속성이 호출 가능한지 확인
         if (func && PyCallable_Check(func)) {

            // 함수의 인수를 포함할 튜플을 만듭니다.
             args = PyTuple_New( 2 );
            PyTuple_SetItem(args, 0 , PyLong_FromLong( 4 ));
            PyTuple_SetItem(args, 1 , PyLong_FromLong( 7 ));

            // simple.py에서 더하기 함수를 실행합니다.
             ret = PyObject_CallObject(func, args);
            Py_DECREF(인자);
            Py_DECREF(펑크);
            Py_DECREF(모듈);

            // 반환값 확인
             if (ret) {

                // 값을 long으로 변환하고
                 long을 출력합니다 . retVal = PyLong_AsLong(ret);
                std::cout  < <  " 결과: "  < < retVal < <  std::endl ;
            }
            다른 {

                // 오류 표시
                 PyErr_Print();
                std::cerr  < <  " 반환 값에 액세스할 수 없습니다."  < <  std::endl ;
                Py_Finalize();
                반환  1 ;
            }
        }
        다른 {

                        // (PyErr_Occurred()) 인 경우 오류 표시

                PyErr_Print();
            std::cerr  < <  " 함수를 실행할 수 없습니다."  < <  std::endl ;
        }
    }
    다른 {

        // 오류 표시
         PyErr_Print();
        std::cerr  < <  " 모듈에 액세스할 수 없습니다."  < <  std::endl ;
        Py_Finalize();
        반환  1 ;
    }

    // Python 임베딩을 마무리합니다.
     Py_Finalize();
    반환  0 ;
}
모듈에 액세스한 후 애플리케이션은 를 plus호출하여 모듈의 기능을 호출합니다 PyObject_CallObject. 함수를 나타내는 속성과 함수에 전달할 두 값을 포함하는 튜플의 두 인수를 전달합니다 plus. 다음 코드는 simple.pyplus 의 함수가 어떻게 생겼는지 보여줍니다.
def plus(a, b):
     a + b 반환
embedding.cpp 에서 애플리케이션을 빌드하려면 Python 설치 디렉터리의 include 폴더에 있는 헤더 파일과 libs 폴더 에 있는 라이브러리 파일에 대해 컴파일러에 알려야 합니다 . 내 시스템에서 응용 프로그램을 실행하면 출력이 다음과 같이 제공됩니다.
결과: 11
4. 파이썬 확장 생성
Python 인터프리터는 , 및 를 포함하는 내장 모듈에 액세스할 수 있습니다 . Python API를 사용하여 확장 모듈 이라는 새로운 내장 모듈을 추가할 수 있습니다 . 일반 모듈과 달리 확장 모듈은 C 또는 C++로 코딩된 동적 라이브러리입니다.osdatetimestring
이 토론에서는 이라는 확장 모듈의 개발 과정을 안내합니다 plustwo. addtwo여기에는 숫자를 받아들이고 숫자와 2의 합을 반환하는 이라는 함수가 포함되어 있습니다 .
파이썬
>>> 플러스투 가져오기
>>> x = plustwo.addtwo( 5 )
>>> 엑스
7
확장 모듈 프로그래밍은 함수가 특별한 이름을 가져야 하고 특별한 데이터 구조를 제공해야 하기 때문에 어렵습니다. 프로세스를 이해하려면 다음 세 가지 사항을 알아야 합니다.
- 원하는 모듈이 인 경우
modname코드는PyInit_modname매개변수를 허용하지 않는 명명된 함수를 정의해야 합니다. 예를 들어, 모듈 이름이plustwo이므로 코드는 이라는 함수를 정의합니다PyInit_plustwo. - 모듈을 설명하려면 코드에서
PyModuleDef구조를 만들고 해당 필드를 설정해야 합니다. 이 필드는 모듈의 이름, 설명서 및 메서드를 식별합니다. - 모듈의 각 함수에 대해 코드는
PyMethodDef구조를 만들고 해당 필드를 설정해야 합니다. 이 필드는 메소드의 이름, 인수 및 문서를 식별합니다. 또한 메소드가 호출될 때 호출될 함수를 식별해야 합니다.
이 섹션에서는 이러한 사항에 대해 자세히 설명하고 plustwo코드에서 확장 모듈을 구현하는 방법을 보여줍니다.
4.1 PyInit 함수
Python 인터프리터가 modname처음으로 확장 모듈을 가져올 때 함수를 호출합니다. 이것은 인터프리터가 실행할 수 있도록 적절하게 코딩되어야 하며 따라야 할 다섯 가지 규칙이 있습니다.PyInit_modname
- 매크로 앞에 와야 하며
PyMODINIT_FUNC이 매크로 앞에 오는 유일한 함수여야 합니다. - 아니어야 하며 코드에서
static유일한 비항목이어야 합니다 .static - 어떤 매개변수도 받아들일 수 없습니다.
- 모듈을 설명하는 에
PyModuleCreate대한 참조로 호출해야 합니다 .PyModuleDef - 반환 값은 의 반환 값으로 설정되어야 합니다
PyModuleCreate.
이러한 규칙을 이해하는 가장 좋은 방법은 예제를 보는 것입니다. 모듈 이름이 이고 모듈을 설명하는 구조가 인 plustwo경우 다음 코드는 코딩 방법을 보여줍니다.PyModuleDefmoduleDefPyInit_plustwo
PyMODINIT_FUNC PyInit_plustwo() {
     return PyModule_Create(&moduleDef);
}
최소한 함수는 참조 PyModule_Create를 사용 하여 호출 PyModuleDef하고 결과를 반환해야 합니다. 그러나 함수는 call 이상을 수행하도록 코딩할 수 있습니다 PyModule_Create.
4.2 PyModuleDef 구조
PyModuleDef확장 모듈은 파이썬 인터프리터에게 모듈 처리 방법을 알려주는 구조를 만들어야 합니다 . 표 3에는 이 구조의 각 필드와 해당 데이터 유형이 나열되어 있습니다.
표 3: PyModuleDef 구조의 필드
| 분야 명 | 데이터 형식 | 설명 |
m_base |
PyModuleDef_Base |
항상 다음으로 설정PyModuleDef_HEAD_INIT |
m_name |
const char* |
모듈의 이름 |
m_doc |
const char* |
모듈 설명 |
m_size |
Py_ssize_t |
모듈 상태를 저장할 메모리 크기 |
m_methods |
PyMethodDef* |
메서드 설명자 배열 |
m_slots |
PyMethodDef_Slot* |
메서드 슬롯 배열 |
m_traverse |
traverseproc |
순회 기능 |
m_clear |
inquiry |
문의 기능 |
m_free |
freefunc |
리소스를 해제하는 기능 |
이 문서는 처음 5개 필드에 중점을 두며 첫 번째 필드는 항상 로 설정해야 합니다 PyModuleDef_HEAD_INIT. 두 번째는 모듈의 이름으로 설정되어야 하고 세 번째는 함수가 호출될 docstring때 표시되는 모듈의 로 설정되어야 합니다 .help
네 번째 필드는 다단계 초기화 및 하위 해석기가 필요한 모듈에 중요합니다. 이 필드는 모듈의 상태 데이터를 저장하기 위해 따로 설정해야 하는 메모리 양을 식별합니다. 이것은 대부분의 확장 모듈에서 문제가 되지 않으므로 m_size로 설정해야 합니다 -1. 이는 다음 코드에 나와 있습니다.
정적  구조체 PyModuleDef moduleDef = {
    PyModuleDef_HEAD_INIT,
    " plustwo" ,
     " 이 모듈에는 숫자에 2를 더하는 함수(addtwo)가 포함되어 있습니다\n" ,
    - 1 ,
    funcs   // 각 모듈에 대한 PyMethodDef를 포함하는 배열 function
 };
필드 는 모듈에 포함된 각 함수의 구조를 m_methods포함하는 배열로 설정되어야 합니다 . PyMethodDef이 예에서 plustwo모듈에는 이라는 하나의 함수가 있습니다 addtwo. 따라서 funcs예제 코드의 배열에는 하나의 PyMethodDef구조가 포함됩니다.
4.3 PyMethodDef 구조
확장 모듈은 구조 배열을 제공하여 기능을 식별합니다 PyMethodDef. 의 필드는 PyMethodDef함수의 이름, 인수 및 독스트링을 식별합니다. 표 4에는 이러한 필드와 해당 데이터 유형이 나열되어 있습니다.
표 4: PyMethodDef 구조의 필드
| 분야 명 | 데이터 형식 | 설명 |
ml_name |
const char* |
함수의 이름 |
ml_meth |
PyCFunction |
코드를 제공하는 C 함수 |
ml_flags |
int |
함수의 인수를 식별하는 플래그 |
ml_doc |
const char* |
함수의docstring |
두 번째 필드인 는 ml_meth모듈의 함수가 호출될 때 실행될 코드를 제공하는 C 함수로 설정되어야 합니다. 이 함수를 코딩할 때 염두에 두어야 할 네 가지 규칙이 있습니다.
- 모듈 함수 이름이 모듈 이름과 다른 경우 C 함수 이름을 로 설정해야 합니다 . 여기서 는 모듈 이름이고 는 함수 이름입니다.
modname_funcnamemodnamefuncname - 모듈 함수가 주변 모듈과 이름이 같으면 C 함수 이름을 로 설정해야 합니다
modname. - 함수에서 허용하는 인수의 수는
ml_flags의 인수 에 의해 결정됩니다PyMethodDef. - C 함수는 선언되어야 하며 포인터
static를 반환해야 합니다PyObject. 함수가 값을 반환하지 않으면Py_RETURN_NONE빈 개체를 반환하는 데 사용해야 합니다.
세 번째 필드인 는 ml_flags함수에서 허용하는 인수의 특성을 식별합니다. 일반적으로 다음 세 값 중 하나로 설정됩니다.
METH_NOARGS- 함수는PyObject*모듈을 나타내는 단일 인수를 허용합니다.METH_OPyObject*- 이 함수는 모듈을 나타내는 a와PyObject*단일 인수를 나타내는 a의 두 가지 인수를 허용합니다 .METH_VARARGSPyObject*- 이 함수는 모듈을 나타내는 a와PyObject*함수의 매개변수를 포함하는 튜플을 나타내는 a의 두 가지 인수를 허용합니다 .
이 문서의 예에서 addtwo함수는 숫자 인수를 허용하고 인수와 2의 합계를 반환합니다. 인수가 하나뿐이므로 를 ml_flags로 설정해야 합니다 METH_O.
4.4 plustwo 확장 모듈
이 시점에서 확장 모듈에서 만들어야 하는 기능 및 데이터 구조에 대한 기본적인 이해가 있어야 합니다. 다음 목록은 이 문서의 소스 코드의 일부인 plustwo.cpp 의 코드를 보여줍니다. plustwo이 파일은 다음과 같은 함수를 포함하는 확장 모듈을 정의합니다 addtwo.
#define PY_SSIZE_T_CLEAN
 #include < Python.h > // 모듈 함수가 호출될 때 실행할 코드
 static PyObject* plustwo_addtwo(PyObject* self, PyObject* arg) {
     long longArg = PyLong_AsLong(arg) + 2 ;
    return PyLong_FromLong(longArg);


}

// PyMethodDef 구조의 배열 - 모듈의 함수를 설명합니다.
 static PyMethodDef funcs[] = {
    { " addtwo" , (PyCFunction)plustwo_addtwo, METH_O, " 이것은 숫자에 2를 더합니다\n" },
    {NULL, NULL, 0 , NULL}
};

// PyModuleDef 구조체는 모듈
 정적  구조체를 설명합니다. PyModuleDef moduleDef = {
    PyModuleDef_HEAD_INIT,
    " plustwo" ,
     " 이 모듈에는 숫자에 2를 더하는 함수(addtwo)가 포함되어 있습니다\n" ,
    - 1 ,
    기능
};

// 인터프리터가 모듈을 가져올 때 호출됨
 PyMODINIT_FUNC PyInit_plustwo() {
     return PyModule_Create(&moduleDef);
}
이 코드를 살펴보면 몇 가지 주목할 사항이 있습니다.
- 모든 기능과 구조는 마지막을
static제외하고 있습니다.PyInit_plustwo - 모듈 함수 는 모듈과 이름이 다르기 때문에 모듈 함수 에 해당하는 함수가
addtwo호출됩니다 .plustwo_addtwo - 모듈에는 하나의 기능만 있지만
PyMethodDefs의 배열에는 두 개의 요소가 있습니다. 두 번째 요소는null함수를 정의하며 이것이 없으면 코드가 작동하지 않습니다. PyMethodDefis 의 세 번째 인수METH_O는 함수가 하나의 인수만 허용하도록 지정합니다. 그러나 코드에서는 모듈을 나타내는 a와 입력 인수를 나타내는plustwo_addtwo두 가지 인수를 허용합니다 .PyObjectPyObject
확장 모듈로 사용하려면 이 코드를 동적 라이브러리( Windows의 경우 plustwo.dll , Linux 및 macOS의 경우 plustwo.so )로 컴파일해야 합니다. Windows에서 plustwo.dll은 파일을 Python 동적 모듈로 식별하는 plustwo.pyd 로 이름을 바꿔야 합니다 . Linux에서는 *.so 접미사를 변경하지 않고 그대로 둘 수 있습니다.
확장 모듈이 생성되면 Python 프롬프트를 열어 테스트할 수 있습니다. 그런 다음 모듈을 가져오고 다음과 같은 세션으로 함수를 plustwo호출 할 수 있습니다 .addtwo
파이썬
>>> 플러스투 가져오기
>>> x = plustwo.addtwo( 5 )
>>> 엑스
7
5. 연혁
- 2023년 8월 2 일 : 최초 제출
- 2023년 8월 4 일 : 고정 코드 라벨
- 2023년 8월 9 일 : 다음에 대한 호출 추가
PyFinalize
특허
이 문서는 관련 소스 코드 및 파일과 함께 The Code Project Open License(CPOL) 에 따라 사용이 허가되었습니다.
광고 클릭에서 발생하는 수익금은 모두 웹사이트 서버의 유지 및 관리, 그리고 기술 콘텐츠 향상을 위해 쓰여집니다.
