Spark StandAlone 설치부터 예제 테스트까지.

Apache Spark™ is a fast and general engine for large-scale data processing.
이 글은 Apache Spark를 쉽게 설치하고 테스트해보기 위한 글 입니다.
Download and Install
설치가 간단하므로 아래 명령을 쭉 따라하시면 됩니다.
root@ubuntu:~# wget http://d3kbcqa49mib13.cloudfront.net/spark-2.1.0-bin-hadoop2.7.tgz
root@ubuntu:~# tar -zxvf spark-2.1.0-bin-hadoop2.7.tgz
root@ubuntu:~/spark-2.1.0-bin-hadoop2.7# ./sbin/start-master.sh
starting org.apache.spark.deploy.master.Master, logging to /root/spark-2.1.0-bin-hadoop2.7/logs/spark-root-org.apache.spark.deploy.master.Master-1-ubuntu.out
failed to launch: nice -n 0 /root/spark-2.1.0-bin-hadoop2.7/bin/spark-class org.apache.spark.deploy.master.Master –host ubuntu –port 7077 –webui-port 8080
JAVA_HOME is not set <-- ERROR 입니다.(JAVA가 없다니..) 해결을 위해 아래 명령 실행!
full log in /root/spark-2.1.0-bin-hadoop2.7/logs/spark-root-org.apache.spark.deploy.master.Master-1-ubuntu.out
root@ubuntu:~/spark-2.1.0-bin-hadoop2.7# apt-get update
root@ubuntu:~/spark-2.1.0-bin-hadoop2.7# apt-get install default-jdk
root@ubuntu:~/spark-2.1.0-bin-hadoop2.7# apt-get install default-jre
Starting a Cluster Manually
마스터 시작에 앞서 저와 같이 localVM에서 테스트 하시는 경우면 hosts파일을 바꿔주는걸 추천 합니다.
root@ubuntu:~/spark-2.1.0-bin-hadoop2.7# vi /etc/hosts
127.0.0.1 localhost
#127.0.1.1 ubuntu
192.168.217.154 ubuntu
# 192.168.217.154는 Spark가 동작중인 ip입니다.
다음을 실행하여 Spark standalone 마스터를 시작합니다.
root@ubuntu:~/spark-2.1.0-bin-hadoop2.7# ./sbin/start-master.sh
starting org.apache.spark.deploy.master.Master, logging to /root/spark-2.1.0-bin-hadoop2.7/logs/spark-root-org.apache.spark.deploy.master.Master-1-ubuntu.out
잘 실행됬나 확인해보죠. 브라우저에 Spark 설치한 ip:8080을 입력하시면 아래 화면처럼 나올 것입니다.

요기서 URL: spark://ubuntu:7077 이걸 확인 하시고 slave를 실행해줍니다.
root@ubuntu:~/spark-2.1.0-bin-hadoop2.7# ./sbin/start-slave.sh spark://ubuntu:7077
starting org.apache.spark.deploy.worker.Worker, logging to /root/spark-2.1.0-bin-hadoop2.7/logs/spark-root-org.apache.spark.deploy.worker.Worker-1-ubuntu.out
화면을 새로고침 하면,
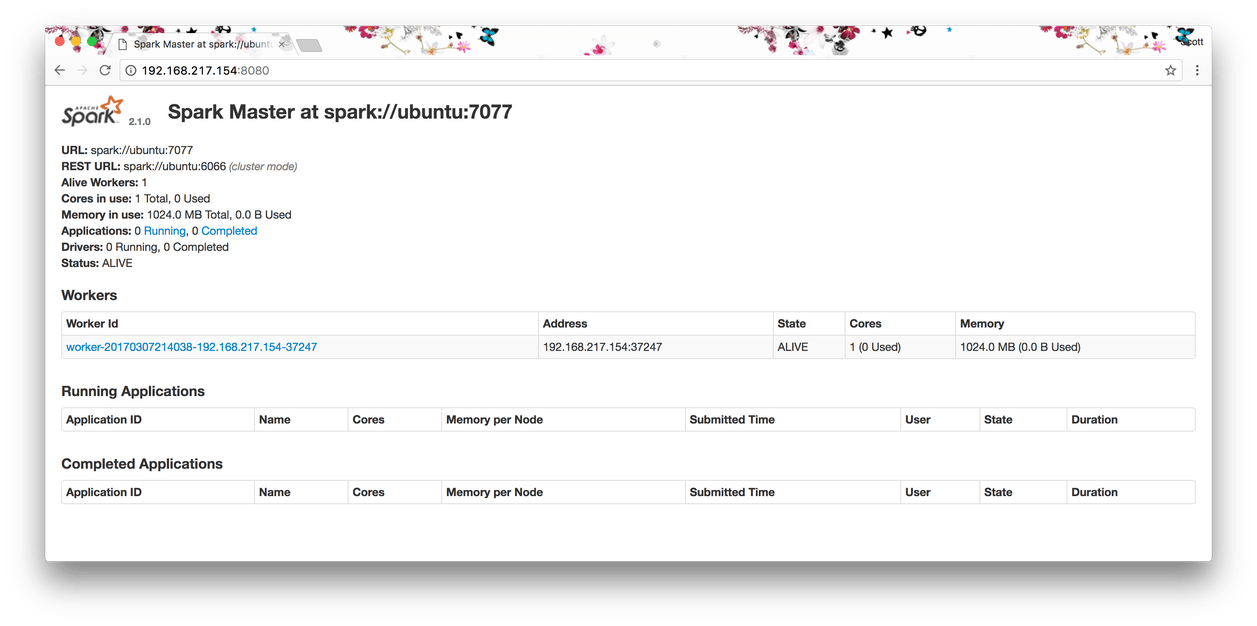
Master, Slave를 각각 실행해봤는데요, 실행시 다음 옵션을 줄 수 있으니 참고 하시기 바랍니다.
Example>
root@ubuntu:~/spark-2.1.0-bin-hadoop2.7# ./sbin/start-slave.sh spark://ubuntu:7077 -m 1024M -c 2
|
Argument
|
Meaning
|
|
-h HOST, –host HOST
|
Hostname to listen on
|
|
-i HOST, –ip HOST
|
Hostname to listen on (deprecated, use -h or –host)
|
|
-p PORT, –port PORT
|
Port for service to listen on (default: 7077 for master, random for worker)
|
|
–webui-port PORT
|
Port for web UI (default: 8080 for master, 8081 for worker)
|
|
-c CORES, –cores CORES
|
Total CPU cores to allow Spark applications to use on the machine (default: all available); only on worker
|
|
-m MEM, –memory MEM
|
Total amount of memory to allow Spark applications to use on the machine, in a format like 1000M or 2G (default: your machine’s total RAM minus 1 GB); only on worker
|
|
-d DIR, –work-dir DIR
|
Directory to use for scratch space and job output logs (default: SPARK_HOME/work); only on worker
|
|
–properties-file FILE
|
Path to a custom Spark properties file to load (default: conf/spark-defaults.conf)
|
이렇게 설치와 실행이 끝났습니다.
Launch and test example
저는 python을 쓸 것이기 때문에 python-shell을 열어 봅시다.
root@ubuntu:~/spark-2.1.0-bin-hadoop2.7# ./bin/pyspark –master spark://ubuntu:7077
Python 2.7.12 (default, Nov 19 2016, 06:48:10)
[GCC 5.4.0 20160609] on linux2
Type “help”, “copyright”, “credits” or “license” for more information.
Using Spark’s default log4j profile: org/apache/spark/log4j-defaults.properties
Setting default log level to “WARN”.
To adjust logging level use sc.setLogLevel(newLevel). For SparkR, use setLogLevel(newLevel).
17/03/07 23:16:57 WARN NativeCodeLoader: Unable to load native-hadoop library for your platform… using builtin-java classes where applicable
17/03/07 23:17:11 WARN ObjectStore: Failed to get database global_temp, returning NoSuchObjectException
Welcome to
____ __
/ __/__ ___ _____/ /__
_\ \/ _ \/ _ `/ __/ ‘_/
/__ / .__/\_,_/_/ /_/\_\ version 2.1.0
/_/
Using Python version 2.7.12 (default, Nov 19 2016 06:48:10)
SparkSession available as ‘spark’.
>>>
돌아가는거 확인 했으니 한번 돌려 봐야죠. Spark에 포함되어있는 machine learning library 중 naïve_bayes_example.py로 테스트 해보겠습니다. (혹시나 numpy가 필요하다고 하면 apt-get install python-pip -> pip install numpy를 해주세요^^)
root@ubuntu:~/spark-2.1.0-bin-hadoop2.7# ./bin/spark-submit –master spark://ubuntu:7077 examples/src/main/python/ml/naive_bayes_example.py
… 쭉 화에 글자가 보이다가…
1
2
3
4
5
6
7
8
9
10
11
12
13
14
15
16
17
18
19
20
21
22
23
24
25
26
|
17/03/07 23:56:39 INFO CodeGenerator: Code generated in 40.759727 ms
+-----+--------------------+--------------------+-----------+----------+
|label| features| rawPrediction|probability|prediction|
+-----+--------------------+--------------------+-----------+----------+
| 0.0|(692,[95,96,97,12...|[-174115.98587057...| [1.0,0.0]| 0.0|
| 0.0|(692,[98,99,100,1...|[-178402.52307196...| [1.0,0.0]| 0.0|
| 0.0|(692,[100,101,102...|[-100905.88974016...| [1.0,0.0]| 0.0|
| 0.0|(692,[123,124,125...|[-244784.29791241...| [1.0,0.0]| 0.0|
| 0.0|(692,[123,124,125...|[-196900.88506109...| [1.0,0.0]| 0.0|
| 0.0|(692,[124,125,126...|[-238164.45338794...| [1.0,0.0]| 0.0|
| 0.0|(692,[124,125,126...|[-184206.87833381...| [1.0,0.0]| 0.0|
| 0.0|(692,[127,128,129...|[-214174.52863813...| [1.0,0.0]| 0.0|
| 0.0|(692,[127,128,129...|[-182844.62193963...| [1.0,0.0]| 0.0|
| 0.0|(692,[128,129,130...|[-246557.10990301...| [1.0,0.0]| 0.0|
| 0.0|(692,[152,153,154...|[-208282.08496711...| [1.0,0.0]| 0.0|
| 0.0|(692,[152,153,154...|[-243457.69885665...| [1.0,0.0]| 0.0|
| 0.0|(692,[153,154,155...|[-260933.50931276...| [1.0,0.0]| 0.0|
| 0.0|(692,[154,155,156...|[-220274.72552901...| [1.0,0.0]| 0.0|
| 0.0|(692,[181,182,183...|[-154830.07125175...| [1.0,0.0]| 0.0|
| 1.0|(692,[99,100,101,...|[-145978.24563975...| [0.0,1.0]| 1.0|
| 1.0|(692,[100,101,102...|[-147916.32657832...| [0.0,1.0]| 1.0|
| 1.0|(692,[123,124,125...|[-139663.27471685...| [0.0,1.0]| 1.0|
| 1.0|(692,[124,125,126...|[-129013.44238751...| [0.0,1.0]| 1.0|
| 1.0|(692,[125,126,127...|[-81829.799906049...| [0.0,1.0]| 1.0|
+-----+--------------------+--------------------+-----------+----------+
only showing top 20 rows
|
이렇게 Spark Standalone이 잘 돌아가는 것을 확인 했습니다.
별거 없죠? 뭐든 안해봐서 그렇지 막상 해보면 별거 없는데 항상 어려울거라는 두려움에 사로잡히지 마세요! 뭐 안되면 내일이 있으니까요.
-End.
[출처] http://hellowuniverse.com/2017/03/08/spark-standalone-%EC%84%A4%EC%B9%98%EB%B6%80%ED%84%B0-%EC%98%88%EC%A0%9C-%ED%85%8C%EC%8A%A4%ED%8A%B8%EA%B9%8C%EC%A7%80/
Spark StandAlone 설치부터 예제 테스트까지.
Apache Spark™ is a fast and general engine for large-scale data processing.
이 글은 Apache Spark를 쉽게 설치하고 테스트해보기 위한 글 입니다.
Download and Install
설치가 간단하므로 아래 명령을 쭉 따라하시면 됩니다.
root@ubuntu:~# wget http://d3kbcqa49mib13.cloudfront.net/spark-2.1.0-bin-hadoop2.7.tgz
root@ubuntu:~# tar -zxvf spark-2.1.0-bin-hadoop2.7.tgz
root@ubuntu:~/spark-2.1.0-bin-hadoop2.7# ./sbin/start-master.sh
starting org.apache.spark.deploy.master.Master, logging to /root/spark-2.1.0-bin-hadoop2.7/logs/spark-root-org.apache.spark.deploy.master.Master-1-ubuntu.out
failed to launch: nice -n 0 /root/spark-2.1.0-bin-hadoop2.7/bin/spark-class org.apache.spark.deploy.master.Master –host ubuntu –port 7077 –webui-port 8080
JAVA_HOME is not set <-- ERROR 입니다.(JAVA가 없다니..) 해결을 위해 아래 명령 실행!
full log in /root/spark-2.1.0-bin-hadoop2.7/logs/spark-root-org.apache.spark.deploy.master.Master-1-ubuntu.out
root@ubuntu:~/spark-2.1.0-bin-hadoop2.7# apt-get update
root@ubuntu:~/spark-2.1.0-bin-hadoop2.7# apt-get install default-jdk
root@ubuntu:~/spark-2.1.0-bin-hadoop2.7# apt-get install default-jre
Starting a Cluster Manually
마스터 시작에 앞서 저와 같이 localVM에서 테스트 하시는 경우면 hosts파일을 바꿔주는걸 추천 합니다.
root@ubuntu:~/spark-2.1.0-bin-hadoop2.7# vi /etc/hosts
127.0.0.1 localhost
#127.0.1.1 ubuntu
192.168.217.154 ubuntu
# 192.168.217.154는 Spark가 동작중인 ip입니다.
다음을 실행하여 Spark standalone 마스터를 시작합니다.
root@ubuntu:~/spark-2.1.0-bin-hadoop2.7# ./sbin/start-master.sh
starting org.apache.spark.deploy.master.Master, logging to /root/spark-2.1.0-bin-hadoop2.7/logs/spark-root-org.apache.spark.deploy.master.Master-1-ubuntu.out
잘 실행됬나 확인해보죠. 브라우저에 Spark 설치한 ip:8080을 입력하시면 아래 화면처럼 나올 것입니다.
요기서 URL: spark://ubuntu:7077 이걸 확인 하시고 slave를 실행해줍니다.
root@ubuntu:~/spark-2.1.0-bin-hadoop2.7# ./sbin/start-slave.sh spark://ubuntu:7077
starting org.apache.spark.deploy.worker.Worker, logging to /root/spark-2.1.0-bin-hadoop2.7/logs/spark-root-org.apache.spark.deploy.worker.Worker-1-ubuntu.out
화면을 새로고침 하면,
Master, Slave를 각각 실행해봤는데요, 실행시 다음 옵션을 줄 수 있으니 참고 하시기 바랍니다.
Example>
root@ubuntu:~/spark-2.1.0-bin-hadoop2.7# ./sbin/start-slave.sh spark://ubuntu:7077 -m 1024M -c 2
|
Argument
|
Meaning
|
|
-h HOST, –host HOST
|
Hostname to listen on
|
|
-i HOST, –ip HOST
|
Hostname to listen on (deprecated, use -h or –host)
|
|
-p PORT, –port PORT
|
Port for service to listen on (default: 7077 for master, random for worker)
|
|
–webui-port PORT
|
Port for web UI (default: 8080 for master, 8081 for worker)
|
|
-c CORES, –cores CORES
|
Total CPU cores to allow Spark applications to use on the machine (default: all available); only on worker
|
|
-m MEM, –memory MEM
|
Total amount of memory to allow Spark applications to use on the machine, in a format like 1000M or 2G (default: your machine’s total RAM minus 1 GB); only on worker
|
|
-d DIR, –work-dir DIR
|
Directory to use for scratch space and job output logs (default: SPARK_HOME/work); only on worker
|
|
–properties-file FILE
|
Path to a custom Spark properties file to load (default: conf/spark-defaults.conf)
|
이렇게 설치와 실행이 끝났습니다.
Launch and test example
저는 python을 쓸 것이기 때문에 python-shell을 열어 봅시다.
root@ubuntu:~/spark-2.1.0-bin-hadoop2.7# ./bin/pyspark –master spark://ubuntu:7077
Python 2.7.12 (default, Nov 19 2016, 06:48:10)
[GCC 5.4.0 20160609] on linux2
Type “help”, “copyright”, “credits” or “license” for more information.
Using Spark’s default log4j profile: org/apache/spark/log4j-defaults.properties
Setting default log level to “WARN”.
To adjust logging level use sc.setLogLevel(newLevel). For SparkR, use setLogLevel(newLevel).
17/03/07 23:16:57 WARN NativeCodeLoader: Unable to load native-hadoop library for your platform… using builtin-java classes where applicable
17/03/07 23:17:11 WARN ObjectStore: Failed to get database global_temp, returning NoSuchObjectException
Welcome to
____ __
/ __/__ ___ _____/ /__
_\ \/ _ \/ _ `/ __/ ‘_/
/__ / .__/\_,_/_/ /_/\_\ version 2.1.0
/_/
Using Python version 2.7.12 (default, Nov 19 2016 06:48:10)
SparkSession available as ‘spark’.
>>>
돌아가는거 확인 했으니 한번 돌려 봐야죠. Spark에 포함되어있는 machine learning library 중 naïve_bayes_example.py로 테스트 해보겠습니다. (혹시나 numpy가 필요하다고 하면 apt-get install python-pip -> pip install numpy를 해주세요^^)
root@ubuntu:~/spark-2.1.0-bin-hadoop2.7# ./bin/spark-submit –master spark://ubuntu:7077 examples/src/main/python/ml/naive_bayes_example.py
… 쭉 화에 글자가 보이다가…
1
2
3
4
5
6
7
8
9
10
11
12
13
14
15
16
17
18
19
20
21
22
23
24
25
26
|
17/03/07 23:56:39 INFO CodeGenerator: Code generated in 40.759727 ms
+-----+--------------------+--------------------+-----------+----------+
|label| features| rawPrediction|probability|prediction|
+-----+--------------------+--------------------+-----------+----------+
| 0.0|(692,[95,96,97,12...|[-174115.98587057...| [1.0,0.0]| 0.0|
| 0.0|(692,[98,99,100,1...|[-178402.52307196...| [1.0,0.0]| 0.0|
| 0.0|(692,[100,101,102...|[-100905.88974016...| [1.0,0.0]| 0.0|
| 0.0|(692,[123,124,125...|[-244784.29791241...| [1.0,0.0]| 0.0|
| 0.0|(692,[123,124,125...|[-196900.88506109...| [1.0,0.0]| 0.0|
| 0.0|(692,[124,125,126...|[-238164.45338794...| [1.0,0.0]| 0.0|
| 0.0|(692,[124,125,126...|[-184206.87833381...| [1.0,0.0]| 0.0|
| 0.0|(692,[127,128,129...|[-214174.52863813...| [1.0,0.0]| 0.0|
| 0.0|(692,[127,128,129...|[-182844.62193963...| [1.0,0.0]| 0.0|
| 0.0|(692,[128,129,130...|[-246557.10990301...| [1.0,0.0]| 0.0|
| 0.0|(692,[152,153,154...|[-208282.08496711...| [1.0,0.0]| 0.0|
| 0.0|(692,[152,153,154...|[-243457.69885665...| [1.0,0.0]| 0.0|
| 0.0|(692,[153,154,155...|[-260933.50931276...| [1.0,0.0]| 0.0|
| 0.0|(692,[154,155,156...|[-220274.72552901...| [1.0,0.0]| 0.0|
| 0.0|(692,[181,182,183...|[-154830.07125175...| [1.0,0.0]| 0.0|
| 1.0|(692,[99,100,101,...|[-145978.24563975...| [0.0,1.0]| 1.0|
| 1.0|(692,[100,101,102...|[-147916.32657832...| [0.0,1.0]| 1.0|
| 1.0|(692,[123,124,125...|[-139663.27471685...| [0.0,1.0]| 1.0|
| 1.0|(692,[124,125,126...|[-129013.44238751...| [0.0,1.0]| 1.0|
| 1.0|(692,[125,126,127...|[-81829.799906049...| [0.0,1.0]| 1.0|
+-----+--------------------+--------------------+-----------+----------+
only showing top 20 rows
|
이렇게 Spark Standalone이 잘 돌아가는 것을 확인 했습니다.
별거 없죠? 뭐든 안해봐서 그렇지 막상 해보면 별거 없는데 항상 어려울거라는 두려움에 사로잡히지 마세요! 뭐 안되면 내일이 있으니까요.
-End.
[출처] http://hellowuniverse.com/2017/03/08/spark-standalone-%EC%84%A4%EC%B9%98%EB%B6%80%ED%84%B0-%EC%98%88%EC%A0%9C-%ED%85%8C%EC%8A%A4%ED%8A%B8%EA%B9%8C%EC%A7%80/
Spark StandAlone 설치부터 예제 테스트까지.
Apache Spark™ is a fast and general engine for large-scale data processing.
이 글은 Apache Spark를 쉽게 설치하고 테스트해보기 위한 글 입니다.
Download and Install
설치가 간단하므로 아래 명령을 쭉 따라하시면 됩니다.
root@ubuntu:~# wget http://d3kbcqa49mib13.cloudfront.net/spark-2.1.0-bin-hadoop2.7.tgz
root@ubuntu:~# tar -zxvf spark-2.1.0-bin-hadoop2.7.tgz
root@ubuntu:~/spark-2.1.0-bin-hadoop2.7# ./sbin/start-master.sh
starting org.apache.spark.deploy.master.Master, logging to /root/spark-2.1.0-bin-hadoop2.7/logs/spark-root-org.apache.spark.deploy.master.Master-1-ubuntu.out
failed to launch: nice -n 0 /root/spark-2.1.0-bin-hadoop2.7/bin/spark-class org.apache.spark.deploy.master.Master –host ubuntu –port 7077 –webui-port 8080
JAVA_HOME is not set <-- ERROR 입니다.(JAVA가 없다니..) 해결을 위해 아래 명령 실행!
full log in /root/spark-2.1.0-bin-hadoop2.7/logs/spark-root-org.apache.spark.deploy.master.Master-1-ubuntu.out
root@ubuntu:~/spark-2.1.0-bin-hadoop2.7# apt-get update
root@ubuntu:~/spark-2.1.0-bin-hadoop2.7# apt-get install default-jdk
root@ubuntu:~/spark-2.1.0-bin-hadoop2.7# apt-get install default-jre
Starting a Cluster Manually
마스터 시작에 앞서 저와 같이 localVM에서 테스트 하시는 경우면 hosts파일을 바꿔주는걸 추천 합니다.
root@ubuntu:~/spark-2.1.0-bin-hadoop2.7# vi /etc/hosts
127.0.0.1 localhost
#127.0.1.1 ubuntu
192.168.217.154 ubuntu
# 192.168.217.154는 Spark가 동작중인 ip입니다.
다음을 실행하여 Spark standalone 마스터를 시작합니다.
root@ubuntu:~/spark-2.1.0-bin-hadoop2.7# ./sbin/start-master.sh
starting org.apache.spark.deploy.master.Master, logging to /root/spark-2.1.0-bin-hadoop2.7/logs/spark-root-org.apache.spark.deploy.master.Master-1-ubuntu.out
잘 실행됬나 확인해보죠. 브라우저에 Spark 설치한 ip:8080을 입력하시면 아래 화면처럼 나올 것입니다.
요기서 URL: spark://ubuntu:7077 이걸 확인 하시고 slave를 실행해줍니다.
root@ubuntu:~/spark-2.1.0-bin-hadoop2.7# ./sbin/start-slave.sh spark://ubuntu:7077
starting org.apache.spark.deploy.worker.Worker, logging to /root/spark-2.1.0-bin-hadoop2.7/logs/spark-root-org.apache.spark.deploy.worker.Worker-1-ubuntu.out
화면을 새로고침 하면,
Master, Slave를 각각 실행해봤는데요, 실행시 다음 옵션을 줄 수 있으니 참고 하시기 바랍니다.
Example>
root@ubuntu:~/spark-2.1.0-bin-hadoop2.7# ./sbin/start-slave.sh spark://ubuntu:7077 -m 1024M -c 2
|
Argument
|
Meaning
|
|
-h HOST, –host HOST
|
Hostname to listen on
|
|
-i HOST, –ip HOST
|
Hostname to listen on (deprecated, use -h or –host)
|
|
-p PORT, –port PORT
|
Port for service to listen on (default: 7077 for master, random for worker)
|
|
–webui-port PORT
|
Port for web UI (default: 8080 for master, 8081 for worker)
|
|
-c CORES, –cores CORES
|
Total CPU cores to allow Spark applications to use on the machine (default: all available); only on worker
|
|
-m MEM, –memory MEM
|
Total amount of memory to allow Spark applications to use on the machine, in a format like 1000M or 2G (default: your machine’s total RAM minus 1 GB); only on worker
|
|
-d DIR, –work-dir DIR
|
Directory to use for scratch space and job output logs (default: SPARK_HOME/work); only on worker
|
|
–properties-file FILE
|
Path to a custom Spark properties file to load (default: conf/spark-defaults.conf)
|
이렇게 설치와 실행이 끝났습니다.
Launch and test example
저는 python을 쓸 것이기 때문에 python-shell을 열어 봅시다.
root@ubuntu:~/spark-2.1.0-bin-hadoop2.7# ./bin/pyspark –master spark://ubuntu:7077
Python 2.7.12 (default, Nov 19 2016, 06:48:10)
[GCC 5.4.0 20160609] on linux2
Type “help”, “copyright”, “credits” or “license” for more information.
Using Spark’s default log4j profile: org/apache/spark/log4j-defaults.properties
Setting default log level to “WARN”.
To adjust logging level use sc.setLogLevel(newLevel). For SparkR, use setLogLevel(newLevel).
17/03/07 23:16:57 WARN NativeCodeLoader: Unable to load native-hadoop library for your platform… using builtin-java classes where applicable
17/03/07 23:17:11 WARN ObjectStore: Failed to get database global_temp, returning NoSuchObjectException
Welcome to
____ __
/ __/__ ___ _____/ /__
_\ \/ _ \/ _ `/ __/ ‘_/
/__ / .__/\_,_/_/ /_/\_\ version 2.1.0
/_/
Using Python version 2.7.12 (default, Nov 19 2016 06:48:10)
SparkSession available as ‘spark’.
>>>
돌아가는거 확인 했으니 한번 돌려 봐야죠. Spark에 포함되어있는 machine learning library 중 naïve_bayes_example.py로 테스트 해보겠습니다. (혹시나 numpy가 필요하다고 하면 apt-get install python-pip -> pip install numpy를 해주세요^^)
root@ubuntu:~/spark-2.1.0-bin-hadoop2.7# ./bin/spark-submit –master spark://ubuntu:7077 examples/src/main/python/ml/naive_bayes_example.py
… 쭉 화에 글자가 보이다가…
1
2
3
4
5
6
7
8
9
10
11
12
13
14
15
16
17
18
19
20
21
22
23
24
25
26
|
17/03/07 23:56:39 INFO CodeGenerator: Code generated in 40.759727 ms
+-----+--------------------+--------------------+-----------+----------+
|label| features| rawPrediction|probability|prediction|
+-----+--------------------+--------------------+-----------+----------+
| 0.0|(692,[95,96,97,12...|[-174115.98587057...| [1.0,0.0]| 0.0|
| 0.0|(692,[98,99,100,1...|[-178402.52307196...| [1.0,0.0]| 0.0|
| 0.0|(692,[100,101,102...|[-100905.88974016...| [1.0,0.0]| 0.0|
| 0.0|(692,[123,124,125...|[-244784.29791241...| [1.0,0.0]| 0.0|
| 0.0|(692,[123,124,125...|[-196900.88506109...| [1.0,0.0]| 0.0|
| 0.0|(692,[124,125,126...|[-238164.45338794...| [1.0,0.0]| 0.0|
| 0.0|(692,[124,125,126...|[-184206.87833381...| [1.0,0.0]| 0.0|
| 0.0|(692,[127,128,129...|[-214174.52863813...| [1.0,0.0]| 0.0|
| 0.0|(692,[127,128,129...|[-182844.62193963...| [1.0,0.0]| 0.0|
| 0.0|(692,[128,129,130...|[-246557.10990301...| [1.0,0.0]| 0.0|
| 0.0|(692,[152,153,154...|[-208282.08496711...| [1.0,0.0]| 0.0|
| 0.0|(692,[152,153,154...|[-243457.69885665...| [1.0,0.0]| 0.0|
| 0.0|(692,[153,154,155...|[-260933.50931276...| [1.0,0.0]| 0.0|
| 0.0|(692,[154,155,156...|[-220274.72552901...| [1.0,0.0]| 0.0|
| 0.0|(692,[181,182,183...|[-154830.07125175...| [1.0,0.0]| 0.0|
| 1.0|(692,[99,100,101,...|[-145978.24563975...| [0.0,1.0]| 1.0|
| 1.0|(692,[100,101,102...|[-147916.32657832...| [0.0,1.0]| 1.0|
| 1.0|(692,[123,124,125...|[-139663.27471685...| [0.0,1.0]| 1.0|
| 1.0|(692,[124,125,126...|[-129013.44238751...| [0.0,1.0]| 1.0|
| 1.0|(692,[125,126,127...|[-81829.799906049...| [0.0,1.0]| 1.0|
+-----+--------------------+--------------------+-----------+----------+
only showing top 20 rows
|
이렇게 Spark Standalone이 잘 돌아가는 것을 확인 했습니다.
별거 없죠? 뭐든 안해봐서 그렇지 막상 해보면 별거 없는데 항상 어려울거라는 두려움에 사로잡히지 마세요! 뭐 안되면 내일이 있으니까요.
-End.
[출처] http://hellowuniverse.com/2017/03/08/spark-standalone-%EC%84%A4%EC%B9%98%EB%B6%80%ED%84%B0-%EC%98%88%EC%A0%9C-%ED%85%8C%EC%8A%A4%ED%8A%B8%EA%B9%8C%EC%A7%80/


