
This month, we present another interesting app in our App Inventor 2 series. Digital wallets are a trending topic ever since our country decided to opt for a ‘less cash’ economy. Creating this app will give readers a good insight into how a digital wallet really works.
After reading and practically trying out the apps in this series, many readers have mastered the components available in the palette and have had much fun moving them between the designer and block editor.
Digital wallets or digital payment services are the talk of the town nowadays because of the government’s initiatives to go digital and the Digital India campaign. Vendors are opting for mobile payments rather than cash, and this is a smooth as well as hassle-free process. Let’s explore the functionality of digital wallet payment systems with the help of a mobile application which we will develop over the course of this two-part tutorial.
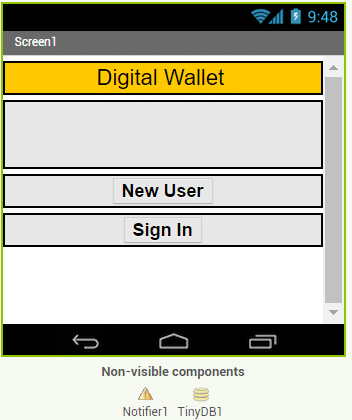
Figure 1: Designer screen (Screen 1)
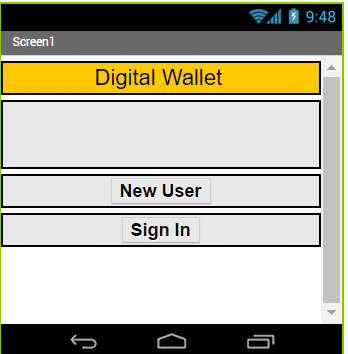
Figure 2: How the application looks
Before that, I would like to define what a digital wallet is and how it works. A digital wallet is an application or feature within an electronic device which enables it to make electronic transactions. It has a linked bank account number from which all the transactions are processed and each transaction is recorded for future reference. The device needs to be connected to the Internet to make payments.
 The theme of the application
The theme is pretty simple and you might have already come across various mobile payment applications. We will make a similar app, and demonstrate its debit and credit features in the digital wallet account.
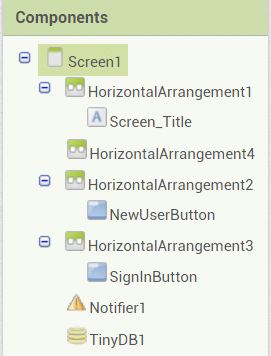
Figure 3: Components view (Screen 1)
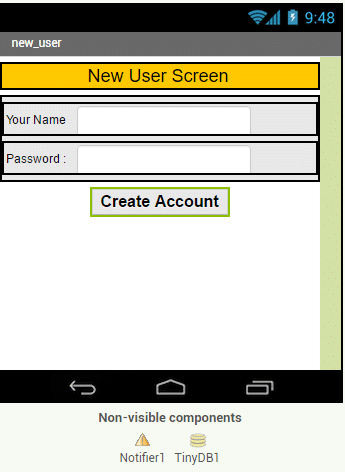
Figure 4: Designer screen (New user screen)
GUI requirements
For every app, we need a graphical user interface or GUI, which helps the user to interact with the on-screen components. How each component responds to user actions is defined in the block editor section. In this app, we will have multiple screens and will define the look and feel for each of them.
There are four GUI screens. Their names are:
1. Screen1
2. Login Screen
3. New User Screen
4. Purchase Screen
The GUI requirements for the application are listed below.
1. Label: Labels are static text components, which are used to display some headings or markings on to the screen.
2. Button: Buttons will let you trigger the event and are very essential components.
3. Horizontal arrangement: These are special components which keep all child components aligned within themselves. The horizontal component keeps all the child components horizontally aligned.
4. Notifier: These are used to display some instructions or to give controls over existing components. You will discover more about their functionality as we implement them in our application.
5. TinyDB: This is the internal storage within the device, which will be used to keep confidential data such as passwords, etc.
6. Text Boxes: These are pretty simple objects that are used to take inputs from the user. You can better control the type of text box by setting various properties such as numeric-only or multiple lines.
Table 1 lists the components that we will require for Screen1, which we will drag on to the designer from the left hand side palette.
1. Drag and drop the components mentioned in Table 1 to the viewer.
2. Visible components will be visible to you while the non-visible components will be located beneath the viewer under the tag ‘Non-visible’.
3. We have placed a label so as to put the name of the application.
4. All buttons need to be put within the Horizontal arrangement so as to keep them aligned horizontally.
5. If you have dragged and placed everything, the Screen1 layout will look somewhat like what’s shown in Figure 1.
6. Make the necessary property changes for the label and button components so that they best fit on to the screen.
7. Renaming the components helps to identify them in the block editor.
8. So, this way, your graphical user interface is ready for the first screen. Figure 2 shows exactly how the application will look after the installation.
9. The hierarchy of the components that we have dragged to the designer is as shown in Figure 3.
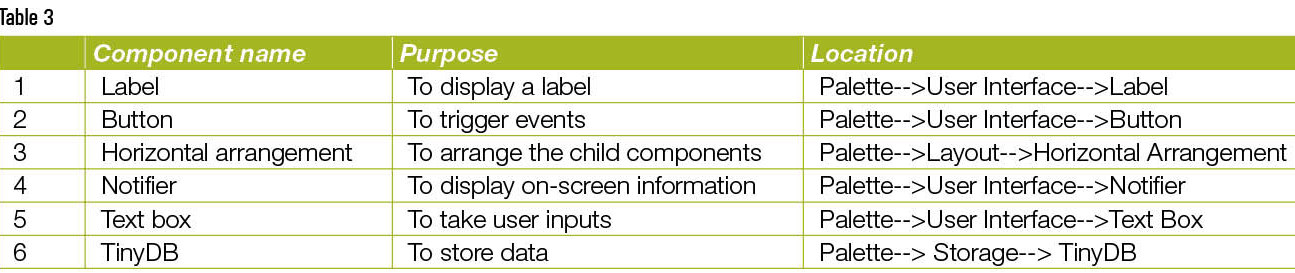
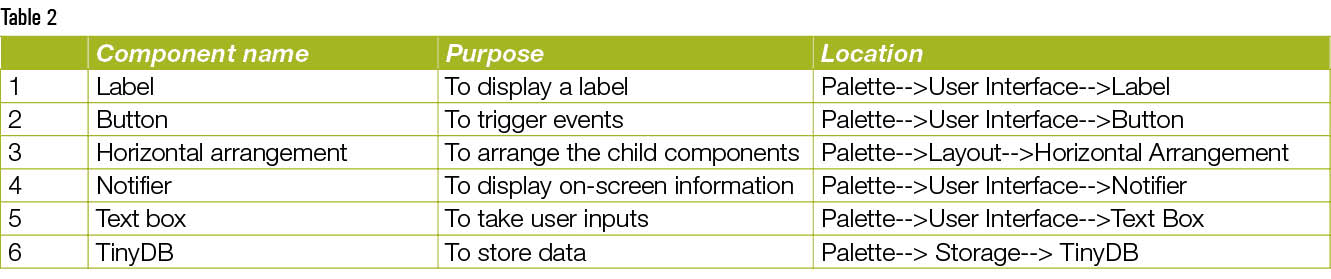
 In a similar fashion, we will design the remaining three screens. Table 2 lists the components that we will require for the new user screen, which we will drag on to the designer from the left hand side palette.
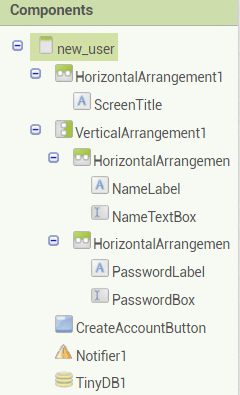
Figure 5: Components view (New user screen)
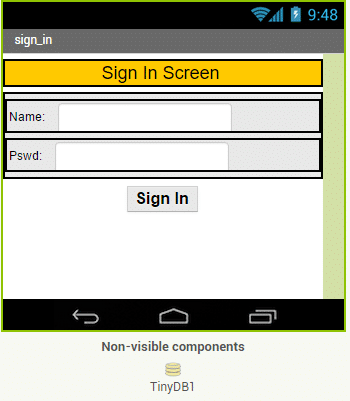
Figure 6: Designer screen (sign-in screen)
If you have dragged and placed everything, the new user screen layout will look something like what’s shown in Figure 4.
Given in Figure 5 is the hierarchy of the components that we have dragged to the designer.
The components that we will require for the sign-in screen which we will drag on to the designer from the left hand side palette are given in Table 3.
If you have dragged and placed everything, the sign-in screen layout will look something like what’s shown in Figure 6.
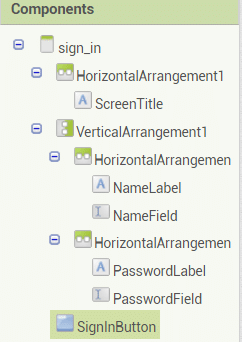
Figure 7: Components view (sign-in screen)
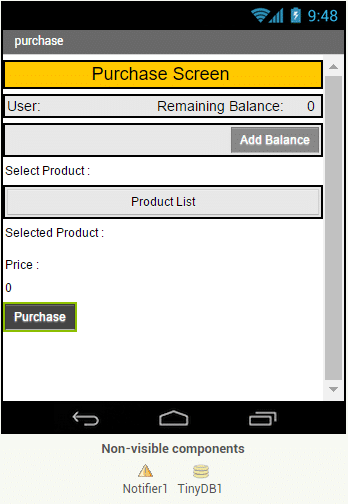
Figure 8: Designer screen (purchase)
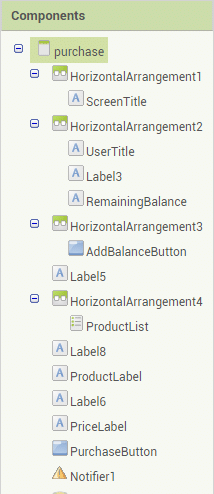
Figure 9: Components view (purchase)
Figure 7 shows the hierarchy of the components that we have dragged to the designer.
The components that we will require for the purchase screen, which we drag on to the designer from the left hand side palette, are given in Table 4.
If you have dragged and placed everything, the purchase screen layout will be similar to Figure 8.
The hierarchy of the components that we have dragged to the designer is given in Figure 9.
So we have been able to develop a simple GUI, which will be enough to demonstrate how a digital transaction app works. Next month, we will explore the logic to be implemented for each of the screens.
If readers have uploaded any of their applications to Google Play Store, I would be pleased if you mailed me the links.
[출처] http://opensourceforu.com/2017/04/creating-a-digital-wallet-application-in-app-inventor-2/


Creating a digital wallet application in App Inventor 2
This month, we present another interesting app in our App Inventor 2 series. Digital wallets are a trending topic ever since our country decided to opt for a ‘less cash’ economy. Creating this app will give readers a good insight into how a digital wallet really works.
After reading and practically trying out the apps in this series, many readers have mastered the components available in the palette and have had much fun moving them between the designer and block editor.
Digital wallets or digital payment services are the talk of the town nowadays because of the government’s initiatives to go digital and the Digital India campaign. Vendors are opting for mobile payments rather than cash, and this is a smooth as well as hassle-free process. Let’s explore the functionality of digital wallet payment systems with the help of a mobile application which we will develop over the course of this two-part tutorial.
Figure 1: Designer screen (Screen 1)
Figure 2: How the application looks
Before that, I would like to define what a digital wallet is and how it works. A digital wallet is an application or feature within an electronic device which enables it to make electronic transactions. It has a linked bank account number from which all the transactions are processed and each transaction is recorded for future reference. The device needs to be connected to the Internet to make payments.
The theme of the application
The theme is pretty simple and you might have already come across various mobile payment applications. We will make a similar app, and demonstrate its debit and credit features in the digital wallet account.
Figure 3: Components view (Screen 1)
Figure 4: Designer screen (New user screen)
GUI requirements
For every app, we need a graphical user interface or GUI, which helps the user to interact with the on-screen components. How each component responds to user actions is defined in the block editor section. In this app, we will have multiple screens and will define the look and feel for each of them.
There are four GUI screens. Their names are:
1. Screen1
2. Login Screen
3. New User Screen
4. Purchase Screen
The GUI requirements for the application are listed below.
1. Label: Labels are static text components, which are used to display some headings or markings on to the screen.
2. Button: Buttons will let you trigger the event and are very essential components.
3. Horizontal arrangement: These are special components which keep all child components aligned within themselves. The horizontal component keeps all the child components horizontally aligned.
4. Notifier: These are used to display some instructions or to give controls over existing components. You will discover more about their functionality as we implement them in our application.
5. TinyDB: This is the internal storage within the device, which will be used to keep confidential data such as passwords, etc.
6. Text Boxes: These are pretty simple objects that are used to take inputs from the user. You can better control the type of text box by setting various properties such as numeric-only or multiple lines.
Table 1 lists the components that we will require for Screen1, which we will drag on to the designer from the left hand side palette.
1. Drag and drop the components mentioned in Table 1 to the viewer.
2. Visible components will be visible to you while the non-visible components will be located beneath the viewer under the tag ‘Non-visible’.
3. We have placed a label so as to put the name of the application.
4. All buttons need to be put within the Horizontal arrangement so as to keep them aligned horizontally.
5. If you have dragged and placed everything, the Screen1 layout will look somewhat like what’s shown in Figure 1.
6. Make the necessary property changes for the label and button components so that they best fit on to the screen.
7. Renaming the components helps to identify them in the block editor.
8. So, this way, your graphical user interface is ready for the first screen. Figure 2 shows exactly how the application will look after the installation.
9. The hierarchy of the components that we have dragged to the designer is as shown in Figure 3.
In a similar fashion, we will design the remaining three screens. Table 2 lists the components that we will require for the new user screen, which we will drag on to the designer from the left hand side palette.
Figure 5: Components view (New user screen)
Figure 6: Designer screen (sign-in screen)
If you have dragged and placed everything, the new user screen layout will look something like what’s shown in Figure 4.
Given in Figure 5 is the hierarchy of the components that we have dragged to the designer.
The components that we will require for the sign-in screen which we will drag on to the designer from the left hand side palette are given in Table 3.
If you have dragged and placed everything, the sign-in screen layout will look something like what’s shown in Figure 6.
Figure 7: Components view (sign-in screen)
Figure 8: Designer screen (purchase)
Figure 9: Components view (purchase)
Figure 7 shows the hierarchy of the components that we have dragged to the designer.
The components that we will require for the purchase screen, which we drag on to the designer from the left hand side palette, are given in Table 4.
If you have dragged and placed everything, the purchase screen layout will be similar to Figure 8.
The hierarchy of the components that we have dragged to the designer is given in Figure 9.
So we have been able to develop a simple GUI, which will be enough to demonstrate how a digital transaction app works. Next month, we will explore the logic to be implemented for each of the screens.
If readers have uploaded any of their applications to Google Play Store, I would be pleased if you mailed me the links.
[출처] http://opensourceforu.com/2017/04/creating-a-digital-wallet-application-in-app-inventor-2/
