
- 전체
- HTML
- Web Design (웹디자인)
- XE 응용 개발
- wordpress plugin dev
- Javascript & JavaScript Application
- MEAN Stack : full stack javascript
- angular js & ionic framework
- bootstrap
- WebGL, Three.js and Babylon.js
- restful api design
- mobile web
- node.js 응용
- Cloud Service 응용
- 웹 어셈블리 개발 [WASM, WebAssembly]
- 마이크로서비스, MSA (microservice architecture)
- WebGL / WebGPU
- next.js 개발
- micro frontend (마이크로프론트앤드)
- 전자상거래/쇼핑몰
- 서버 클라우드 (aws, azure, google)
웹 어셈블리 개발 [WASM, WebAssembly] [웹 어셈블리, WSAM] Porting a Linux Program to Run in Browser using Emscripten : mscripten을 사용하여 브라우저에서 실행되도록 Linux 프로그램 포팅
2024.04.20 21:33
[웹 어셈블리, WSAM] Porting a Linux Program to Run in Browser using Emscripten : mscripten을 사용하여 브라우저에서 실행되도록 Linux 프로그램 포팅
제가 구현하고 싶었던 무한히 긴 목록 중 하나는 바이너리를 가져와서 웹페이지에 채워서 완전히 클라이언트 측에서 실행하는 것이었습니다. 오늘 저는 새로운 Atari 2600 IDE 로 바로 그 일을 해냈습니다 . 이를 통해 브라우저에서 어셈블리 프로그램을 완전히 작성하고 컴퓨터에 어떤 종류의 툴체인도 설정하지 않고도 실행할 수 있습니다. 다음은 llvm 및 wasm을 사용하여 브라우저에서 실행되도록 c/C++를 컴파일하고 바이너리를 생성하고 해당 바이너리를 일부 바닐라 Javascript와 인터페이스하는 방법인 emscripten을 얻는 방법에 대한 메모입니다 .
내가 만든 것
Atari 2600용 프로그램을 작성하려면 먼저 어셈블러와 텍스트 편집기를 설정해야 합니다. 권장되는 도구는 6502 어셈블리용 명령줄 어셈블러 인 dasm 인 것 같습니다. 이것이 브라우저에서 완전히 실행되도록 컴파일할 내용입니다. 하지만 이 프로그램에는 emscripten을 방해하는 몇 가지 문제가 있습니다. 많은 전역 변수를 사용하며 실제로 재설정하지 않고 실행하도록 의도된 것은 아닙니다.
저는 이러한 빈티지 시스템에서 실행할 코드를 더 쉽게 작성할 수 있는 방법을 찾기 위해 Retro Game Mechanics explained 에서 영감을 받았습니다 . 저는 항상 이러한 빈티지 시스템을 위한 코드를 작성하고 싶었고 이제 emscripten을 사용하여 구축한 작은 IDE를 사용하여 작성할 수 있습니다. 이미지를 클릭할 수 있으며 이 프로그램은 데스크톱의 Chrome에서만 실행됩니다. 다른 곳에서는 테스트해보지 않았습니다.
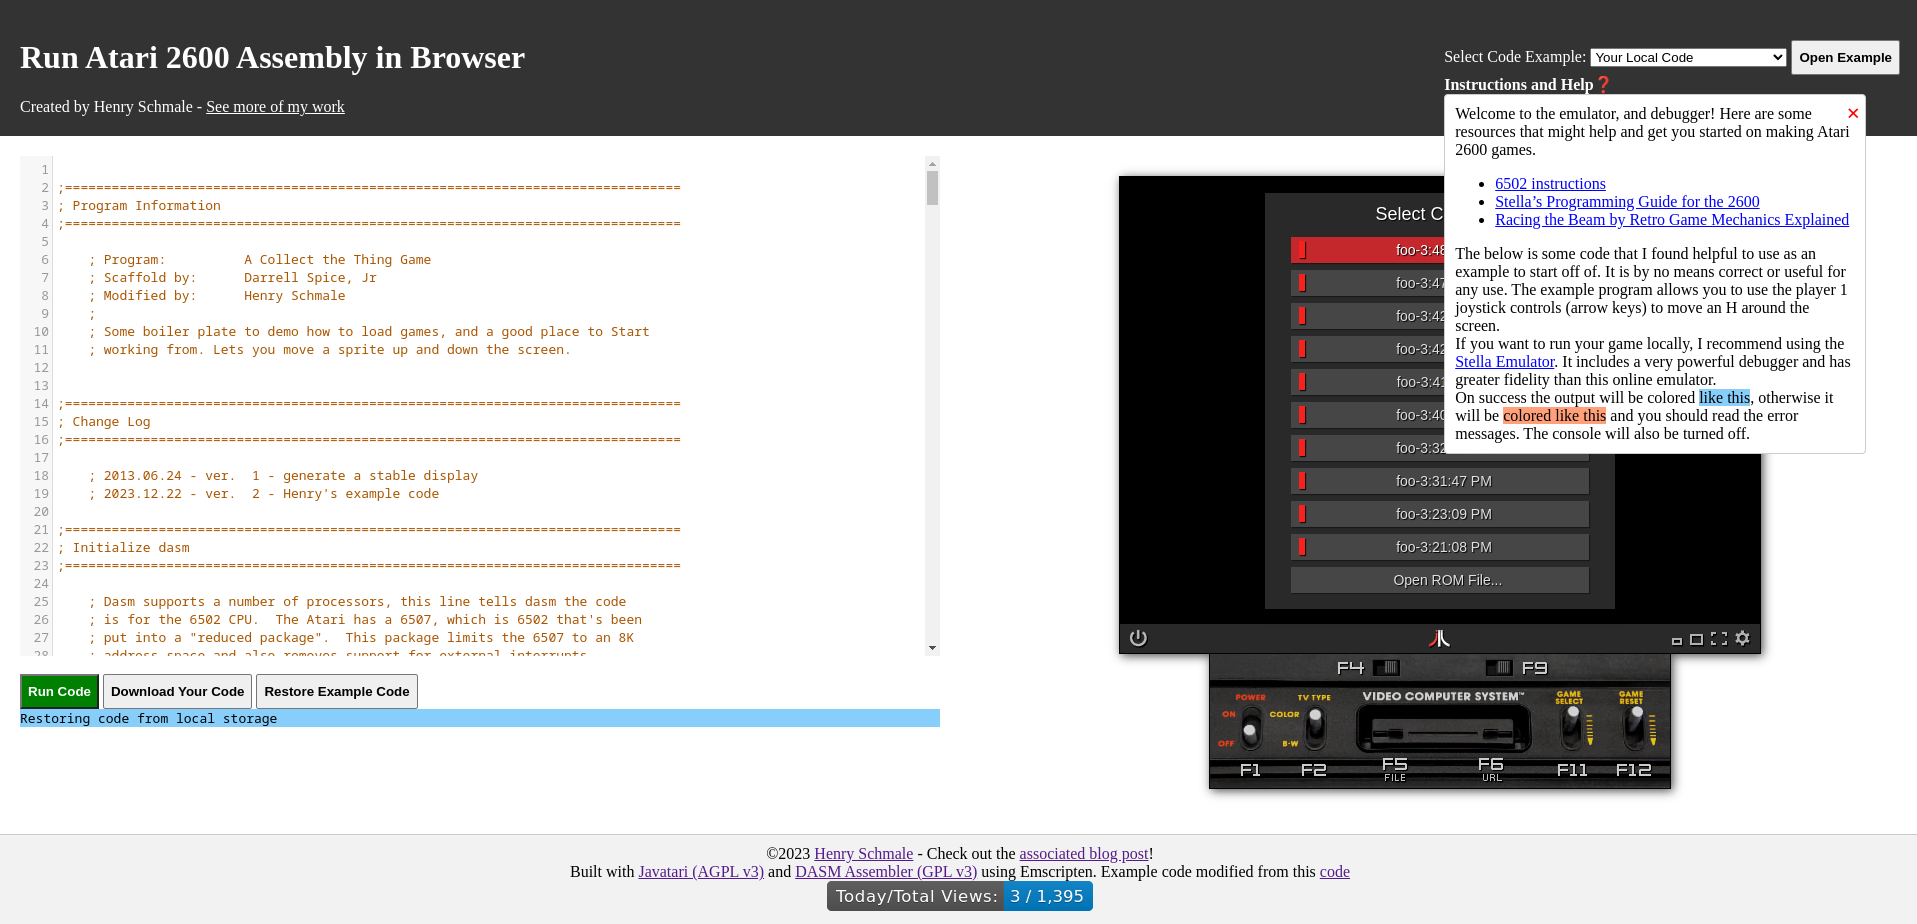
사용하기 쉽고 내장된 에뮬레이터를 만들어준 Javatari 프로젝트 에 특별히 감사드립니다 .
엠스크립트 설정
첫 번째 단계는 emsdk 도구를 가져와 설정하는 것입니다. 우리는 고급 설정을 수행하지 않으므로 기본값을 따르십시오. 내가 사용한 명령은 다음과 같습니다.
git clone https://github.com/emscripten-core/emsdk
cd emsdk
./emsdk install latest
./emsdk activate latest
source emsdk_env.sh # For bash users, other env files are generated.
이를 통해 우리는 새로운 C 컴파일러와 사용할 수 있는 몇 가지 다른 도구를 얻을 수 있습니다. 우리는 C 프로그램 컴파일에만 관심이 있으므로 export CC=emcc실제로 접하게 될 대부분의 makefile에 대해 이를 수정하는 데만 관심이 있습니다. automake 등을 사용하는 복잡한 프로그램에 도움이 되는 다른 것들이 있습니다.
프로그램 컴파일하기
다음으로 링커 단계에서 makefile을 수정해야 할 것입니다. 이것은 모든 개체 파일이 빌드된 후이며 이제 서로 연결되고 있습니다. 런타임이 원하는 대로 작동하도록 다양한 플래그를 에 전달할 수 있습니다 . emcc일부 로컬 파일을 바이너리와 함께 묶거나 프로그램 내에서 바이너리를 여러 번 실행할 수도 있습니다. 또한 사용하기 위해 일부 기능을 내보내야 할 수도 있습니다. 아래에 설정한 플래그와 그 이유를 정의 목록으로 나열했습니다. 다음은 모두 -s이와 같은 플래그와 인수를 사용합니다.
EXPORTED_FUNCTIONS=_main- 이를 통해 우리 프로그램의 주요 기능을 내보내고 호출할 수 있습니다.
EXPORTED_RUNTIME_METHODS=FS,callMain- 반환된 객체에 대해 FS 및 callMain 함수를 사용해야 합니다. FS는 emscripten에서 사용하는 파일 시스템입니다. 지속되지 않는 가짜 가상의 것입니다. 연결하는 동안 플래그를 사용하여 항목을 추가할 수 있습니다
-embed-file path.callMain실제로 작업을 실행할 수 있습니다. EXIT_RUNTIME=1- 이로 인해 런타임이 지속되는 대신 적절하게 종료됩니다. DASM은 많은 전역 상태를 사용하며 이는 실행이 끝날 때 완전히 정리되지 않습니다. 명령줄 프로그램을 작성하는 올바른 방법은 무엇입니까? 운영 체제가 이를 처리해 줍니다.
MODULARIZE- 이를 통해 런타임 생성을 반복적으로 처리하는 팩토리 함수를 얻을 수 있습니다.
EXPORT_NAME="createDasmUtil"- 팩토리 함수의 이름은 무엇입니까?
INVOKE_RUN=0- 기본적으로 런타임을 생성하면 main에 대한 인수 없이 생성되자마자 자동으로 실행됩니다. 실제 인수를 사용하여 Main을 호출해야 하기 때문에 그런 일이 발생하는 것을 원하지 않습니다.
링커 라인에서 플래그를 구성했으면 이제 시작할 준비가 되었습니다. 우리는 프로그램을 구축한 make다음 wasm 및 관련 자바스크립트 파일을 우리 웹사이트에 복사할 것입니다. 이제 HTML에 통합하는 재미있는 부분이 있습니다.
웹 페이지에 통합
이제 JavaScript를 작성하고 모든 것이 어떻게 작동하는지 설명할 시간입니다. 여기에서는 번들러를 사용할 수도 있지만 인간적으로 가능한 한 단순하게 유지하기 위해 바닐라 JS로 모든 작업을 수행했습니다. 나는 모든 것을 파악하기 위해 콘솔을 대화식으로 사용하는 데 많은 시간을 보냈습니다.
먼저 친숙한 emscripten 래퍼 스크립트를 로드하십시오..
<script src="your_wasm.js"></script>
<script src="my_integration.js"></script>
다음으로, 로 사용한 것을 기억하세요 EXPORT_NAME. 위에서 정의한 것을 예로 사용하겠습니다. 또한 함수를 프로그램 호출을 위한 이벤트 핸들러로 만들 것입니다. 원하는 대로 첨부할 수 있습니다.
async function invokeMyProgram() {
    let dasmBinary = await createDasmUtil({
        "print": function (text) {
            let output = text + '\n';
            document.getElementById('output').innerText += output;
        },
        "printErr": function (text) {
            let output = 'Error: ' + text + '\n';
            document.getElementById('output').innerText += output;
        }
    });
    // setup and inject whatever you need to in the file system here
    dasmBinary.FS.writeFile('inputFile.txt', 'my program input here');

    // actually invoke main
    // rc is our return code exactly like it works in a shell.
    // 0 indicates success anything else is an error.
    let rc = dasmBinary.callMain(['inputFile.txt', 'myArg2', '-oYourOutputFile.txt']);

    // do something with the file output and pass it where it needs to go
    // stuff is going to be a raw uint8array
    let stuff = dasmBinary.FS.readFile("YourOutputFile.txt");
}
보시다시피 실제로 C 코드를 호출하는 데는 그렇게 많은 상용구가 필요하지 않습니다. 우리가 전달하는 내용과 이러한 바이트 버퍼에서 작동하는 방법에 주의하면 됩니다.
파일 시스템은 엄격하게 메모리에 있지만 이를 재정의하고 유지하는 방법이 있지만 내 프로젝트에는 필요하지 않았기 때문에 다루지 않겠습니다. 파일 시스템은 으로 쉽게 볼 수 있습니다 instance.FS.readdir(path). 이것이 ls여기서 가장 좋은 대안입니다. 프로그램이 실행되는 위치와 관련 경로가 무엇인지 이해하는 것이 좋습니다. 결국에는 docker에서 발생할 수 있는 것과 동일한 문제가 발생합니다. 현재 작업 디렉토리는 무엇이며, 필요한 곳에 모든 것을 복사했습니까?
마무리
이것이 emscripten에 대한 계몽적인 소개가 되기를 바라며 웹에서 실행할 프로그램을 설정하고 컴파일하는 데 도움이 되기를 바랍니다. 상당히 정교한 프로그램을 가져와서 서버 상호 작용 없이 일반 인터넷에 공개할 수 있다는 것은 매우 멋진 일입니다. 나는 다른 오래된 학교 프로그램을 브라우저에서 실행하고 대화형으로 만드는 것을 포함하여 이 작업을 수행하고 싶은 다른 프로젝트가 있습니다. 또한 여기에서 일부 물리 시뮬레이션을 사용할 수 있게 만들고 싶습니다. 특히 제가 NIST에서 작업한 내용을 일반 대중에게 공개하면 정말 멋질 것 같습니다.
[출처] https://www.henryschmale.org/2023/12/21/emscripten.html
On my infinitely long list of things I wanted to implement one of them was taking a binary and stuffing it into a webpage to run entirely client side. Today I have accomplished just that with my new Atari 2600 IDE. This allows you to write an assembly program entirely in browser and run it without setting up any kind of toolchain on your own machine. The following are my notes on getting emscripten, a way to compile c/c++ to run in browser using llvm and wasm, to generate a binary and interfacing that binary with some vanilla Javascript.


What I Built
In order to write programs for the Atari 2600, you must first set up an assembler and text editor. The recommended tool seems to be dasm, a command line assembler for 6502 assembly. This is what we’re going to compile to run entirely in browser. However, this program has some issues that interfere with emscripten. It uses a lot of global variables, and was never really meant to run without being reset.
I was inspired by Retro Game Mechanics Explained to make an easier way to write code to run on these vintage systems. I always wanted to write code for these vintage systems, and now I can with my little IDE I built using emscripten. The image is clickable, and this program will only run on Chrome on desktop. I haven’t tested it any where else.
Special thanks to the Javatari project for making a fantastic easy to use and embed emulator.
Emscripten Setup
The first step is grab the emsdk tool and set it up. We are not doing advanced setup so just follow the defaults. The commands I used are listed below:
git clone https://github.com/emscripten-core/emsdk
cd emsdk
./emsdk install latest
./emsdk activate latest
source emsdk_env.sh # For bash users, other env files are generated.
This gives us a new C compiler and a couple other tools to use. We’re only interested in compiling a C program, so just export CC=emcc to fix it for most makefiles you’ll encounter in the wild. There’s other things to help with complex programs that use automake and etc.
Compiling Your Program
Next you’ll have to probably modify the makefile at the linker stage. This is after all the object files have been built, and now they’re being strung together. Various flags can be passed to emcc, to make the runtime do what you want. You might want to bundle some local files with the binary or run the binary multiple times inside of your program. You’ll also probably have to export some functions for your use. I’ve listed the flags I set below, and why as a definition list. The following all use the -s flag and argument like such.
EXPORTED_FUNCTIONS=_main- This allows the main function from our program to be exported and callable.
EXPORTED_RUNTIME_METHODS=FS,callMain- We need to use the FS and callMain functions on the returned object. FS is the file system use by emscripten. It’s a fake virtual thing that is not persisted. We can add things to it using the
-embed-file pathflag during linking.callMainallows actually executing the thing. EXIT_RUNTIME=1- This causes the runtime to properly terminate instead of persisting. DASM uses a lot of global state, and this isn’t cleaned up fully at the end of execution. Which is the right way to write command line programs. The operating system will take care of it for you.
MODULARIZE- This allows us to get a factory function to handle creating our runtime repeatably.
EXPORT_NAME="createDasmUtil"- What the factory function should be called.
INVOKE_RUN=0- By default when you create a runtime it will be executed automatically as soon as it’s created with no arguments to main. We don’t want that to happen since we need to callMain with real arguments.
Once we have configured our flags in the linker line, we are ready to go. We’ll build the program with make and then copy over the wasm and associated javascript file to our website. Now comes the fun part with integrating into the html.
Integrating into the Web Page
Now it’s time to write some JavaScript and explain how everything works. You could probably use a bundler here, but I did everything with vanilla JS to keep it as simple as humanly possible. I spent a lot of time using the console interactively to figure everything out.
First load your friendly emscripten wrapper script..
<script src="your_wasm.js"></script>
<script src="my_integration.js"></script>
Next, remember what you used as your EXPORT_NAME, we’ll use what I defined above as an example. We’ll also make the function be an event handler for invoking our program. You can attach it however you would like.
async function invokeMyProgram() {
    let dasmBinary = await createDasmUtil({
        "print": function (text) {
            let output = text + '\n';
            document.getElementById('output').innerText += output;
        },
        "printErr": function (text) {
            let output = 'Error: ' + text + '\n';
            document.getElementById('output').innerText += output;
        }
    });
    // setup and inject whatever you need to in the file system here
    dasmBinary.FS.writeFile('inputFile.txt', 'my program input here');

    // actually invoke main
    // rc is our return code exactly like it works in a shell.
    // 0 indicates success anything else is an error.
    let rc = dasmBinary.callMain(['inputFile.txt', 'myArg2', '-oYourOutputFile.txt']);

    // do something with the file output and pass it where it needs to go
    // stuff is going to be a raw uint8array
    let stuff = dasmBinary.FS.readFile("YourOutputFile.txt");
}
As we can see it’s not that much boilerplate to actually invoke our C code. We just need to be careful with what we pass around, and how we operate on these byte buffers.
The filesystem is strictly in memory, but there are ways to override and persist it that I’m not going to cover since it wasn’t needed for my project. The file system can easily be viewed with instance.FS.readdir(path), this is your best ls alternative here. I highly recommend understanding where your program is running from and what are the relevant paths. At the end of the day, its the same troubles you might have with docker. What is my current working directory, and did I copy everything in place where it needs to go?
Wrapping Up
Hopefully you found this to be an enlightening introduction to emscripten, and hopefully it helps you setup and compile your own programs to run on the web with it. It’s quite neat that we can take some fairly sophisticated programs and open them up to the general internet without any server interaction. I have other projects I want to work on with this stuff including getting other old school programs to run in browser and be interactive. I also want to make some physics simulations available here. Especially the stuff I worked on at NIST, as it would be really cool to open that up to the general public.
[출처] https://www.henryschmale.org/2023/12/21/emscripten.html
광고 클릭에서 발생하는 수익금은 모두 웹사이트 서버의 유지 및 관리, 그리고 기술 콘텐츠 향상을 위해 쓰여집니다.
