
- 전체
- JAVA 일반
- JAVA 수학
- JAVA 그래픽
- JAVA 자료구조
- JAVA 인공지능
- JAVA 인터넷
- Java Framework
- Java GUI (AWT,SWING,SWT,JFACE)
- SWT and RCP (web RAP/RWT)[eclipse], EMF
SWT and RCP (web RAP/RWT)[eclipse], EMF Eclipse RCP Tutorial: Eclipse Rich Client Application with a View
2015.10.05 22:02
Eclipse RCP Tutorial: Eclipse Rich Client Application with a View
Eclipse RCP provides an easy way to create desktop applications with industry standards. Once you understand how the framework works, it’s very straightforward to add more views, perspectives, etc.
This article shows how to create a simple rich client application with a view by using development wizard. It also explains the role of each file created. I assume you already have PDE installed. If you don't, you can quickly find out how to do that from the "How to install PDE" tutorial.
1. Steps for creating a simple RCP application with a View
The following 4 pictures show the 4 steps for creating a simple app with wizard.
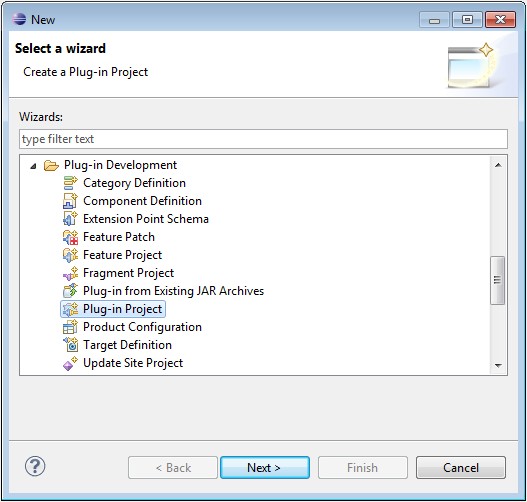
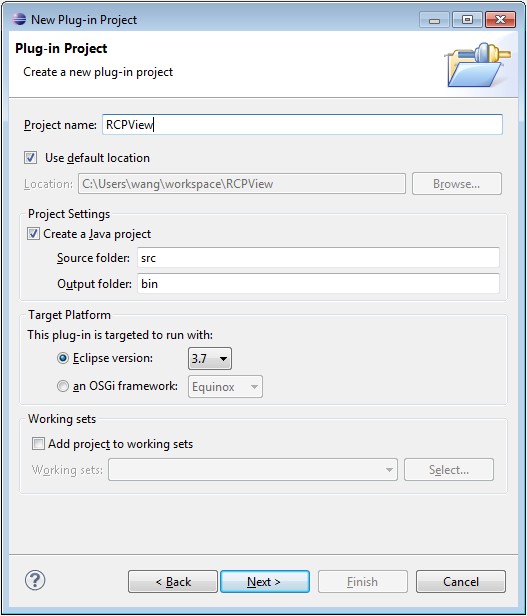
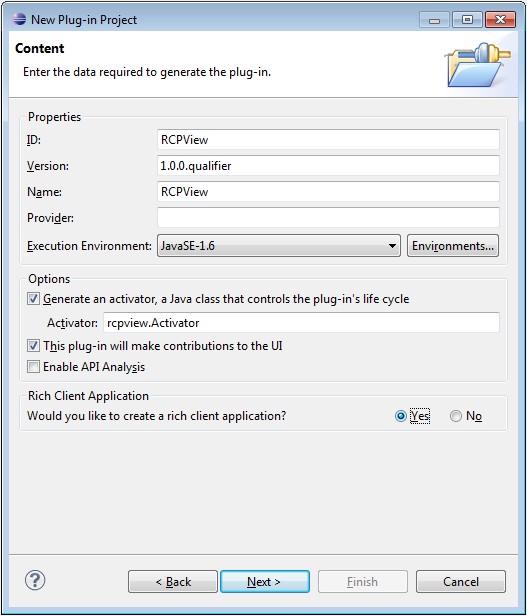
The template used is "RCP Application with a View".
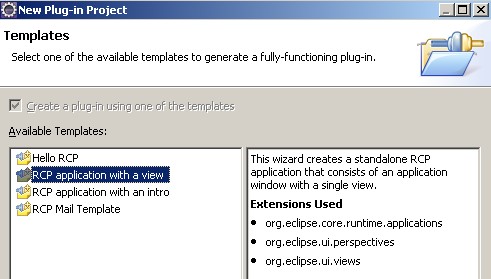
2. Files created and their functions
Here is the files created automatically by Eclipse.
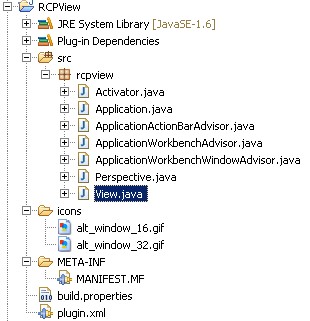
Eclipse RCP provides the concept of "extension points" and "extensions" to facilitate commercial desktop application development. It provides a way to use the whole framework easily through plugin.xml file which is under root directory of each directory.
plugin.xml
<?xml version="1.0" encoding="UTF-8"?> <?eclipse version="3.4"?> <plugin> <extension id="application" point="org.eclipse.core.runtime.applications"> <application> <run class="rcpview.Application"> </run> </application> </extension> <extension point="org.eclipse.ui.perspectives"> <perspective name="Perspective" class="rcpview.Perspective" id="RCPView.perspective"> </perspective> </extension> <extension point="org.eclipse.ui.views"> <view name="View" class="rcpview.View" id="RCPView.view"> </view> </extension> <extension point="org.eclipse.ui.perspectiveExtensions"> <perspectiveExtension targetID="*"> <view standalone="true" minimized="false" relative="org.eclipse.ui.editorss" relationship="left" id="RCPView.view"> </view> </perspectiveExtension> </extension> <extension point="org.eclipse.ui.menus"> <menuContribution locationURI="menu:org.eclipse.ui.main.menu"> <menu label="File"> <command commandId="org.eclipse.ui.file.exit" label="Exit"> </command> </menu> </menuContribution> </extension> </plugin> |
During the startup of an Eclipse RCP application, the Eclipse runtime detects main entry point class through extension point defined in plugin.xml. The class implements IApplication interface, and is loaded first like the main function in a general Java application.


Application.java
package rcpview; import org.eclipse.equinox.app.IApplication; import org.eclipse.equinox.app.IApplicationContext; import org.eclipse.swt.widgets.Display; import org.eclipse.ui.IWorkbench; import org.eclipse.ui.PlatformUI; /** * This class controls all aspects of the application's execution */ public class Application implements IApplication { public Object start(IApplicationContext context) { Display display = PlatformUI.createDisplay(); try { int returnCode = PlatformUI.createAndRunWorkbench(display, new ApplicationWorkbenchAdvisor()); if (returnCode == PlatformUI.RETURN_RESTART) { return IApplication.EXIT_RESTART; } return IApplication.EXIT_OK; } finally { display.dispose(); } } public void stop() { if (!PlatformUI.isWorkbenchRunning()) return; final IWorkbench workbench = PlatformUI.getWorkbench(); final Display display = workbench.getDisplay(); display.syncExec(new Runnable() { public void run() { if (!display.isDisposed()) workbench.close(); } }); } } |
Application class creates and runs a Workbench.
What is a Workbench?
The Workbench builds on top of the Runtime, SWT and JFace to provide a highly scalable, open-ended, multi-window environment for managing views, editors, perspectives (task-oriented layouts), actions, wizards, preference pages, and more.
The Workbench is configured via WorkbenchAdvisor. WorkbenchAdvisor tells the Workbench how to behave, how to draw, what to draw, and so forth. In particular, WorkbenchAdvisor identifies two things(check the code below):
1. The initial perspective to be shown.
2. which WorkbenchWindowAdvisor to use.
ApplicationWorkbenchAdvisor.java
package rcpview; import org.eclipse.ui.application.IWorkbenchWindowConfigurer; import org.eclipse.ui.application.WorkbenchAdvisor; import org.eclipse.ui.application.WorkbenchWindowAdvisor; public class ApplicationWorkbenchAdvisor extends WorkbenchAdvisor { private static final String PERSPECTIVE_ID = "RCPView.perspective"; public WorkbenchWindowAdvisor createWorkbenchWindowAdvisor( IWorkbenchWindowConfigurer configurer) { return new ApplicationWorkbenchWindowAdvisor(configurer); } public String getInitialWindowPerspectiveId() { return PERSPECTIVE_ID; } } |
The workbench starts WorkbenchWindow which is configured via WorkbenchWindowAdvisor.
ApplicationWorkbenchWindowAdvisor.java
package rcpview; import org.eclipse.swt.graphics.Point; import org.eclipse.ui.application.ActionBarAdvisor; import org.eclipse.ui.application.IActionBarConfigurer; import org.eclipse.ui.application.IWorkbenchWindowConfigurer; import org.eclipse.ui.application.WorkbenchWindowAdvisor; public class ApplicationWorkbenchWindowAdvisor extends WorkbenchWindowAdvisor { public ApplicationWorkbenchWindowAdvisor(IWorkbenchWindowConfigurer configurer) { super(configurer); } public ActionBarAdvisor createActionBarAdvisor( IActionBarConfigurer configurer) { return new ApplicationActionBarAdvisor(configurer); } //preWindowOpen method configure the initial window size and positions. public void preWindowOpen() { IWorkbenchWindowConfigurer configurer = getWindowConfigurer(); configurer.setInitialSize(new Point(400, 300)); configurer.setShowCoolBar(false); configurer.setShowStatusLine(false); configurer.setTitle("RCP Application"); } } |
WorkbenchWindowAdvisor creates the toolbar/menubar of the application which is configured via ActionBarAdvisor. The ApplicationActionBarAdvisor class in the following is too simple to implement any methods. But generally, the following two methods can be used to fill menu bar and tool bar:
protected void fillMenuBar(IMenuManager menuBar) { } protected void fillCoolBar(ICoolBarManager coolBar) { } |
ApplicationActionBarAdvisor.java
package rcpview; import org.eclipse.ui.application.ActionBarAdvisor; import org.eclipse.ui.application.IActionBarConfigurer; /** * An action bar advisor is responsible for creating, adding, and disposing of * the actions added to a workbench window. Each window will be populated with * new actions. */ public class ApplicationActionBarAdvisor extends ActionBarAdvisor { // Actions - important to allocate these only in makeActions, and then use // them // in the fill methods. This ensures that the actions aren't recreated // when fillActionBars is called with FILL_PROXY. public ApplicationActionBarAdvisor(IActionBarConfigurer configurer) { super(configurer); } } |
On a typical appliation, when you start it, there is a window shown up. Perspective is like a page in a book, while the book is the window. A perspective is a container for visual elements like views, editors, and actions. Each perspective may contain 0 or several views depending on the design.
Perspective.java
package rcpview; import org.eclipse.ui.IPageLayout; import org.eclipse.ui.IPerspectiveFactory; public class Perspective implements IPerspectiveFactory { public void createInitialLayout(IPageLayout layout) { layout.setEditorAreaVisible(false); layout.setFixed(true); } } |
A view is a workbench part to perform a visual task, such as navigating a tree directory, editing an email, etc. It provide a better way to organize visual components based on their functions or purposes.
View.java
package rcpview; import org.eclipse.jface.viewers.IStructuredContentProvider; import org.eclipse.jface.viewers.ITableLabelProvider; import org.eclipse.jface.viewers.LabelProvider; import org.eclipse.jface.viewers.TableViewer; import org.eclipse.jface.viewers.Viewer; import org.eclipse.swt.SWT; import org.eclipse.swt.graphics.Image; import org.eclipse.swt.widgets.Composite; import org.eclipse.ui.ISharedImages; import org.eclipse.ui.PlatformUI; import org.eclipse.ui.part.ViewPart; public class View extends ViewPart { public static final String ID = "RCPView.view"; private TableViewer viewer; /** * The content provider class is responsible for providing objects to the * view. It can wrap existing objects in adapters or simply return objects * as-is. These objects may be sensitive to the current input of the view, * or ignore it and always show the same content (like Task List, for * example). */ class ViewContentProvider implements IStructuredContentProvider { public void inputChanged(Viewer v, Object oldInput, Object newInput) { } public void dispose() { } public Object[] getElements(Object parent) { if (parent instanceof Object[]) { return (Object[]) parent; } return new Object[0]; } } class ViewLabelProvider extends LabelProvider implements ITableLabelProvider { public String getColumnText(Object obj, int index) { return getText(obj); } public Image getColumnImage(Object obj, int index) { return getImage(obj); } public Image getImage(Object obj) { return PlatformUI.getWorkbench().getSharedImages().getImage( ISharedImages.IMG_OBJ_ELEMENT); } } /** * This is a callback that will allow us to create the viewer and initialize * it. */ public void createPartControl(Composite parent) { viewer = new TableViewer(parent, SWT.MULTI | SWT.H_SCROLL | SWT.V_SCROLL); viewer.setContentProvider(new ViewContentProvider()); viewer.setLabelProvider(new ViewLabelProvider()); // Provide the input to the ContentProvider viewer.setInput(new String[] {"One", "Two", "Three"}); } /** * Passing the focus request to the viewer's control. */ public void setFocus() { viewer.getControl().setFocus(); } } |
Click Eclipse RCP Development Tutorials to see more advanced topics.
[출처] http://www.programcreek.com/2011/03/eclipse-tutorial-for-a-simple-desktop-application/
광고 클릭에서 발생하는 수익금은 모두 웹사이트 서버의 유지 및 관리, 그리고 기술 콘텐츠 향상을 위해 쓰여집니다.
