
- 전체
- JAVA 일반
- JAVA 수학
- JAVA 그래픽
- JAVA 자료구조
- JAVA 인공지능
- JAVA 인터넷
- Java Framework
- Java GUI (AWT,SWING,SWT,JFACE)
- SWT and RCP (web RAP/RWT)[eclipse], EMF
SWT and RCP (web RAP/RWT)[eclipse], EMF [EMF] EMF Tutorial EMF 튜터리얼
2023.08.23 17:31
[EMF] EMF Tutorial EMF 튜터리얼
EMF Tutorial
24 min Read
What every Eclipse developer should know about EMF
This tutorial is an introduction to EMF and explains the basics of EMF. We start by showing you how to build a very simple data-centric application, including the UI, based on EMF. We explain how to define a model in EMF and generate code from it. We explore the API of the generated code, that is, how to create, navigate and modify model instances.
Next we demonstrate how to build a UI based on this model using databinding. For our example, we build an application to manage a bowling league, including matches and players. Later on in the tutorial, we explore the advantages of using AdapterFactories and briefly look at data management in EMF. We also include a few pointers on the most important add-on technologies for EMF. If you are interested in getting fast results building an application based on EMF, maybe EMF Client Platform is also a good starting point for you, see this tutorial.
PDF Download: This tutorial is also available for download as a PDF on our website.
Installation Requirements: To work through the examples, you’ll need to download and install a fresh version of the Eclipse Modeling Tools from the Eclipse Download Page.
Introduction
To answer the question, “What is EMF?”, we’ll borrow the description from the EMF website:
“The EMF project is a modeling framework and code generation facility for building tools and other applications based on a structured data model. From a model specification described in XMI, EMF provides tools and runtime support to produce a set of Java classes for the model, along with a set of adapter classes that enable viewing and command-based editing of the model, and a basic editor.”
Source: https://www.eclipse.org/emf
It is worth mentioning that in addition to being a successful modeling framework, EMF has also been a stable standard for many other modeling technologies. We recommend using EMF for any structured data model you want to create in Eclipse, especially if it is stored, displayed and modified in UIs.
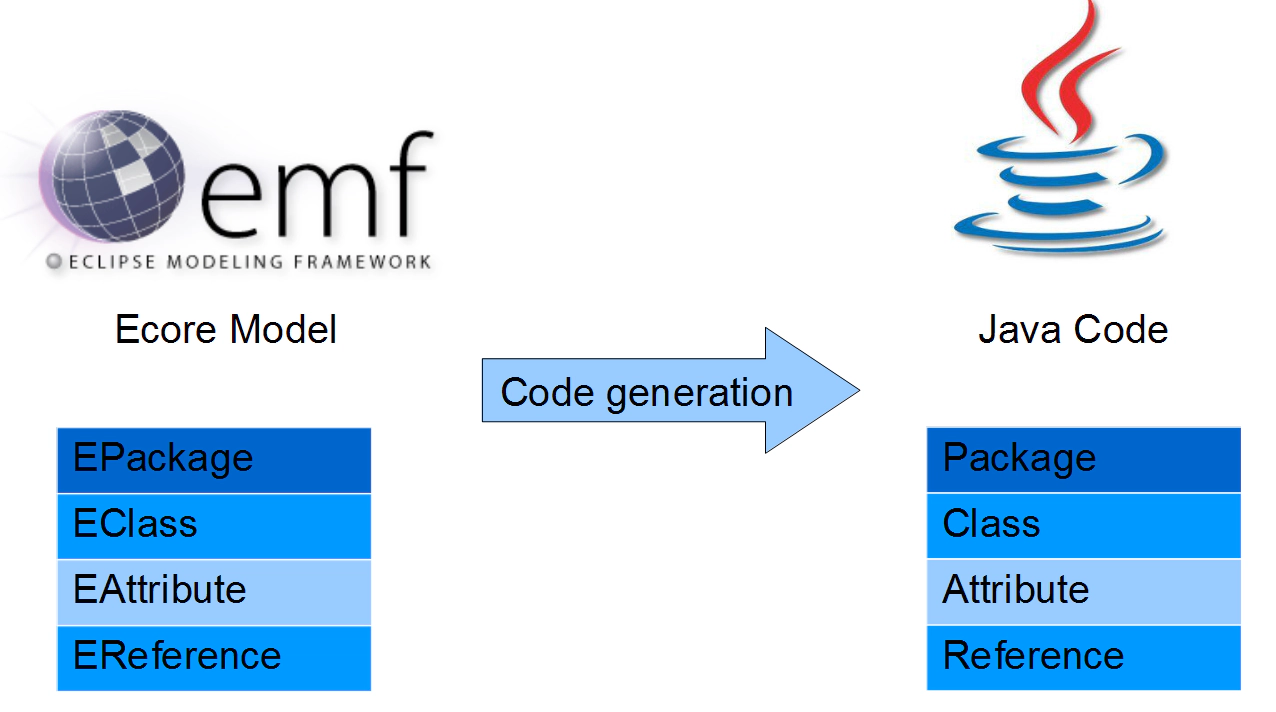
The basic EMF workflow is very pragmatic; a model is created and defined in the Ecore format, which is basically a subset of UML Class diagrams. From an Ecore model, you can generate Java code.
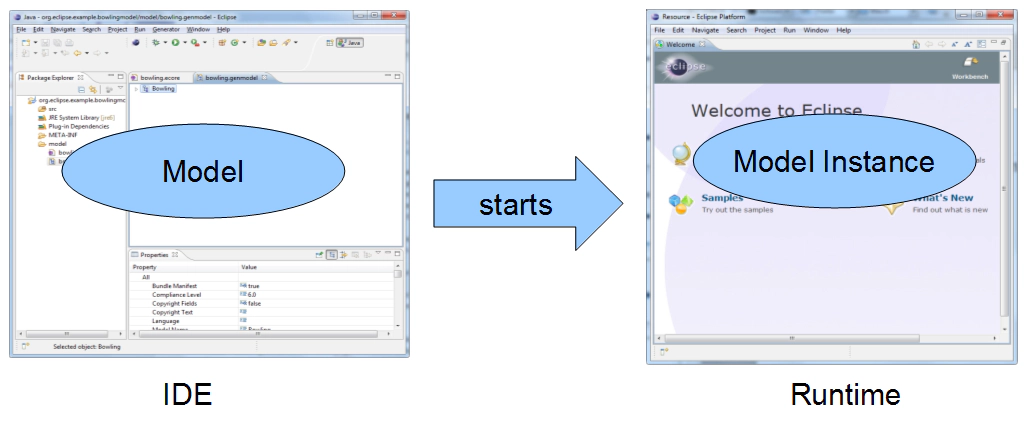
Later in this tutorial we will have two running instances of Eclipse. In the first instance, called the “IDE”, we will define the model and generate code from it. The second instance, called the “Runtime”, will be started from the IDE and will contain instances of the generated model.
Need help?
⇒ Find out more about Developer Support and Training or contact us.
Example Model
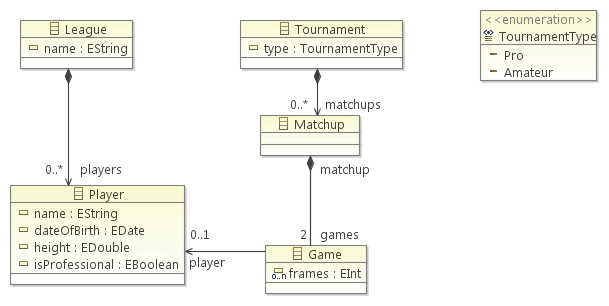
In this tutorial we will create an example model for managing a bowling league and its tournaments. A League contains an arbitrary number of Players. A Tournament consists of an arbitrary number of Matchups. Each Matchup always contains two Games. A Game is a list of frames (the score) and is assigned to a certain Player. Finally, a Tournament has an Enumeration that determines the type of Tournament.
In the next section, we will show how to create and generate code from this model.
Modeling
We will create our example model in EMF to generate the entity classes for our application. The first step is to create an empty modeling project in your workspace. In your running IDE select “File” from the toolbar menu → “New” → “Other…” and choose “Empty EMF Project”.
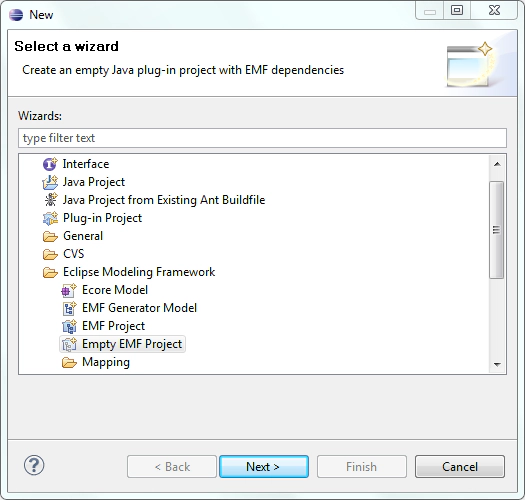
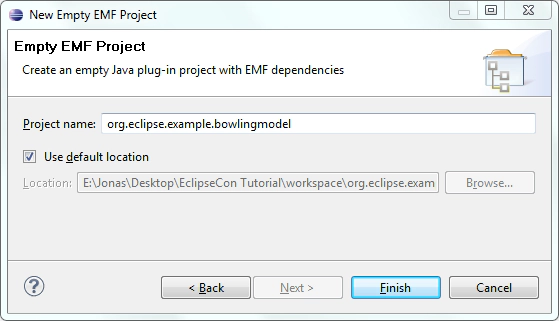
Click “Next”, enter a name for the project, e.g., “org.eclipse.example.bowlingmodel”, and hit “Finish”:
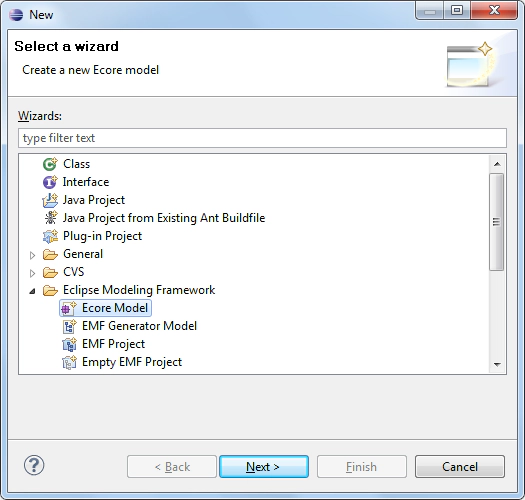
The essential part of the modeling project is the model itself, defined in the format “Ecore”. Please right click the model folder in your new modeling project → “New” → “Other…” → “Ecore Model” → “Next” and give the ecore file the name “bowling.ecore”.
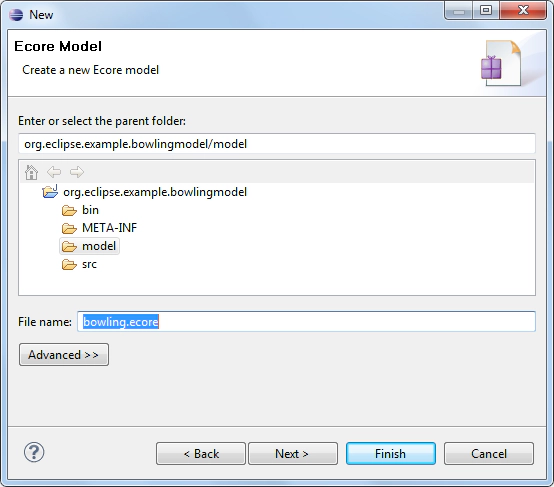
Click “Finish” to create the model. It will open in the default Ecore editor, which allows the definition of Ecore models in a tree-based view. There are several additional options for defining Ecore models, including graphical modeling, textual modeling, Java annotations and importing from UML tools. We will stick to the default editor in this tutorial and later, briefly demonstrate the graphical editor for Ecore.
In the Ecore editor tree, you can create and delete model elements as well as modify the structure of your model via drag and drop. Properties of model elements can be modified in a second view, which opens up on double-click or right-click → “Show Properties View”.
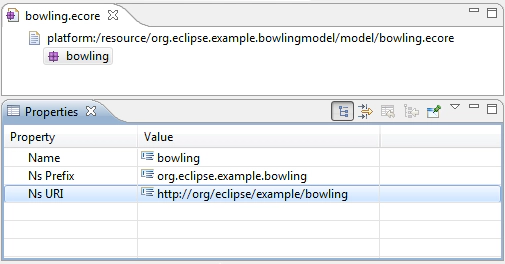
You’ll need to give the package of your new model a name and an URI. This will be done in the properties view. The URI is used to identify the model later on. Name the package “bowling”, set the Ns Prefix to “org.eclipse.example.bowling” and the Ns URI to ”https://org/eclipse/example/bowling”.
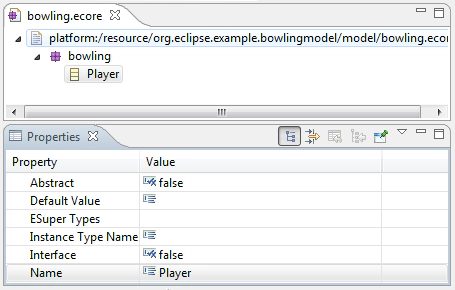
Now we can define our model elements as children of the root package. Create a new EClass by right clicking on the bowling package → “New Child” → “EClass” and set the name to Player in the properties view of the newly created EClass
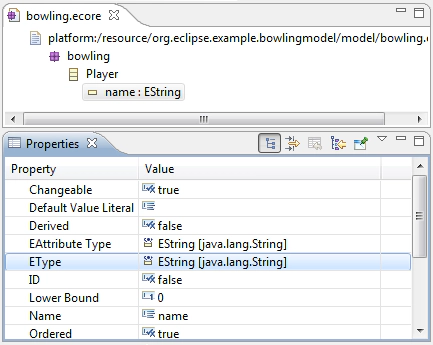
From the context menu of an EClass, you can add EAttributes and EReferences as children. Create an EAttribute in the Player EClass and open the Property view for it. The properties of an EAttribute define its name, its data type and other properties, which we will cover later in the tutorial. Set the name to “name” and assign the EType “EString” (java.lang.string). Repeat this step and add a second EAttribute named “dateOfBirth” of type “EDate”. The convention we’ll use here is that all class names start with an uppercase letter, attributes and references start with a lowercase letter.
EMF models usually build up a structured hierarchy, that is, model element instances. For example, a Player is contained in a specific container object. This provides a tree structure, which is useful for navigation and serialization (e.g. XML). This tree structure is often referred to as a containment tree. In our model, Players are contained in a League. It is important to note that this also implies that every Player is referenced by exactly one League, and thus cannot be part of more than one League. EMF will automatically make sure that a player is not contained in more than one league. If you add a player to a second league, its reference to the original league vanishes.
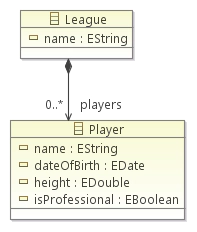
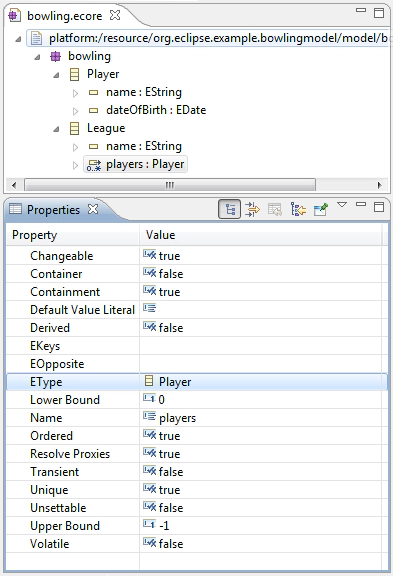
Create a second EClass and name it “League”. To identify the League, also create an EString attribute called “name”. The next step is to create an EReference between League and Player by right clicking on the League model element. Name the reference “players”. Set the EType of the reference to “Player”. Since a League can contain an arbitrary number of Players, set the upper bound to “-1”, the equivalent of “many”. Finally, set the property Containment to “true”, defining the EReference to be a containment reference.
We can already generate code from this first model iteration, which will be shown in the next section. EMF can also generate an example editor. With this editor you can create instances of the generated model, in our case, instances of Leagues and Players. This allows us to do initial testing on the model by creating instances of it. Then we can further refine and add more EAttributes and EReferences in a second iteration that will complete the model.
Need help?
⇒ Find out more about Developer Support and Training or contact us.
Code Generation
In this step, we will generate the entities from the Ecore file we have created. Note that if you need to change your model, you will be able to regenerate the entities again. EMF can deal with simple changes like adding model elements or EAttributes. If you have complex changes, like moving an attribute to another class, you will have to migrate existing instances of the model. This is supported by the EDAPT framework. (see)
To generate entities, we first have to create a generator model. This allows you to configure properties for the code generation that are not part of the model itself. For example, source code is generated for the plugin and subfolder as well.
Right click the model folder in the project → “New” → “Other…” → “EMF Generator Model” → “Next” and enter bowling.genmodel as the file name. Proceed to the next page and select “Ecore model” as the model importer. After clicking “Next”, select “Browse Workspace…” and select our previously created bowling.ecore. Go the next wizard page and select “Finish”.
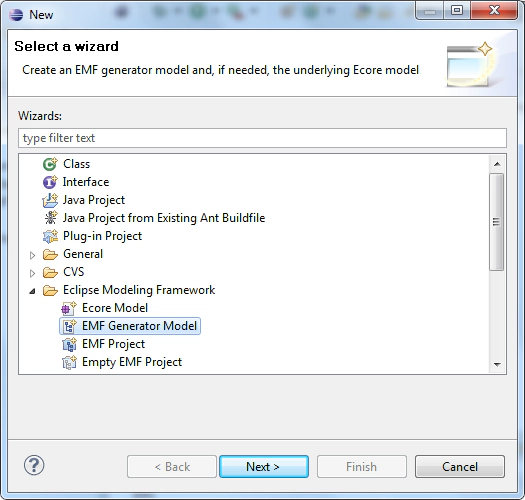
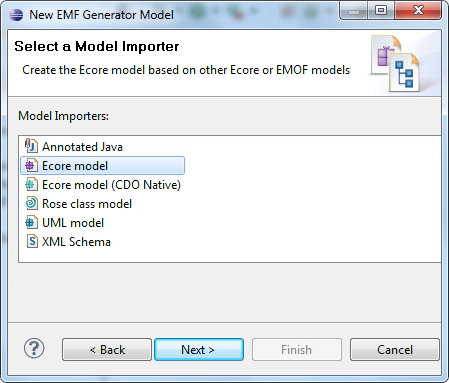
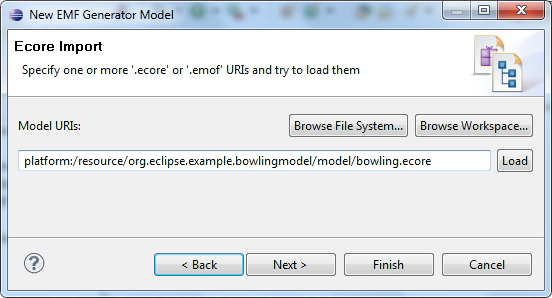
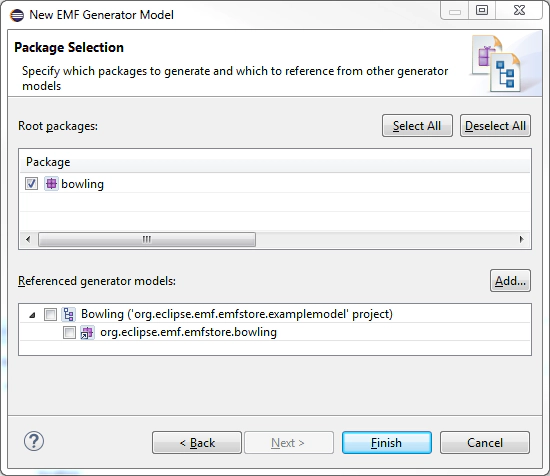
In the root node of the generator model, you can set the properties for generating code. In the tree of the generator model, we can set properties for every generated entity. For the first code generation, we’ll use the default settings. Based on the generator model, we can now generate the source code. EMF allows you to generate a maximum of four different plugins for a defined model:
-
Model: The model contains all entities, packages and factories to create instances of the model.
-
Edit: The edit plugin contains providers to display a model in a UI. For example, the providers offer a label for every model element, which can be used to display an entity showing an icon and a name.
-
Editor: The editor plugin is a generated example editor to create and modify instances of a model.
-
Test: The test plugin contains templates to write tests for a model.
To generate the plugins, right-click on the root node of the generator model and select the plugin. For our tutorial, please select “generate all”.
Before we look at the generated code, let’s start the application and create an entity of our model. Right click on the plugin containing the ecore file and select “Debug as → Eclipse Application”. This will start a new runtime Eclipse.
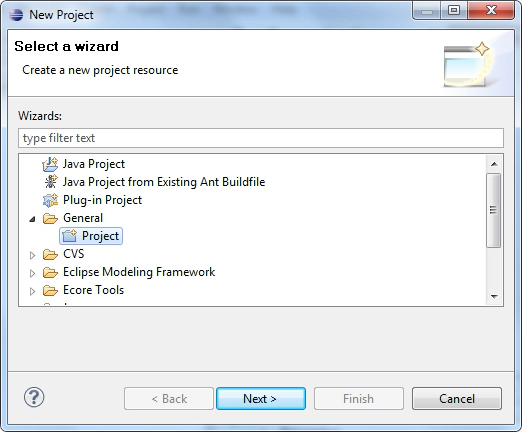
Then, in the runtime, create a new empty project (Toolbar menu → “File” → “New” → ”Other…” → “General” → “Project”) named bowlinginstance.
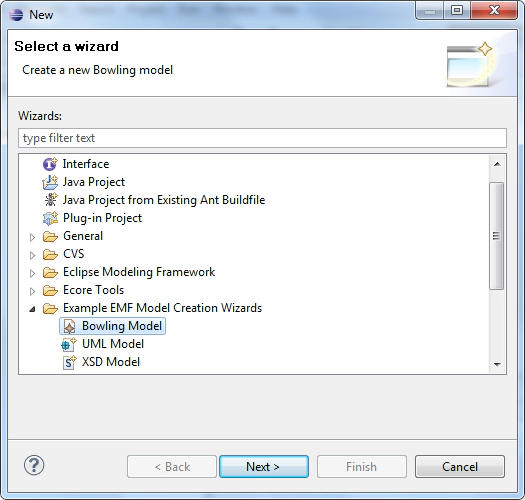
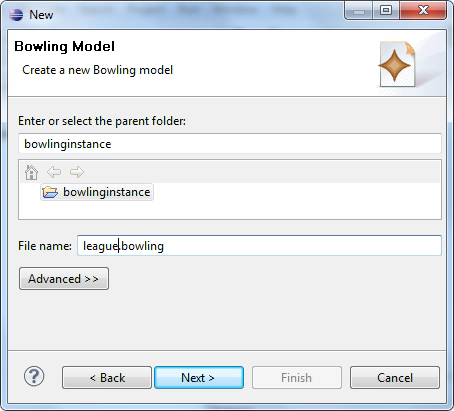
Right click the created project → “New” → “Other…” → “Example EMF Model Creation Wizards” → “Bowling Model” → “Next” and enter league.bowling as the name. This file will contain a serialized version of our model instance.
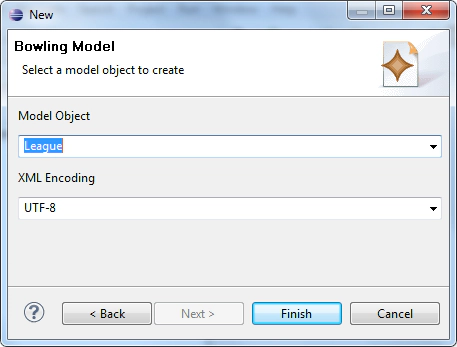
Select League as the model object. This sets the root object of the model instance we are about to create.
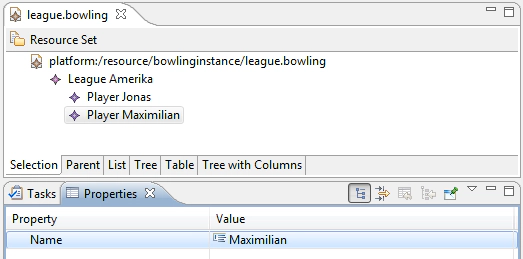
The generated editor for model instances works similarly to the Ecore editor. Model element instances can be created via a right-click and EAttributes can be modified in the properties view. Please give the League a name and create two Players. On save, all created instances are serialized in the XMI file “league.bowling”.
Need help?
⇒ Find out more about Developer Support and Training or contact us.
Model Refinement
Let’s switch back to our IDE Eclipse environment, complete the model and regenerate the source code. In this second model iteration, we will add different type of EReferences as well as EEnums and Multi-EAttributes. First, add the following classes to the bowling model:
-
Tournament
-
Matchup
-
Game
These classes model the results of bowling tournaments and build up a second tree in our model. Therefore, we add containment EReferences from Tournament to Matchup and from Matchup to Game. Remember to set the containment property to true for both references. Following the bowling rules, a Matchup consists of two Games (each from one Player). We model this by setting the upper bound and lower bound of the EReference “games” of the EClass Matchup to “2”.
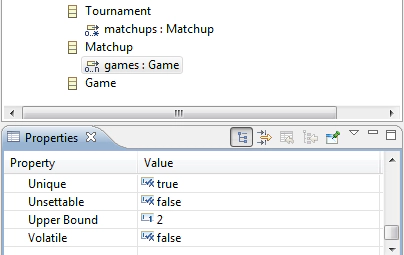
We defined the EReference between Matchup and Game as bi-directional. This means that the reference can be navigated from both ends. Therefore we have to create a second EReference from Game to Matchup and bind both EReferences. EMF will take care of the bi-directional synchronization. In other words, adding a Matchup to a Game will automatically add the Game to the Matchup.
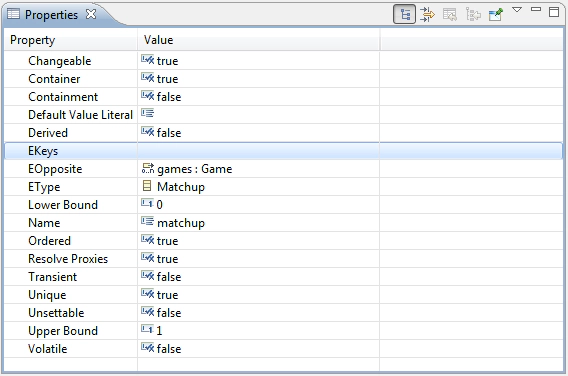
Please add an EReference to Game called “matchup” with the EType “Matchup”. By setting the EOpposite to the EReference “games”, both EReferences are coupled bi-directionally. Note that the property “Container” will automatically be set to True.
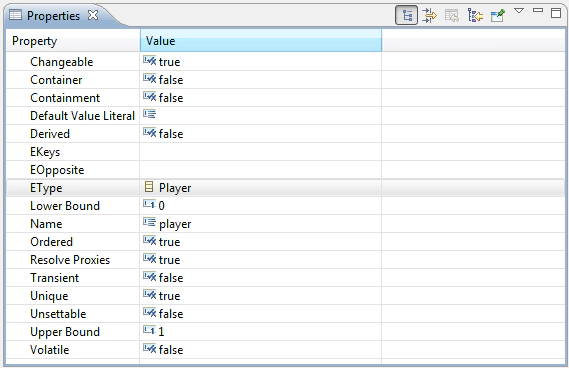
The next step is to add a cross-EReference. In contrast to containment EReferences, cross-referenced model elements do not contain each other. In our model, we add a cross-referencing EReference from Game to Player named “player”. Set both container and containment properties to “false”. An arbitrary number of games can be assigned to a Player now and the Player is still contained in a League.
As a final mandatory step, we will create an EEnumeration for the type of Tournament. A Tournament can be of type “Pro” and “Amateur” in our model. Please create an EEnum by right-clicking on the root bowling model package, in the same way we created a class. Add two EEnum Literals to this EEnum.
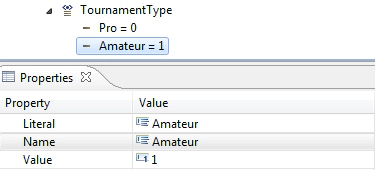
Then, add an EAttribute to the EClass Tournament, name it “type” and set the EType to “TournamentType”.
The extended example model contains more EAttributes and EReferences to be added including all basic types and some special cases as the Multi-Integer EAttribute in Tournament. If you’d like, you can also model the following features:
Player
-
height: EDouble
-
isProfessional: EBoolean
Game
- frames: EInt, UpperBound = 10
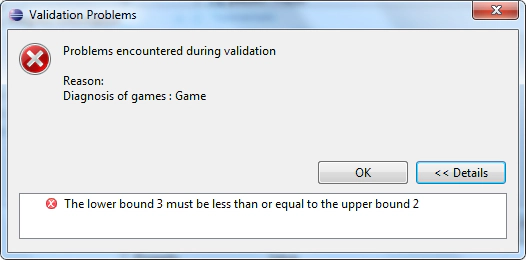
After applying complex changes to the model it is always a good idea to validate it with a right-click on the model root in the Ecore editor. Let’s do something wrong in the model and set the lower bound of the EAttribute “games” (in Matchup) to 3. As the upper bound is 2, this model doesn’t make too much sense. This will be detected by the model validation – something that is impossible in plain Java code.
After this model refinement, we will re-generate the code to reflect our changes. Start the runtime Application again and create a second model “tournament”. Add a Matchup and two Games. To assign the Games to Players you will have to load the “league” model created earlier. Select “Load Resource” from the menu “Bowling Editor” and select the first model file. Now link the Games to the Players in the properties view.
Why is This Better than Writing POJOs?
You might ask, “Why should I use EMF instead of creating the model by writing plain POJOs?” Without considering benefits like the generated editor for rapid testing and all the additional frameworks available for EMF, let’s look at two very simple and exemplary benefits.
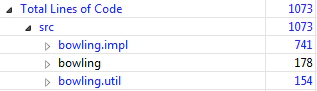
Before we look at the generated code (we will do that in a minute), let’s consider the amount of code we have just produced. The Eclipse metrics plugin tells us that we have generated over 1,000 LOC, while only 150 are part of utility classes. Even very simple code is considered to be worth 93897 per LOC. So, we have earned 93897,000 just by clicking some buttons ????
In the next sections, we’ll explore the EMF API for the code we have generated.
Need help?
⇒ Find out more about Developer Support and Training or contact us.
EMF API
In this part of the tutorial, we will explore EMF’s API, including the generated code, as well as EMF’s utility classes. Let’s have a look at the generated code first.
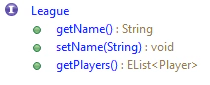
In the model plugin from our tutorial org.eclipse.example.bowling you will find interfaces and implementations for all of the model’s entities. A look at the outline of an entity’s interface reveals that it contains getters and setters for the attributes we have defined in the model as well as getters for the references. All entities of the generated EMF model are subclasses of EObject. EObject contains basic functionality – for example, a change notification mechanism.
The model plugin contains factories to create model element entities. Note that the constructor of EObjects is usually not public. Please also note that factories are used by many frameworks for their functionality, e.g., deserialization. Changing these methods successfully requires some careful planning. Let’s use the factories to programmatically create some entities and use their APIs to modify them. We will use the pre-generated test plugin to run this example code. If you open the plugin, org.eclipse.example.bowlingmodel.test, you will find a generated test class for all of the entities of your model. By adding methods starting with “test” you can create single test cases. The test cases can be started with a right-click on the test class => “Debug As” => “JUnit Test”. Please note that we will not really “test” our model. In this context test cases are just a very simple way of exploring and using the API of the generated classes.
In this very simple example, we’ll use the BowlingFactory to create a Matchup and a Game, adding a reference to the Matchup and checking the bi-directional update on the Game.
public void testMatchupGameRef() {
   Matchup matchup = BowlingFactory.eINSTANCE.createMatchup();
   Game game = BowlingFactory.eINSTANCE.createGame();
   matchup.getGames().add(game);
   assertEquals(game.getMatchup(), matchup);
}
The super class EObjects offers many methods to access an entity in a more generic way. For example, we will test the containment between Matchup and Game by accessing the EContainer instead of the getMatchup() method.
public void testMatchupGameRef() {
   Matchup matchup = BowlingFactory.eINSTANCE.createMatchup();
   Game game = BowlingFactory.eINSTANCE.createGame();
   matchup.getGames().add(game);
   assertEquals(game.eContainer(), matchup);
}
EObjects offer reflective access to their attributes using the methods eSet() and eGet(). This can be useful in modifying an entity in a generic way.
public void testReflection() {
   EObject eObject = BowlingFactory.eINSTANCE.createPlayer();
   eObject.eSet(BowlingPackage.eINSTANCE.getPlayer_Name(), "Jonas");
   Player player = (Player) eObject;
   assertEquals("Jonas", player.getName());
}
Information about the available EAttributes and EReferences, as well as all additional concepts we have modeled before, can be accessed either through the EClass or through the EPackage. The following test checks whether the EReference of League is a multiplicity greater than one.
public void testReflectiveInformation() {
   League league = BowlingFactory.eINSTANCE.createLeague();
   assertTrue(league.eClass().getEAllReferences().get(0).isMany());
   assertTrue(BowlingPackage.eINSTANCE.getLeague_Players().isMany());
}
EMF also supports the validation of model instances. For example, we can validate the model’s constraint that a matchup must always consist of two games.
public void testValidation() {
   Matchup matchup = BowlingFactory.eINSTANCE.createMatchup();
   matchup.getGames().add(BowlingFactory.eINSTANCE.createGame());
   Diagnostic validate = Diagnostician.INSTANCE.validate(matchup);
   assertEquals(Diagnostic.ERROR, validate.getSeverity());
}
Finally, EMF provides many utility classes. A very important one is EcoreUtil. It is worthwhile browsing through the available methods of EcoreUtil. We’ll use the copy method to create a copy of an EObject.
public void testCopy() {
   Player player = BowlingFactory.eINSTANCE.createPlayer();
   player.setName("Jonas");
   Player copy = EcoreUtil.copy(player);
   assertNotSame(player, copy);
   assertEquals(player.getName(), copy.getName());
}
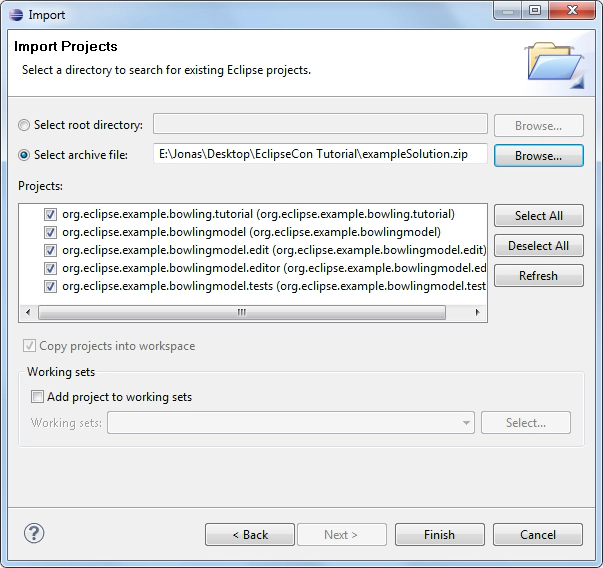
Import Intermediate Sample Solution Before we continue with the tutorial, please import the intermediate sample solution, which can be downloaded here.
Switch to an empty workspace (File → Switch Workspace) and select “Import” → “General” → “Existing Projects into Workspace”. Select “exampleSolution2.zip” and import all projects.
AdapterFactories
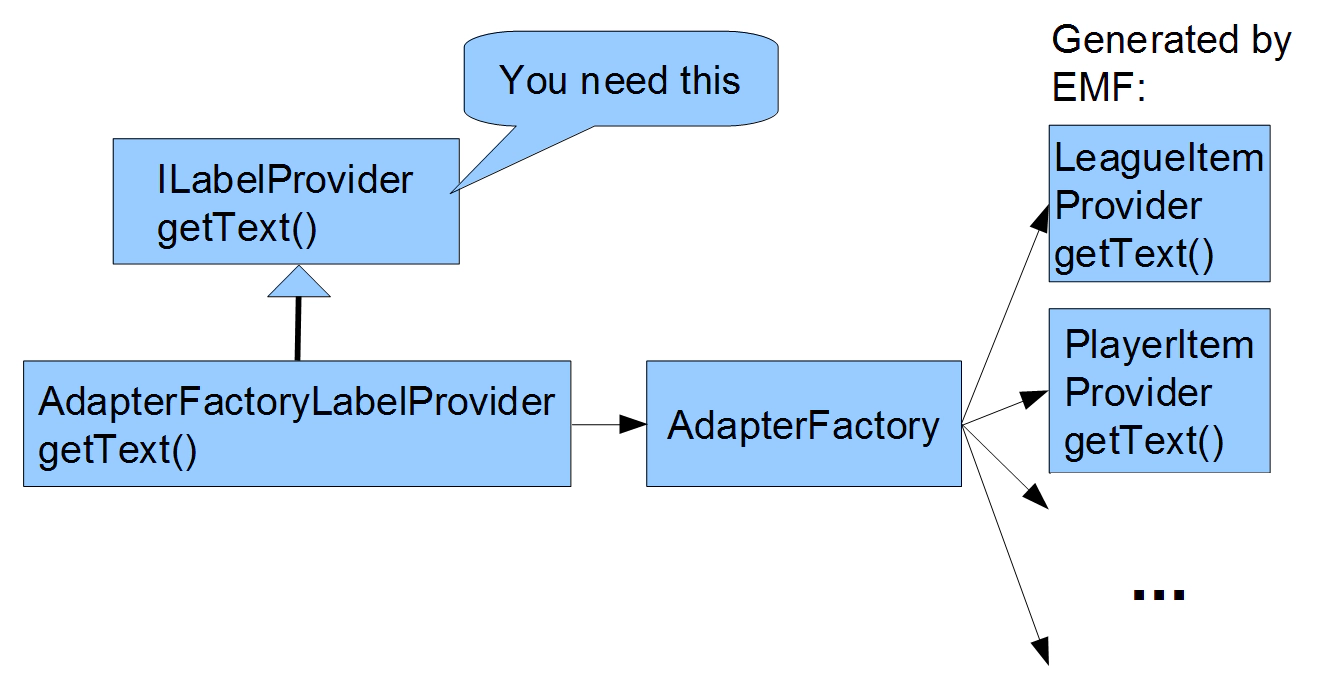
For the next sections of the tutorial, it is important to understand the concept of AdapterFactories. We will give a basic introduction. More advanced concepts are also described in this blog post.
The basic function of AdapterFactories is to provide you with the interface you need for a certain purpose such as an ILabelProvider needed in the UI. EMF generates a lot of these classes for you. To retrieve the right class, you can use an AdapterFactory implementation of the interface you need, e.g., an AdapterFactoryLabelProvider. The AdapterFactoryLabelProvider will retrieve the generated LabelProviders for all EObjects using an AdapterFactory.
EMF Data Management
In the previous sections we have shown how to generate a structured data model with EMF. In a typical application, these data models have to be stored and likely also versioned and distributed. There are a couple of frameworks that support different use cases.
By default EMF provides the ability to serialize EObjects to XMI files. In the following example, we will load EObjects from a file and save them afterwards. EMF also offers commands to make modifications to the model. Commands can be easily undone. In the example, we will load an XMI file containing a Tournament. We can add new Matchups to that Tournament and undo these changes. When we’re finished, we can save the changes back to the file.
For the tutorial, we have prepared an example dialog in the plugin org.eclipse.example.bowling.tutorial, which has been imported from the sample solution. You can open this dialog by right-clicking a file containing instances of a bowling model and select “Tutorial” → ”Open Tournament Example Dialog”. After implementing the next two sections of the tutorial, it will look like this:
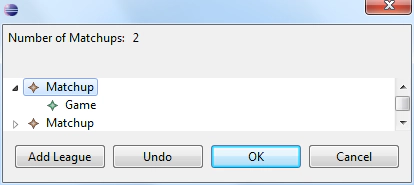
In the subclass ExampleTournamentDialog, there are empty method stubs to be implemented in this tutorial. Just a note here that for the purposes of the tutorial we have focused on simplicity over perfect design. Also, everything that is not relevant for the tutorial is implemented in an abstract base class called AbstractTournamentExampleDialog.
Now you’ll need to open the class ExampleTournamentDialog. We will implement the loadContent method, which is triggered by opening the example view. The purpose of this method is to get a Tournament from the file that is then displayed in the example view. To keep it simple, we assume that the file contains a Tournament and this Tournament is the first element in the file. You can easily create a file like this with the generated example editor.
First, we create an editing domain. An editing domain manages a set of interrelated models and the commands that are run to modify them. For example, it contains the stack of all former commands. An editing domain can create a resource, which is a container for storing EObjects. Resources can be saved and loaded and contents can be added to them. In the example, we get the first EObject in the resource, assume it is a Tournament and make it a member of our superclass.
@Override
protected void loadContent(IFile file) throws IOException {
  // Load Tournament from file and set it with setTournament
  AdapterFactoryEditingDomain domain = new AdapterFactoryEditingDomain(
   getAdapterFactory(),
   new BasicCommandStack());
  resource = domain.createResource(file.getFullPath().toString());
  resource.load(null);
  EObject eObject = resource.getContents().get(0);
  setTournament((Tournament) eObject);
}
After loading the content, we will implement a save. This will be triggered by pressing OK in the dialog and will serialize the model and apply all changes to the file.
@Override
protected void save() throws IOException {
   // save changes in the file
   resource.save(null);
}
Now we want to implement the addition of a Matchup to a Tournament. We will use a command for this. First we create a Matchup using the appropriate factory. The factory, by convention, has the same name as the base package of the model. Then we create a command which adds the newly created Matchup to the Tournament that has been loaded from the resource in the previous step. Finally, we run the command on the command stack of the editing domain.
@Override
protected void addMatchup() {
 // add a new Matchup using a Command
 Matchup matchup = BowlingFactory.eINSTANCE.createMatchup();
 EditingDomain editingDomain = AdapterFactoryEditingDomain
.getEditingDomainFor(getTournament());
 Command command = AddCommand.create(editingDomain, getTournament(),
   BowlingPackage.eINSTANCE.getTournament_Matchups(),
   matchup);
 editingDomain.getCommandStack().execute(command);
}
At this point, the changes will not be reflected in the dialog’s UI, but we will implement the code in the next section of the tutorial.
The next step is to implement undo. To undo the last command, all you’ll need to do is to call undo on the command stack of the editing domain.
@Override
protected void undo() {
  // Undo the last change
  AdapterFactoryEditingDomain
    .getEditingDomainFor(getTournament())
    .getCommandStack().undo();
}
Now, start the bowling application and create an XMI file with the example editor. It should contain a Tournament and several Matchups and Games. Right click on the file and select “Tutorial” → ”Open Example Tournament View”. In this view, you can add new Tournaments, undo this operation and save by clicking on “OK”. You can validate the result by opening the file in the Ecore editor. Please note again that the UI of the View will not be updated yet, but we will initialize the UI in the next step of the tutorial.
Need help?
⇒ Find out more about Developer Support and Training or contact us.
Additional Persistence Frameworks
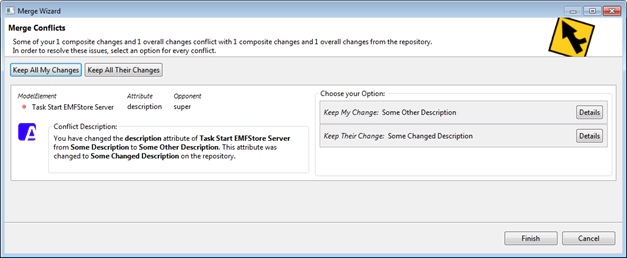
There are several frameworks for storing and versioning EMF model instances. Here are three that we can recommend:
EMFStore Merge Dialog
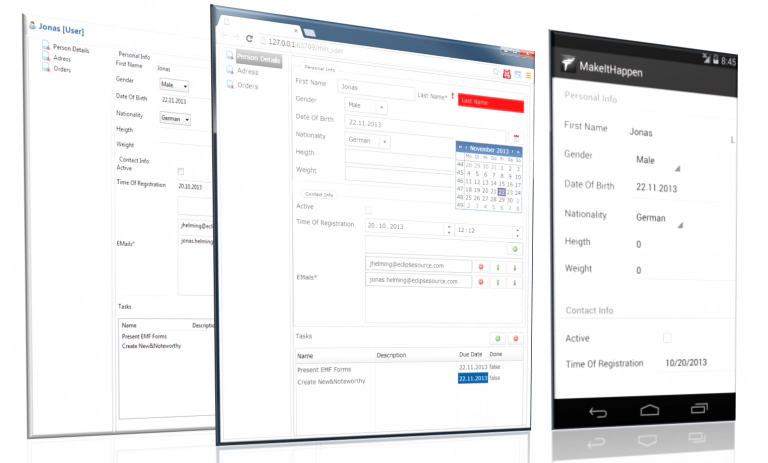
EMF UI In this section we will show two examples of how EMF supports in developing UIs and thereby fill the example view with two basic UI elements. More concretely, we will show, how to attach listeners to EMF model instances and how to create a tree viewer based on EMF. Please note, this is only the tip of the iceberg. EMF offers extensive support for creating different kinds of UIs based on a given data model. As an example, it supports databinding to bind UI elements to the data of a model instance. Furthermore, there are several frameworks supporting UI development, which are summarized at the end of this section. For instance, if you want to create a form-based UI allowing you to show and enter attributes and references from your data model, such as shown below, you should take a look at EMF Forms.
EMF Listener
In this section, we will bind the Label to the top showing the number of Matchups in the opened Tournament to the model. We will use the notification mechanism to update the Label whenever the number of Matchups changes. Second, we will fill the TreeViewer with a list of the Matchups and display their Games as children. To update, the Label we will register a listener on the Tournament EObject, which is opened in the view. This listener will always be notified by the EMF runtime if there is a change in the Tournament EObject.
@Override
protected void initializeListener() {
  // initialize a listener for the Label displaying the number of Matchups
  numberOfMatchupListener = new NumberofMatchupListener();
  getTournament().eAdapters().add(numberOfMatchupListener);
}
In the second step, we will implement the listener itself. In the notify method, we check first whether the change was on the EReference to Matchups and consequently influenced the number of Matchups. If this is the case, we update the Label via the updateNumberOfMatchups method (implemented in the AbstractTournamentExampleView).
private final class NumberofMatchupListener extends AdapterImpl {
  // Implement a listener to update the Label. Call updateNumberOfMatchups
  @Override
  public void notifyChanged(Notification msg) {
    if (msg.getFeature().equals(
      BowlingPackage.eINSTANCE.getTournament_Matchups())) {
      updateNumberOfMatchups();    }
    super.notifyChanged(msg);
  }
}
This is how you would manually implement listeners. To create UIs with bi-directional updates between UI elements and data-models, we recommend using data binding that is already available for EMF. In Eclipse data-binding, you can bind a certain UI element to a certain EAttribute or EReference, and it will take care of bi-directional updates.
To implement form-based UIs, you should also have a look at EMF Forms.
Tree Viewer
Next, we will initialize the TreeViewer to display the Matchups of the current Tournament and their Games as children. A TreeViewer needs three things to be initialized: the ContentProvider, the LabelProvider and an input. The ContentProvider defines the structure of the Tree by providing the method getChildren(). The LabelProvider is called to get an icon and the text to be displayed for one node. The input of a TreeViewer is the invisible root element of the Tree. The elements displayed in the root of the tree are the children of that element. In our case, the input is the Tournament.
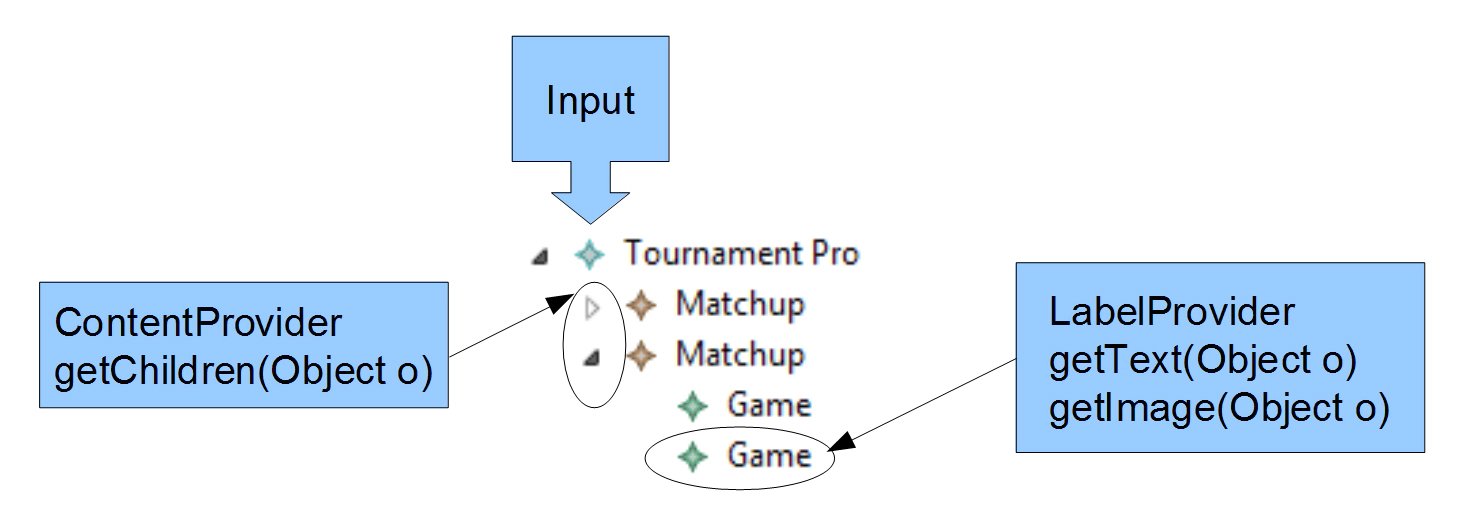
ContentProvider and especially LabelProvider usually depend on a certain EClass. EMF generates providers for several purposes including Content- and LabelProvider. We will use the AdapterFactory concept explained previously to retrieve the right provider for every element. Finally, we set the Input to the Tournament that is currently open.
@Override
protected void initializeTreeviewer(TreeViewer treeViewer) {
  // initialize a TreeViewer to show the Matchups
  // and Games of the opened Tournament
  AdapterFactoryLabelProvider labelProvider =
new AdapterFactoryLabelProvider(
getAdapterFactory());
  AdapterFactoryContentProvider contentProvider =
new AdapterFactoryContentProvider(
getAdapterFactory());
  treeViewer.setLabelProvider(labelProvider);
  treeViewer.setContentProvider(contentProvider);
  treeViewer.setInput(getTournament());
}
To test the UI features just implemented, you’ll need to re-start the bowling example application. To modify the appearance of a Label you can simply modify the ItemProvider of the respective class. Let’s modify the LabelProvider for Matchup. To modify the appearance of EObjects in the TreeViewer, you can adapt the generated ItemProvider MatchupItemProvider. We will show the number of Games contained in a Matchup Game in the example. Mark the method as “generated NOT” to prevent it from being overwritten during the next generation.
/**
* This returns the label text for the adapted class.
*
* @generated NOT
*/
@Override
public String getText(Object object) {
   if (object instanceof Matchup) {
   EList games = ((Matchup) object).getGames();
   if (games != null) {
   return "Matchup, Games: " + games.size();
   }
   }
   return getString("_UI_Matchup_type");
}
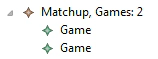
In the running application, the new LabelProvider is displayed in the Tournament Example view as well as in the Ecore Editor:
As a last step, you should remove all listeners when closing the view. Note that LabelProvider and ContentProvider are registered listeners on the model, so you should delete them as well.
If you want to have a look at the final sample solution, please import the projects from here.
Additional UI Frameworks
There are several frameworks for displaying data from an EMF model instance. If you want to create form-based UIs, maybe even for different UI platforms, such as in the screenshot below, you should definitely have a look at EMF Forms.
If you want to create an application similar to the screenshot below, you should definitely have a look at the EMF Client Platform (Tutorial).
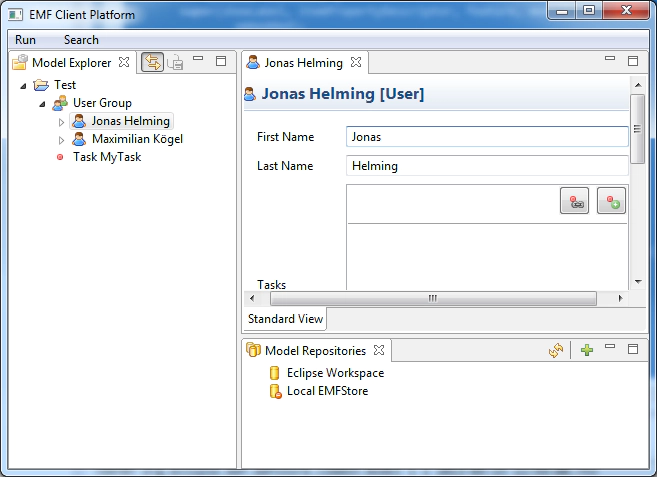
EMF Client Platform Navigator and Editor
Additional frameworks that are worthwhile having a look at for creating UIs are:
-
Eclipse GLSP: GLSP is an extensible open source framework to build custom diagram editors in the web/cloud. Graphiti (Graphical Editor)
-
Graphiti (Graphical Editor)
-
Graphical Modeling Framework (Graphical Editor)
-
Extended Editing Framework (Advanced Property View)
Additional EMF-based Technologies
In this last section of the tutorial we’d like to give you our short list of additional EMF-based technologies for you to explore:
-
EMF.cloud: EMF.cloud is the umbrella project for components and technologies making the Eclipse Modeling Framework (EMF) and its benefits available in the web and cloud
-
EMF Compare for comparing models
-
EDAPT for migrating models
-
EMF IncQuery for querying models
-
XText for textual modeling (DSLs)
Conclusion
We hope you found this tutorial helpful. If you have feedback or questions, please feel free to contact us at modeling@eclipsesource.com. Updates of this tutorial will become available on our website.
Need help?
⇒ Find out more about Developer Support and Training or contact us.


Jonas, Maximilian and Philip
Jonas Helming, Maximilian Koegel and Philip Langer co-lead EclipseSource. They work as consultants and software engineers for building …
EMF 튜토리얼
24분 읽기
모든 Eclipse 개발자가 EMF에 대해 알아야 할 사항
이 튜토리얼은 EMF를 소개하고 EMF의 기본 사항을 설명합니다. EMF를 기반으로 UI를 포함하여 매우 간단한 데이터 중심 애플리케이션을 구축하는 방법을 보여주는 것부터 시작합니다. EMF에서 모델을 정의하고 모델에서 코드를 생성하는 방법을 설명합니다. 생성된 코드의 API, 즉 모델 인스턴스를 생성, 탐색 및 수정하는 방법을 살펴봅니다.
다음으로 데이터 바인딩을 사용하여 이 모델을 기반으로 UI를 구축하는 방법을 보여줍니다. 이 예에서는 경기와 선수를 포함하여 볼링 리그를 관리하는 애플리케이션을 구축합니다. 튜토리얼 후반부에서는 AdapterFactories 사용의 이점을 살펴보고 EMF의 데이터 관리에 대해 간략하게 살펴봅니다. 또한 EMF의 가장 중요한 추가 기술에 대한 몇 가지 지침도 포함되어 있습니다. EMF 기반 애플리케이션을 구축하여 빠른 결과를 얻는 데 관심이 있다면 EMF 클라이언트 플랫폼 도 좋은 출발점이 될 수 있습니다. 이 튜토리얼을 참조하세요 .
PDF 다운로드 : 이 튜토리얼은 당사 웹사이트에서 PDF로 다운로드할 수도 있습니다 .
설치 요구 사항 : 예제를 진행하려면 Eclipse 다운로드 페이지 에서 새로운 버전의 Eclipse 모델링 도구를 다운로드하여 설치해야 합니다 .
소개
"EMF란 무엇입니까?"라는 질문에 답하기 위해 EMF 웹사이트의 설명을 인용하겠습니다.
“EMF 프로젝트는 구조화된 데이터 모델을 기반으로 도구 및 기타 애플리케이션을 구축하기 위한 모델링 프레임워크이자 코드 생성 시설입니다. XMI에 설명된 모델 사양에서 EMF는 모델의 보기 및 명령 기반 편집을 가능하게 하는 어댑터 클래스 세트와 기본 편집기와 함께 모델에 대한 Java 클래스 세트를 생성하기 위한 도구 및 런타임 지원을 제공합니다.
출처: https://www.eclipse.org/emf
EMF는 성공적인 모델링 프레임워크일 뿐만 아니라 다른 많은 모델링 기술에 대한 안정적인 표준이기도 하다는 점을 언급할 가치가 있습니다. Eclipse에서 생성하려는 구조화된 데이터 모델, 특히 UI에 저장, 표시 및 수정되는 경우 EMF를 사용하는 것이 좋습니다.
기본 EMF 작업 흐름은 매우 실용적입니다. 모델은 기본적으로 UML 클래스 다이어그램의 하위 집합인 Ecore 형식으로 생성되고 정의됩니다. Ecore 모델에서 Java 코드를 생성할 수 있습니다.
이 튜토리얼의 뒷부분에서는 두 개의 Eclipse 인스턴스가 실행됩니다. 첫 번째 인스턴스인 "IDE"에서는 모델을 정의하고 모델에서 코드를 생성합니다. "런타임"이라고 불리는 두 번째 인스턴스는 IDE에서 시작되며 생성된 모델의 인스턴스를 포함합니다.
도움이 필요하다?
⇒ 개발자 지원 및 교육 에 대해 자세히 알아보거나 당사에 문의 하십시오 .
예시 모델
이 튜토리얼에서는 볼링 리그와 토너먼트를 관리하기 위한 예제 모델을 만듭니다. 리그에는 임의의 수의 플레이어가 포함됩니다. 토너먼트는 임의의 수의 매치업으로 구성됩니다. 각 매치업에는 항상 두 개의 게임이 포함됩니다. 게임은 프레임 목록(점수)이며 특정 플레이어에게 할당됩니다. 마지막으로 토너먼트에는 토너먼트 유형을 결정하는 열거형이 있습니다.
다음 섹션에서는 이 모델에서 코드를 생성하고 생성하는 방법을 보여 드리겠습니다.
모델링
애플리케이션에 대한 엔터티 클래스를 생성하기 위해 EMF에서 예제 모델을 생성하겠습니다. 첫 번째 단계는 작업 공간에 빈 모델링 프로젝트를 만드는 것입니다. 실행 중인 IDE의 도구 모음 메뉴에서 "파일" → "새로 만들기" → "기타…"를 선택하고 "Empty EMF 프로젝트"를 선택합니다.
"다음"을 클릭하고 프로젝트 이름(예: "org.eclipse.example.bowlingmodel")을 입력한 후 "마침"을 누르십시오.
모델링 프로젝트의 핵심 부분은 "Ecore" 형식으로 정의된 모델 자체입니다. 새 모델링 프로젝트의 모델 폴더 → "새로 만들기" → "기타…" → "Ecore Model" → "다음"을 마우스 오른쪽 버튼으로 클릭하고 ecore 파일 이름을 "bowling.ecore"로 지정하세요.
"마침"을 클릭하여 모델을 생성합니다. 트리 기반 보기에서 Ecore 모델을 정의할 수 있는 기본 Ecore 편집기에서 열립니다. 그래픽 모델링, 텍스트 모델링, Java 주석 및 UML 도구에서 가져오기를 포함하여 Ecore 모델을 정의하기 위한 몇 가지 추가 옵션이 있습니다. 이 튜토리얼에서는 기본 편집기를 사용하고 나중에 Ecore의 그래픽 편집기를 간략하게 설명합니다.
Ecore 편집기 트리에서는 모델 요소를 생성 및 삭제할 수 있을 뿐만 아니라 드래그 앤 드롭을 통해 모델 구조를 수정할 수도 있습니다. 모델 요소의 속성은 두 번 클릭하거나 마우스 오른쪽 버튼을 클릭하고 → "속성 보기 표시"로 열리는 두 번째 보기에서 수정할 수 있습니다.
새 모델의 패키지에 이름과 URI를 제공해야 합니다. 이 작업은 속성 보기에서 수행됩니다. URI는 나중에 모델을 식별하는 데 사용됩니다. 패키지 이름을 "bowling"으로 지정하고 Ns 접두사를 "org.eclipse.example.bowling"으로 설정하고 Ns URI를 " https://org/eclipse/example/bowling"으로 설정합니다.
이제 모델 요소를 루트 패키지의 하위 항목으로 정의할 수 있습니다. 볼링 패키지 → "New Child" → "EClass"를 마우스 오른쪽 버튼으로 클릭하고 새로 생성된 EClass의 속성 보기에서 이름을 Player로 설정하여 새 EClass를 생성합니다.
EClass의 상황에 맞는 메뉴에서 EAttributes 및 EReferences를 하위 항목으로 추가할 수 있습니다. Player EClass에 EAttribute를 생성하고 이에 대한 Property 뷰를 엽니다. EAttribute의 속성은 해당 이름, 데이터 유형 및 기타 속성을 정의하며 이에 대해서는 튜토리얼의 뒷부분에서 다룰 것입니다. 이름을 "name"으로 설정하고 EType "EString"(java.lang.string)을 할당합니다. 이 단계를 반복하고 "EDate" 유형의 "dateOfBirth"라는 두 번째 EAttribute를 추가합니다. 여기서 사용할 규칙은 모든 클래스 이름이 대문자로 시작하고 속성과 참조가 소문자로 시작한다는 것입니다.
EMF 모델은 일반적으로 구조화된 계층 구조, 즉 모델 요소 인스턴스를 구축합니다. 예를 들어 Player는 특정 컨테이너 개체에 포함되어 있습니다. 이는 탐색 및 직렬화(예: XML)에 유용한 트리 구조를 제공합니다. 이 트리 구조를 흔히 포함 트리라고 합니다. 우리 모델에서는 플레이어가 리그에 포함되어 있습니다. 이는 또한 모든 플레이어가 정확히 하나의 리그에 의해 참조되므로 하나 이상의 리그에 속할 수 없음을 의미한다는 점에 유의하는 것이 중요합니다. EMF는 플레이어가 둘 이상의 리그에 포함되지 않도록 자동으로 확인합니다. 두 번째 리그에 플레이어를 추가하면 원래 리그에 대한 참조가 사라집니다.
두 번째 EClass를 생성하고 이름을 "League"로 지정합니다. 리그를 식별하려면 "name"이라는 EString 속성도 생성합니다. 다음 단계는 리그 모델 요소를 마우스 오른쪽 버튼으로 클릭하여 리그와 플레이어 간의 EReference를 만드는 것입니다. 참조 이름을 "플레이어"로 지정합니다. 참조의 EType을 "Player"로 설정합니다. 리그에는 임의의 수의 플레이어가 포함될 수 있으므로 상한을 "다수"에 해당하는 "-1"로 설정합니다. 마지막으로 Containment 속성을 "true"로 설정하여 EReference를 포함 참조로 정의합니다.
우리는 이미 이 첫 번째 모델 반복에서 코드를 생성할 수 있으며, 이는 다음 섹션에 표시됩니다. EMF는 예제 편집기를 생성할 수도 있습니다. 이 편집기를 사용하면 생성된 모델의 인스턴스(이 경우 리그 및 플레이어 인스턴스)를 생성할 수 있습니다. 이를 통해 모델의 인스턴스를 생성하여 모델에 대한 초기 테스트를 수행할 수 있습니다. 그런 다음 모델을 완성하는 두 번째 반복에서 더 많은 EAttributes 및 EReferences를 더 구체화하고 추가할 수 있습니다.
도움이 필요하다?
⇒ 개발자 지원 및 교육 에 대해 자세히 알아보거나 당사에 문의 하십시오 .
코드 생성
이 단계에서는 우리가 만든 Ecore 파일에서 엔터티를 생성합니다. 모델을 변경해야 하는 경우 엔터티를 다시 생성할 수 있습니다. EMF는 모델 요소나 EAttribute 추가와 같은 간단한 변경을 처리할 수 있습니다. 속성을 다른 클래스로 이동하는 등 복잡한 변경 사항이 있는 경우 모델의 기존 인스턴스를 마이그레이션해야 합니다. 이는 EDAPT 프레임워크에서 지원됩니다. ( 참조 )
엔터티를 생성하려면 먼저 생성기 모델을 생성해야 합니다. 이를 통해 모델 자체의 일부가 아닌 코드 생성에 대한 속성을 구성할 수 있습니다. 예를 들어 플러그인과 하위 폴더에 대한 소스 코드도 생성됩니다.
프로젝트의 모델 폴더를 마우스 오른쪽 버튼으로 클릭하고 → “New” → “Other…” → “EMF Generator Model” → “Next”를 클릭하고 파일 이름으로 Bowling.genmodel을 입력합니다. 다음 페이지로 이동하여 모델 임포터로 “Ecore 모델”을 선택하세요. "다음"을 클릭한 후 "작업 공간 찾아보기…"를 선택하고 이전에 생성된 Bowling.ecore를 선택합니다. 다음 마법사 페이지로 이동하여 "마침"을 선택합니다.
생성기 모델의 루트 노드에서 코드 생성을 위한 속성을 설정할 수 있습니다. 생성기 모델의 트리에서 생성된 모든 엔터티에 대한 속성을 설정할 수 있습니다. 첫 번째 코드 생성에서는 기본 설정을 사용합니다. 생성기 모델을 기반으로 이제 소스 코드를 생성할 수 있습니다. EMF를 사용하면 정의된 모델에 대해 최대 4개의 서로 다른 플러그인을 생성할 수 있습니다.
-
모델: 모델에는 모델의 인스턴스를 생성하는 데 필요한 모든 엔터티, 패키지 및 팩토리가 포함됩니다.
-
편집: 편집 플러그인에는 UI에 모델을 표시하는 공급자가 포함되어 있습니다. 예를 들어 공급자는 아이콘과 이름을 표시하는 엔터티를 표시하는 데 사용할 수 있는 모든 모델 요소에 대한 레이블을 제공합니다.
-
편집기: 편집기 플러그인은 모델의 인스턴스를 생성하고 수정하기 위해 생성된 예제 편집기입니다.
-
테스트: 테스트 플러그인에는 모델에 대한 테스트를 작성하기 위한 템플릿이 포함되어 있습니다.
플러그인을 생성하려면 생성기 모델의 루트 노드를 마우스 오른쪽 버튼으로 클릭하고 플러그인을 선택하세요. 튜토리얼에서는 "모두 생성"을 선택하십시오.
생성된 코드를 살펴보기 전에 애플리케이션을 시작하고 모델의 엔터티를 생성해 보겠습니다. ecore 파일이 포함된 플러그인을 마우스 오른쪽 버튼으로 클릭하고 "Debug as → Eclipse Application"을 선택합니다. 그러면 새로운 런타임 Eclipse가 시작됩니다.
그런 다음 런타임에 Bowlinginstance라는 이름의 새로운 빈 프로젝트(도구 모음 메뉴 → "파일" → "새로 만들기" → "기타..." → "일반" → "프로젝트")를 만듭니다.
생성된 프로젝트를 우클릭 → “New” → “Other…” → “Example EMF Model Creation Wizards” → “Bowling Model” → “Next”를 클릭하고 이름에 League.bowling을 입력합니다. 이 파일에는 모델 인스턴스의 직렬화된 버전이 포함됩니다.
모델 객체로 League를 선택합니다. 이는 우리가 생성하려는 모델 인스턴스의 루트 객체를 설정합니다.
모델 인스턴스용으로 생성된 편집기는 Ecore 편집기와 유사하게 작동합니다. 모델 요소 인스턴스는 마우스 오른쪽 버튼 클릭을 통해 생성할 수 있으며 속성 보기에서 EAttributes를 수정할 수 있습니다. 리그에 이름을 지정하고 두 명의 플레이어를 생성하세요. 저장 시 생성된 모든 인스턴스는 XMI 파일 "league.bowling"에 직렬화됩니다.
도움이 필요하다?
⇒ 개발자 지원 및 교육 에 대해 자세히 알아보거나 당사에 문의 하십시오 .
모델 개선
IDE Eclipse 환경으로 다시 전환하여 모델을 완성하고 소스 코드를 다시 생성해 보겠습니다. 이 두 번째 모델 반복에서는 EEnum 및 Multi-EAttribute뿐만 아니라 다양한 유형의 EReference를 추가합니다. 먼저 볼링 모델에 다음 클래스를 추가합니다.
-
토너먼트
-
매치업
-
게임
이 클래스는 볼링 토너먼트 결과를 모델링하고 모델에 두 번째 트리를 구축합니다. 따라서 토너먼트에서 매치업으로, 매치업에서 게임으로 포함 EReference를 추가합니다. 두 참조 모두에 대해 포함 속성을 true로 설정해야 합니다. 볼링 규칙에 따라 매치업은 두 게임(각각 한 명의 플레이어가 참여)으로 구성됩니다. 우리는 EClass Matchup의 EReference "게임"의 상한과 하한을 "2"로 설정하여 이를 모델링합니다.
우리는 Matchup과 Game 간의 EReference를 양방향으로 정의했습니다. 이는 참조를 양쪽 끝에서 탐색할 수 있음을 의미합니다. 따라서 Game에서 Matchup으로 두 번째 EReference를 생성하고 두 EReference를 모두 바인딩해야 합니다. EMF는 양방향 동기화를 처리합니다. 즉, 게임에 매치업을 추가하면 해당 게임도 자동으로 매치업에 추가됩니다.
EType "Matchup"을 사용하여 "matchup"이라는 게임에 대한 EReference를 추가하세요. EOpposite를 EReference "게임"으로 설정하면 두 EReference가 양방향으로 결합됩니다. "컨테이너" 속성은 자동으로 True로 설정됩니다.
다음 단계는 상호 EReference를 추가하는 것입니다. 포함 EReference와 달리 상호 참조된 모델 요소는 서로를 포함하지 않습니다. 우리 모델에서는 게임에서 "플레이어"라는 플레이어로의 상호 참조 EReference를 추가합니다. 컨테이너 및 포함 속성을 모두 "false"로 설정합니다. 이제 임의의 수의 게임을 플레이어에게 할당할 수 있으며 플레이어는 여전히 리그에 포함되어 있습니다.
마지막 필수 단계로 토너먼트 유형에 대한 EEnumeration을 생성합니다. 우리 모델에서는 토너먼트 유형이 "프로"와 "아마추어"일 수 있습니다. 클래스를 생성한 것과 같은 방법으로 루트 볼링 모델 패키지를 마우스 오른쪽 버튼으로 클릭하여 EEnum을 생성하세요. 이 EEnum에 두 개의 EEnum 리터럴을 추가합니다.
그런 다음 EClass 토너먼트에 EAttribute를 추가하고 이름을 "type"으로 지정한 다음 EType을 "TournamentType"으로 설정합니다.
확장된 예제 모델에는 토너먼트의 다중 정수 EAttribute와 같은 일부 특수 사례와 모든 기본 유형을 포함하여 추가할 더 많은 EAttributes 및 EReferences가 포함되어 있습니다. 원하는 경우 다음 기능을 모델링할 수도 있습니다.
플레이어
-
키: E더블
-
isProfessional: EBoolean
게임
- 프레임: EInt, UpperBound = 10
모델에 복잡한 변경 사항을 적용한 후에는 항상 Ecore 편집기에서 모델 루트를 마우스 오른쪽 버튼으로 클릭하여 이를 검증하는 것이 좋습니다. 모델에서 뭔가 잘못된 일을 하고 EAttribute "games"(Matchup에서)의 하한을 3으로 설정해 보겠습니다. 상한이 2이므로 이 모델은 그다지 의미가 없습니다. 이는 모델 유효성 검사를 통해 감지됩니다. 이는 일반 Java 코드에서는 불가능한 것입니다.
이 모델 개선 후에는 변경 사항을 반영하도록 코드를 다시 생성할 것입니다. 런타임 애플리케이션을 다시 시작하고 두 번째 모델 "토너먼트"를 만듭니다. 매치업과 두 개의 게임을 추가합니다. 게임을 플레이어에게 할당하려면 앞서 만든 "리그" 모델을 로드해야 합니다. “Bowling Editor” 메뉴에서 “Load Resource”를 선택하고 첫 번째 모델 파일을 선택합니다. 이제 속성 보기에서 게임을 플레이어에 연결하세요.
POJO를 작성하는 것보다 이것이 더 나은 이유는 무엇입니까?
"일반 POJO를 작성하여 모델을 생성하는 대신 EMF를 사용해야 하는 이유는 무엇입니까?"라고 물을 수 있습니다. 신속한 테스트를 위해 생성된 편집기와 EMF에 사용할 수 있는 모든 추가 프레임워크와 같은 이점을 고려하지 않고 매우 간단하고 모범적인 두 가지 이점을 살펴보겠습니다.
생성된 코드를 살펴보기 전에(잠시 후에 살펴보겠습니다) 방금 생성한 코드의 양을 고려해 보겠습니다. Eclipse 메트릭 플러그인은 1,000개 이상의 LOC를 생성했으며 150개만이 유틸리티 클래스의 일부임을 알려줍니다. 매우 간단한 코드라도 LOC당 1달러의 가치가 있는 것으로 간주됩니다. 그래서 우리는 버튼 몇 개를 클릭하는 것만으로도 93897,000를 벌었습니다 ????
다음 섹션에서는 생성한 코드에 대한 EMF API를 살펴보겠습니다.
도움이 필요하다?
⇒ 개발자 지원 및 교육 에 대해 자세히 알아보거나 당사에 문의 하십시오 .
EMF API
튜토리얼의 이 부분에서는 생성된 코드를 포함한 EMF의 API와 EMF의 유틸리티 클래스를 살펴보겠습니다. 먼저 생성된 코드를 살펴보겠습니다.
튜토리얼 org.eclipse.example.bowling의 모델 플러그인에서 모든 모델 엔터티에 대한 인터페이스와 구현을 찾을 수 있습니다. 엔터티 인터페이스의 개요를 살펴보면 모델에 정의한 속성에 대한 getter 및 setter와 참조에 대한 getter가 포함되어 있음을 알 수 있습니다. 생성된 EMF 모델의 모든 엔터티는 EObject의 하위 클래스입니다. EObject에는 변경 알림 메커니즘과 같은 기본 기능이 포함되어 있습니다.
모델 플러그인에는 모델 요소 엔터티를 생성하는 팩토리가 포함되어 있습니다. EObject의 생성자는 일반적으로 공개되지 않습니다. 또한 역직렬화와 같은 기능을 위해 많은 프레임워크에서 팩토리를 사용한다는 점에 유의하세요. 이러한 방법을 성공적으로 변경하려면 신중한 계획이 필요합니다. 팩토리를 사용하여 일부 엔터티를 프로그래밍 방식으로 생성하고 해당 API를 사용하여 수정해 보겠습니다. 이 예제 코드를 실행하기 위해 사전 생성된 테스트 플러그인을 사용할 것입니다. org.eclipse.example.bowlingmodel.test 플러그인을 열면 모델의 모든 엔터티에 대해 생성된 테스트 클래스를 찾을 수 있습니다. "test"로 시작하는 메서드를 추가하면 단일 테스트 케이스를 만들 수 있습니다. 테스트 클래스 => “Debug As” => “JUnit Test”를 마우스 오른쪽 버튼으로 클릭하면 테스트 사례를 시작할 수 있습니다. 우리 모델을 실제로 "테스트"하지는 않을 것이라는 점에 유의하십시오.
이 매우 간단한 예에서는 BowlingFactory를 사용하여 Matchup과 Game을 생성하고 Matchup에 대한 참조를 추가하고 게임의 양방향 업데이트를 확인합니다.
public void testMatchupGameRef() {
   Matchup matchup = BowlingFactory.eINSTANCE.createMatchup();
   Game game = BowlingFactory.eINSTANCE.createGame();
   matchup.getGames().add(game);
   assertEquals(game.getMatchup(), matchup);
}
슈퍼 클래스 EObjects는 보다 일반적인 방식으로 엔터티에 액세스할 수 있는 다양한 메서드를 제공합니다. 예를 들어 getMatchup() 메서드 대신 EContainer에 액세스하여 Matchup과 Game 간의 포함을 테스트합니다.
public void testMatchupGameRef() {
   Matchup matchup = BowlingFactory.eINSTANCE.createMatchup();
   Game game = BowlingFactory.eINSTANCE.createGame();
   matchup.getGames().add(game);
   assertEquals(game.eContainer(), matchup);
}
EObject는 eSet() 및 eGet() 메소드를 사용하여 해당 속성에 대한 반사 액세스를 제공합니다. 이는 일반적인 방식으로 엔터티를 수정하는 데 유용할 수 있습니다.
public void testReflection() {
   EObject eObject = BowlingFactory.eINSTANCE.createPlayer();
   eObject.eSet(BowlingPackage.eINSTANCE.getPlayer_Name(), "Jonas");
   Player player = (Player) eObject;
   assertEquals("Jonas", player.getName());
}
사용 가능한 EAttributes 및 EReferences에 대한 정보는 물론 이전에 모델링한 모든 추가 개념은 EClass 또는 EPackage를 통해 액세스할 수 있습니다. 다음 테스트는 League의 EReference가 1보다 큰지 여부를 확인합니다.
public void testReflectiveInformation() {
   League league = BowlingFactory.eINSTANCE.createLeague();
   assertTrue(league.eClass().getEAllReferences().get(0).isMany());
   assertTrue(BowlingPackage.eINSTANCE.getLeague_Players().isMany());
}
EMF는 모델 인스턴스의 검증도 지원합니다. 예를 들어, 매치업은 항상 두 게임으로 구성되어야 한다는 모델의 제약 조건을 검증할 수 있습니다.
public void testValidation() {
   Matchup matchup = BowlingFactory.eINSTANCE.createMatchup();
   matchup.getGames().add(BowlingFactory.eINSTANCE.createGame());
   Diagnostic validate = Diagnostician.INSTANCE.validate(matchup);
   assertEquals(Diagnostic.ERROR, validate.getSeverity());
}
마지막으로 EMF는 많은 유틸리티 클래스를 제공합니다. 매우 중요한 것은 EcoreUtil입니다. EcoreUtil의 사용 가능한 방법을 살펴보는 것은 가치 있는 일입니다. 우리는 EObject의 복사본을 생성하기 위해 copy 메소드를 사용할 것입니다.
public void testCopy() {
   Player player = BowlingFactory.eINSTANCE.createPlayer();
   player.setName("Jonas");
   Player copy = EcoreUtil.copy(player);
   assertNotSame(player, copy);
   assertEquals(player.getName(), copy.getName());
}
중간 샘플 솔루션 가져오기 튜토리얼을 계속하기 전에 여기에서 다운로드할 수 있는 중간 샘플 솔루션을 가져오십시오 .
빈 작업 공간으로 전환(파일 → 작업 공간 전환)하고 "가져오기" → "일반" → "기존 프로젝트를 작업 공간으로"를 선택합니다. "exampleSolution2.zip"을 선택하고 모든 프로젝트를 가져옵니다.
어댑터공장
튜토리얼의 다음 섹션에서는 AdapterFactories의 개념을 이해하는 것이 중요합니다. 기본적인 소개를 해드리겠습니다. 이 블로그 게시물 에는 더 고급 개념도 설명되어 있습니다 .
AdapterFactories의 기본 기능은 UI에 필요한 ILabelProvider와 같은 특정 목적에 필요한 인터페이스를 제공하는 것입니다. EMF는 이러한 클래스를 많이 생성합니다. 올바른 클래스를 검색하려면 필요한 인터페이스(예: AdapterFactoryLabelProvider)의 AdapterFactory 구현을 사용할 수 있습니다. AdapterFactoryLabelProvider는 AdapterFactory를 사용하여 모든 EObject에 대해 생성된 LabelProvider를 검색합니다.
EMF 데이터 관리
이전 섹션에서는 EMF를 사용하여 구조화된 데이터 모델을 생성하는 방법을 보여주었습니다. 일반적인 애플리케이션에서는 이러한 데이터 모델을 저장해야 하며 버전 관리 및 배포도 해야 합니다. 다양한 사용 사례를 지원하는 몇 가지 프레임워크가 있습니다.
기본적으로 EMF는 EObject를 XMI 파일로 직렬화하는 기능을 제공합니다. 다음 예에서는 파일에서 EObject를 로드하고 나중에 저장합니다. EMF는 모델을 수정하는 명령도 제공합니다. 명령은 쉽게 취소할 수 있습니다. 예제에서는 토너먼트가 포함된 XMI 파일을 로드합니다. 해당 토너먼트에 새로운 매치업을 추가하고 이러한 변경 사항을 취소할 수 있습니다. 완료되면 변경 사항을 파일에 다시 저장할 수 있습니다.
튜토리얼을 위해 샘플 솔루션에서 가져온 플러그인 org.eclipse.example.bowling.tutorial에 예제 대화 상자를 준비했습니다. 볼링 모델의 인스턴스가 포함된 파일을 마우스 오른쪽 버튼으로 클릭하고 "튜토리얼" → "토너먼트 예제 대화 상자 열기"를 선택하여 이 대화 상자를 열 수 있습니다. 튜토리얼의 다음 두 섹션을 구현하면 다음과 같습니다.
서브클래스 exampleTournamentDialog에는 이 튜토리얼에서 구현할 빈 메서드 스텁이 있습니다. 튜토리얼의 목적을 위해 우리는 완벽한 디자인보다 단순성에 중점을 두었습니다. 또한 튜토리얼과 관련되지 않은 모든 것은 AbstractTournamentExampleDialog라는 추상 기본 클래스에서 구현됩니다.
이제 exampleTournamentDialog 클래스를 열어야 합니다. 예제 보기를 열면 트리거되는 loadContent 메소드를 구현하겠습니다. 이 방법의 목적은 예제 보기에 표시되는 파일에서 토너먼트를 가져오는 것입니다. 단순하게 유지하기 위해 파일에 토너먼트가 포함되어 있고 이 토너먼트가 파일의 첫 번째 요소라고 가정합니다. 생성된 예제 편집기를 사용하면 이와 같은 파일을 쉽게 만들 수 있습니다.
먼저 편집 도메인을 만듭니다. 편집 도메인은 상호 연관된 모델 세트와 이를 수정하기 위해 실행되는 명령을 관리합니다. 예를 들어 이전 명령의 스택이 모두 포함되어 있습니다. 편집 도메인은 EObject를 저장하기 위한 컨테이너인 리소스를 생성할 수 있습니다. 리소스를 저장하고 로드할 수 있으며 콘텐츠를 추가할 수 있습니다. 예제에서는 리소스의 첫 번째 EObject를 가져와 토너먼트라고 가정하고 이를 슈퍼클래스의 멤버로 만듭니다.
@Override
protected void loadContent(IFile file) throws IOException {
  // Load Tournament from file and set it with setTournament
  AdapterFactoryEditingDomain domain = new AdapterFactoryEditingDomain(
   getAdapterFactory(),
   new BasicCommandStack());
  resource = domain.createResource(file.getFullPath().toString());
  resource.load(null);
  EObject eObject = resource.getContents().get(0);
  setTournament((Tournament) eObject);
}
콘텐츠를 로드한 후 저장을 구현하겠습니다. 이는 대화 상자에서 확인을 누르면 트리거되며 모델을 직렬화하고 모든 변경 사항을 파일에 적용합니다.
@Override
protected void save() throws IOException {
   // save changes in the file
   resource.save(null);
}
이제 토너먼트에 매치업을 추가하는 기능을 구현하려고 합니다. 이를 위해 명령을 사용하겠습니다. 먼저 적절한 팩토리를 사용하여 Matchup을 만듭니다. 관례적으로 팩토리는 모델의 기본 패키지와 동일한 이름을 갖습니다. 그런 다음 이전 단계의 리소스에서 로드된 토너먼트에 새로 생성된 Matchup을 추가하는 명령을 생성합니다. 마지막으로 편집 도메인의 명령 스택에서 명령을 실행합니다.
@Override
protected void addMatchup() {
 // add a new Matchup using a Command
 Matchup matchup = BowlingFactory.eINSTANCE.createMatchup();
 EditingDomain editingDomain = AdapterFactoryEditingDomain
.getEditingDomainFor(getTournament());
 Command command = AddCommand.create(editingDomain, getTournament(),
   BowlingPackage.eINSTANCE.getTournament_Matchups(),
   matchup);
 editingDomain.getCommandStack().execute(command);
}
이 시점에서는 변경 사항이 대화 상자의 UI에 반영되지 않지만 튜토리얼의 다음 섹션에서 코드를 구현하겠습니다.
다음 단계는 실행 취소를 구현하는 것입니다. 마지막 명령을 실행 취소하려면 편집 도메인의 명령 스택에서 실행 취소를 호출하기만 하면 됩니다.
@Override
protected void undo() {
  // Undo the last change
  AdapterFactoryEditingDomain
    .getEditingDomainFor(getTournament())
    .getCommandStack().undo();
}
이제 볼링 애플리케이션을 시작하고 예제 편집기를 사용하여 XMI 파일을 생성합니다. 여기에는 토너먼트와 여러 매치업 및 게임이 포함되어야 합니다. 파일을 마우스 오른쪽 버튼으로 클릭하고 "튜토리얼" → "예제 토너먼트 보기 열기"를 선택합니다. 이 보기에서 새 토너먼트를 추가하고 이 작업을 실행 취소하고 "확인"을 클릭하여 저장할 수 있습니다. Ecore 편집기에서 파일을 열어 결과를 확인할 수 있습니다. 뷰의 UI는 아직 업데이트되지 않지만 튜토리얼의 다음 단계에서 UI를 초기화할 것이라는 점을 다시 한 번 참고하세요.
도움이 필요하다?
⇒ 개발자 지원 및 교육 에 대해 자세히 알아보거나 당사에 문의 하십시오 .
추가 지속성 프레임워크
EMF 모델 인스턴스를 저장하고 버전 관리하기 위한 여러 프레임워크가 있습니다. 우리가 추천할 수 있는 세 가지는 다음과 같습니다.
EMFStore 병합 대화 상자
EMF UI 이 섹션에서는 EMF가 UI 개발을 지원하는 방법에 대한 두 가지 예를 보여주고 이를 통해 두 가지 기본 UI 요소로 예제 보기를 채웁니다. 보다 구체적으로 EMF 모델 인스턴스에 리스너를 연결하는 방법과 EMF를 기반으로 트리 뷰어를 만드는 방법을 보여 드리겠습니다. 이는 빙산의 일각일 뿐이라는 점을 참고하시기 바랍니다. EMF는 주어진 데이터 모델을 기반으로 다양한 종류의 UI를 생성하기 위한 광범위한 지원을 제공합니다. 예를 들어 UI 요소를 모델 인스턴스의 데이터에 바인딩하는 데이터 바인딩을 지원합니다. 또한 UI 개발을 지원하는 여러 프레임워크가 있으며 이 섹션의 끝 부분에 요약되어 있습니다. 예를 들어, 아래와 같이 데이터 모델의 속성과 참조를 표시하고 입력할 수 있는 양식 기반 UI를 생성하려면 EMF 양식을 살펴봐야 합니다 .
EMF 청취자
이 섹션에서는 열린 토너먼트의 매치업 수를 표시하는 라벨을 모델에 바인딩하겠습니다. 매치업 수가 변경될 때마다 알림 메커니즘을 사용하여 라벨을 업데이트할 것입니다. 둘째, TreeViewer를 매치업 목록으로 채우고 해당 게임을 하위 항목으로 표시합니다. 업데이트하기 위해 레이블을 보기에서 열리는 토너먼트 EObject에 리스너를 등록합니다. 토너먼트 EObject에 변경 사항이 있는 경우 이 리스너는 항상 EMF 런타임에 의해 알림을 받습니다.
@Override
protected void initializeListener() {
  // initialize a listener for the Label displaying the number of Matchups
  numberOfMatchupListener = new NumberofMatchupListener();
  getTournament().eAdapters().add(numberOfMatchupListener);
}
두 번째 단계에서는 리스너 자체를 구현합니다. 알림 메서드에서는 먼저 변경 사항이 EReference to Matchups에 있었고 결과적으로 Matchups 수에 영향을 미쳤는지 확인합니다. 이 경우 updateNumberOfMatchups 메서드(AbstractTournamentExampleView에서 구현됨)를 통해 레이블을 업데이트합니다.
private final class NumberofMatchupListener extends AdapterImpl {
  // Implement a listener to update the Label. Call updateNumberOfMatchups
  @Override
  public void notifyChanged(Notification msg) {
    if (msg.getFeature().equals(
      BowlingPackage.eINSTANCE.getTournament_Matchups())) {
      updateNumberOfMatchups();    }
    super.notifyChanged(msg);
  }
}
이것이 리스너를 수동으로 구현하는 방법입니다. UI 요소와 데이터 모델 간의 양방향 업데이트로 UI를 생성하려면 이미 EMF에 사용 가능한 데이터 바인딩을 사용하는 것이 좋습니다. Eclipse 데이터 바인딩에서는 특정 UI 요소를 특정 EAttribute 또는 EReference에 바인딩할 수 있으며 이는 양방향 업데이트를 처리합니다.
양식 기반 UI를 구현하려면 EMF 양식 도 살펴봐야 합니다 .
트리 뷰어
다음으로, 현재 토너먼트의 매치업과 해당 게임을 하위 항목으로 표시하기 위해 TreeViewer를 초기화하겠습니다. TreeViewer를 초기화하려면 ContentProvider, LabelProvider 및 입력의 세 가지가 필요합니다. ContentProvider는 getChildren() 메소드를 제공하여 트리의 구조를 정의합니다. 하나의 노드에 대해 표시할 아이콘과 텍스트를 가져오기 위해 LabelProvider가 호출됩니다. TreeViewer의 입력은 트리의 보이지 않는 루트 요소입니다. 트리 루트에 표시되는 요소는 해당 요소의 하위 요소입니다. 우리의 경우 입력은 토너먼트입니다.
ContentProvider, 특히 LabelProvider는 일반적으로 특정 EClass에 의존합니다. EMF는 Content- 및 LabelProvider를 포함한 여러 목적으로 공급자를 생성합니다. 이전에 설명한 AdapterFactory 개념을 사용하여 모든 요소에 대한 올바른 공급자를 검색합니다. 마지막으로 입력을 현재 열려 있는 토너먼트로 설정합니다.
@Override
protected void initializeTreeviewer(TreeViewer treeViewer) {
  // initialize a TreeViewer to show the Matchups
  // and Games of the opened Tournament
  AdapterFactoryLabelProvider labelProvider =
new AdapterFactoryLabelProvider(
getAdapterFactory());
  AdapterFactoryContentProvider contentProvider =
new AdapterFactoryContentProvider(
getAdapterFactory());
  treeViewer.setLabelProvider(labelProvider);
  treeViewer.setContentProvider(contentProvider);
  treeViewer.setInput(getTournament());
}
방금 구현한 UI 기능을 테스트하려면 볼링 예제 애플리케이션을 다시 시작해야 합니다. Label의 모양을 수정하려면 해당 클래스의 ItemProvider를 수정하면 됩니다. Matchup에 대한 LabelProvider를 수정해 보겠습니다. TreeViewer에서 EObject의 모양을 수정하려면 생성된 ItemProvider MatchupItemProvider를 조정할 수 있습니다. 예시에서는 매치업 게임에 포함된 게임 수를 보여드리겠습니다. 다음 생성 중에 덮어쓰이는 것을 방지하려면 메소드를 "생성된 NOT"으로 표시하십시오.
/**
* This returns the label text for the adapted class.
*
* @generated NOT
*/
@Override
public String getText(Object object) {
   if (object instanceof Matchup) {
   EList games = ((Matchup) object).getGames();
   if (games != null) {
   return "Matchup, Games: " + games.size();
   }
   }
   return getString("_UI_Matchup_type");
}
실행 중인 애플리케이션에서 새로운 LabelProvider가 토너먼트 예제 보기와 Ecore 편집기에 표시됩니다.
마지막 단계로 뷰를 닫을 때 모든 리스너를 제거해야 합니다. LabelProvider 및 ContentProvider는 모델에 등록된 리스너이므로 이들도 삭제해야 합니다.
최종 샘플 솔루션을 보려면 여기 에서 프로젝트를 가져오세요 .
추가 UI 프레임워크
EMF 모델 인스턴스의 데이터를 표시하기 위한 여러 프레임워크가 있습니다. 아래 스크린샷과 같이 다양한 UI 플랫폼에 대한 양식 기반 UI를 생성하려면 반드시 EMF 양식을 살펴봐야 합니다.
아래 스크린샷과 유사한 애플리케이션을 생성하려면 반드시 EMF 클라이언트 플랫폼 ( 튜토리얼 ) 을 살펴봐야 합니다 .
EMF 클라이언트 플랫폼 네비게이터 및 편집기
UI 생성을 위해 살펴볼 가치가 있는 추가 프레임워크는 다음과 같습니다.
-
Eclipse GLSP : GLSP는 웹/클라우드에서 사용자 정의 다이어그램 편집기를 구축하기 위한 확장 가능한 오픈 소스 프레임워크입니다. Graphiti (그래픽 편집기)
-
Graphiti (그래픽 편집기)
-
그래픽 모델링 프레임워크 (그래픽 편집기)
-
확장된 편집 프레임워크 (고급 속성 보기)
추가 EMF 기반 기술
튜토리얼의 마지막 섹션에서는 여러분이 살펴볼 추가 EMF 기반 기술의 간단한 목록을 제공하고자 합니다.
-
EMF.cloud : EMF.cloud는 EMF(Eclipse Modeling Framework)와 그 이점을 웹과 클라우드에서 사용할 수 있도록 만드는 구성 요소 및 기술을 위한 포괄적인 프로젝트입니다.
-
모델 비교를 위한 EMF 비교
-
모델 마이그레이션을 위한 EDAPT
-
모델 쿼리를 위한 EMF IncQuery
-
텍스트 모델링(DSL)을 위한 XText
결론
이 튜토리얼이 도움이 되었기를 바랍니다. 피드백이나 질문이 있는 경우 언제든지 modelling@eclipsesource.com 으로 문의해 주세요 . 이 튜토리얼의 업데이트는 당사 웹사이트에서 제공될 예정입니다 .
도움이 필요하다?
조나스, 막시밀리안, 필립
Jonas Helming, Maximilian Koegel 및 Philip Langer는 EclipseSource를 공동으로 이끌고 있습니다. 그들은 건축을 위한 컨설턴트 및 소프트웨어 엔지니어로 일하고 있습니다.
[출처] https://eclipsesource.com/blogs/tutorials/emf-tutorial/
광고 클릭에서 발생하는 수익금은 모두 웹사이트 서버의 유지 및 관리, 그리고 기술 콘텐츠 향상을 위해 쓰여집니다.
