
- 전체
- Sample DB
- database modeling
- [표준 SQL] Standard SQL
- G-SQL
- 10-Min
- ORACLE
- MS SQLserver
- MySQL
- SQLite
- postgreSQL
- 데이터아키텍처전문가 - 국가공인자격
- 데이터 분석 전문가 [ADP]
- [국가공인] SQL 개발자/전문가
- NoSQL
- hadoop
- hadoop eco system
- big data (빅데이터)
- stat(통계) R 언어
- XML DB & XQuery
- spark
- DataBase Tool
- 데이터분석 & 데이터사이언스
- Engineer Quality Management
- [기계학습] machine learning
- 데이터 수집 및 전처리
- 국가기술자격 빅데이터분석기사
- 암호화폐 (비트코인, cryptocurrency, bitcoin)
[기계학습] machine learning [러닝 텐서플로]Chap02 - 텐서플로 설치 및 실행
2020.12.24 15:21
[러닝 텐서플로]Chap02 - 텐서플로 설치 및 실행
2.1 텐서플로 설치
텐서플로 설치에 대한 자세한 내용는 https://www.tensorflow.org/install/ 에서 각 운영체제별로 설치할 수 있게 안내되어 있다.
# TensorFlow CPU
pip install tensorflow
# TensorFlow GPU
pip install tensorflow-gpu
2.2 Hello World
TensorFlow의 첫 번째 예제인 Hello와 World!라는 단어를 결합해 Hello World!라는 문구를 출력하는 프로그램이다.
import tensorflow as tf
# TensorFlow 버전 확인
print(tf.__version__)
1.8.0
# hello_world.py
h = tf.constant("Hello") # 상수
w = tf.constant(" World!")
hw = h + w
with tf.Session() as sess:
ans = sess.run(hw)
print(ans)
b'Hello World!'
다음은 str 타입의 phw = ph + pw와 tf.constant 타입의 hw를 비교해보자.
ph = "Hello"
pw = " World!"
phw = ph + pw
print('str: {}, type: {}'.format(phw, type(phw)))
print('tensorflow: {}, type: {}'.format(hw, type(hw)))
  str: Hello World!, type: <class 'str'>
  tensorflow: Tensor("add:0", shape=(), dtype=string), type: <class 'tensorflow.python.framework.ops.Tensor'>
3장에서 텐서플로의 연산 그래프 모델을 자세히 알아 볼 수 있다.
텐서플로의 연산 그래프와 관련된 중요한 개념은,
-
먼저 어떠한 연산을 할지 정의해둔 후
-
외부 메커니즘을 통해서 그 연산을 실행 시킨다.
위의 코드에서 hw = h + w에서 텐서플로 코드는 h와 w의 합인 Hello World!를 출력하는 것이 아닌 나중에 실행될 합 연산을 연산 그래프(computation graph) 에 추가한다.
그런 다음, Session 객체는 텐서플로 연산 메커니즘에 대한 인터페이스 역할을 하며, ans = sess.run(hw)에서 hw = h + w연산을 수행한다. 따라서, print(ans)를 하면 Hllo World!를 출력한다.
2.3 MNIST
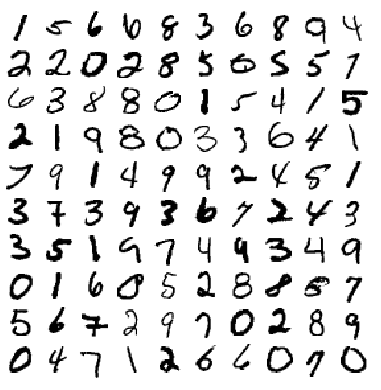
위에서 간단한 텐서플로 예제를 살펴 보았다. 이번에는 필기체 숫자로 이루어진 'MNIST 데이터베이스'를 이용해 필기체 숫자 분류를 해보자. MNIST는 미국 인구조사국으 지기원들이 쓴 숫자와 고등학생들이 쓴 숫자로 만든 미국 국립표준기술연구소(NIST)의 데이터베이스를 다시 섞어 만든 필기체 숫자 이미지 데이터베이스이다.
MNIST 데이터는 딥러닝 예제에서 빠지지 않고 등장하는 데이터라고 할 수 있다.
2.4 소프트맥스 회귀 - Softmax Regression
이번에 구현할 MNIST 분류 예제에서는 소프트맥스 회귀(softamx regression) 을 이용하여 구현한다. 텐서플로를 공부하는 것이기 때문에 자세한 설명은 생략한다. softmax regression은 binary classification에서 사용되는 logistic regression을 multinomial classification로 확장한 개념이라 할 수 있다. 자세한 내용은 해당 용어의 링크를 참고하면 된다.
# softmax.py
# import tensorflow as tf
from tensorflow.examples.tutorials.mnist import input_data
# 상수 설정
DATA_DIR = '../data'
NUM_STEPS = 1000
MINIBATCH_SIZE = 100
# MNIST 데이터 불러오기
data = input_data.read_data_sets(DATA_DIR, one_hot=True)
  Extracting ../data\train-images-idx3-ubyte.gz
  Extracting ../data\train-labels-idx1-ubyte.gz
  Extracting ../data\t10k-images-idx3-ubyte.gz
  Extracting ../data\t10k-labels-idx1-ubyte.gz
#########
# 모델링
#########
x = tf.placeholder(tf.float32, [None, 784])
W = tf.Variable(tf.zeros([784, 10]))
# b = tf.Variable(tf.random_uniform([10], -1., 1.))
# y_pred = tf.add(tf.matmul(x ,W), b)
y_pred = tf.matmul(x, W)
y_true = tf.placeholder(tf.float32, [None, 10])
# Cost(Loss) Function
cross_entropy = tf.reduce_mean(
tf.nn.softmax_cross_entropy_with_logits_v2(logits=y_pred, labels=y_true))
# Gradient Step(Optimze)
gd_step = tf.train.GradientDescentOptimizer(learning_rate=0.5).minimize(cross_entropy)
correct_mask = tf.equal(tf.argmax(y_pred, 1), tf.argmax(y_true, 1))
accuracy = tf.reduce_mean(tf.cast(correct_mask, tf.float32))
  with tf.Session() as sess:
      # 학습
      sess.run(tf.global_variables_initializer())

      for step in range(NUM_STEPS):
          batch_xs, batch_ys = data.train.next_batch(MINIBATCH_SIZE)
          sess.run(gd_step, feed_dict={x: batch_xs, y_true: batch_ys})

          if(step + 1) % 100 == 0:
              print(step+1, '|', sess.run(cross_entropy, feed_dict={x: batch_xs, y_true: batch_ys}))

      # 테스트
      ans = sess.run(accuracy, feed_dict={x: data.test.images,
                                         y_true: data.test.labels})

  print("Accuracy: {:.2f}%".format(ans*100))
  100 | 0.42410415
  200 | 0.29747245
  300 | 0.25943187
  400 | 0.280245
  500 | 0.27326566
  600 | 0.23633882
  700 | 0.32467315
  800 | 0.26527068
  900 | 0.45479637
  1000 | 0.42248863
  Accuracy: 91.73%
소스코드 분석
위의 softmax.py 코드를 한 블록씩 분석 해보자.
1) TensorFlow import 및 MNIST example utils import
  import tensorflow as tf
  from tensorflow.examples.tutorials.mnist import input_data
텐서플로에서 MNIST 데이터를 바로 불러올 수 있도록 내장 유틸리티를 제공한다.
2) 프로그램에서 사용하는 상수 정의
  DATA_DIR = '../data'
  NUM_STEPS = 1000
  MINIBATCH_SIZE = 100
3) MNIST 데이터 읽어오기
data = input_data.read_data_sets(DATA_DIR, one_hot=True)
MNIST 데이터를 읽어 들이는 read_data_sets()메소드는 데이터를 내려받아 로컬에 저장하여 프로그램에서 사용할 수 있도록 해준다. 하지만 현재(2018.05.30 기준) TensorFlow 1.8 버전에서는 위의 코드를 실행하면 다음과 같은 에러 문구가 나타난다.
  read_data_sets (from tensorflow.contrib.learn.python.learn.datasets.mnist) is deprecated and will be removed in a future version.
  Instructions for updating:
  Please use alternatives such as official/mnist/dataset.py from tensorflow/models.
이러한 Warning을 나타나지 않게 하기위해서 tf.keras.datasets.mnist.load_data()를 이용할 수 있다. 이것을 이용한 코드는 나중에 설명하도록 하겠다.
4) 모델 설정 단계
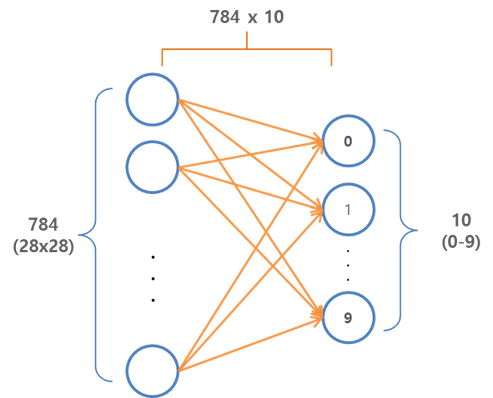
이번 MNIST 분류 예제에서는 아래의 그림처럼 입력(Input)과 출력(Output)사이의 가중치()를 학습하는 모델이다.


  x = tf.placeholder(tf.float32, [None, 784])
  W = tf.Variable(tf.zeros([784, 10]))
-
tf.Variable()은 변수이며 연산 과정에서 값이 변경된다. -
tf.placeholder()은 연산 그래프가 실행될 때 제공되어야 하는 값이라 할 수 있다. 예제에서는 MNIST 이미지는 입력 데이터(x)이며, 연산 그래프가 실행될때 제공된다. -
x = tf.placeholder(tf.float32, [None, 784])에서[None, 784]는 한 이미지의 사이즈가 784(28 * 28)이며 몇개의 이미지 만큼을 입력으로 받을지는 지정하지 않은 것이다. 여기에 입력될 이미지의 개수는 위에서 정의한MINIBATCH_SIZE = 100인 만큼 입력받게 된다.
  y_pred = tf.matmul(x ,W)
  y_true = tf.placeholder(tf.float32, [None, 10])
-
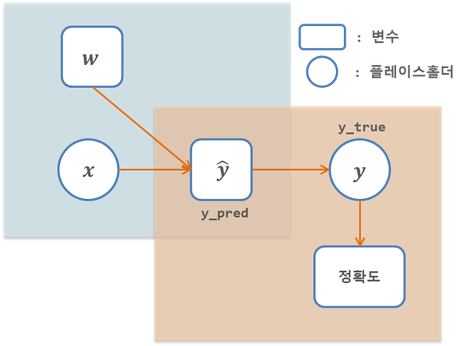
y_pred는 모델이 출력한 결과값 즉, 예측값 -
y_true는 이미지의 실제 레이블(정답) 값
5) 손실함수(Loss Function)
cross_entropy = tf.reduce_mean(
tf.nn.softmax_cross_entropy_with_logits_v2(logits=y_pred, labels=y_true))
gd_step = tf.train.GradientDescentOptimizer(learning_rate=0.5).minimize(cross_entropy)
손실함수로는 교차엔트로피를 사용한다.
gd_step = tf.train.GradientDescentOptimizer(learning_rate=0.5).minimize(cross_entropy)
손실함수를 최소화 하는 방법으로는 경사하강법(Gradient Descent)을 사용한다.
6) 정확도 테스트
  correct_mask = tf.equal(tf.argmax(y_pred, 1), tf.argmax(y_true, 1))
  accuracy = tf.reduce_mean(tf.cast(correct_mask, tf.float32))
정확하게 분류된 테스트 데이터의 비율을 사용한다.
7) 세션을 만들기
위에서 정의한 연산 그래프를 사용하려면 세션을 만들어야 한다. 나머지 과정인 학습 및 정확도 테스트는 모두 세션 내에서 실행된다.
  with tf.Session() as sess:
      # 학습
      # TODO:

      # 테스트
      # TODO:
8) 모든 변수 초기화
먼저 모든 변수를 초기화해야 한다. 초기화 과정은 학습과정에 영향을 주게 되는데 이러한 영향을 많이 받는 모델들이 있는데 이 부분에 대해서는 나중에 자세히 다루게 된다.
sess.run(tf.global_variables_initializer())
9) 학습 단계
경사 하강법을 이용해 학습이 이루어 지는 부분이다. 여기에서 for문을 NUM_STEPS = 1000만큼 반복하면서 학습이 이루어 진다. sess.run()의 인수로 feed_dict를 사용하는데, 이것은 위에서 정의한 tf.placeholder인 x에 MINIBATCH_SIZE=100 개수만큼의 batch_xs (train 데이터에서 임의로 추출한 100개의 이미지)를 x인 tf.placeholder에 값을 주는(feed) 것이다.
  for step in range(NUM_STEPS):
      batch_xs, batch_ys = data.train.next_batch(MINIBATCH_SIZE)
      sess.run(gd_step, feed_dict={x: batch_xs, y_true: batch_ys})
10) 테스트
학습을 마친 모델을 평가하기 위한 정확도를 계산한다.
  ans = sess.run(accuracy, feed_dict={x: data.test.images,
                                      y_true: data.test.labels})
위의 과정을 그래프로 그리면 다음과 같다.
2.5 tf.data.Dataset을 이용한 MNIST 데이터 불러오기
위에서도 말했듯이, 텐서플로 1.8 버전에서
  from tensorflow.examples.tutorials.mnist import input_data
  data = input_data.read_data_sets(DATA_DIR, one_hot=True)
를 실행하면 다음과 같은 경고 문구가 나오게 된다.
  read_data_sets (from tensorflow.contrib.learn.python.learn.datasets.mnist) is deprecated and will be removed in a future version.
  Instructions for updating:
  Please use alternatives such as official/mnist/dataset.py from tensorflow/models.
따라서, 이러한 경고문구가 나오지 않도록 tf.keras.datasets.mnist.load_data() 와 tf.data.Dataset을 이용하여 모델의 입력값에 맞게끔 데이터를 만들어 보도록 하자. 아래의 코드들은 tensorflow.org의 Datasets Quick Start를 참고하여 작성했다. 자세한 내용은 해당링크를 참고하면 된다.
def mnist_load():
(train_x, train_y), (test_x, test_y) = tf.keras.datasets.mnist.load_data()
# Train set
# Image
train_x = train_x.reshape([train_x.shape[0], -1])
train_x = train_x.astype('float32') / 255
# Label
train_y = tf.keras.utils.to_categorical(train_y, num_classes=10)
# Test set
# Image
test_x = test_x.reshape([test_x.shape[0], -1])
test_x = test_x.astype('float32') / 255
# Label
test_y = tf.keras.utils.to_categorical(test_y, num_classes=10)
return (train_x, train_y), (test_x, test_y)
(train_x, train_y), (test_x, test_y) = mnist_load()
buffer_size = train_x.shape[0] + test_x.shape[0]
dataset = tf.data.Dataset.from_tensor_slices(({"image": train_x}, train_y))
dataset = dataset.shuffle(buffer_size).repeat().batch(MINIBATCH_SIZE)
iterator = dataset.make_one_shot_iterator()
next_batch = iterator.get_next()
x = tf.placeholder(tf.float32, [None, 784])
W = tf.Variable(tf.zeros([784, 10]))
y_pred = tf.matmul(x ,W)
y_true = tf.placeholder(tf.float32, [None, 10])
# Cost(Loss) Function
cross_entropy = tf.reduce_mean(
tf.nn.softmax_cross_entropy_with_logits_v2(logits=y_pred, labels=y_true))
# Gradient Step(Optimze)
gd_step = tf.train.GradientDescentOptimizer(learning_rate=0.5).minimize(cross_entropy)
correct_mask = tf.equal(tf.argmax(y_pred, 1), tf.argmax(y_true, 1))
accuracy = tf.reduce_mean(tf.cast(correct_mask, tf.float32))
  %%time
  with tf.Session() as sess:
      # 학습
      sess.run(tf.global_variables_initializer())

      for step in range(NUM_STEPS):
          batch_xs, batch_ys = sess.run(next_batch)
          sess.run(gd_step, feed_dict={x: batch_xs['image'], y_true: batch_ys})

          if(step + 1) % 100 == 0:
              print(step+1, '|', sess.run(cross_entropy, feed_dict={x: batch_xs['image'], y_true: batch_ys}))

      # 테스트
      ans = sess.run(accuracy, feed_dict={x: test_x,
                                         y_true: test_y})

  print("Accuracy: {:.2f}%".format(ans*100))
  100 | 0.31033343
  200 | 0.26896414
  300 | 0.25220472
  400 | 0.2761525
  500 | 0.19281076
  600 | 0.14138816
  700 | 0.25681496
  800 | 0.22324719
  900 | 0.27169204
  1000 | 0.19857246
  Accuracy: 91.79%
  Wall time: 16.1 s
출처: https://excelsior-cjh.tistory.com/149?category=940399 [EXCELSIOR]
광고 클릭에서 발생하는 수익금은 모두 웹사이트 서버의 유지 및 관리, 그리고 기술 콘텐츠 향상을 위해 쓰여집니다.
