
- 전체
- Native Apps
- WinJS App
- C# Apps
- XAML
- VB.net
- VisualC.net
- C++
- MFC
- visual studio mobile app dev
- Azure ms cloud service
- Asp.net
- 인공지능 (AI)
- wpf
- UWP
- MAUI
- asp.net
C# Apps [C# app] Gidon C# 플러그인 프레임워크에 Python 애플리케이션 포함 : Embedding Python Applications within Gidon C# Plugin Framework
2023.03.07 15:08
[C# app] Gidon C# 플러그인 프레임워크에 Python 애플리케이션 포함 : Embedding Python Applications within Gidon C# Plugin Framework

소개
파이썬의 장점
최근에는 파이썬으로 많은 작업을 하고 있습니다. 제 생각에는 Python은 개별 과학자와 개발자에게 훌륭한 언어입니다. 아마도 다른 언어나 패키지보다 더 많은 내장 과학 및 플로팅 라이브러리가 있으며 널리 사용되는 대부분의 Python 라이브러리는 무료입니다.
Python은 매우 단순한 것으로 간주되며 과학자들은 소프트웨어 언어를 배우는 데 많은 시간을 할애하지 않고 자신의 전문 분야에 집중하기를 원하기 때문에 이것을 좋아합니다.
Python의 또 다른 큰 장점은 다중 플랫폼이며 Windows, Linux 및 MacOS에서 정확히 동일하게 작동한다는 것입니다.
Python에는 Python 프로그램을 구축하고 조정하는 동안 소프트웨어와 데이터를 실험할 수 있는 훌륭한 대화형 환경이 있습니다.
Python은 해석된 언어이며 컴파일이 필요하지 않습니다.
파이썬의 단점
일반 파이썬은 인터프리터 언어이기 때문에 상당히 느립니다. 훨씬 빠르게 컴파일되고 실행되는 일부 버전의 Python이 있지만 많이 사용하지는 않습니다. 컴파일된 코드의 성능이 향상됨에 따라 해당 버전의 컴파일 시간이 귀찮아지고 있다고 가정합니다.
Python은 강력한 타이핑이 부족하기 때문에 Intellisense는 JavaScript와 유사하며 C# 또는 Java와 같은 강력한 타이핑 언어보다 훨씬 나쁩니다. 그 때문에 파이썬 라이브러리는 배우기가 더 어려울 수 있습니다.
위에서 언급했듯이 Python은 팀 개발, 플러그인 및 관심사 분리를 위한 뛰어난 기능은 없지만 개인 개발을 위한 훌륭한 언어입니다.
Python 애플리케이션 호스팅을 위한 C# Avalonia Gidon 플러그인 프레임워크 사용
Gidon MVVM Plugin 프레임워크는 Gidon-Avalonia 기반의 MVVM Plugin IoC Container 에 기술되어 있다 . 이 기사에서는 동적으로 로드되는 C# 플러그인을 만드는 방법을 제시합니다.
최근에 저는 Gidon이 별도의 Python 프로세스로 실행되는 Python 창을 호스팅할 수 있는 기능을 추가했습니다.
Python Windows는 Gidon의 일부인 다중 플랫폼 Avalonia UniDock 창 도킹 프레임워크를 사용하여 C#에 이식됩니다. 따라서 Python 창을 함께 도킹하거나 탭하거나 별도의 부동 창으로 끌어올 수 있습니다.
다양한 Python 및 C# 프로세스 간의 통신은 관심사 분리가 있는 게시/구독 gRPC 릴레이 서버RelayServer 에 설명된 대로 수행되며 기본 Avalonia 창을 호스팅하는 C# 프로세스에 의해 실행됩니다.
다음은 3개의 Python 창이 이식된 Gidon 샘플의 모습입니다.
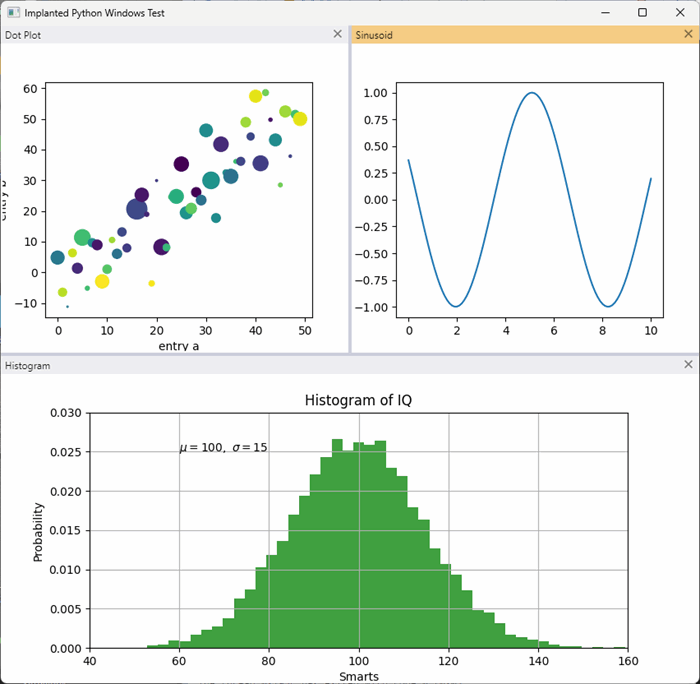
이 샘플의 코드는 아래에서 자세히 설명합니다.
플롯에 대한 Python 코드는 독립 실행형 창을 만들기 위해 PySide6 코드가 추가된 matplotlib 자습서 에서 가져옵니다.
Python 플롯의 헤더를 사용하여 재정렬하거나 일부를 독립 실행형 플로팅 창으로 가져오거나 탭할 수 있습니다. 예를 들면 다음과 같습니다.

위 그림에서 히스토그램은 Dot Plot과 함께 탭으로 표시되고 그 옆에는 Sinusoid가 도킹되어 있습니다.
기사에 사용된 소프트웨어
C# 측에서 오픈 소스 Gidon MVVM 플러그인 패키지는 이제 Python 창 이식에 필요한 다른 모든 것을 통합합니다.
Gidon의 일부로서 저는 WPF의 오픈 소스 C# 다중 플랫폼 버전인 Avalonia를 사용하여 Python 창이 이식될 셸의 UI를 만듭니다.
Gidon 창 도킹 기능은 Avalonia 기반 UniDock 프레임워크 에 의해 지원됩니다 .
matplotlib개별 플롯의 경우 Python UI 라이브러리 와 결합된 Python 라이브러리를 사용합니다 PySide6.
서로 다른 프로세스 간의 통신을 위해 Grpc 기반 릴레이 서버 (Gidon 프레임워크의 일부가 됨)를 사용합니다.
샘플 코드 위치
샘플 코드는 NP.Avalonia.Demos 저장소의 Gidon/DockableAppsDemo 폴더 아래에 있습니다 .
Visual Studio 솔루션 파일(C# 및 Python 코드 모두 포함)은 DockableAppImplantsDemo.sln 의 Gidon/DockableAppsDemo/DockableAppImplantsDemo 폴더 에 있습니다 .
Windows에서 샘플 코드 실행
전제 조건
Windows에서 샘플 코드를 실행하려면 다음 전제 조건이 필요합니다.
- Python 기능이 포함된 Visual Studio 2022. 저는 프로페셔널 에디션을 사용합니다(커뮤니티 추가가 작동하는지 확실하지 않지만 가능성이 높습니다).
- Windows 컴퓨터에 최신 Python3 및 Pip3 버전을 설치해야 합니다(Pip for Python은 Python 패키지를 설치하는 데 사용되며 C#용 nuget과 유사함).
- C# 및 Python 패키지를 설치하려면 작동하는 인터넷 연결이 있어야 합니다.
샘플 코드 구조
샘플 코드는 하나의 기본 C# 프로젝트 와 Apps 솔루션 폴더 DockableAppImplantsDemo아래의 4개의 Python 프로젝트 로 구성됩니다.
CommonPythonDotPyMatPlotHistogramPlotSinusoidPyMatPlot

CommonPython프로젝트는 아래에 설명된 대로 Python 가상 환경을 사용하려는 경우에만 필요합니다.
나머지 Python 프로젝트는 샘플 일대일 내의 다양한 맵에 해당합니다.
기본 Python 환경(Python 가상 환경 없음)의 Windows 시스템에서 샘플 실행
(특별한 가상 환경을 만드는 대신) 기본 Python 환경을 사용하여 샘플을 실행하는 것이 더 쉽지만 기본 Python 환경에 일부 Python 패키지가 추가됩니다.
따라서 기본 Python 환경을 그대로 유지하려면 이 하위 섹션을 건너뛰고 가상 Python 환경을 만들고 샘플에 사용하는 방법을 설명하는 다음 섹션으로 이동하세요.
기본 Python 환경을 사용하고 있으므로 모든 Python 프로젝트에 대해 선택합니다(환경이 하나만 있는 경우 Visual Studio에서 이미 수행해야 함).

프로젝트 중 하나(예: )에서 DotPyMatPlot기본 환경을 마우스 왼쪽 버튼으로 클릭하고 requirements.txt에서 설치 옵션을 선택합니다.

requirements.txt 파일은 모든 프로젝트에서 동일하고 전역적으로 사용 가능한 동일한 환경을 업데이트하고 있으므로 어느 것을 선택하든 상관 없습니다 .
다음은 Python 샘플을 실행하는 데 필요한 모든 패키지를 나열하는 내용 또는 requirements.txt 파일입니다.
cycler==0.11.0
grpcio==1.51.3
kiwisolver==1.4.4
matplotlib==3.7.0
NP.Grpc.PythonMessages==0.99.2
NP.Grpc.PythonRelayInterfaces==0.99.2
numpy==1.24.2
packaging==23.0
Pillow==9.4.0
pip==22.3.1
protobuf==4.22.0
pyparsing==3.0.9
PySide6==6.4.2
PySide6-Addons==6.4.2
PySide6-Essentials==6.4.2
python-dateutil==2.8.2
setuptools==65.5.0
shiboken6==6.4.2
six==1.16.0
주요 패키지는 다음과 같습니다.
matplotlib- 플롯 생성numpy- 플롯에 대한 데이터 계산PySide6- UI 창 구축 및 (필요한 경우 버튼 및 기타 공통 UI 컨트롤 추가)NP.Grpc.PythonRelayInterfaces- RelayServer와의 일반 통신 메커니즘용NP.Grpc.PythonMessagesWindowInfo- 릴레이 서버에 대한 창 핸들을 전달하는 특정 메시지의 경우
DotPyMatPlotPython 패키지를 설치한 후 예를 들어 오른쪽 마우스를 클릭 하고 Debug -> Start New Instance를 선택하여 개별 Python 프로젝트가 실행되는지 확인할 수 있습니다 .

해당 플롯이 포함된 Python 애플리케이션이 팝업되어야 합니다.

Python 애플리케이션은 독립 실행형(명령줄 인수 부족으로 인해)을 감지하고 C# 프로젝트의 일부이며 Python 프로젝트만 시작될 때 실행되지 않는 릴레이 서버를 호출하려고 시도하지 않습니다.
Python 프로그램을 종료합니다(아직 실행 중인 경우).
기본 프로젝트를 마우스 오른쪽 버튼으로 클릭 DockableAppImplantsDemo하고 Rebuild 를 선택합니다 .
빌드가 성공할 때까지 기다렸다가 기본 프로젝트를 실행합니다.

이제 다른 순서로 플롯을 드래그하고 도킹하고 탭하여 플롯을 가지고 놀 수 있습니다.
Python 프로젝트에 가상 환경 사용
기본 Python 환경을 수정하지 않으려면 여전히 CommonPython프로젝트 내에서 가상 환경을 만들고 호출하고 활성화하고 requirements.txtenv 에서 패키지를 설치하면 모든 Python 프로젝트가 이름으로 선택합니다 .env
특별히 호출된 가상 환경을 만들어야 합니다. env그렇지 않으면 미리 정의된 검색 경로가 작동하지 않습니다. 전역적으로 사용 가능한 환경이 이미 있고 env이를 변경하지 않으려면 다른 이름의 가상 환경을 만든 다음 모든 Python 프로젝트의 검색 경로를 수정할 수 있습니다. 예:

또한 각 프로젝트의 코드, 특히 줄을 약간 수정해야 합니다.
sys.path.append(r'..\CommonPython\env\Lib\site-packages')
올바른 환경 경로를 가리키도록 수정해야 합니다.
CommonPython프로젝트 아래에 새 환경을 만들려면 Python 환경을 마우스 오른쪽 버튼으로 클릭 하고 환경 추가를 선택합니다 .

열린 대화 상자에서 Python 환경 창에서 보기를 클릭 한 다음 만들기 버튼을 클릭합니다.

프로젝트의 Python 환경 아래에 환경이 표시되려면 몇 초 정도 기다려야 할 수 있습니다 . 마우스 오른쪽 버튼을 클릭하고 환경 활성화를 선택합니다 .

새 환경은 requirements.txt 에서 자동으로 채워져야 합니다 . 확장하여 패키지 콘텐츠를 확인하고 채워지지 않은 경우 마우스 오른쪽 버튼을 클릭하고 requirements.txt에서 설치를 선택합니다 .
DockableAppImplantsDemo이제 이전 하위 섹션에서 설명한 대로 Python 프로젝트를 개별적으로 테스트하고 기본 C# 프로젝트를 빌드하고 시작할 수 있습니다 .
코드 설명
여기서는 Python 앱을 C# 셸에 포함할 수 있는 C# 및 Python 코드에 대해 설명합니다.
기본 C# 프로젝트의 코드 DockableAppImplantsDemo
샘플의 기본 C# 프로젝트는 네 가지 nuget 패키지에 따라 다릅니다.
NP.Avalonia.Gidon- 주요 의존성NP.Grpc.RelayClientRelayServer- 클라이언트 구현NP.Grpc.RelayServer- 구현RelayServerXamlNameReferenceGenerator- XAML 코드 구문 분석에 필요한 Avalonia 파일
위에 나열된 프로젝트 중 플러그인으로 설치 NP.Grpc.RelayClient됩니다 ( Nuget 패키지로 플러그인 생성 및 설치NP.Grpc.RelayServer 에 설명된 대로 ). 즉, 해당 구현 코드는 샘플 프로그램에서 사용할 수 없으며 패키지의 일부로 패키지 에서 제공하는 인터페이스만 사용할 수 있습니다 .NP.Grpc.CommonRelayInterfacesNP.Avalonia.Gidon
파일 App.axaml 에는 (평소와 같이) 응용 프로그램 전체에서 공유되는 공통 스타일에 대한 참조가 포함되어 있습니다.
<Application xmlns="https://github.com/avaloniaui"
             xmlns:x="http://schemas.microsoft.com/winfx/2006/xaml"
             x:Class="DockableAppImplantsDemo.App">
    <Application.Styles>
		<StyleInclude Source="avares://Avalonia.Themes.Default/Accents/BaseLight.xaml"/>
		<StyleInclude Source="avares://Avalonia.Themes.Default/DefaultTheme.xaml"/>
		<StyleInclude Source="avares://NP.Avalonia.Visuals/Themes/CustomWindowStyles.axaml"/>
		<StyleInclude Source="avares://NP.Avalonia.UniDock/Themes/DockStyles.axaml"/>
    </Application.Styles>
</Application>
App.axaml.cs 파일은 IoC 제공 플러그인에서 빌드 RelayServer및 개체를 만드는 방법을 정의하므로 훨씬 더 흥미롭습니다 . RelayClient또한 WindowHandleMatcher유형의 객체를 관찰하는 객체를 생성합니다.
public class WindowInfo
{
   long WindowHandle { get; }
   string UniqueWindowHostId { get; }
}
Python 프로그램에서 도착했습니다. 적절한 핸들이 있는 Windows를 호스트 개체에 삽입하는 데 사용되는 개체 내에서 에 대한 참조가 WindowHandleMatcher제공됩니다 ( MainWindow.axamlMultiPlatformProcessInitInfoWithMatcher 파일 을 볼 때 설명됨 ).
다음은 App.axaml.cs 파일 의 문서화된 흥미로운 부분입니다 .
public class App : Application
{
    // IoC Container
    private static IDependencyInjectionContainer<Enum> IoCContainer { get; }

    // IRelayServer (provided so that we could shut it down when the program shuts down)
    private static IRelayServer TheRelayServer { get; }

    // IRelayClient used for getting WindowHandles from the python windows
    // started in different processes
    private static IRelayClient TheRelayClient { get; }

    // Window handle matcher - matches the window handle with the unique
    // window host id
    public static WindowHandleMatcher TheWindowHandleMatcher { get; }

    static App()
    {
        // create the container builder
        IContainerBuilderWithMultiCells<Enum> containerBuilder =
                                              new ContainerBuilder<Enum>();

        // register a multicell that can container several different Enum values
        // corresponding to the various topics of the RelayServer.
        // Here we use only one topic - WindowInfoTopic the allows to publish
        // and subscribe object of WindowInfo type
        // (contained within NP.Gidon.Message package) that
        // provide the WindowHandle (of type long) and UniqueWindowHostId
        // (or type string)
        containerBuilder.RegisterMultiCell(typeof(Enum), IoCKeys.Topics);

        // provides an object for determining Grpc server host and port
        // (in our simple case they are hardcoded to "localhost"
        // and 5051 correspondingly)
        containerBuilder.RegisterType<IGrpcConfig, GrpcConfig>();

        // provides the topics MultiCell (only one topic WindowInfoTopic - in our case)
        containerBuilder.RegisterAttributedStaticFactoryMethodsFromClass
                         (typeof(MessagesTopicsGetter));

        // picks up the RelayServer and RelayClient implementations
        // as plugins from Plugins/Services folder
        containerBuilder.RegisterPluginsFromSubFolders("Plugins/Services");

        // builds the IoC Container
        IoCContainer = containerBuilder.Build();

        // gets a reference to the Relay Server from the container
        TheRelayServer = IoCContainer.Resolve<IRelayServer>();

        // gets a reference to the RelayClient from the container
        TheRelayClient = IoCContainer.Resolve<IRelayClient>();

        // gets the WindowHandleMatcher - an object that observes the
        // RelayServer from WindowInfo objects
        // and fires events matching the UniqueWindowHostId and the
        // WindowHandle every time
        // such objects arrive
        TheWindowHandleMatcher = new WindowHandleMatcher(TheRelayClient);
    }

    ...
}
그러나 실제 고기는 MainWindow.axaml 파일 에 있습니다 . 각 플롯에 하나씩 3개의 간단한 UniDock 그룹을 정의합니다 DockItems. 상단에 2개의 도크 항목과 하단에 1개의 도크 항목이 있습니다.
UniDock 프레임워크에 대한 자세한 내용은 UniDock - 새로운 다중 플랫폼 UI 도킹 프레임워크를 참조하십시오. UniDock 전원 기능.
각각의 내용은 DockItems매우 유사하며 다른 Python 프로그램을 호출하는 데만 사용되므로 그중 하나만 설명하겠습니다.
<np:DockItem Header="Dot Plot" DockId="DockPlot">
    <np:DockItemImplantedWindowHost x:Name="TheWindowHostContainer1"
                                    Margin="2"
                                    HorizontalAlignment="Stretch"
                                    VerticalAlignment="Stretch">
        <np:DockItemImplantedWindowHost.ProcessInitInfo>
            <np:MultiPlatformProcessInitInfoWithMatcher UniqueWindowHostId="DotPlot"
             TheWindowHandleMatcher="{x:Static local:App.TheWindowHandleMatcher}">
                <np:MultiPlatformProcessInitInfoWithMatcher.WindowsProcInitInfo>
                    <np:ProcessInitInfo ExePath="pythonw"
                     WorkingDir="../../../../Apps/DotPyMatPlot/" InsertIdx="1">
                        <np:ProcessInitInfo.Args>
                            <x:String>DotPyMatPlot.py</x:String>
                        </np:ProcessInitInfo.Args>
                    </np:ProcessInitInfo>
                </np:MultiPlatformProcessInitInfoWithMatcher.WindowsProcInitInfo>
                <np:MultiPlatformProcessInitInfoWithMatcher.LinuxProcInitInfo>
                    <np:ProcessInitInfo ExePath="python3"
                     WorkingDir="../../../../Apps/DotPyMatPlot/" InsertIdx="1">
                        <np:ProcessInitInfo.Args>
                            <x:String>DotPyMatPlot.py</x:String>
                        </np:ProcessInitInfo.Args>
                    </np:ProcessInitInfo>
                </np:MultiPlatformProcessInitInfoWithMatcher.LinuxProcInitInfo>
            </np:MultiPlatformProcessInitInfoWithMatcher>
        </np:DockItemImplantedWindowHost.ProcessInitInfo>
    </np:DockItemImplantedWindowHost>
</np:DockItem>
각 개체에는 개체를 포함하도록 설정된 속성을 통해 릴레이 클라이언트와의 통신을 처리하는 DockItem유형의 개체가 포함되어 있습니다 . 후자의 개체는 (응용 프로그램에 대해 고유해야 함) 및 개체 에 대한 참조를 포함하는 -를 포함합니다 .DockItemImplantedWindowHostProcessInitInfoMultiPlatformProcessInitInfoWithMatcherUniqueWindowHostIdTheWindowHandleMatcherWindowHandleMatcher
또한 해당 OS에서 프로세스를 시작하는 방법을 정의하는 여러 속성이 있습니다. 예를 들어 WindowProcInitInfoWindows에서 프로세스를 시작하는 방법을 지정하고 LinuxProcInitInfoLinux에서는 -를 지정합니다.
예를 들어 다음 WindowProcInitInfo과 같이 설정합니다.
<np:ProcessInitInfo ExePath="pythonw"
 WorkingDir="../../../../Apps/DotPyMatPlot/" InsertIdx="1">
    <np:ProcessInitInfo.Args>
        <x:String>DotPyMatPlot.py</x:String>
    </np:ProcessInitInfo.Args>
</np:ProcessInitInfo>
즉, Windows에서 Python 프로세스를 시작하는 명령은 pythonw(콘솔 없이 Python 창을 시작할 수 있는 명령입니다.) Python 프로세스가 시작되는 폴더는 ../../../../Apps/DotPyMatPlot 입니다. / , Unique Window Host Id 가 index 에 삽입되고 1Python 프로그램이 시작됩니다 DotPyMapPlot.py .
따라서 Python 프로세스를 시작하는 전체 라인은 다음과 같습니다.
pythonw ../../../../Apps/DotPyMatPlot/DotPyMatPlot.py DotPlot
여기서 DotPlot는 현재의 고유 창 호스트 ID입니다 DockItem.
WindowHandleMatcher인스턴스가 static객체에 연결되어 있는 객체는 (Python 프로세스에 의해 게시된) 객체가 도착할 MultiPlatformProcessInitInfoWithMatcher때 이벤트를 발생시킨다는 것을 기억하십시오 .WindowInfoRelayServer
개체 는 속성 이 일치하는 개체를 MultiPlatformProcessInitInfoWithMatcher감시 하고 이러한 개체가 도착하면 해당 속성을 사용하여 Python 창을 현재 개체에 삽입합니다.WindowInfoUniqueWindowHostIdWindowHandleDockItem
파이썬 코드
세 개의 Python 프로젝트는 모두 매우 유사하므로 여기서는 그중 DotPyMatPlog.py 하나만 설명하겠습니다 .
다음은 프로그램의 문서화된 코드입니다.
imports ...
class ApplicationWindow(QtWidgets.QMainWindow):
    def __init__(self):
        super().__init__()
        # create QWidget, its layout and canvas for the figure
        self._main = QtWidgets.QWidget()
        self.setCentralWidget(self._main)
        layout = QtWidgets.QVBoxLayout(self._main)
        layout.setContentsMargins(0,0,0,0)
        canvas = FigureCanvas()
        layout.addWidget(canvas)

        # generate data for the plot
        np.random.seed(19680801)
        data = {'a': np.arange(50),
                'c': np.random.randint(0, 50, 50),
                'd': np.random.randn(50)}
        data['b'] = data['a'] + 10 * np.random.randn(50)
        data['d'] = np.abs(data['d']) * 100
        #end generate data for the plot

        # create plot
        plt = canvas.figure.subplots()
        #paint the dots
        plt.scatter('a', 'b', c='c', s='d', data=data)

        #set the names of the axes of the plot
        plt.set_xlabel('entry a')
        plt.set_ylabel('entry b')

def main(argv):
    sys.path.append(r'..\CommonPython\env\Lib\site-packages')

    import Messages_pb2 as messages

    # Check whether there is already a running QApplication (e.g., if running
    # from an IDE).
    qapp = QtWidgets.QApplication.instance()
    if not qapp:
        qapp = QtWidgets.QApplication(sys.argv)

    #create and show the window
    app = ApplicationWindow()
    app.show()
    app.activateWindow()

    # get the handle of the window
    winhandle = int(app.winId())
    print(winhandle);

    # argument means that the Python program is started from the C# code
    if len(argv) > 0:
        app.unique_window_host_id = argv[0]; #unique window host id

        #create Relay Client
        broadcastingClient = BroadcastingRelayClient("localhost", 5051)

        # connect the relay client to the server
        broadcastingClient.connect_if_needed()

        # create the WindowInfo object containing the UniqueWindowHostId
        # and the WindowHandle
        winInfo = messages.WindowInfo(WindowHandle=winhandle,
                  UniqueWindowHostId=app.unique_window_host_id)

        #publish the WindowInfo object to the Relay Server
        broadcastingClient.broadcast_object(winInfo, "WindowInfoTopic", 1)

    app.raise_()
    qapp.exec()

if __name__ == "__main__":
    main(sys.argv[1:])
기본적으로 데이터를 생성한 다음 QT 창 내에서 (산란) 플롯으로 표시합니다.
프로그램에 대한 명령줄 인수가 있는 경우 우리는 그것이 이라고 가정하고 UniqueWindowHostId" "에서 실행 중인 서버에 연결 하고 를 호출하여 결정한 및 로 구성된 localhost:5051서버에 다시 게시합니다 .WindowInfoUniqueWindowHostIdWindowHandlewinhandle = int(app.winId())
Linux에서 샘플 실행(Ubuntu - fluxbox)
불행하게도 Linux - Gnome 환경은 창 이식을 방해합니다. 이것은 내가 Avalonia와 나 사이에서 해결하려고 하는 것입니다. 따라서 이 시점에서 플럭스박스에 이식된 애플리케이션만 실행할 수 있습니다.
먼저 Linux에 dotnet 6.0, python3, pip3 및 python3-tk(PySide6용)를 설치해야 합니다. Ubuntu에 설치하는 명령은 다음과 같습니다.
sudo apt-get install -y dotnet-sdk-6.0
sudo apt install python3
sudo apt install python3-pip
sudo apt-get install python3-tk
필요한 경우 암호를 제공하십시오.
그런 다음 다음을 입력하여 Linux 패키지를 설치합니다.
pip3 install numpy
pip3 install matplotlib
pip3 install grpcio
pip3 install NP.Grpc.PythonRelayInterfaces
pip3 install NP.Grpc.PythonMessages
pip3 install PySide6
pip3 install --upgrade protobuf
이유는 모르겠지만 protobuf제 경우에는 업그레이드가 필요했습니다.
Linux에서 샘플을 실행하려면 Windows에서 샘플을 컴파일한 다음 솔루션의 전체 폴더 구조를 Linux에 복사해야 합니다.
<RootDir>DockableAppsDemo/DockableAppImplantsDemo/bin/Debug/net6.0 으로 cd 하고 다음을 실행합니다.
dotnet DockableAppImplantsDemo.dll
표시되는 내용은 다음과 같습니다.

응용 프로그램을 빌드하는 데 사용되는 모든 구성 요소(C# 및 Python)가 다중 플랫폼이기 때문에 전체 응용 프로그램은 Windows와 매우 유사한 방식으로 Linux에 표시됩니다.
불행하게도 UniDock은 현재 Linux에서 도킹 가능한 창을 이동하는 데 몇 가지 문제가 있으므로 개별 플롯을 다시 도킹할 수 없습니다. 이러한 문제를 곧 해결할 계획이므로 모든 OS에서 윈도우 도킹이 제대로 작동해야 합니다.
-----------------------------------------------------------
Embedding Python Applications within Gidon C# Plugin Framework


Introduction
Advantages of Python
Recently, I've been working a lot with Python. My opinion is that Python is a great language for individual scientists and developers. It has probably more built-in scientific and plotting libraries than any other language or package and most of the widely used Python libraries are free.


Python is considered very simple and the scientists love this, since they want to concentrate on their area of expertise and not spend a lot of time learning a software language.
Another great advantage of Python is that it is multiplatform and works exactly the same on Windows, Linux and MacOS.
Python has great interactive environments allowing to experiment with software and data while building and tuning Python programs.
Python is an interpreted language and does not require compilation.
Shortcomings of Python
General Python is an interpreted language and because of that is pretty slow. There are some versions of Python that are compiled and run much faster but not many are using them. I assume that the compilation time for those versions is becoming bothersome as the performance of the compiled code improves.
Because of Python's lack of strong typing, its intellisense is akin to JavaScript and much worse than in strongly typed languages like C# or Java. Because of that, Python libraries can be more difficult to learn.
As was mentioned above, Python is a great language for individual development, though it does not have great capabilities for team development, plugins and separation of concerns.
Using C# Avalonia Gidon Plugin Framework for Hosting Python Applications
Gidon MVVM Plugin framework has been described in Gidon - Avalonia based MVVM Plugin IoC Container. In that article, I present a way to create dynamically loaded C# plugins.
Recently, I've added an ability for Gidon to also host Python windows run as separate Python processes.
The Python Windows are implanted into C# by using multiplatform Avalonia UniDock window docking framework which is part of Gidon. The Python windows, thus can be docked or tabbed together or pulled into separate floating windows.
Communications between various Python and C# processes is done via a RelayServer described in Publish/Subscribe gRPC Relay Server with Separation of Concerns and run by the C# process that hosts the main Avalonia window.
Here is the how Gidon sample with three implanted Python windows looks:
The code for this sample will be described in detail below.
The Python code for the plots is taken from matplotlib tutorials with added PySide6 code to make standalone windows out of them.
One can use the headers of the Python plots to rearrange them, pull some of them out into stand-alone floating windows or tab them, e.g.:
On the picture above, histogram is tabbed together with the Dot Plot while the Sinusoid is docked next to them.
Software Used in the Article
On the C# side, open source Gidon MVVM Plugin Package now incorporates everything else required for the implanting Python windows.
As part of Gidon, I use Avalonia - an open source C# multiplatform version of WPF to create the UI of the Shell into which the Python windows will be implanted.
Gidon window docking functionality is fuelled by Avalonia based UniDock framework.
For individual plots, I use Python matplotlib library combined with PySide6 Python UI library.
For communications between different processes, I use the Grpc based Relay Server (which became part of Gidon framework).
Sample Code Location
The sample code is located under Gidon/DockableAppsDemo folder of NP.Avalonia.Demos repository.
The Visual Studio solution file (that includes both the C# and the Python code) is located within Gidon/DockableAppsDemo/DockableAppImplantsDemo folder at DockableAppImplantsDemo.sln.
Running Sample Code on Windows
Prerequisites
In order to run the sample code on Windows, you need the following prerequisites:
- Visual Studio 2022 with Python capability. I use professional edition (not sure if community addition would work, but most likely - yes).
- You should install the latest Python3 and Pip3 versions on your Windows machine (Pip for Python is used to install Python packages - similar to nuget for C#).
- You should have a functional internet connection for installing C# and Python packages.
Sample Code Structure
The code of the sample consists of one main C# project - DockableAppImplantsDemo and four Python project under Apps solution folder:
CommonPythonDotPyMatPlotHistogramPlotSinusoidPyMatPlot
CommonPython project is only needed if you want to use a Python Virtual environment as will be explained below.
The rest of the Python projects correspond to various maps within the sample one-to-one.
Running the Sample on your Windows Machine in your Main Python Environment (without Python Virtual Environment)
Running the sample using your main Python environment (instead of creating a special virtual environment) is easier, but it will add some Python packages to your main Python environment.
So if you care to preserve your main Python environment as it was, skip this sub-section and go to the next one explaining how to create a Virtual Python Environment and use it for the sample.
Since you are using the Main Python Environment, choose it for every Python project (if you have only one environment, the Visual Studio should have done it for you already):
In one of the projects, e.g., DotPyMatPlot, left click on the main environment and choose Install from requirements.txt option:
Since requirements.txt files are the same in every project and since you are updating the same globally available environment, it does not matter which one you choose.
Here is the content or any of the requirement.txt files listing all the packages needed for the Python samples to run:
cycler==0.11.0
grpcio==1.51.3
kiwisolver==1.4.4
matplotlib==3.7.0
NP.Grpc.PythonMessages==0.99.2
NP.Grpc.PythonRelayInterfaces==0.99.2
numpy==1.24.2
packaging==23.0
Pillow==9.4.0
pip==22.3.1
protobuf==4.22.0
pyparsing==3.0.9
PySide6==6.4.2
PySide6-Addons==6.4.2
PySide6-Essentials==6.4.2
python-dateutil==2.8.2
setuptools==65.5.0
shiboken6==6.4.2
six==1.16.0
The key packages are:
matplotlib- for creating the plotsnumpy- for calculating the data for the plotsPySide6- for building the UI window and (if needed adding buttons and other common UI controls)NP.Grpc.PythonRelayInterfaces- for generic communication mechanism with the RelayServerNP.Grpc.PythonMessages- for a specificWindowInfomessage carrying the Window Handle to the Relay Server
After you install Python packages, you can check that the individual Python projects run, by e.g., right mouse clicking on DotPyMatPlot and choosing Debug->Start New Instance:
The Python application containing the corresponding plot should popup:
The Python application detects that it is stand alone (due to a lack of command line argument) and does not try to call the Relay Server which is part of the C# project and is not running when only Python project is started.
Kill the Python program (if still running).
Right click on the main project DockableAppImplantsDemo and choose Rebuild.
Wait for the successful build and run the main project:
Now you can play with the plots by dragging the out, docking and tabbing them in different order.
Using a Virtual Environment for Python Projects
If you do not want to modify your main Python environment, you can still create a Virtual environment within CommonPython project, call it env, activate it, install the packages from requirements.txt to it and all Python projects will pick it up by env name.
Note that you have to create a virtual environment specifically called env otherwise the predefined search paths will not work. If you already have a globally available env environment and do not want to change it, you can create a virtual environment of different names and then modify the Search Paths of all the Python projects, e.g.
Also, you'll have to slightly modify the code of each project - specifically lines:
sys.path.append(r'..\CommonPython\env\Lib\site-packages')
will have to be modified to point to the correct environment path.
To create a new environment under CommonPython project, right click on its Python Environments and choose Add Environment:
In the opened dialog, click View in Python environments window and then click Create button:
You might need to wait several seconds in order for the environment to appear under Python Environments of the project. Right mouse click on it and choose Activate Environment:
The new environment should be populated automatically from requirements.txt, expand it to check its package content and if it is not populated - right mouse click on it and choose Install from requirements.txt.
Now you can test the Python projects individually and build and start the main C# project DockableAppImplantsDemo as was described in the previous sub-section.
Explanations of the Code
Here, I explain both the C# and Python code that allows embedding Python apps into a C# shell.
Code for the Main C# Project DockableAppImplantsDemo
The main C# project of the sample depends on four nuget packages:
NP.Avalonia.Gidon- the main dependencyNP.Grpc.RelayClient- implementation of theRelayServerclientNP.Grpc.RelayServer- implementation of theRelayServerXamlNameReferenceGenerator- Avalonia file needed for parsing XAML code
Out of the projects listed above, NP.Grpc.RelayClient and NP.Grpc.RelayServer are installed as plugins (as was described in Creating and Installing Plugins as Nuget Packages). This means that their implementation code is not available to the sample program, only their interfaces provided by NP.Grpc.CommonRelayInterfaces package as part of NP.Avalonia.Gidon package.
File App.axaml contains (as usual) the reference to common styles shared across the application:
<Application xmlns="https://github.com/avaloniaui"
             xmlns:x="http://schemas.microsoft.com/winfx/2006/xaml"
             x:Class="DockableAppImplantsDemo.App">
    <Application.Styles>
		<StyleInclude Source="avares://Avalonia.Themes.Default/Accents/BaseLight.xaml"/>
		<StyleInclude Source="avares://Avalonia.Themes.Default/DefaultTheme.xaml"/>
		<StyleInclude Source="avares://NP.Avalonia.Visuals/Themes/CustomWindowStyles.axaml"/>
		<StyleInclude Source="avares://NP.Avalonia.UniDock/Themes/DockStyles.axaml"/>
    </Application.Styles>
</Application>
App.axaml.cs file is considerably more interesting as it defines a way to build RelayServer and RelayClient objects from IoC provided plugins. It also creates WindowHandleMatcher object that observes the objects of type:
public class WindowInfo
{
   long WindowHandle { get; }
   string UniqueWindowHostId { get; }
}
arrived from the Python programs. A reference to the WindowHandleMatcher is provided within MultiPlatformProcessInitInfoWithMatcher objects that are used for inserting the Windows with the proper handle into their host objects (as will be explained when we look at MainWindow.axaml file).
Here is the documented interesting part of the App.axaml.cs file:
public class App : Application
{
    // IoC Container
    private static IDependencyInjectionContainer<Enum> IoCContainer { get; }

    // IRelayServer (provided so that we could shut it down when the program shuts down)
    private static IRelayServer TheRelayServer { get; }

    // IRelayClient used for getting WindowHandles from the python windows
    // started in different processes
    private static IRelayClient TheRelayClient { get; }

    // Window handle matcher - matches the window handle with the unique
    // window host id
    public static WindowHandleMatcher TheWindowHandleMatcher { get; }

    static App()
    {
        // create the container builder
        IContainerBuilderWithMultiCells<Enum> containerBuilder =
                                              new ContainerBuilder<Enum>();

        // register a multicell that can container several different Enum values
        // corresponding to the various topics of the RelayServer.
        // Here we use only one topic - WindowInfoTopic the allows to publish
        // and subscribe object of WindowInfo type
        // (contained within NP.Gidon.Message package) that
        // provide the WindowHandle (of type long) and UniqueWindowHostId
        // (or type string)
        containerBuilder.RegisterMultiCell(typeof(Enum), IoCKeys.Topics);

        // provides an object for determining Grpc server host and port
        // (in our simple case they are hardcoded to "localhost"
        // and 5051 correspondingly)
        containerBuilder.RegisterType<IGrpcConfig, GrpcConfig>();

        // provides the topics MultiCell (only one topic WindowInfoTopic - in our case)
        containerBuilder.RegisterAttributedStaticFactoryMethodsFromClass
                         (typeof(MessagesTopicsGetter));

        // picks up the RelayServer and RelayClient implementations
        // as plugins from Plugins/Services folder
        containerBuilder.RegisterPluginsFromSubFolders("Plugins/Services");

        // builds the IoC Container
        IoCContainer = containerBuilder.Build();

        // gets a reference to the Relay Server from the container
        TheRelayServer = IoCContainer.Resolve<IRelayServer>();

        // gets a reference to the RelayClient from the container
        TheRelayClient = IoCContainer.Resolve<IRelayClient>();

        // gets the WindowHandleMatcher - an object that observes the
        // RelayServer from WindowInfo objects
        // and fires events matching the UniqueWindowHostId and the
        // WindowHandle every time
        // such objects arrive
        TheWindowHandleMatcher = new WindowHandleMatcher(TheRelayClient);
    }

    ...
}
The real meat, however, is located within MainWindow.axaml file. It defines a simple UniDock groups with three DockItems - one for each plot. Two dock items at the top and one at the bottom.
To learn more about UniDock framework, please read UniDock - A New Multiplatform UI Docking Framework. UniDock Power Features.
The contents of each one of the DockItems are very similar, only are used to invoke different Python programs so I shall only explain one of them:
<np:DockItem Header="Dot Plot" DockId="DockPlot">
    <np:DockItemImplantedWindowHost x:Name="TheWindowHostContainer1"
                                    Margin="2"
                                    HorizontalAlignment="Stretch"
                                    VerticalAlignment="Stretch">
        <np:DockItemImplantedWindowHost.ProcessInitInfo>
            <np:MultiPlatformProcessInitInfoWithMatcher UniqueWindowHostId="DotPlot"
             TheWindowHandleMatcher="{x:Static local:App.TheWindowHandleMatcher}">
                <np:MultiPlatformProcessInitInfoWithMatcher.WindowsProcInitInfo>
                    <np:ProcessInitInfo ExePath="pythonw"
                     WorkingDir="../../../../Apps/DotPyMatPlot/" InsertIdx="1">
                        <np:ProcessInitInfo.Args>
                            <x:String>DotPyMatPlot.py</x:String>
                        </np:ProcessInitInfo.Args>
                    </np:ProcessInitInfo>
                </np:MultiPlatformProcessInitInfoWithMatcher.WindowsProcInitInfo>
                <np:MultiPlatformProcessInitInfoWithMatcher.LinuxProcInitInfo>
                    <np:ProcessInitInfo ExePath="python3"
                     WorkingDir="../../../../Apps/DotPyMatPlot/" InsertIdx="1">
                        <np:ProcessInitInfo.Args>
                            <x:String>DotPyMatPlot.py</x:String>
                        </np:ProcessInitInfo.Args>
                    </np:ProcessInitInfo>
                </np:MultiPlatformProcessInitInfoWithMatcher.LinuxProcInitInfo>
            </np:MultiPlatformProcessInitInfoWithMatcher>
        </np:DockItemImplantedWindowHost.ProcessInitInfo>
    </np:DockItemImplantedWindowHost>
</np:DockItem>
Each DockItem object contains an object of type DockItemImplantedWindowHost which takes care of communications with the Relay Client via its ProcessInitInfo property set to contain MultiPlatformProcessInitInfoWithMatcher object. The latter object contains the UniqueWindowHostId (which should be unique for the application) and a TheWindowHandleMatcher - containing a reference to the WindowHandleMatcher object.
It also has several properties defining how to start the process on the corresponding OS. For example, WindowProcInitInfo specifies how to start the process on Window, while LinuxProcInitInfo - on Linux.
For example, WindowProcInitInfo set to:
<np:ProcessInitInfo ExePath="pythonw"
 WorkingDir="../../../../Apps/DotPyMatPlot/" InsertIdx="1">
    <np:ProcessInitInfo.Args>
        <x:String>DotPyMatPlot.py</x:String>
    </np:ProcessInitInfo.Args>
</np:ProcessInitInfo>
means that the command that starts the python process on Windows is pythonw (this is the command that can start python window without console), the folder in the Python process is started is ../../../../Apps/DotPyMatPlot/, the Unique Window Host Id is inserted at index 1 and the Python program started is DotPyMapPlot.py.
So the total line starting Python process is:
pythonw ../../../../Apps/DotPyMatPlot/DotPyMatPlot.py DotPlot
where DotPlot is the Unique Window Host Id of the current DockItem.
Remember that the WindowHandleMatcher whose static instance is connected to our MultiPlatformProcessInitInfoWithMatcher object will fire an event when a WindowInfo object arrives from the RelayServer (published to it by the Python process).
The MultiPlatformProcessInitInfoWithMatcher object will watch for WindowInfo objects with matching UniqueWindowHostId property and when such object arrives, it will use its WindowHandle property to insert the Python window into the current DockItem object.
Python Code
All three Python projects are very similar, so, here I shall describe only one of them - DotPyMatPlog.py.
Here is the documented code of the program:
imports ...
class ApplicationWindow(QtWidgets.QMainWindow):
    def __init__(self):
        super().__init__()
        # create QWidget, its layout and canvas for the figure
        self._main = QtWidgets.QWidget()
        self.setCentralWidget(self._main)
        layout = QtWidgets.QVBoxLayout(self._main)
        layout.setContentsMargins(0,0,0,0)
        canvas = FigureCanvas()
        layout.addWidget(canvas)

        # generate data for the plot
        np.random.seed(19680801)
        data = {'a': np.arange(50),
                'c': np.random.randint(0, 50, 50),
                'd': np.random.randn(50)}
        data['b'] = data['a'] + 10 * np.random.randn(50)
        data['d'] = np.abs(data['d']) * 100
        #end generate data for the plot

        # create plot
        plt = canvas.figure.subplots()
        #paint the dots
        plt.scatter('a', 'b', c='c', s='d', data=data)

        #set the names of the axes of the plot
        plt.set_xlabel('entry a')
        plt.set_ylabel('entry b')

def main(argv):
    sys.path.append(r'..\CommonPython\env\Lib\site-packages')

    import Messages_pb2 as messages

    # Check whether there is already a running QApplication (e.g., if running
    # from an IDE).
    qapp = QtWidgets.QApplication.instance()
    if not qapp:
        qapp = QtWidgets.QApplication(sys.argv)

    #create and show the window
    app = ApplicationWindow()
    app.show()
    app.activateWindow()

    # get the handle of the window
    winhandle = int(app.winId())
    print(winhandle);

    # argument means that the Python program is started from the C# code
    if len(argv) > 0:
        app.unique_window_host_id = argv[0]; #unique window host id

        #create Relay Client
        broadcastingClient = BroadcastingRelayClient("localhost", 5051)

        # connect the relay client to the server
        broadcastingClient.connect_if_needed()

        # create the WindowInfo object containing the UniqueWindowHostId
        # and the WindowHandle
        winInfo = messages.WindowInfo(WindowHandle=winhandle,
                  UniqueWindowHostId=app.unique_window_host_id)

        #publish the WindowInfo object to the Relay Server
        broadcastingClient.broadcast_object(winInfo, "WindowInfoTopic", 1)

    app.raise_()
    qapp.exec()

if __name__ == "__main__":
    main(sys.argv[1:])
Essentially, we generate data and then display it as a (scatter) plot within the QT window.
If there is a command line argument to the program, we assume that it is the UniqueWindowHostId, connect to the server running at "localhost:5051" and publish back to the server WindowInfo consisting of the UniqueWindowHostId and WindowHandle which we determine by calling winhandle = int(app.winId()).
Running the Sample on Linux (Ubuntu - fluxbox)
Unfortunately Linux - Gnome environment screws us the window implanting. This is something I am trying to resolve between Avalonia and myself. So, at this point, I can only run implanted application on fluxbox.
First, you need to install dotnet 6.0, python3, pip3 and python3-tk (for PySide6) on Linux. Here are the commands to install them on Ubuntu:
sudo apt-get install -y dotnet-sdk-6.0
sudo apt install python3
sudo apt install python3-pip
sudo apt-get install python3-tk
and provide the password if required.
Then install the Linux packages by typing:
pip3 install numpy
pip3 install matplotlib
pip3 install grpcio
pip3 install NP.Grpc.PythonRelayInterfaces
pip3 install NP.Grpc.PythonMessages
pip3 install PySide6
pip3 install --upgrade protobuf
Do not know why but protobuf required upgrade in my case.
To run the sample on Linux, you need to compile it on Windows and then copy the whole folder structure of the solution onto linux.
cd to <RootDir>DockableAppsDemo/DockableAppImplantsDemo/bin/Debug/net6.0 and run:
dotnet DockableAppImplantsDemo.dll
Here is what you'll see:
The whole application shows on Linux in a fashion very similar to windows since all the components used for building the application (C# and Python) are multiplatforms.
Unfortunately, UniDock currently has some issues with moving dockable windows on Linux, so redocking individual plots will not work. I plan to resolve these problems soon, so the window docking should work properly on any OS.
[출처] https://www.codeproject.com/Articles/5355675/Embedding-Python-Applications-within-Gidon-Csharp
광고 클릭에서 발생하는 수익금은 모두 웹사이트 서버의 유지 및 관리, 그리고 기술 콘텐츠 향상을 위해 쓰여집니다.
댓글 0
| 번호 | 제목 | 글쓴이 | 날짜 | 조회 수 |
|---|---|---|---|---|
| 3 |
Get started with Ionic 2 apps in Visual Studio
 | 졸리운_곰 | 2016.11.20 | 1512 |
| 2 | How to: Ionic in Visual Studio | 졸리운_곰 | 2016.05.09 | 594 |
| 1 | Get started with Ionic apps in Visual Studio : 비주얼 스투이오로 모바일 앱 생성 ionic 프레임워크 | 졸리운_곰 | 2016.05.09 | 329 |