
- 전체
- Python 일반
- Python 수학
- Python 그래픽
- Python 자료구조
- Python 인공지능
- Python 인터넷
- Python SAGE
- wxPython
- TkInter
- iPython
- wxPython
- pyQT
- Jython
- django
- flask
- blender python scripting
- python for minecraft
- Python 데이터 분석
- Python RPA
- cython
- PyCharm
- pySide
- kivy (python)
flask How to deploy python-flask in wampserver
2017.07.22 19:44
How to deploy python-flask in wampserver
Posted in Python, Web By Khan Vuthy On March 25, 2016Today i gonna show how to deploy python-flask on wampserver. This is simple way how to configure python with flask micro framework on Wampserver in Window platform. After googling for few day and reading some document from Flask deployment note, I get the solution and I know what I need is WSGI-complaint(WSGI module) server running on my Window Platform. So before start with this guide make sure you already had :
1 Make sure you have Wampserver installation in your window
2 Make sure you have Python, Flask micro framework installation in your window.
3 You need to download WSGI Module for x86 window version and for window x64, you need to download both version from this link
4 You need to donwload Microsoft Visual C++ Compiler for Python 2.7 (Any version depend on your python installed version) and run setup it, then go to this directory mod_wsgi-4.4.21 (any name after you extract from zip download file) -> win32->ap24py27-win32-VC9.mk (choose your apache and python version), open this file and add some path like this :
#Your Apache path
APACHE_ROOTDIR = C:\wamp\bin\apache\apache2.4.17
#Your Python path
PYTHON_ROOTDIR = C:\Python27
PYTHON_VERSION = 27
include common-VC9.mk
Next step is open your Microsfot Visual C++ Compiler for Python and run some command with my code snapshot below :
Run nmake -f apXYpyXY-winNN-VC?.mk clean. Substitute 'XY' in each case for the version of Apache and Python being used. Substitute 'NN' with either '32' or '64' and substitute '?' with '9' or '10'.
Run nmake -f apXYpyXY-winNN-VC?.mk. This will build mod_wsgi.
Run nmake -f apXYpyXY-winNN-VC?.mk install. This will install the mod_wsgi module into the modules directory of your Apache installation.
Don’t worried it’s just command run to create Module WSGI for your apache module it’s located in your :
C:\wamp\bin\apache\apache2.4.17\modules

Now let open you IDE and create new file name : flaskapp.wsgi and save it in your flask app directory normally location in : C:\wamp\www\flaskapp directory (flaskapp is your project directory) .

Open that file and put this snapshot code :
import sys
#Expand Python classes path with your app's path
sys.path.insert(0, 'C:/wamp/www/flaskapp')
from test import app
#Put logging code (and imports) here ...
#Initialize WSGI app object
application = app
Ok after complete all above step let start config Mod_wsgi, go to your edit your httpd.config ( located in : C:\wamp\bin\apache\apache2.4.17\conf ) with your IDE


Add this line of code to your httpd.conf file :
LoadModule wsgi_module modules/mod_wsgi.so
WSGIPythonHome C:\Python27
After you done with all these step let take look at our module does it active or not, please follow with snapshot below if it’s work, it’s will show the same snapshot below.
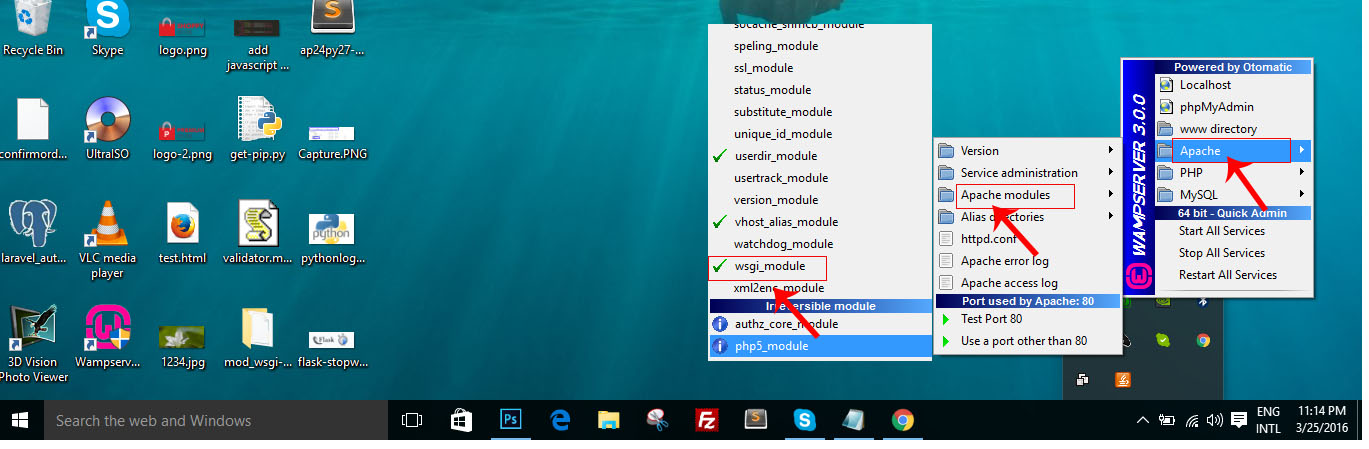
How to deploy python-flask in wampserver
Now Wampserver is already to serve WSGI webapplications. Next step is to tell where is our application locate and URL alias.
WSGIScriptAlias /flaskapp C:/wamp/www/flaskapp/flaskapp.wsgi
<Directory C:/wamp/www/flaskapp>
 Order allow,deny
 Allow from all
</Directory>
Now it’s time to test your hosting, let create new empty file and save it inside flaskapp directory and place this code to this file :
from flask import Flask, request
app = Flask(__name__)
@app.route('/hello')
def hello_world():
 return "Hello World "
if __name__ == '__main__':
 app.run()
Anything wonder drop your command below.
[출처] http://developer.e-power.com.kh/how-to-deploy-python-flask-in-wampserver/
광고 클릭에서 발생하는 수익금은 모두 웹사이트 서버의 유지 및 관리, 그리고 기술 콘텐츠 향상을 위해 쓰여집니다.
