
- 전체
- Python 일반
- Python 수학
- Python 그래픽
- Python 자료구조
- Python 인공지능
- Python 인터넷
- Python SAGE
- wxPython
- TkInter
- iPython
- wxPython
- pyQT
- Jython
- django
- flask
- blender python scripting
- python for minecraft
- Python 데이터 분석
- Python RPA
- cython
- PyCharm
- pySide
- kivy (python)
Python 인공지능 Networks in Python and SciKit Learn 0.18
2018.03.22 12:51
Networks in Python and SciKit Learn 0.18
Building a Neural Network in Python
I’m Jose Portilla and I about Data Science and Programming and I also conduct , for more info you can reach me at training AT pieriandata.com.
The code and data for this tutorial is at , if you want to follow along.
The most popular machine learning library for Python is . The latest version (0.18) now has built in support for Neural Network models! In this article we will learn how Neural Networks work and how to implement them with the Python programming language and the latest version of SciKit-Learn! Basic understanding of Python is necessary to understand this article, and it would also be helpful (but not necessary) to have some experience with Sci-Kit Learn.
Neural Networks
Neural Networks are a machine learning framework that attempts to mimic the learning pattern of natural biological neural networks: you can think of them as a crude approximation of what we assume the human mind is doing when it is learning. Biological neural networks have interconnected neurons with dendrites that receive inputs, then based on these inputs they produce an output signal through an axon to another neuron. We will try to mimic this process through the use of Artificial Neural Networks (ANN), which we will just refer to as neural networks from now on. Neural networks are the foundation of deep learning, a subset of machine learning that is responsible for some of the most exciting technological advances today! The process of creating a neural network in Python begins with the most basic form, a single perceptron. Let’s start by explaining the single perceptron!
The Perceptron
Let’s start our discussion by talking about the Perceptron! A perceptron has one or more inputs, a bias, an activation function, and a single output. The perceptron receives inputs, multiplies them by some weight, and then passes them into an activation function to produce an output. There are many possible activation functions to choose from, such as the logistic function, a trigonometric function, a step function etc. We must also make sure to add a , a constant weight outside of the inputs that allows us to achieve better fit for our predictive models. Check out the diagram below for a visualization of a perceptron:
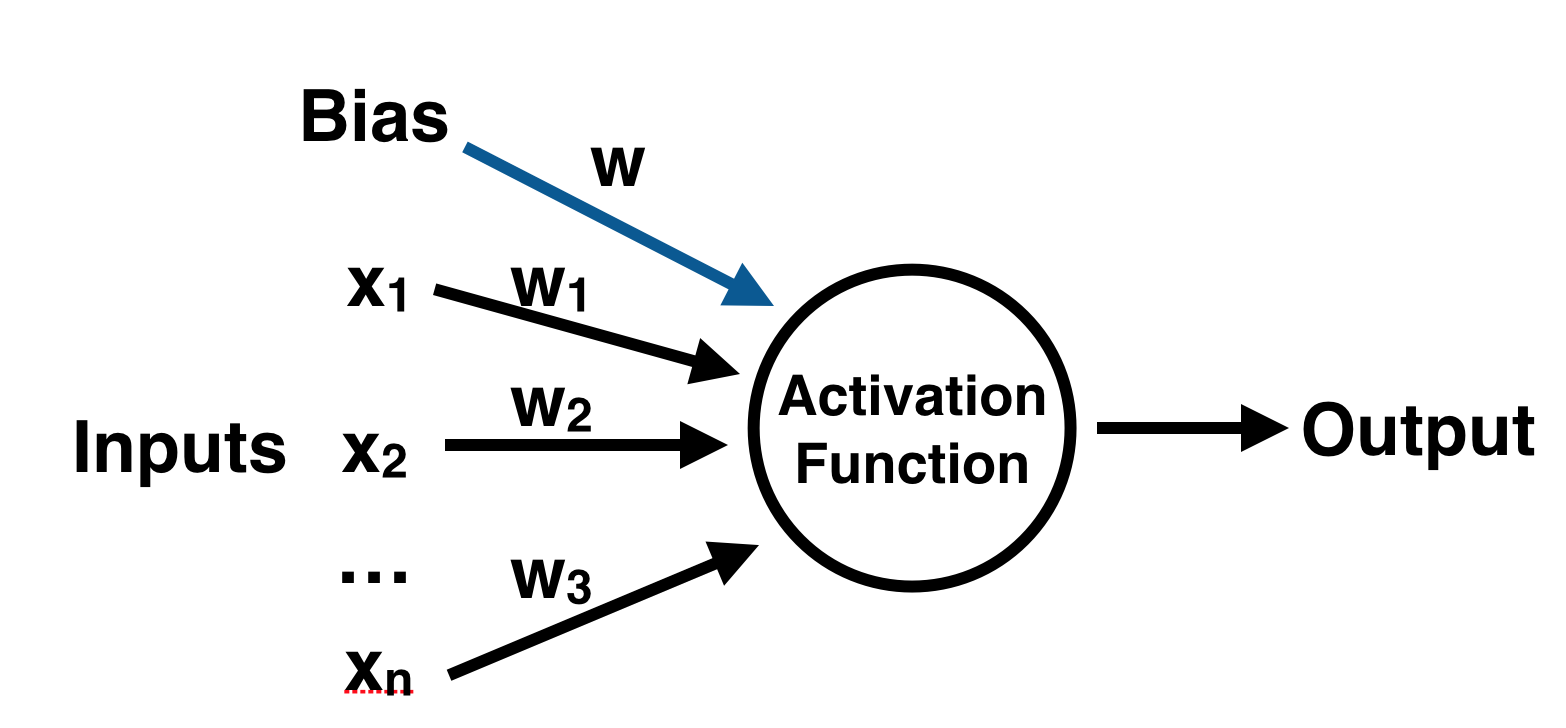
Once we have the output we can compare it to a known label and adjust the weights accordingly (the weights usually start off with random initialization values). We keep repeating this process until we have reached a maximum number of allowed iterations, or an acceptable error rate.
To create a neural network, we simply begin to add layers of perceptrons together, creating a multi-layer perceptron model of a neural network. You’ll have an input layer which directly takes in your data and an output layer which will create the resulting outputs. Any layers in between are known as hidden layers because they don’t directly “see” the feature inputs within the data you feed in or the outputs. For a visualization of this check out the diagram below (source: Wikipedia).
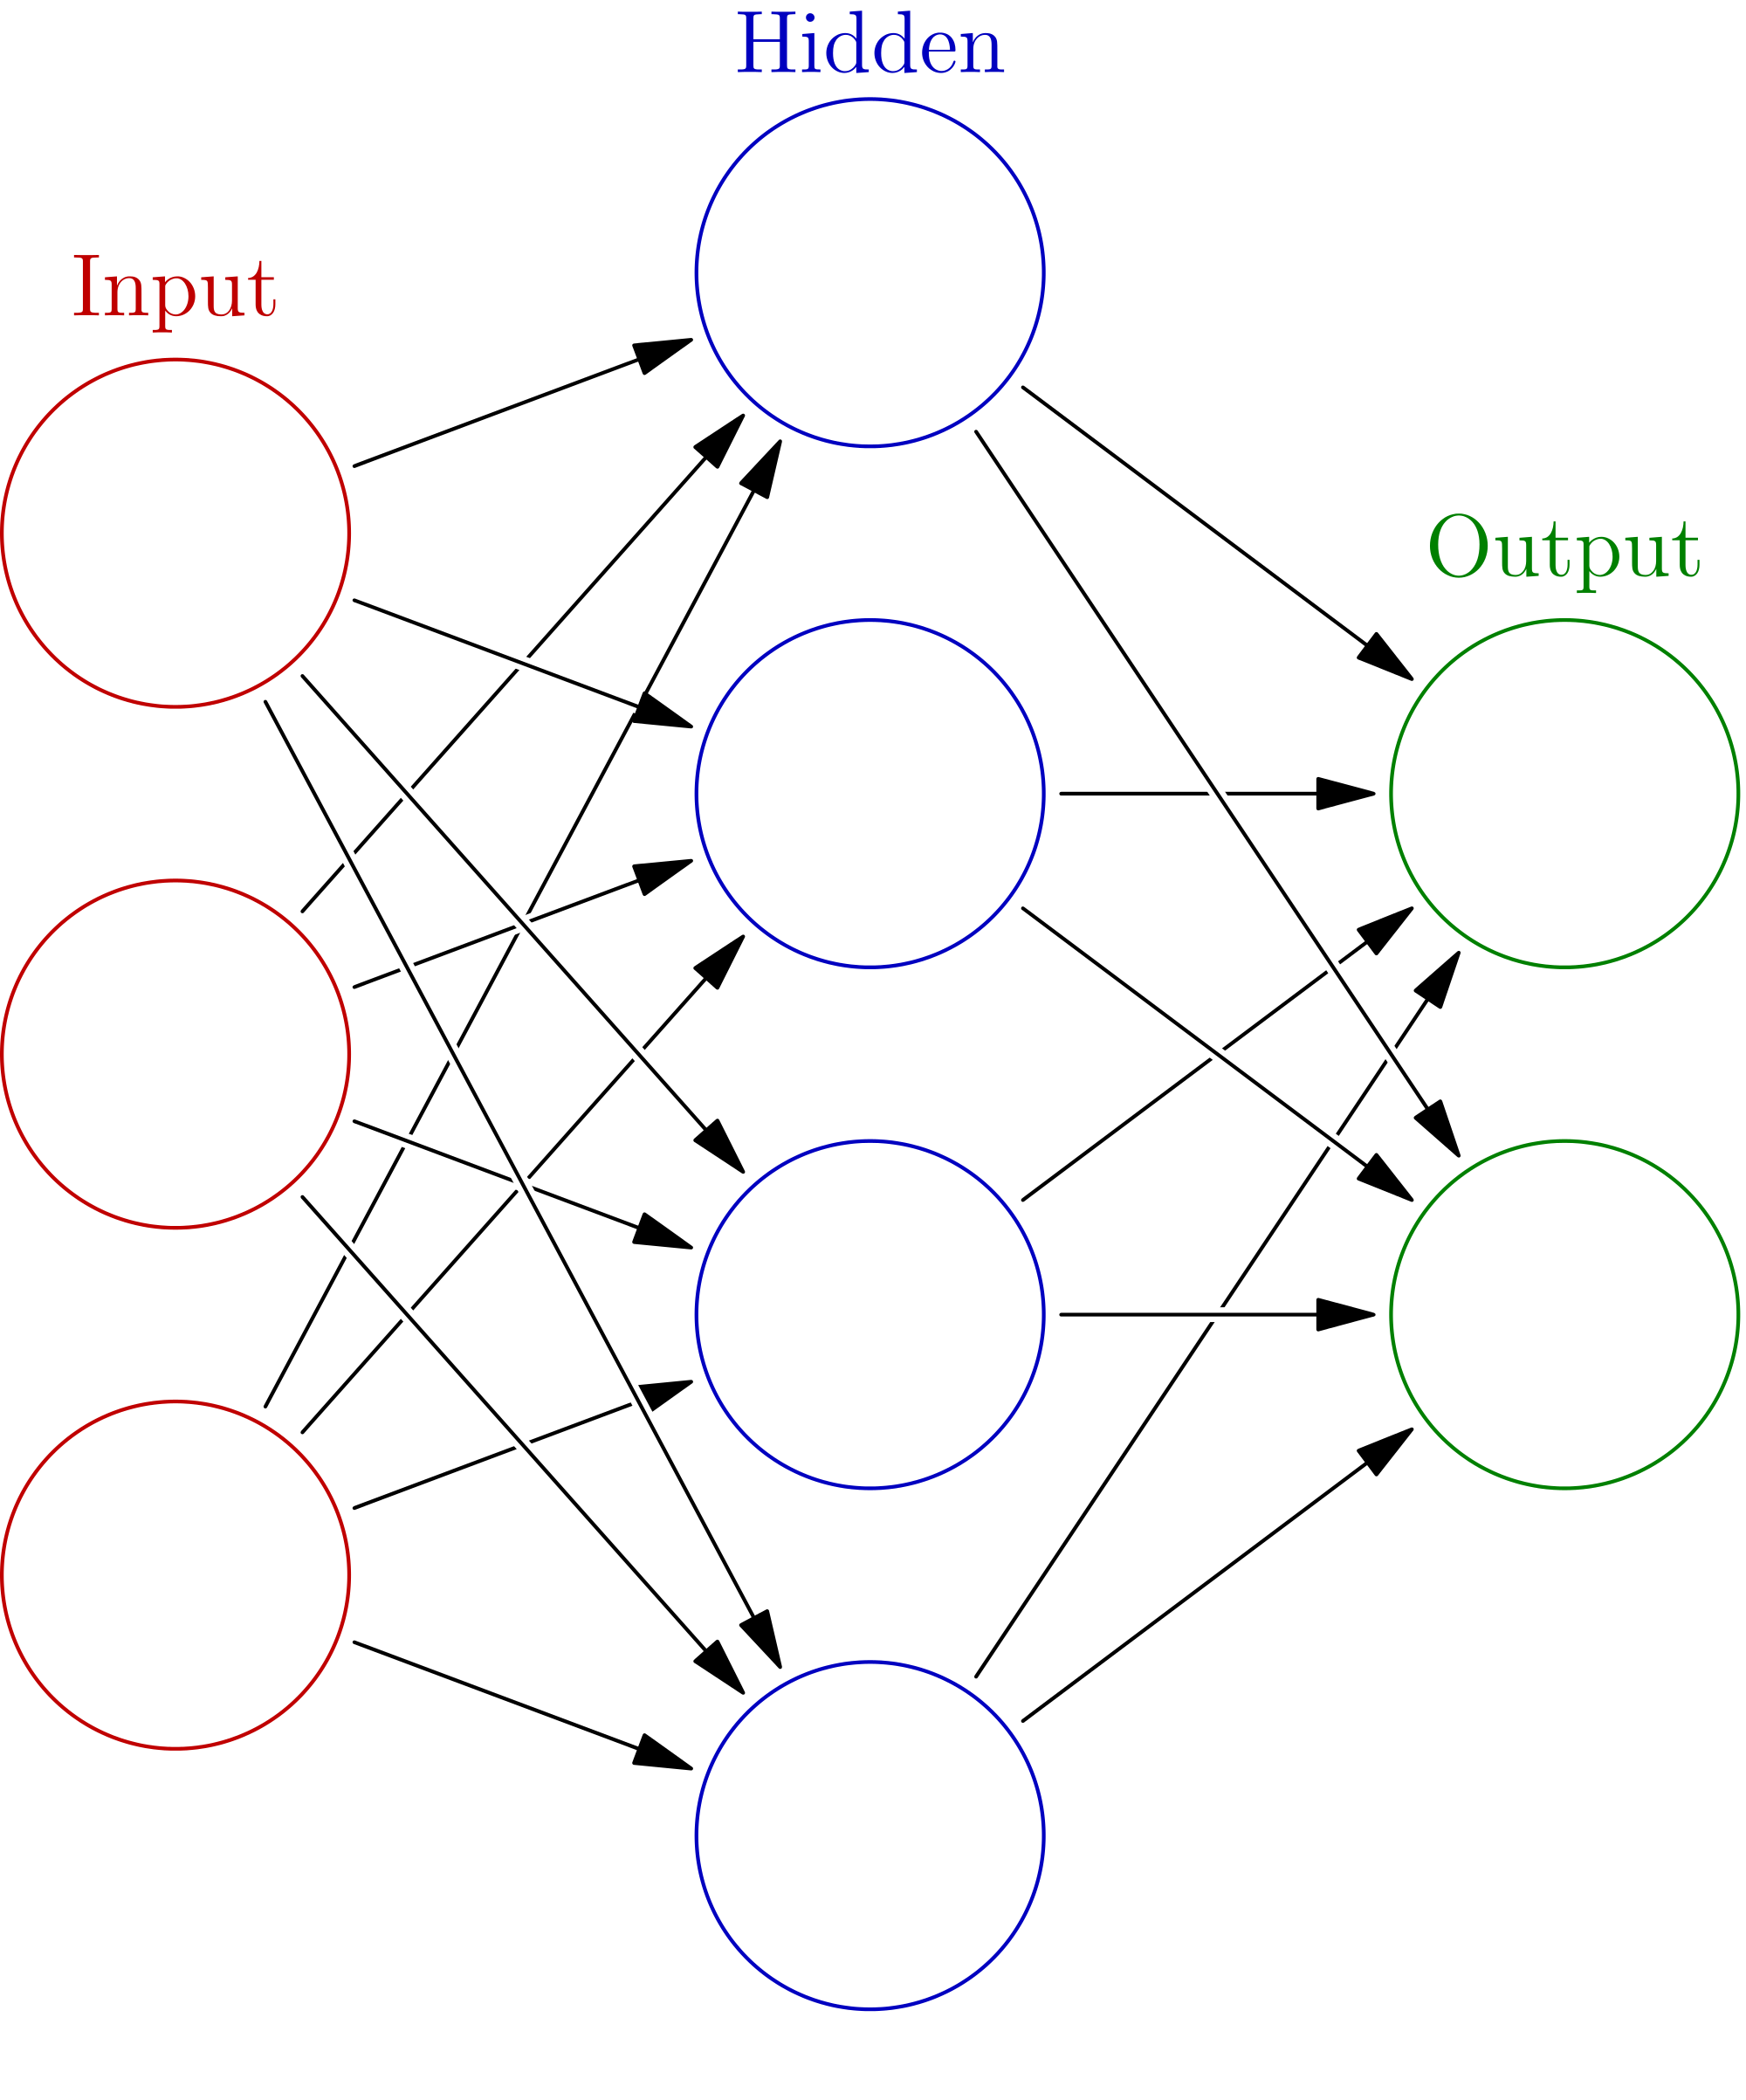
Keep in mind that due to their nature, neural networks tend to work better on GPUs than on CPU. The sci-kit learn framework isn’t built for GPU optimization. If you want to continue using GPUs and distributed models, take a look at some other frameworks, such as Google’s open sourced .
Let’s move on to actually creating a neural network with Python and Sci-Kit Learn!
SciKit-Learn
In order to follow along with this tutorial, you’ll need to have the latest version of SciKit Learn (>0.18) installed! It is easily installable either through pip or conda, but you can reference the for complete details on this.
Anaconda and iPython Notebook
One easy way of getting SciKit-Learn and all of the tools you need to have to do this exercise is by using Anaconda’s iPython Notebook software. will help you get started with these tools so you can build a neural network in Python within.
Data
For this analysis we will cover one of life’s most important topics – Wine! All joking aside, is a very real thing. Let’s see if a Neural Network in Python can help with this problem! We will use the wine data set from the UCI Machine Learning Repository. It has various chemical features of different wines, all grown in the same region in Italy, but the data is labeled by three different possible cultivars. We will try to build a model that can classify what cultivar a wine belongs to based on its chemical features using Neural Networks. You can get the data
First let’s import the dataset! We’ll use the names feature of Pandas to make sure that the column names associated with the data come through.
import pandas as pd
wine = pd.read_csv('wine_data.csv', names = ["Cultivator", "Alchol", "Malic_Acid", "Ash", "Alcalinity_of_Ash", "Magnesium", "Total_phenols", "Falvanoids", "Nonflavanoid_phenols", "Proanthocyanins", "Color_intensity", "Hue", "OD280", "Proline"])
Let’s check out the data:
wine.head()
wine.describe().transpose()
# 178 data points with 13 features and 1 label column
wine.shape
Let’s set up our Data and our Labels:
X = wine.drop('Cultivator',axis=1)
y = wine['Cultivator']
Train Test Split
Let’s split our data into training and testing sets, this is done easily with SciKit Learn’s train_test_split function from model_selection:
from sklearn.model_selection import train_test_split
X_train, X_test, y_train, y_test = train_test_split(X, y)
Data Preprocessing
The neural network in Python may have difficulty converging before the maximum number of iterations allowed if the data is not normalized. Multi-layer Perceptron is sensitive to feature scaling, so it is highly recommended to scale your data. Note that you must apply the same scaling to the test set for meaningful results. There are a lot of different methods for normalization of data, we will use the built-in StandardScaler for standardization.


from sklearn.preprocessing import StandardScaler
scaler = StandardScaler()
# Fit only to the training data
scaler.fit(X_train)
# Now apply the transformations to the data:
X_train = scaler.transform(X_train)
X_test = scaler.transform(X_test)
Training the model
Now it is time to train our model. SciKit Learn makes this incredibly easy, by using estimator objects. In this case we will import our estimator (the Multi-Layer Perceptron Classifier model) from the neural_network library of SciKit-Learn!
from sklearn.neural_network import MLPClassifier
Next we create an instance of the model, there are a lot of parameters you can choose to define and customize here, we will only define the hidden_layer_sizes. For this parameter you pass in a tuple consisting of the number of neurons you want at each layer, where the nth entry in the tuple represents the number of neurons in the nth layer of the MLP model. There are many ways to choose these numbers, but for simplicity we will choose 3 layers with the same number of neurons as there are features in our data set along with 500 max iterations.
mlp = MLPClassifier(hidden_layer_sizes=(13,13,13),max_iter=500)
Now that the model has been made we can fit the training data to our model, remember that this data has already been processed and scaled:
mlp.fit(X_train,y_train)
You can see the output that shows the default values of the other parameters in the model. I encourage you to play around with them and discover what effects they have on your neural network in Python!
Predictions and Evaluation
Now that we have a model it is time to use it to get predictions! We can do this simply with the predict() method off of our fitted model:
predictions = mlp.predict(X_test)
Now we can use SciKit-Learn’s built in metrics such as a classification report and confusion matrix to evaluate how well our model performed:
from sklearn.metrics import classification_report,confusion_matrix
print(confusion_matrix(y_test,predictions))
print(classification_report(y_test,predictions))
Not bad! Looks like we only misclassified one bottle of wine in our test data! This is pretty good considering how few lines of code we had to write for our neural network in Python. The downside however to using a Multi-Layer Perceptron model is how difficult it is to interpret the model itself. The weights and biases won’t be easily interpretable in relation to which features are important to the model itself.
However, if you do want to extract the MLP weights and biases after training your model, you use its public attributes coefs_ and intercepts_.
coefs_ is a list of weight matrices, where weight matrix at index i represents the weights between layer i and layer i+1.
intercepts_ is a list of bias vectors, where the vector at index i represents the bias values added to layer i+1.
len(mlp.coefs_)
len(mlp.coefs_[0])
len(mlp.intercepts_[0])
Conclusion
Hopefully you’ve enjoyed this brief discussion on Neural Networks! Try playing around with the number of hidden layers and neurons and see how they effect the results of your neural network in Python!
Want to learn more? You can check out my Python for Data Science and Machine Learning course on Udemy! Get it for 90% off at this link:
If you are looking for corporate in-person training, feel free to contact me at: training AT pieriandata.com.
Please feel free to follow along with the code and leave comments below if you have any questions!
[출처] https://www.springboard.com/blog/beginners-guide-neural-network-in-python-scikit-learn-0-18/
광고 클릭에서 발생하는 수익금은 모두 웹사이트 서버의 유지 및 관리, 그리고 기술 콘텐츠 향상을 위해 쓰여집니다.
