
- 전체
- HTML
- Web Design (웹디자인)
- XE 응용 개발
- wordpress plugin dev
- Javascript & JavaScript Application
- MEAN Stack : full stack javascript
- angular js & ionic framework
- bootstrap
- WebGL, Three.js and Babylon.js
- restful api design
- mobile web
- node.js 응용
- Cloud Service 응용
- 웹 어셈블리 개발 [WASM, WebAssembly]
- 마이크로서비스, MSA (microservice architecture)
- WebGL / WebGPU
- next.js 개발
- micro frontend (마이크로프론트앤드)
- 전자상거래/쇼핑몰
- 서버 클라우드 (aws, azure, google)
WebGL, Three.js and Babylon.js From Unity to Three.js
2017.08.16 22:29
From Unity to Three.js
Over the last several years, Unity has been quietly revolutionising the way we create interactive content. Since we started using it in 2009, it has evolved into a powerful solution for 3D and now 2D development, with remarkable smooth workflows.
Although HTML5 isn’t (yet) among the many platforms Unity supports, we can still take advantage of its robust toolset for our WebGL projects.
The Three.js 3D engine is our library of choice for building interactive experiences for the web. It’s fast, powerful and always getting better.
While working on HelloRun and Lights, we found ourselves increasingly using Unity in the asset pipeline. Initially writing custom JSON exporters for proprietary formats, and later on supporting the native Three.js Object spec.
But these are quick and dirty approaches that require a considerable maintenance effort to keep up with the features of each project and the development of the engine. We want our workflow to rely on existing tools and open formats wherever possible.

This post describes the asset pipeline from the Unity Editor to the Three.js WebGL engine, using the Collada format.
But why use Unity in the first place? The most immediate advantage is that of importing 3D assets and arrange them in the scene with little effort.

And that’s just the beginning, the Unity Asset Store is full of useful packages and plugins covering everything from textures, models and animations to whole project examples, tutorials and editor extensions.
Some tools are great for optimising our models and reduce render time, like Mesh Baker for combining multiple meshes and materials together, or Cruncher for reducing polygon count.
We also rely on the Asset Store for purchasing game-ready 3D models or building them from scratch. There’s plenty of modelling extensions for creating all kinds of objects and a huge library of high quality 3D models at very affordable prices.
On top of that, the Pro version of Unity includes an integrated lightmapping tool that perfectly bakes lights into textures for amazing quality and performance. It leverages Autodesk’s Beast, a set of tools for creating realistic lighting in games, to dramatically enhance the quality of our visuals.
Last but not least, we also use Unity to rapidly prototype our ideas. It’s much faster to iterate with and allows us to try out different concepts and designs quickly.
If you haven’t tried it yet, we suggest you download the free version of Unity and take a look at its excellent learning resources.

Unity can import 3D models, bones, and animations from almost any 3D application, just by dragging the file to the project panel or the Assets directory in the project folder.
Select the model file to display the Import Settings inspector and adjust the scale factor and how normals and tangents are imported.
Also make sure you set the Material Naming option to From Model’s Material, so the original material names are maintained.
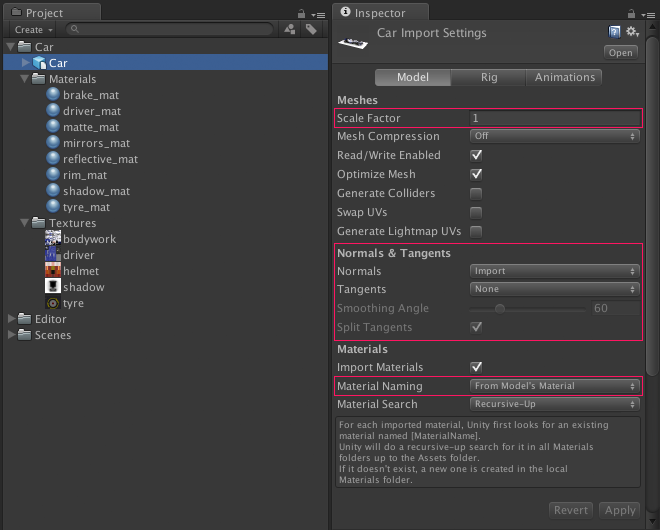
For more information about getting your assets into Unity, check out the Importing Models page in the manual or The Project Panel and Importingtutorial.



To export assets from Unity we use the Collada Exporter from the Asset Store, a very comprehensive extension with support for animation, skinning, terrain, material properties, lightmaps and physics (colliders, rigid bodies).
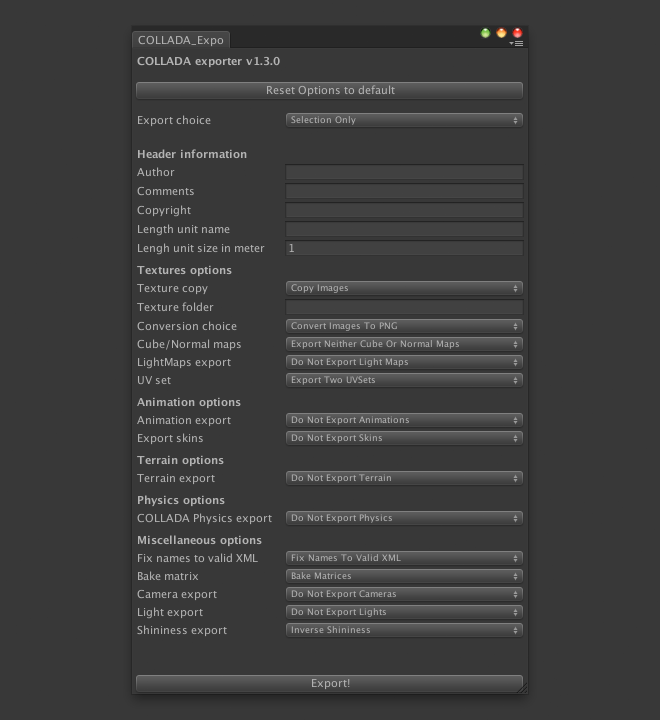
The exporter generates a DAE file containing object hierarchy and mesh geometry data in Collada format, a XML-based interchange format that allows information to be easily shared between authoring tools.
An additional feature of this extension is that it creates PNG textures for the included materials, which comes in very handy when using textures with alpha channel.
The file format we use for the exported textures generally depends on whether they have an alpha channel. For 24-bit textures (without alpha channel) we export to JPG format using Photoshop’s Save for Web and Devicesto minimise file size.
If the texture includes an alpha channel we use 32-bit PNG format, but not from Photoshop because it saves transparency instead of alpha. There are ways to solve this, but fortunately the Collada Exporter does it for us and correctly converts PSD files with alpha channel to PNG format.

Since Collada is not a delivery format, it’s not well suited for web applications. We can load DAE files directly into Three.js, but in order to save bandwidth and reduce loading times, it’s preferable to convert them to Three.js native JSON format.
The easiest way to do this is using the Three.js Editor. Just drag the DAE file into the editor and export it back as an Object file. You can repeat this step whenever you need to update your model files to the latest revision of the engine.

We also use the editor to check how models look in WebGL and ensure the conversion has worked correctly without any errors.
If you don’t see your model after it’s been imported, select the root DAE object in the Scene panel and make sure that its scale is not set to zero.

To load the exported Object file into Three.js just use the THREE.ObjectLoaderclass. Make sure you are not using the older THREE.JSONLoader class because it supports a different JSON format.
Please note that due to security restrictions, loading from a file system is not allowed by the browser. When loading models or textures from external files, you need to run from a local server.
Another option is to start Chrome with the allow-access-from-files flag: /Applications/Google\ Chrome.app/Contents/MacOS/Google\ Chrome –allow-file-access-from-files (Thanks to Andy for the tip)

In our workflow we usually create materials and shaders from scratch in JavaScript, instead of trying to import them from Unity. This way we know we’re looking at the real thing and can assess quality and performance.
We hope you find this asset pipeline helpful. We work constantly on improving our processes, and we know that many other developers do the same. If you have any question or advice, please leave a comment.
[출처] http://helloenjoy.com/2013/from-unity-to-three-js/
광고 클릭에서 발생하는 수익금은 모두 웹사이트 서버의 유지 및 관리, 그리고 기술 콘텐츠 향상을 위해 쓰여집니다.
댓글 0
| 번호 | 제목 | 글쓴이 | 날짜 | 조회 수 |
|---|---|---|---|---|
| 4 |
AngularJS 개념 및 기초잡기
 | 졸리운_곰 | 2017.01.29 | 584 |
| 3 |
AngularJS
| 졸리운_곰 | 2017.01.29 | 620 |
| 2 |
[tutorial] AngularJS 튜토리얼 - 1
| 졸리운_곰 | 2017.01.29 | 356 |
| 1 |
[튜토리얼/번역] AngularJS Modules (AngularJS 모듈)
| 졸리운_곰 | 2017.01.29 | 674 |