
- 전체
- HTML
- Web Design (웹디자인)
- XE 응용 개발
- wordpress plugin dev
- Javascript & JavaScript Application
- MEAN Stack : full stack javascript
- angular js & ionic framework
- bootstrap
- WebGL, Three.js and Babylon.js
- restful api design
- mobile web
- node.js 응용
- Cloud Service 응용
- 웹 어셈블리 개발 [WASM, WebAssembly]
- 마이크로서비스, MSA (microservice architecture)
- WebGL / WebGPU
- next.js 개발
- micro frontend (마이크로프론트앤드)
- 전자상거래/쇼핑몰
- 서버 클라우드 (aws, azure, google)
WebGL, Three.js and Babylon.js Three.js를 사용한 기본 3D 그래픽
2017.05.30 21:47
Three.js를 사용한 기본 3D 그래픽
3D 그래픽 및 WebGL 기반 Three.js 라이브러리를 사용한 렌더링의 기본 사항을 알아봅니다.
기본 큐브
셰이더 및 필요한 수학(행렬, 사원수 등)과 더불어 네이티브 WebGL 그래픽 프로그래밍은 복잡할 수 있습니다. 이러한 복잡성을 줄이는 데 도움이 되도록 Three.js를 비롯한 여러 단순화 라이브러리가 있습니다. 이 라이브러리의 기본 사항에 대해서는 다음에 설명합니다.
OpenGL과 마찬가지로 Three.js는 오른쪽 좌표계를 사용합니다.
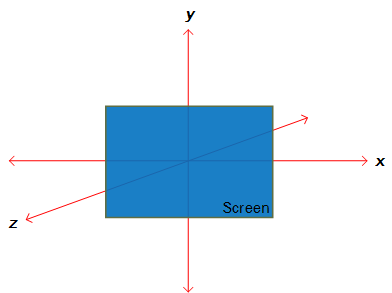
이 그림에서 컴퓨터 화면은 xy 평면과 일치하며 원점 (0, 0, 0)에 중심이 있습니다. 양의 z축은 화면에서 관찰자 쪽을 가리킵니다.
구형 등의 Three.js 개체를 장면에 추가하면 기본적으로 개체가 xyz 좌표계의 원점에 추가됩니다. 따라서 카메라 개체 및 구형 개체를 장면에 추가하는 경우 둘 다 (0, 0, 0)에 배치되며 안쪽에서 바깥쪽으로 구형을 보게 됩니다. 해결 방법은 z축에서 양의 50단위만큼 아래 등의 적절한 위치로 카메라를 이동하는 것입니다. camera.position.z = 50
다음 코드 예제에서 자세히 설명합니다.
<!DOCTYPE html>

<html>
<head>
  <meta charset="utf-8" />
  <title>Cube</title>
  <style>
    body {
      text-align: center;
    }

    canvas {
      width: 100%;
      height: 100%;
      border: 1px solid black;
    }
  </style>
</head>

<body>
  <h1>Liquid Three.js Cube</h1>
  <p>Change the browser's window size.</p>
  <script src="https://rawgithub.com/mrdoob/three.js/master/build/three.js"></script> <!-- Get the latest version of the Three.js library. -->
  <script>
    var scene = new THREE.Scene(); // Create a Three.js scene object.
    var camera = new THREE.PerspectiveCamera(75, window.innerWidth / window.innerHeight, 0.1, 1000); // Define the perspective camera's attributes.

    var renderer = window.WebGLRenderingContext ? new THREE.WebGLRenderer() : new THREE.CanvasRenderer(); // Fallback to canvas renderer, if necessary.
    renderer.setSize(window.innerWidth, window.innerHeight); // Set the size of the WebGL viewport.
    document.body.appendChild(renderer.domElement); // Append the WebGL viewport to the DOM.

    var geometry = new THREE.CubeGeometry(20, 20, 20); // Create a 20 by 20 by 20 cube.
    var material = new THREE.MeshBasicMaterial({ color: 0x0000FF }); // Skin the cube with 100% blue.
    var cube = new THREE.Mesh(geometry, material); // Create a mesh based on the specified geometry (cube) and material (blue skin).
    scene.add(cube); // Add the cube at (0, 0, 0).

    camera.position.z = 50; // Move the camera away from the origin, down the positive z-axis.

    var render = function () {
      cube.rotation.x += 0.01; // Rotate the sphere by a small amount about the x- and y-axes.
      cube.rotation.y += 0.01;

      renderer.render(scene, camera); // Each time we change the position of the cube object, we must re-render it.
      requestAnimationFrame(render); // Call the render() function up to 60 times per second (i.e., up to 60 animation frames per second).
    };

    render(); // Start the rendering of the animation frames.
  </script>
</body>
</html>
코드 주석에서 수행되는 작업을 자세히 설명하지만 5가지 특정 영역을 좀 더 자세히 살펴보겠습니다.
-
var camera = new THREE.PerspectiveCamera(75, window.innerWidth / window.innerHeight, 0.1, 1000);
PerspectiveCamera의 매개 변수 4개는 다음과 같습니다.75window.innerWidth / window.innerHeight0.11000
이러한 매개 변수를 고려하여 다음 그림을 살펴보겠습니다.
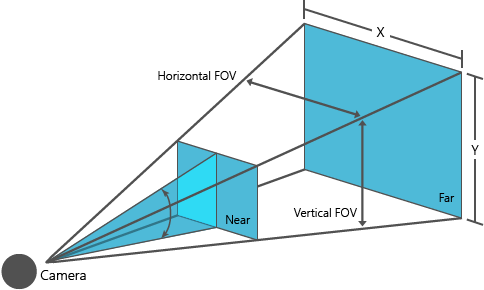
- 첫 번째 매개 변수(
75)는 맨 아래에서 보기의 맨 위까지 카메라의 세로 시야(도)를 정의합니다. 지정된 시점에 화면에 표시되는 관찰 가능한 세계의 범위입니다. 가로 FOV는 세로 FOV를 사용하여 계산됩니다. - 두 번째 매개 변수(
window.innerWidth / window.innerHeight)는 카메라의 가로 세로 비율을 정의합니다. 일반적으로 뷰포트 요소의 너비를 해당 높이로 나눈 값을 사용하는 것이 좋으며, 그렇지 않으면 이미지가 찌그러져 보일 수도 있습니다. - 세 번째 매개 변수(
0.1)는 가까운 카메라 절두체 평면을 정의합니다(그림의 "Near"). 이 경우 가까운 절두체 평면은 xy 평면(즉, 화면)과 거의 일치합니다. - 마지막 매개 변수(
1000)는 먼 카메라 절두체 평면을 정의합니다(그림의 "Far"). 이 경우 개체가 ±1000단위만큼 이동하면 보이는 Three.js 환경 외부에 있는 것으로 간주되며 보기에서 잘립니다.
-
var renderer = window.WebGLRenderingContext ? new THREE.WebGLRenderer() : new THREE.CanvasRenderer();
사용자 브라우저에서 WebGL을 지원하지 않는 경우(Internet Explorer 10 이전), canvas 기반 렌더러가 대신 사용됩니다(
THREE.CanvasRenderer()). 이 경우 코드베이스가 여전히 있는 그대로 작동하지만 속도가 느려지며 그래픽 품질도 저하됩니다. -
document.body.appendChild(renderer.domElement);
div등의 적절한 요소에 Three.js 렌더러(viewport) 요소를 추가할 수 있습니다. 이 경우canvas요소(따라서 위의canvasCSS)인 Three.js 렌더러를body요소에 추가합니다. -
var geometry = new THREE.CubeGeometry(20, 20, 20); // Create a 20 by 20 by 20 cube.
var material = new THREE.MeshBasicMaterial({ color: 0x0000FF }); // Skin the cube with 100% blue.
var cube = new THREE.Mesh(geometry, material); // Create a mesh based on the specified geometry (cube) and material (blue skin).
3D 그래픽에서는 일반적으로 메시를 만든 다음 재질(예: 비트맵 질감)을 적용합니다. 보시다시피, 지정한
geometry및material을 사용하여 메시(cube)가 만들어집니다. -
camera.position.z = 50;
Three.js에서 개체를 장면에 추가하면 일반적으로 원점 (0, 0, 0)에 추가됩니다. 이 경우 자동으로 추가된 카메라 개체를 z축에서 관찰자 쪽으로 양의 50단위만큼 아래로 이동하여 큐브와 카메라가 동일한 "실제" 위치에 존재하지 않도록 합니다.


관련된 코드 주석을 검토하면 이 예제(예제 1)의 나머지 코드를 이해할 수 있습니다.
이제 광원 안의 구형인 좀 더 복잡한 시나리오를 살펴보겠습니다.
광원 안의 구형
이 코드 예제에서는 광원을 사용하여 NASA의 행성 비트맵 질감을 가진 반사 구형을 만듭니다.
<!DOCTYPE html>

<html>
<head>
  <meta charset="utf-8" />
  <title>Sphere</title>
  <style>
    body {
      text-align: center;
      color: white;
      background-color: black;
    }

    canvas {
      width: 100%;
      height: 100%;
    }
  </style>
</head>

<body>
  <h1>Liquid Three.js Sphere</h1>
  <button id="startButton">Start</button>
  <script src="https://rawgithub.com/mrdoob/three.js/master/build/three.js"></script> <!-- Get the latest version of the Three.js library. -->
  <script>
    var bitmap = new Image();
    bitmap.src = 'images/jupiter.jpg'; // Pre-load the bitmap, in conjunction with the Start button, to avoid any potential THREE.ImageUtils.loadTexture async issues.
    bitmap.onerror = function () {
      console.error("Error loading: " + bitmap.src);
    }

    var scene = new THREE.Scene(); // Create a Three.js scene object.
    var camera = new THREE.PerspectiveCamera(75, window.innerWidth / window.innerHeight, 0.1, 1000); // Define the perspective camera's attributes.

    var renderer = window.WebGLRenderingContext ? new THREE.WebGLRenderer() : new THREE.CanvasRenderer(); // Fallback to canvas renderer, if necessary.
    renderer.setSize(window.innerWidth, window.innerHeight); // Set the size of the WebGL viewport.
    document.body.appendChild(renderer.domElement); // Append the WebGL viewport to the DOM.

    // Be aware that a light source is required for MeshPhongMaterial to work:
    var pointLight = new THREE.PointLight(0xFFFFFF); // Set the color of the light source (white).
    pointLight.position.set(100, 100, 250); // Position the light source at (x, y, z).
    scene.add(pointLight); // Add the light source to the scene.

    var texture = THREE.ImageUtils.loadTexture(bitmap.src); // Create texture object based on the given bitmap path.
    var material = new THREE.MeshPhongMaterial({ map: texture }); // Create a material (for the spherical mesh) that reflects light, potentially causing sphere surface shadows.
    var geometry = new THREE.SphereGeometry(50, 64, 64); // Radius size, number of vertical segments, number of horizontal rings.

    var sphere = new THREE.Mesh(geometry, material); // Create a mesh based on the specified geometry (cube) and material (blue skin).
    scene.add(sphere); // Add the sphere at (0, 0, 0).

    camera.position.z = 150; // Move the camera away from the origin, down the positive z-axis.

    var render = function () {
      sphere.rotation.x += 0.002; // Rotate the sphere by a small amount about the x- and y-axes.
      sphere.rotation.y += 0.005;

      renderer.render(scene, camera); // Each time we change the position of the cube object, we must re-render it.
      requestAnimationFrame(render); // Call the render() function up to 60 times per second (i.e., up to 60 animation frames per second).
    };

    document.getElementById('startButton').addEventListener('click', function () {
      render(); // Start the rendering of the animation frames.
    }, false);
  </script>
</body>
</html>
예제 2의 코드 주석도 수행되는 작업을 잘 설명하지만 다음 두 가지 항목을 자세히 살펴보겠습니다.
-
var bitmap = new Image();
bitmap.src = 'images/jupiter.jpg';
페이지가 로드된 후 사용자가 Start 단추를 클릭하는 데 걸리는 시간 후에 비트맵 이미지가 "미리 로드"됩니다. 이렇게 하면 THREE.ImageUtils.loadTexture()에서 발생할 수 있는 비동기 비트맵 로드 문제를 방지하는 데 도움이 됩니다.
-
var pointLight = new THREE.PointLight(0xFFFFFF); // Set the color of the light source (white).
pointLight.position.set(100, 100, 250); // Position the light source at (x, y, z).
scene.add(pointLight); // Add the light source to the scene.
THREE.MeshPhongMaterial()을 성공적으로 사용하려면 광원이 필요합니다. Phong 음영은 행성 비트맵(texture)에 반사 표면을 제공합니다.var material = new THREE.MeshPhongMaterial({ map: texture });
관련된 코드 주석을 검토하면 이 예제(예제 2)의 나머지 코드를 이해할 수 있습니다.
[출처] https://msdn.microsoft.com/ko-kr/library/dn479430(v=vs.85).aspx
광고 클릭에서 발생하는 수익금은 모두 웹사이트 서버의 유지 및 관리, 그리고 기술 콘텐츠 향상을 위해 쓰여집니다.
댓글 0
| 번호 | 제목 | 글쓴이 | 날짜 | 조회 수 |
|---|---|---|---|---|
| 4 | [Bootstrap3] Bootstrap 기본 | 졸리운_곰 | 2020.02.20 | 506 |
| 3 |
bootstrap 시작하기
 | 졸리운_곰 | 2017.01.29 | 718 |
| 2 |
Bootstrap 사용법
| 졸리운_곰 | 2017.01.29 | 716 |
| 1 |
Bootstrap
| 졸리운_곰 | 2017.01.29 | 365 |