
- 전체
- HTML
- Web Design (웹디자인)
- XE 응용 개발
- wordpress plugin dev
- Javascript & JavaScript Application
- MEAN Stack : full stack javascript
- angular js & ionic framework
- bootstrap
- WebGL, Three.js and Babylon.js
- restful api design
- mobile web
- node.js 응용
- Cloud Service 응용
- 웹 어셈블리 개발 [WASM, WebAssembly]
- 마이크로서비스, MSA (microservice architecture)
- WebGL / WebGPU
- next.js 개발
- micro frontend (마이크로프론트앤드)
- 전자상거래/쇼핑몰
- 서버 클라우드 (aws, azure, google)
Mouse-Picking Collada Models with three.js, Part II
Posted by Jens Arps filed under Experiments in Web, How to.
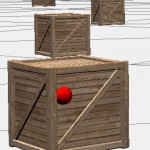 Roughly a year ago, I wrote about detecting COLLADA models with a three.js ray caster. That code was written for three.js revision 49 – whereas the current revision is 62. A lot of things changed since then, and the code no longer works. So, here is an update of that post for revision 62.
If you don’t come here from that previous post, here’s what this is about: When the user clicks somewhere on the screen we want to find the object in the scene that is actually being “clicked on”. More precise – we want to know when a user clicked on an imported COLLADA model. The most straight forward way to achieve this is to do ray casting.
I’ll be following along with this demo (it shows a couple of boxes and will set a marker to the point where you clicked on a box): http://jensarps.github.io/webgl_experiments/collada_picking_ray_r62.html
The annotated source is here: https://github.com/jensarps/webgl_experiments/blob/master/collada_picking_ray_r62.html
DIFFERENCES TO REVISION 49
There’s two major good news for the current revision:
1. The performance and memory efficiency of three.js’ built-in ray casting classes have greatly improved.
2. The built-in raycaster is able to detect COLLADA models without any further modifications.
The main ideas behind the ReusableRay class made it into three.js’ Raycaster class. Effectively, that means that there is no more need for the ReusableRay class that I recommended to use for prior revisions of three.js. Win!
If you compare the source code of the two collada_picking_ray versions on GitHub, you’ll see that it’s almost identical. Let’s go through the code again step by step; If there are changes to the previous versions, I’ll put a bold “Changes to R49:” below the code so that you can quickly skim through the post.
THE CODE
Initially, we setup some vars we will later need:
var raycaster = new THREE.Raycaster();
var projector = new THREE.Projector();
var directionVector = new THREE.Vector3();
The first thing we do is to record the mouse event. We do not react to it right now, because we don’t want to do anything outside of the render loop, so we keep control about what happens when.
Changes to R49: No more new ReusableRay() – instead, we create a new instance of THREE.Raycaster that we can re-use.


So let’s just store the coordinates and set a flag that we can later look up:
- container.addEventListener('click', function (evt) {
- // The user has clicked; let's note this event
- // and the click's coordinates so that we can
- // react to it in the render loop
- clickInfo.userHasClicked = true;
- clickInfo.x = evt.clientX;
- clickInfo.y = evt.clientY;
- }, false);
Next, in the render loop, we check if a click has happened. If so, we start the whole ray casting thingy. To define the ray, we need two vectors: One representing the start point of the ray, and the other one representing the direction. The first is easy, it’s the camera position. The second is more interesting. We start with translating the mouse coordinates into something that’s independent of screen size, and assigning them to the direction vector:
- // The following will translate the mouse coordinates into a number
- // ranging from -1 to 1, where
- // x == -1 && y == -1 means top-left, and
- // x == 1 && y == 1 means bottom right
- var x = ( clickInfo.x / SCREEN_WIDTH ) * 2 - 1;
- var y = -( clickInfo.y / SCREEN_HEIGHT ) * 2 + 1;
Now, there’s a little bit of math magic happening. Currently, we have the right direction if the camera’s position and view direction wouldn’t have changed. So we need to modify the vector to take these into account; I can’t really explain why this works, you need to trust me on this one:
- // Unproject the vector
- projector.unprojectVector(directionVector, camera);
- // Substract the vector representing the camera position
- directionVector.sub(camera.position);
Changes to R49: Method name change: Vector3.subSelf() now is Vector3.sub().
Ok, now we’ve got a vector that describes the direction correctly, but if you inspect it, you’ll find that it contains some crazy numbers. We need to make sure it contains only numbers ranging from -1 to 1 before passing it on to the ray caster class and firing off the ray:
- // Normalize the vector, to avoid large numbers from the
- // projection and substraction
- directionVector.normalize();
- // Now our direction vector holds the right numbers!
- raycaster.set(camera.position, directionVector);
Changes to R49: Like ReusableRay, Raycaster has a method to set the source and direction of the ray – and it takes the same arguments. So it’s an easy change: instead of ray.setSource(), just call raycaster.set().
We can now ask the ray class for intersections, and it will report back all objects that intersect with our ray. Intersections are ordered by distance, so in this case, we only need the first one we get. The first argument is an array of objects that are possible candidates for an intersection. I recommend to optimize this, but for this example, I’m just passing all the scene’s children. If you have imported COLLADA models in your list of candidates, you need to set the second argument to “true”.
- // Ask the raycaster for intersects with all objects in the scene:
- // (The second arguments means "recursive")
- var intersects = raycaster.intersectObjects(scene.children, true);
- if (intersects.length) {
- // intersections are, by default, ordered by distance,
- // so we only care for the first one. The intersection
- // object holds the intersection point, the face that's
- // been "hit" by the ray, and the object to which that
- // face belongs. We only care for the object itself.
- var target = intersects[0].object;
- statsNode.innerHTML = 'Name: ' + target.name
- + '<br>'
- + 'ID: ' + target.id;
- }
Changes to R49: The top level object of the imported COLLADA still is a plain Object3D instance; but the new ray caster can dive down recursively into the objects and will find the mesh that the ray hit. To do this, the second parameter, “recursive” must be set to true.
And that’s it – Mouse-picking COLLADA models has become really easy!
[출처] http://jensarps.de/2013/10/29/mouse-picking-collada-models-with-three-js-part-ii/
<!doctype html>
<html>
<head>
  <title>Mouse-picking Collada models with Three.js</title>
  <meta charset="utf-8">
  <style>
    body {
      background-color: #f0f0f0;
      margin: 0;
      overflow: hidden;
      font-family: monospace;
      font-size: 13px;
      text-align: center;
      font-weight: bold;
    }

    a {
      color: #0078ff;
    }

    #info {
      color: #000000;
      position: absolute;
      top: 0;
      width: 100%;
      padding: 5px;
      z-index: 100;
    }

    #stats {
      position: absolute;
      right: 10px;
      top: 5px;
      color: #fff;
      text-align: left;
      background: rgba(0, 0, 0, 0.5);
      padding: 10px;
      width: 200px;
      height: 60px;
      border: solid 1px black;
      border-radius: 5px;
    }

  </style>
</head>
<body>

<div id="info">
  - mouse-picking COLLADA models with <a href="http://github.com/mrdoob/three.js"
                                    target="_blank">three.js</a> -<br>
  crate model by <a
  href="http://www.turbosquid.com/FullPreview/Index.cfm/ID/631645"
  target="_blank">DeYogbar</a><br>
  Move around using WASD and click on objects.
</div>

<div id="stats"></div>

<script src="threejs_r62/build/three.min.js"></script>

<script src="threejs_r62/ColladaLoader.js"></script>
<script src="threejs_r62/FirstPersonControls.js"></script>

<script src="three.js/js/Detector.js"></script>
<script src="three.js/js/Stats.js"></script>

<script>

if (!Detector.webgl) Detector.addGetWebGLMessage();

var container, stats;
var camera, controls, scene, renderer;

var clock = new THREE.Clock();

var raycaster = new THREE.Raycaster();
var projector = new THREE.Projector();
var directionVector = new THREE.Vector3();

var SCREEN_HEIGHT = window.innerHeight;
var SCREEN_WIDTH = window.innerWidth;

var clickInfo = {
  x: 0,
  y: 0,
  userHasClicked: false
};

var statsNode = document.getElementById('stats');
var marker;

init();
animate();

function init () {

  container = document.createElement('div');
  document.body.appendChild(container);

container.addEventListener('click', function (evt) {
  // The user has clicked; let's note this event
  // and the click's coordinates so that we can
  // react to it in the render loop
  clickInfo.userHasClicked = true;
  clickInfo.x = evt.clientX;
  clickInfo.y = evt.clientY;
}, false);

  // we just do the following to hide the event from controls
  // and disable moving via mouse buttons
  var stopEvent = function (evt) {
    evt.preventDefault();
    evt.stopPropagation();
  };
  container.addEventListener('mousedown', stopEvent, false);
  container.addEventListener('mouseup', stopEvent, false);

  /* Scene & Camera */

  scene = new THREE.Scene();
  camera = new THREE.PerspectiveCamera(25, SCREEN_WIDTH / SCREEN_HEIGHT);
  scene.add(camera);


  /* Controls */

  controls = new THREE.FirstPersonControls(camera);
  controls.constrainVertical = true;
  controls.movementSpeed = 60;
  controls.lookSpeed = 0.05;


  /* Renderer */

  renderer = new THREE.WebGLRenderer({ antialias: true, preserveDrawingBuffer: true });
  renderer.setSize(SCREEN_WIDTH, SCREEN_HEIGHT);
  container.appendChild(renderer.domElement);


  /* Lights */

  var ambientLight = new THREE.AreaLight(0xffffff);
  scene.add(ambientLight);

  var directionalLight = new THREE.DirectionalLight(0xe0e0e0);
  directionalLight.position.set(1, 1, 0.5).normalize();
  scene.add(directionalLight);

  directionalLight = new THREE.DirectionalLight(0xe0e0e0);
  directionalLight.position.set(-1, 1, 0.5).normalize();
  scene.add(directionalLight);


  /* Ground */

  var plane = new THREE.Mesh(new THREE.PlaneGeometry(1000, 1000, 10, 10), new THREE.MeshBasicMaterial({ color: 0x808080, wireframe: true }));
  plane.rotation.x = -Math.PI / 2;
  plane.name = 'Ground';
  scene.add(plane);


  /* Collada Objects */

  createBoxes();

  /* hit point marker */

  marker = new THREE.Mesh(new THREE.SphereGeometry(1), new THREE.MeshLambertMaterial({ color: 0xff0000 }));
  scene.add(marker);
}

function createBoxes () {
  var boxCount = 20;

  var loader = new THREE.ColladaLoader();
  loader.options.convertUpAxis = true;
  loader.load('models/WoodenBox02/WoodenBox02.dae', function (collada) {

    var objectProto = collada.scene;

    for (var i = 0; i < boxCount; i++) {

      var object = objectProto.clone();

      object.name = 'Box #' + i;

      object.position.x = Math.random() * 800 - 400;
      object.position.y = 5;
      object.position.z = Math.random() * 800 - 400;

      object.rotation.y = ( Math.random() * 360 ) * Math.PI / 180;

      object.scale.x = 10;
      object.scale.y = 10;
      object.scale.z = 10;

      scene.add(object);
    }

  });
}

function animate () {

  var delta = clock.getDelta();

  requestAnimationFrame(animate);

  render(delta);
}

function render (delta) {

  if (clickInfo.userHasClicked) {

    clickInfo.userHasClicked = false;

    statsNode.innerHTML = '';

    // The following will translate the mouse coordinates into a number
    // ranging from -1 to 1, where
    //      x == -1 && y == -1 means top-left, and
    //      x ==  1 && y ==  1 means bottom right
    var x = ( clickInfo.x / SCREEN_WIDTH ) * 2 - 1;
    var y = -( clickInfo.y / SCREEN_HEIGHT ) * 2 + 1;

    // Now we set our direction vector to those initial values
    directionVector.set(x, y, 1);

    // Unproject the vector
    projector.unprojectVector(directionVector, camera);

    // Substract the vector representing the camera position
    directionVector.sub(camera.position);

    // Normalize the vector, to avoid large numbers from the
    // projection and substraction
    directionVector.normalize();

    // Now our direction vector holds the right numbers!
    raycaster.set(camera.position, directionVector);

    // Ask the raycaster for intersects with all objects in the scene:
    // (The second arguments means "recursive")
    var intersects = raycaster.intersectObjects(scene.children, true);

    if (intersects.length) {
      // intersections are, by default, ordered by distance,
      // so we only care for the first one. The intersection
      // object holds the intersection point, the face that's
      // been "hit" by the ray, and the object to which that
      // face belongs. We only care for the object itself.
      var target = intersects[0].object;
      statsNode.innerHTML = 'Name: ' + target.name
        + '<br>'
        + 'ID: ' + target.id;

      // let's move the marker to the hit point
      marker.position.x = intersects[0].point.x;
      marker.position.y = intersects[0].point.y;
      marker.position.z = intersects[0].point.z;
    }

  }

  controls.update(delta);
  camera.position.y = 20;

  renderer.render(scene, camera);
}


</script>

<script type="text/javascript">

  var _gaq = _gaq || [];
  _gaq.push(['_setAccount', 'UA-10931011-2']);
  _gaq.push(['_trackPageview']);

  (function () {
    var ga = document.createElement('script');
    ga.type = 'text/javascript';
    ga.async = true;
    ga.src = ('https:' == document.location.protocol ? 'https://ssl' : 'http://www') + '.google-analytics.com/ga.js';
    var s = document.getElementsByTagName('script')[0];
    s.parentNode.insertBefore(ga, s);
  })();

</script>

</body>
</html>
|
광고 클릭에서 발생하는 수익금은 모두 웹사이트 서버의 유지 및 관리, 그리고 기술 콘텐츠 향상을 위해 쓰여집니다.
댓글 0
| 번호 | 제목 | 글쓴이 | 날짜 | 조회 수 |
|---|---|---|---|---|
| 1 |
[CSS 기초] DIV 태그를 이용하여 프레임 나누기
 | 졸리운_곰 | 2017.08.25 | 496 |