
- 전체
- Sample DB
- database modeling
- [표준 SQL] Standard SQL
- G-SQL
- 10-Min
- ORACLE
- MS SQLserver
- MySQL
- SQLite
- postgreSQL
- 데이터아키텍처전문가 - 국가공인자격
- 데이터 분석 전문가 [ADP]
- [국가공인] SQL 개발자/전문가
- NoSQL
- hadoop
- hadoop eco system
- big data (빅데이터)
- stat(통계) R 언어
- XML DB & XQuery
- spark
- DataBase Tool
- 데이터분석 & 데이터사이언스
- Engineer Quality Management
- [기계학습] machine learning
- 데이터 수집 및 전처리
- 국가기술자격 빅데이터분석기사
- 암호화폐 (비트코인, cryptocurrency, bitcoin)
[기계학습] machine learning Install TensorFlow with GPU Support the Easy Way on Ubuntu 18.04 (without installing CUDA)
2018.06.25 14:09
Install TensorFlow with GPU Support the Easy Way on Ubuntu 18.04 (without installing CUDA)
TensorFlow is a very important Machine/Deep Learning framework and Ubuntu Linux is a great workstation platform for this type of work. If you are wanting to setup a workstation using Ubuntu 18.04 with CUDA GPU acceleration support for TensorFlow then this guide will hopefully help you get your machine learning environment up and running without a lot of trouble. And, you don't have to do a CUDA install!
This guide is for Ubuntu 18.04 but I will also be doing a similar post using the latest Windows 10 build.
Ubuntu 18.04 is out and in my opinion it is a big improvement over 16.04. 18.04 is the latest LTS (Long Term Support) build of Ubuntu. It will become the standard base platform for a lot of projects. There is usually some lag time before packages and projects move to a new base platform like Ubuntu 18.04, however, at this point nearly all of the projects that I care about are already supported on 18.04.
I said "nearly all" ...! Right now I have Ubuntu 18.04 running supported version of Docker, NVIDIA-docker v2, Virtualbox, Anaconda Python, etc, there is only one package that I generally install that is not (officially) supported on 18.04 yet. That one package is NVIDIA CUDA. I had waited to write anything about Ubuntu 18.04 until CUDA 9.2 was released because I was sure it would have install support for 18.04. Well, guess what, it doesn't. For Ubuntu the recent 9.2 CUDA release only has installer support for 16.04 and 17.10! I was really surprised to see that. 16.04 makes sense but 17.10 is a short term intermediate release and it is similar enough to 18.04 that I don't understand why 18.04 didn't happen. There may be something broken that they just decided to wait to fix rather than delay the 9.2 release any further. That would be understandable and reasonable.
I will do a detailed post on how to do an Ubuntu 18.04 install including an unofficial CUDA 9.2 install. In this post I am assuming you have successfully installed Ubuntu 18.04. If that is not the case then you may want to wait for my detailed install post.
If you are not doing CUDA development work then you may not need to install CUDA anyway. The focus here is to get a good GPU accelerated TensorFlow work environment up and running without a lot of fuss.
Python environment setup with Anaconda Python
I highly recommend you use Anaconda Python. If you need some arguments for using Python take a look at my post Should You Learn to Program with Python. For arguments on why you should use the Anaconda Python distribution see, How to Install Anaconda Python and First Steps for Linux and Windows.
Anaconda is focused toward data-science and machine learning. It installs cleanly on your system in a single directory so it doesn't make a mess in your systems application and library directories. It is also performance optimized and links important numerical packages like numpy to Intel's MKL. Most importantly for this post, it includes easily installed modules for TensorFlow that include the CUDA dependencies!
Install Anaconda Python
- Go to the Anaconda downloads page https://www.anaconda.com/downloads and get the Python 3.6 version.
- It's good to check the file hash to be sure you got a good copy.
sha256sum Anaconda3-5.1.0-Linux-x86_64.sh
- Look up the hash for the file you downloaded. and check that it matches.
- The file that you downloaded is a bash shell archive. You can install it with
bash Anaconda3-5.1.0-Linux-x86_64.sh
- You will be asked to accept a license agreement and then questioned about the install location. By default it will install at the top of your home directory under
anaconda3. I recommend that you use that. [ If you ever want to get rid of it or reinstall you can just remove that directory.] - Next it will ask if you want to append the Anaconda executable directory to your PATH environment variable in .bashrc I recommend that you do that but, remember that you did. It will add something like the following at the end of your .bashrc file,
# added by Anaconda3 installer
export PATH="/home/dbk/anaconda3/bin:$PATH"
- Then "re-source" your .bashrc file to execute that
export. [ It will happen automatically on subsequent login. ]
source ~/.bashrc
- Next you will be asked if you want to install Microsoft VSCode. VSCode is a really good editor and it is available for free on Windows, Linux and MacOS. However, if you are interested in trying it out I would recommend that you go to the VSCode website and check it out. If you you think you want to try it then go ahead and download it and install it yourself. I usually use the Atom editor which also runs on Windows, Linux and MacOS. If you are checking out editors I recommend you try both of these as well as Sublime Text. They are all great editors!
- Check your install. If you have you sourced your .bashrc file and your PATH is correct you should see something like,
python --version

Python 3.6.4 :: Anaconda, Inc.
- Update your base Anaconda packages. (
condais a powerful package and environment management tool for Anaconda and it's not restricted to use with just Python)
conda update conda
conda update anaconda
conda update python
conda update --all
That should bring your entire base Anaconda install up to the latest packages.
There is a GUI for Anaconda called anaconda-navigator. I personally find it distracting/confusing/annoying and prefer using conda from the command-line. Your taste may differ! ... and my opinion is subject to change if they keep improving it.
Create a Python "virtual environment" for TensorFlow using conda
You should set up an environment for TensorFlow separate from your base Anaconda environment. This keeps your base clean and will give TensorFlow a space for all of it's dependencies. It is in general good practice to keep separate environments for projects especially when they have special package dependencies.
There are many possible options when creating an environment with conda including adding packages with specific version numbers and specific Python base versions. This is sometimes useful if you want fine control and it also helps with version dependencies resolution. Here we will keep it simple and just create a named environment and then activate that environment and install the packages we want inside of that.
From a command line do,
conda create --name tf-gpu
I named the environment 'tf-gpu' but you can use any name you want.
Now activate the environment, (I'll show my full terminal prompt and output instead of just the commands)
dbk@i9:~$ source activate tf-gpu
(tf-gpu) dbk@i9:~$
You can see that my shell prompt is now preceded by the the name of the environment.
Install TensorFlow from the Anaconda Cloud Repositories
The TensorFlow documentation is in general very good but the install documentation does not present a very good way to get a setup working on a workstation.
Do not follow the install documentation from the TensorFlow site! If you do you will have a painful time getting things working and you will have a nearly impossible to maintain install setup.
There is no good reason to do an (old) CUDA install and a pip install when you are using Anaconda Python. There is an up-to-date official Anaconda package for TensorFlow with GPU acceleration that includes all of the needed CUDA dependencies and it is well optimized for performance.
Lets install TensorFlow with GPU acceleration and all of the dependencies.
(tf-gpu) dbk@i9:~$ conda install tensorflow-gpu
That's it! That's all you need to do!
Just running that one short command above gave the following list of packages to be installed. They are installed and isolated in the "tf-gpu" environment we created. There is no nasty mess on your system!


I've cut some of the packages out and just left the "most interesting" ones in this output listing.
The following NEW packages will be INSTALLED:
...
...
    cudatoolkit:       9.0-h13b8566_0
    cudnn:             7.1.2-cuda9.0_0
    cupti:             9.0.176-0
...
    intel-openmp:      2018.0.0-8
    mkl:               2018.0.2-1
    mkl_fft:           1.0.1-py36h3010b51_0
    mkl_random:        1.0.1-py36h629b387_0

    libgcc-ng:         7.2.0-hdf63c60_3
    libgfortran-ng:    7.2.0-hdf63c60_3
    libprotobuf:       3.5.2-h6f1eeef_0
    libstdcxx-ng:      7.2.0-hdf63c60_3
...
    numpy:             1.14.3-py36hcd700cb_1
    numpy-base:        1.14.3-py36h9be14a7_1
...
    protobuf:          3.5.2-py36hf484d3e_0
    python:            3.6.5-hc3d631a_2
...
    tensorboard:       1.8.0-py36hf484d3e_0
    tensorflow:        1.8.0-hb11d968_0
    tensorflow-base:   1.8.0-py36hc1a7637_0
    tensorflow-gpu:    1.8.0-h7b35bdc_0
You now have GPU accelerated TensorFlow 1.8, CUDA 9.0, cuDNN 7.1, Intel's MKL libraries (that are linked into numpy) and TensorBoard. Nice!
Create a Jupyter Notebook Kernel for the TensorFlow Environment
You can work with an editor and the command line and you often want to do that, but, Jupyter notebooks are great for doing machine learning development work. In order to get Jupyter notebook to work the way you want with this new TensorFlow environment you will need to add a "kernel" for it.
With your tf-gpu environment activated do,
(tf-gpu) dbk@i9:~$ conda install ipykernel
Now create the Jupyter kernel,
(tf-gpu) dbk@i9:~$ python -m ipykernel install --user --name tf-gpu --display-name "TensorFlow-GPU"
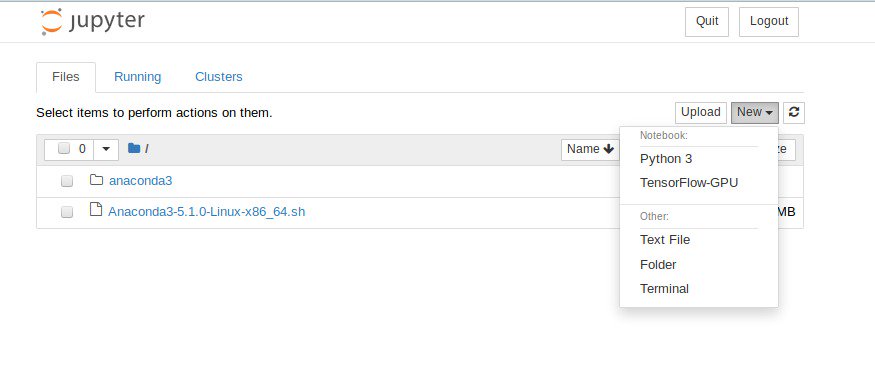
With this "tf-gpu" kernel installed, when you open a Jupyter notebook you will now have an option to to start a new notebook with this kernel.
An Example using Keras with TensorFlow Backend
In order to check everything out lets setup LeNet-5 using Keras (with our TensorFlow backend) using a Jupyter notebook with our "TensorFlow-GPU" kernel. We'll train the model on the MNIST digits data-set.
Install Keras
With the tf-gpu environment activated do,
(tf-gpu) dbk@i9:~$ conda install keras
You now have Keras installed utilizing your GPU accelerated TensorFlow. It is that easy!
Launch a Jupyter Notebook
With the tf-gpu environment activated start Jupyter,
(tf-gpu) dbk@i9:~$ jupyter notebook
From the 'New' drop-down menu select the 'TensorFlow-GPU' kernel that you added (as seen in the image in the last section). You can now start writing code!
MNIST example
Following are Python snippets you can copy into cells in your Jupyter notebook to setup and train LeNet-5 with MNIST digits data.
Import dependencies
import keras
from keras.datasets import mnist
from keras.models import Sequential
from keras.layers import Dense, Dropout
from keras.layers import Flatten,  MaxPooling2D, Conv2D
from keras.callbacks import TensorBoard
Load and process the MNIST data
(X_train,y_train), (X_test, y_test) = mnist.load_data()

X_train = X_train.reshape(60000,28,28,1).astype('float32')
X_test = X_test.reshape(10000,28,28,1).astype('float32')

X_train /= 255
X_test /= 255

n_classes = 10
y_train = keras.utils.to_categorical(y_train, n_classes)
y_test = keras.utils.to_categorical(y_test, n_classes)
Create the LeNet-5 neural network architecture
model = Sequential()
model.add(Conv2D(32, kernel_size=(3,3), activation='relu', input_shape=(28,28,1)) )
model.add(Conv2D(64, kernel_size=(3,3), activation='relu'))
model.add(MaxPooling2D(pool_size=(2,2)))
model.add(Dropout(0.25))
model.add(Flatten())
model.add(Dense(128, activation='relu'))
model.add(Dropout(0.5))
model.add(Dense(n_classes, activation='softmax'))
Compile the model
model.compile(loss='categorical_crossentropy', optimizer='adam', metrics=['accuracy'])
Set log data to feed to TensorBoard for visual analysis
tensor_board = TensorBoard('./logs/LeNet-MNIST-1')
Train the model
model.fit(X_train, y_train, batch_size=128, epochs=15, verbose=1,
          validation_data=(X_test,y_test), callbacks=[tensor_board])
The results
After running that training for 15 epochs the last epoch gave,
Epoch 15/15
60000/60000 [==============================] - 5s 83us/step - loss: 0.0188 - acc: 0.9939 - val_loss: 0.0303 - val_acc: 0.9917
Not bad! Training accuracy 99.39% and Validation accuracy 99.17%
Look at the job run with TensorBoard
Start TensorBoard
(tf-gpu) dbk@i9:~$ tensorboard --logdir=./logs --port 6006
It will give you an address similar to http://i9:6006 Open that in your browser and you will be greeted with (the wonderful) TensorBoard. These are the plots it had for that job run,
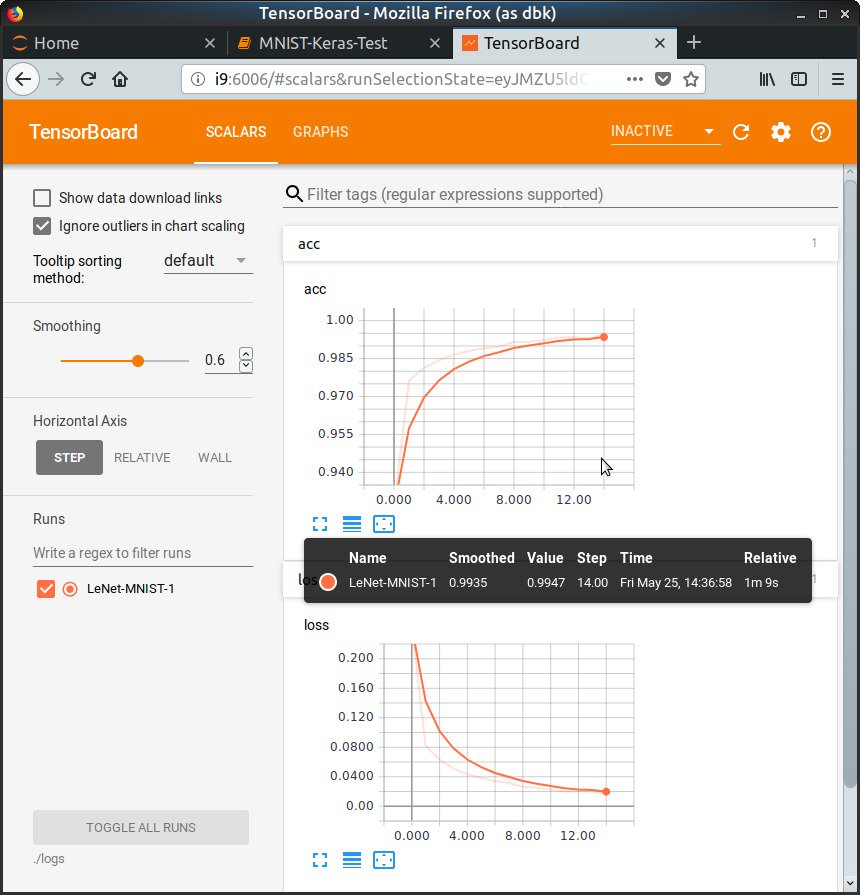
That was a model with 1.2 million training parameters and a dataset with 60,000 images. It took 1 minute and 9 seconds utilizing the NVIDIA GeForce 1080Ti in my system!
Happy computing! --dbk
[source] https://www.pugetsystems.com/labs/hpc/Install-TensorFlow-with-GPU-Support-the-Easy-Way-on-Ubuntu-18-04-without-installing-CUDA-1170/
광고 클릭에서 발생하는 수익금은 모두 웹사이트 서버의 유지 및 관리, 그리고 기술 콘텐츠 향상을 위해 쓰여집니다.
