
- 전체
- Python 일반
- Python 수학
- Python 그래픽
- Python 자료구조
- Python 인공지능
- Python 인터넷
- Python SAGE
- wxPython
- TkInter
- iPython
- wxPython
- pyQT
- Jython
- django
- flask
- blender python scripting
- python for minecraft
- Python 데이터 분석
- Python RPA
- cython
- PyCharm
- pySide
- kivy (python)
Flask AngularJS app powered by RESTful API – Setting Up the Application
In the first and second of part of this tutorial series, we saw how to get started with creating a RESTful API using Python Flask and MySQL. In this part of the series, we’ll use those RESTful APIs to create a Flask AngularJS application.
AngularJS is JavaScript framework by Google for building powerful and robust web application. Now if you ask why AngularJS, quoting from the official docs,
HTML is great for declaring static documents, but it falters when we try to use it for declaring dynamic views in web-applications. AngularJS lets you extend HTML vocabulary for your application. The resulting environment is extraordinarily expressive, readable, and quick to develop.
Why Flask AngularJS won’t work together ?
While trying to use Flask and AngularJS together using the jinja templates it didn’t quite work straight away. I recommend you read why AngularJS not working with Flask web app for more information.
Getting Started
Let’s get started by creating a clone of the angular-seed project. It’s good to have not to start from scratch and the angular seed project gives us the required boiler plate code to begin development. So, clone the repository.
git clone https://github.com/angular/angular-seed.git
Once you have cloned the repository navigate to the project directory and install the required dependency.
cd angular-seed
npm install
When you are done with installing the dependency, simply type:
npm start
The above code would start the application server and you should be able to view the default application running at http://localhost:8000/app/index.html.
Creating Home Page
First, we’ll remove the existing pages from the default angular seed project. Inside angular-seed/app directory, remove the view1 and view2 directories. Open app/index.html and remove the references to the view1 and view2 scripts.
Start by installing bootstrap in the project. We’ll use bower to install bootstrap, so make sure you have bower installed. Navigate to the project directory and install bootstrap using bower.
bower install bootstrap
Once bootstrap has been installed, refer the bootstrap CSS in the index.html page. Modify the index.html page as shown below:
<!DOCTYPE html>
<html lang="en" ng-app="myApp" class="no-js">
<head>
<meta charset="utf-8">
<meta http-equiv="X-UA-Compatible" content="IE=edge">
<title>My AngularJS App</title>
<meta name="description" content="">
<meta name="viewport" content="width=device-width, initial-scale=1">
<link rel="stylesheet" href="bower_components/bootstrap/dist/css/bootstrap.css">
<link rel="stylesheet" href="bower_components/html5-boilerplate/dist/css/normalize.css">
<link rel="stylesheet" href="bower_components/html5-boilerplate/dist/css/main.css">
<link rel="stylesheet" href="app.css">
<script src="bower_components/html5-boilerplate/dist/js/vendor/modernizr-2.8.3.min.js"></script>
</head>
<body>
<div class="container">
<div class="header clearfix">
<nav>
<ul class="nav nav-pills pull-right">
<li role="presentation" class="active"><a href="#">Home</a></li>
<li role="presentation"><a href="#">SignIn</a></li>
<li role="presentation"><a href="#">SignUp</a></li>
</ul>
</nav>
<h3 class="text-muted">AngularJS & Python</h3>
</div>
<div ng-view></div>
<footer class="footer">
<p>© Company 2014</p>
</footer>
</div>
<script src="bower_components/angular/angular.js"></script>
<script src="bower_components/angular-route/angular-route.js"></script>
<script src="app.js"></script>
<script type="text/javascript" src="home/home.js"></script>
<script src="components/version/interpolate-filter.js"></script>
</body>
</html>
In the above code, most of the code is pure HTML but there is one piece of HTML which is enhanced using AngularJS.
<div ng-view></div>
The way our AngularJS application works is, it keeps the outer template or structure the same and keeps changing the inner view of the application. So each time we click on the a menu item, only the view changes and the page isn’t reloaded. In order to get that working AngularJS provides a directive called ngView. From the official docs,
ngViewis a directive that complements the $route service by including the rendered template of the current route into the main layout (index.html) file. Every time the current route changes, the included view changes with it according to the configuration of the$routeservice.
And as you can notice in the above div in the index.html page, we have added the ngView directive to it.
Next create a folder called home inside the app directory. Inside a home folder create a file called home.html which is our home view.
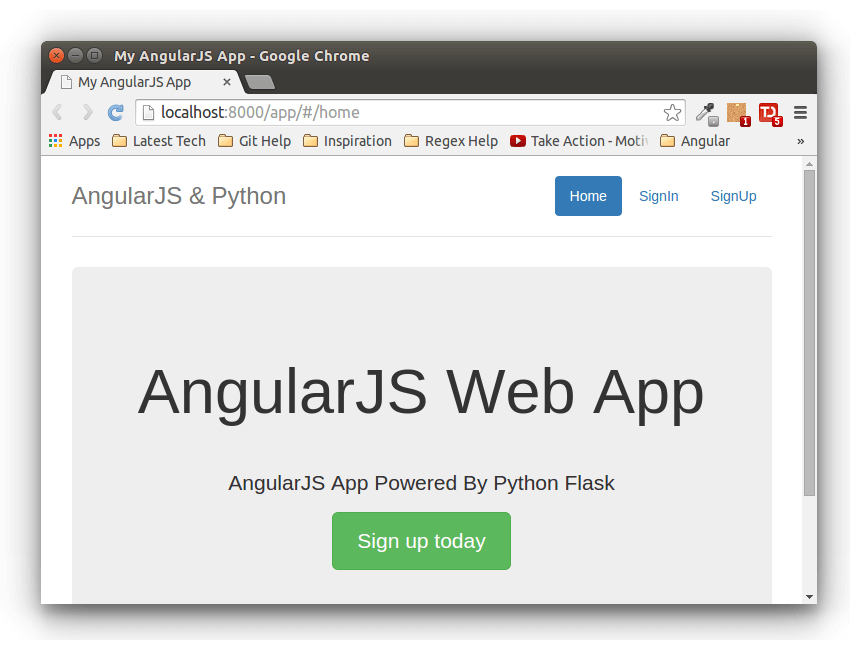
<div class="jumbotron">
   <h1>AngularJS Web App</h1>
   <p class="lead">AngularJS App Powered By Python Flask</p>
   <p><a class="btn btn-lg btn-success" href="#" role="button">Sign up today</a></p>
</div>
Create a file called home.js inside the home directory. In this file we’ll define the home module and controller for the home view.
'use strict';

angular.module('myApp.home', ['ngRoute'])

.config(['$routeProvider', function($routeProvider) {
  $routeProvider.when('/home', {
    templateUrl: 'home/home.html',
    controller: 'HomeCtrl'
  });
}])

.controller('HomeCtrl', [function() {

}]);
As seen in the above code, we first created an AngularJS module called myApp.home. Then we injected ngRoute, a routing module provided by AngularJS. Using $routeProvider we have defined the view and controller for the route /home.


In app.js add the home module to the AngularJS app and set the default route to /home.
'use strict';

// Declare app level module which depends on views, and components
angular.module('myApp', [
  'ngRoute',
  'myApp.home'
]).
config(['$routeProvider', function($routeProvider) {
  $routeProvider
  .otherwise({redirectTo: '/home'});
}]);
Save the above changes and reload the project running at http://localhost:8000/app.
Creating Sign In Page
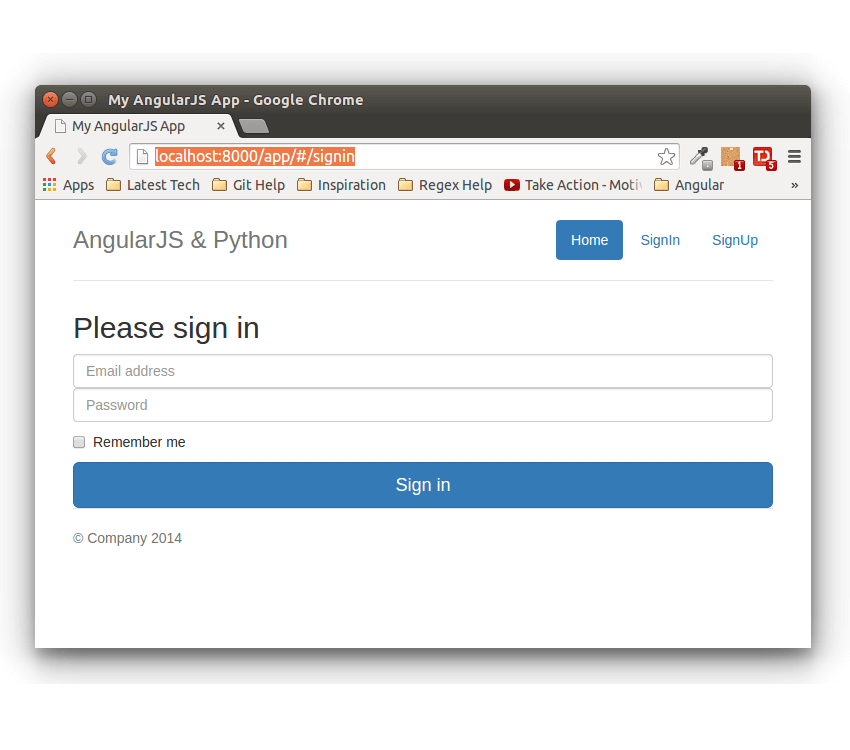
Create a folder called signin inside the app folder. Inside signin folder create a file called signin.html which is our sign in view and a file called signin.js which would have our route and controller. Here is how our signin.html file would look like:
<form class="form-signin">
   <h2 class="form-signin-heading">Please sign in</h2>
   <label for="inputEmail" class="sr-only">Email address</label>
   <input type="email" id="inputEmail" class="form-control" placeholder="Email address" required="" autofocus="">
   <label for="inputPassword" class="sr-only">Password</label>
   <input type="password" id="inputPassword" class="form-control" placeholder="Password" required="">
   <div class="checkbox">
     <label>
     <input type="checkbox" value="remember-me"> Remember me
     </label>
   </div>
   <button class="btn btn-lg btn-primary btn-block" type="submit">Sign in</button>
</form>
Open up signin.js and add the following code to set up the route and controller for the sign in view.
'use strict';

angular.module('myApp.signin', ['ngRoute'])

.config(['$routeProvider', function($routeProvider) {
  $routeProvider.when('/signin', {
    templateUrl: 'signin/signin.html',
    controller: 'SignInCtrl'
  });
}])

.controller('SignInCtrl', [function() {

}]);
Add the signin module to the AngularJS application in the app.js file.
'use strict';

// Declare app level module which depends on views, and components
angular.module('myApp', [
  'ngRoute',
  'myApp.home',
  'myApp.signin'
]).
config(['$routeProvider', function($routeProvider) {
  $routeProvider
  .otherwise({redirectTo: '/home'});
}]);
Finally add the signin.js script reference in the index.html page.
<script src="signin/signin.js"></script>
Save the above changes and refresh the application page. Point your browser URL to http://localhost:8000/app/#/signin and you should be able to view the sign in page.
Also modify the href URL in the index.html page for the sign in and home page links.
<li role="presentation" class="active"><a href="#home">Home</a></li>
<li role="presentation"><a href="#signin">SignIn</a></li>
<li role="presentation"><a href="#signup">SignUp</a></li>
I have also modified the sign up link URL which we’ll implement next.
Creating Sign Up Page
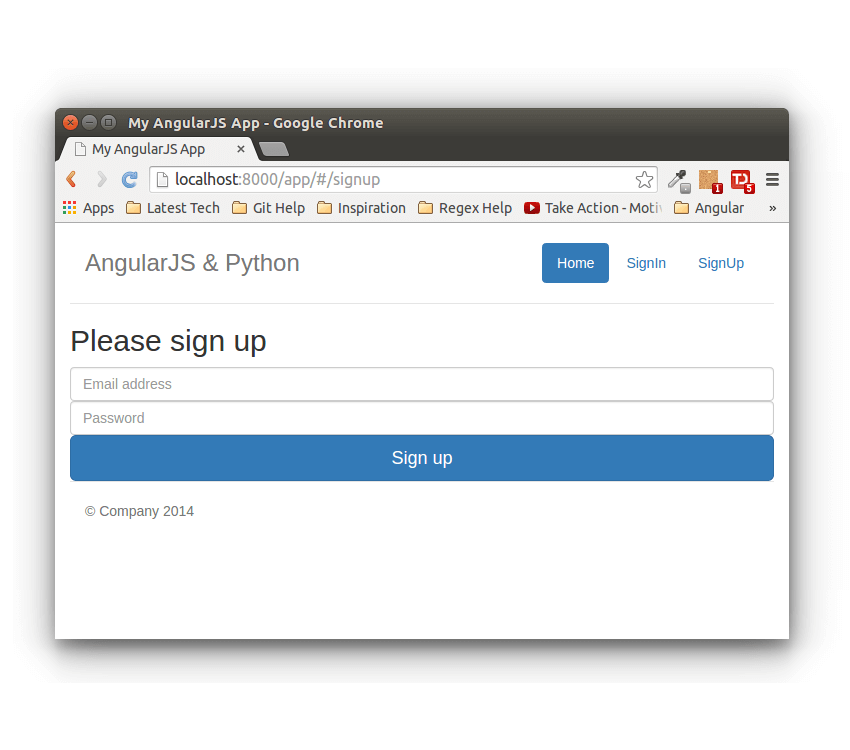
So we already created our home page and sign in page. Next, we’ll create the view, route and controller for our sign up page. In the app directory, create a new folder called signup. Inside signup create a new file called signup.html, which would be our view. Here is how signup.html would look like:
<form class="form-signin">
   <h2 class="form-signin-heading">Please sign up</h2>
   <label for="inputEmail" class="sr-only">Email address</label>
   <input type="email" id="inputEmail" class="form-control" placeholder="Email address" required="" autofocus="">
   <label for="inputPassword" class="sr-only">Password</label>
   <input type="password" id="inputPassword" class="form-control" placeholder="Password" required="">

   <button class="btn btn-lg btn-primary btn-block" type="submit">Sign up</button>
</form>
Create a file called signup.js inside signup folder. We define the route and controller for the signup.html view inside this file. Here is how signup.js would look like:
'use strict';

angular.module('myApp.signup', ['ngRoute'])

.config(['$routeProvider', function($routeProvider) {
  $routeProvider.when('/signup', {
    templateUrl: 'signup/signup.html',
    controller: 'SignUpCtrl'
  });
}])

.controller('SignUpCtrl', [function() {

}]);
Add a reference to the signup.js script in the index.html page.
<script src="signup/signup.js"></script>
Inside app.js new the newly added myApp.signup module to the AngularJS app.
'use strict';

// Declare app level module which depends on views, and components
angular.module('myApp', [
  'ngRoute',
  'myApp.home',
  'myApp.signin',
  'myApp.signup'
]).
config(['$routeProvider', function($routeProvider) {
  $routeProvider
  .otherwise({redirectTo: '/home'});
}]);
Save the above changes and refresh the application in the browser. On clicking the sign up link you should be able to view the sign up page of our Flask AngularJS web application.
Wrapping It Up
In this part of the tutorial, we saw how to get started with creating the Flask AngularJS application. We simply designed the required pages and linked them. In the next part of the tutorial, we’ll implement the functionality using the Flask RESTful APIs created in the first and second part of this tutorial series.
Source code from this tutorial is available on GitHub.
Do let us know you thoughts, suggestions or any corrections in the comments below !
See you in the next part. Till then, Happy Coding 본 웹사이트는 광고를 포함하고 있습니다.
광고 클릭에서 발생하는 수익금은 모두 웹사이트 서버의 유지 및 관리, 그리고 기술 콘텐츠 향상을 위해 쓰여집니다.
