
- 전체
- Sample DB
- database modeling
- [표준 SQL] Standard SQL
- G-SQL
- 10-Min
- ORACLE
- MS SQLserver
- MySQL
- SQLite
- postgreSQL
- 데이터아키텍처전문가 - 국가공인자격
- 데이터 분석 전문가 [ADP]
- [국가공인] SQL 개발자/전문가
- NoSQL
- hadoop
- hadoop eco system
- big data (빅데이터)
- stat(통계) R 언어
- XML DB & XQuery
- spark
- DataBase Tool
- 데이터분석 & 데이터사이언스
- Engineer Quality Management
- [기계학습] machine learning
- 데이터 수집 및 전처리
- 국가기술자격 빅데이터분석기사
- 암호화폐 (비트코인, cryptocurrency, bitcoin)
[기계학습] machine learning Installing Tensorflow GPU on Ubuntu 18.04 LTS
2018.05.06 19:50
Installing Tensorflow GPU on Ubuntu 18.04 LTS
While I’m not an expert, I wanted to detail what I did to get tensorflow-gpu working with my fresh Ubuntu 18.04 LTS install. NVIDIA doesn’t have any official downloads for Ubuntu 18.04 yet, but you can get things to work with the available files for Ubuntu 17.04.
Check your NVIDIA driver version
The first thing you should check is that you have an Nvidia driver installed for your graphics card. Your graphics card must support at least Nvidia compute 3.0 to install tensorflow-gpu.
You can check what graphics driver you have installed with thenvidia-smicommand. You should see some output like the following:

If you don’t have a proper driver installed, go do that now.
Install CUDA Toolkit 9.0
Head over to https://developer.nvidia.com/cuda-toolkit and grab the the runfile download for Ubuntu 17.04. While this is for a different version of Ubuntu, you can get it to install what you need. You’ll have to go to the legacy downloads archive page to find version 9.0.
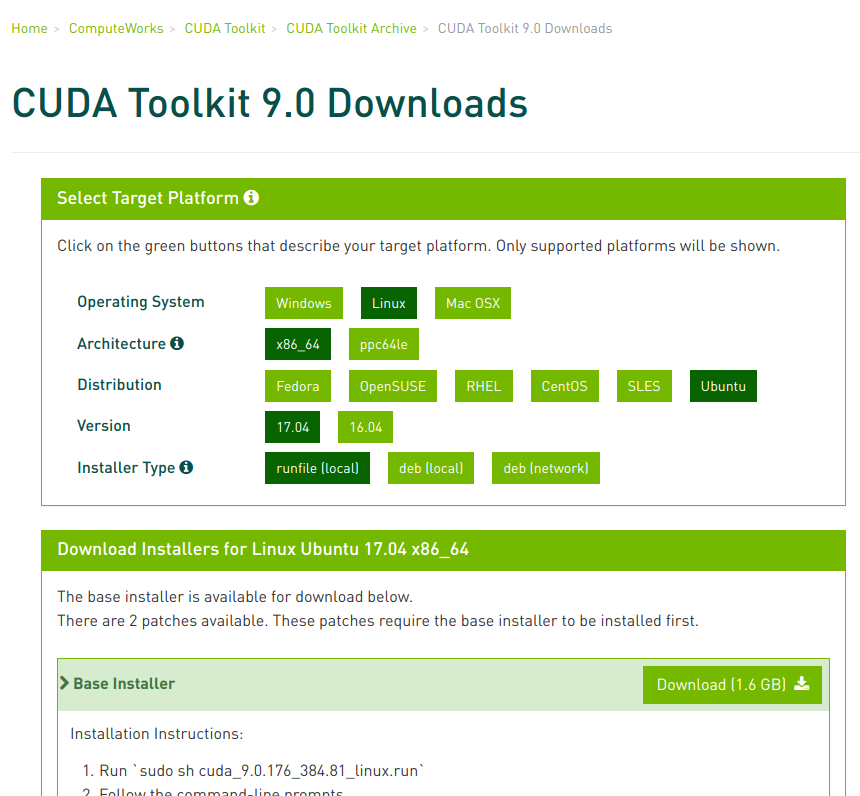
Once you’ve got that file, navigate to where the file was downloaded in your terminal and do
sudo chmod +x cuda_9.0.176_384.81_linux.run
./cuda_9.0.176_384.81_linux.run --override
Accept the terms and conditions, say yes to installing with an unsupported configuration, and no to “Install NVIDIA Accelerated Graphics Driver for Linux-x86_64 384.81?”. Make sure you don’t agree to install the new driver. In my experience, doing so often leads to system instability issues. Follow the prompts to install the toolkit using the default install locations.
Install CUDNN 7.0
Next, head to https://developer.nvidia.com/cudnn to get CUDNN 7.0. Go to the downloads archive page again and find version 7.0 for CUDA 9.0 that you just installed. Download the link that says “cuDNN v7.0.5 Library for Linux”. This will download an archive that you can unpack and move the contents the correct locations.
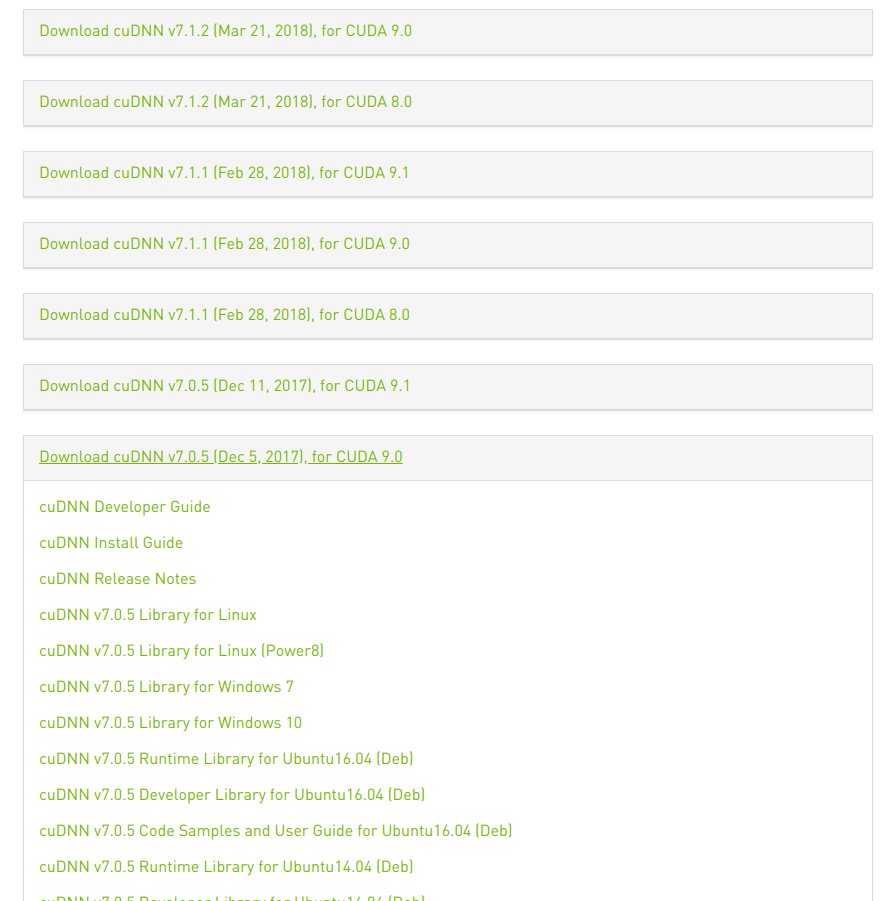
Once downloaded, unpack the archive and move it the contents into the directory where you install CUDA 9.0:
# Unpack the archive
tar -zxvf cudnn-9.0-linux-x64-v7.tgz
# Move the unpacked contents to your CUDA directory
sudo cp -P cuda/lib64/libcudnn/* /usr/local/cuda-9.0/lib64/
sudo cp  cuda/include/cudnn.h /usr/local/cuda-9.0/include/
# Give read access to all users
sudo chmod a+r /usr/local/cuda-9.0/include/cudnn.h /usr/local/cuda/lib64/libcudnn*
Install libcupti
This one is easy.


sudo apt-get install libcupti-dev
Do the CUDA post-install actions
So Tensorflow can find your CUDA installation and use it properly, you need to add these lines to the end of you ~/.bashrc or ~/.zshrc.
export PATH=/usr/local/cuda-9.0/bin${PATH:+:${PATH}}
export LD_LIBRARY_PATH=/usr/local/cuda/lib64:${LD_LIBRARY_PATH:+:${LD_LIBRARY_PATH}}
Restart your terminal before proceeding to the next step.
Install Tensorflow GPU
Finally, to install tensorflow-gpu run
pip install --upgrade tensorflow-gpu
I recommend installing tensorflow in a virtualenv to prevent having to muck around with your system Python packages. The official Tensorflow install instructions give various options, so you can choose what works best for you. If you choose the virtualenv route, I highly recommend using virtualenvwrapper, which makes using virtualenv far easier.
You can now test everything worked by opening a new python interpreter with python and running the following commands:
from tensorflow.python.client import device_lib

device_lib.list_local_devices()
If everything worked fine, you’ll see your GPU listed as part of the output like so:
[{
    name: "/device:CPU:0",
    device_type: "CPU",
    memory_limit: 268435456,
    locality {},
    incarnation: 12584189039274141042
},{
    name: "/device:GPU:0",
    device_type: "GPU",
    memory_limit: 3252486144,
    locality {
      bus_id: 1,
      links {}
    },
    incarnation: 16344452236433767630,
    physical_device_desc: "device: 0, name: GeForce GTX 1050, pci bus id: 0000:01:00.0, compute capability: 6.1"
]
That’s it! Good luck!
[source] https://medium.com/@taylordenouden/installing-tensorflow-gpu-on-ubuntu-18-04-89a142325138
광고 클릭에서 발생하는 수익금은 모두 웹사이트 서버의 유지 및 관리, 그리고 기술 콘텐츠 향상을 위해 쓰여집니다.
