
- 전체
- Native Apps
- WinJS App
- C# Apps
- XAML
- VB.net
- VisualC.net
- C++
- MFC
- visual studio mobile app dev
- Azure ms cloud service
- Asp.net
- 인공지능 (AI)
- wpf
- UWP
- MAUI
- asp.net
MFC [Windows Apps][MFC] 2D LUA Based Robot Simulator : 2D LUA 기반 로봇 시뮬레이터
2023.11.29 01:25
[Windows Apps][MFC] 2D LUA Based Robot Simulator : 2D LUA 기반 로봇 시뮬레이터
2D LUA Based Robot Simulator
 127.1K
 7.9K
7.9K 118
118- Download Azolla 1.0.4 (binary) - 583.21 KB
- Download Azolla 1.0.4 (source) - 1.36 MB
- azolla104-bin.zip azolla104-src-vs2005.zip
- Download Getting Started Document - 227.78 KB
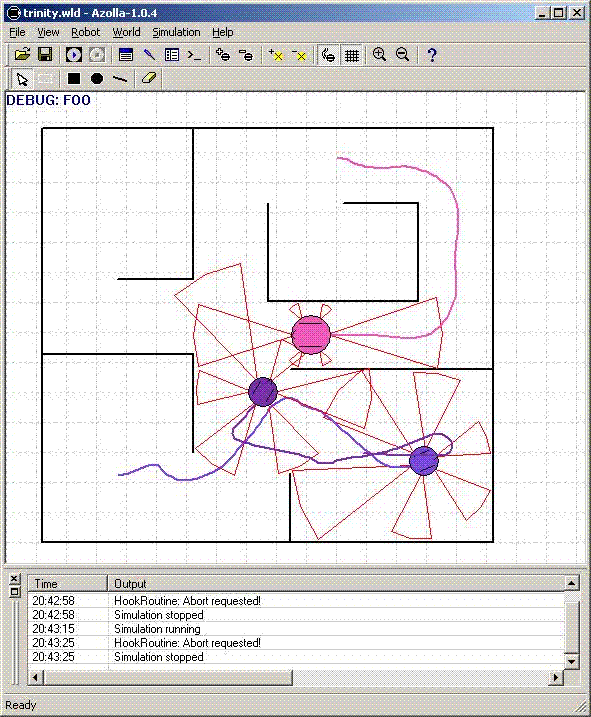
Introduction
Here, I would like to introduce a 2D mobile robot simulator. With this simulator, we can design how a robot will navigate in a 2D world by using a set of rules that we design. The rules are designed by using Lua script. Lua itself is a powerful, fast, lightweight, embeddable scripting language. Using Lua will offer us many benefits in designing algorithms for mobile robots. For the world editor, we use GDI Device Context programming. Users can create the environment for testing the robots by using the click and drag method. Here is a summary of the features:
- Differential steering robot
- Multiple-robot simulation
- Sonar and laser beam type distance sensor
- Embedded Lua script for the robot code
- Graphical world editor
- Code editor with syntax colorization and auto completion
Knowledge in Lua is also necessary. Lua is not something difficult to learn. You can check the Lua website.
The Robot Theory
The robot that we have here is a wheeled robot. It has two wheels. It navigates with a differentially steered drive system. A differentially steered drive system is like a wheeled chair. Steering a wheeled chair can be done by varying the speed of its wheels. If one wheel is rotating faster, the wheeled chair will make a curved path. If both wheels are on the same speed, it will make a straight path.
The Robot Mathematics
For details about mobile robot theory, you can refer the G.W. Lucas tutorial. To make it simple, here are the equations used to model differential steering behaviour:

If the left wheel and the right wheel are at the same speed, the equation above cannot be implemented since it will result in division by zero error. Using L'Hospital's rule, it can be shown that the equation has limits approaching a straight line (check again the G.W. Lucas tutorial). So, when the left wheel and the right wheel are at the same speed, use this equation (please notice that dx/dt means the difference between the current x position and the previous x position):


To get the current position of the robot, we only need to input the time, left wheel speed, and the right wheel speed to the equation above. The robot angle is something that we also need to calculate. Here is the equation to calculate the robot angle:

Finally, here is the implementation code for those equations:
void CRobot::goRobotGo(double *t){
    if (canResetTime){
        *t = 0;
        canResetTime = false;
    }

    int plusFactor = m_robot.rWheelSpeed + m_robot.lWheelSpeed;
    int minusFactor = m_robot.lWheelSpeed - m_robot.rWheelSpeed;

    if (m_robot.lWheelSpeed - m_robot.rWheelSpeed != 0.0){
        m_robot.theta = m_theta0 + minusFactor * (*t) / m_robot.size ;
        m_robot.pos.x = ceil(m_pos0.x + m_robot.size / 2 * plusFactor / minusFactor
                        * (sin(minusFactor * (*t) / m_robot.size + m_robot.theta0)
                        - sin(m_robot.theta0)));
        m_robot.pos.y = m_pos0.y - m_robot.size / 2 * plusFactor / minusFactor
                        * (cos(minusFactor * (*t) / m_robot.size + m_robot.theta0)
                        - cos(m_robot.theta0));
    }
    else{
        m_robot.pos.x = plusFactor / 2 * cos(m_robot.theta) * (*t) + m_pos0.x;
        m_robot.pos.y = plusFactor / 2 * sin(m_robot.theta) * (*t) + m_pos0.y;
    }
}
All things related to the robot are put in the class CRobot in the files Robot.h and Robot.cpp.
The World Editor
The world editor is simply an implementation of GDI device context programming. We use simple graphs such as rectangle, ellipse, and line to create rooms and obstacles. With a little math, we can make those graphs selectable, moveable, and resizable. This world editor is based on my own previous work. I know it is very simple and also not good since I received several bad responses on it. I will make it better if I have time. All things related to the world editor are in CCanvas in the files Canvas.h and Canvas.cpp.
The Code Editor
For the code editor, I use the Scintilla library. With the Scintilla library, we can easily make an editor that supports syntax colorization. I learned about this library from an article I found on CodeProject. Check here and here. All things related to the world editor are in the files EditorDlg.h and EditorDlg.cpp.
The Embedded Lua
Lua is a very nice programming language. It is a light-weight, small-footprint programming language designed for extending applications. Here, I embedded several C++ functions to Lua by using the Lua script C++ wrapper created by RhicadS.
readsensor(integer index)accepts the sensor index; returns the measured distance of the active robot.setspeed(integer left, integer right)accepts the left and right wheel speed of the active robot; returns nothing.getangle()accepts nothing; returns the current angular position of the active robot (in radians).getnumofrobots()accepts nothing; returns number of existing robots.getposition()accepts nothing; returns x and y position of active robot.gettarget(int index)accepts index of target; returns x and y position of selected target.textline(string msg)accepts the message to be displayed; returns nothing.setactiverobot(integer index)activates a certain robot.stepforward()runs simulation one time step.
Basically, those functions are used to manipulate the robot. Lua itself has many internal functions that you can use to develop your algorithm. You can check the Lua reference manual to see the available functions such as: functions for math, string, or file manipulation.
How to Use
You can display the code editor window by clicking View >> Editor, or by clicking View code editor on the toolbar (Ctrl+E). A world file is saved with a *.wld extension, while the code file is saved with a *.lua extension. Loading and saving them are done separately.
Let's give a try. First, draw a big ellipse on the world editor. Then, draw another smaller ellipse inside the first ellipse (or you can load file doubled_wall.wld). Drag the robot inside the alley made by these two ellipses. Load the code editor and paste the following code. Run the simulation. When the robot disappears, click the menu Robot >> Reset Position.
function azolla.main(azolla)
    azolla:setspeed(20,20)
    while true do
        a = azolla:readsensor(1)
        b = azolla:readsensor(5)
        if (a - b > 2) then
            azolla:setspeed(30,20)
        end

        if (a - b < -2) then
            azolla:setspeed(20,30)
        end

        if( (a - b > -2)  and (a - b < 2) ) then
            azolla:setspeed(20,20)
        end
        azolla:stepforward()
    end
end
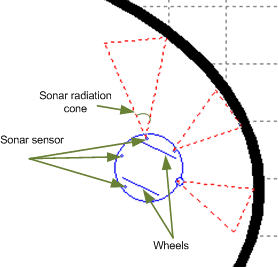
The above code is to make the robot move forward following the wall. See how it reads the sensor value. There are six sensors in the robot (by default). You can modify the number of sensors using the menu Robot >> Set properties. They are all laser beam type distance. As we know, there are also sonar type distance sensors. Take a look at the picture. Sensor numbering starts from the robot head, and the index increases in the clockwise direction.
Let's try another. Within the demo, I included two files trinity.wrl and trinity.lua. Load the two files. Copy and paste the following code:
function azolla.main(azolla)
    azolla:textline("START...\n")
    while(true) do
        for i = 0, azolla:getnumofrobots() - 1 do
            azolla:setactiverobot(i)
            front = azolla:readsensor(0)
            left = azolla:readsensor(5)
            right = azolla:readsensor(1)

            if (front < 10) then
                azolla:setspeed(4,-4)

            else
                delta = 0.5 * (right - left)
                azolla:setspeed(4 + delta,4 - delta)
            end
        end
    azolla:stepforward()
    end
end
Let's take a closer look. function azolla.main(azolla) will always be first called. It's the main function. The function is always written with something like this: function azolla.function_name(azolla)<function_name(parameter_if_exist)>< />. In the code above, the robot will travel around the maze using simple P(proportional) algorithm. The robot will read input from left and right sensor. Control signal (delta) will be calculated based on the difference between left and right sensor value. This control signal will be used to correct the speed of both wheels.< />
Multiple Robot Simulation
Since version 1.0.2, Azolla now supports multiple robot simulation. We can add several robots and run all of them at the same time. To activate a certain robot, setcativerobot must be used. Take a look at the following code:
function azolla.main(this)
    azolla:setspeed(20,20)
    while true do
        --ACTIVATE THE ROBOT ONE BY ONE!!!
        for i = 0, azolla:getnumofrobot() - 1 do
            --This part is for wall following
            azolla:setactiverobot(i)
            a = azolla:readsensor(1)
            b = azolla:readsensor(5)

            if (a - b > 2) then
                azolla:setspeed(30,20)
            end

            if (a - b < -2) then
                azolla:setspeed(20,30)
            end

            if( (a - b > -2)  and (a - b < 2) ) then
                azolla:setspeed(20,20)
            end
        end
        azolla:stepforward()
    end
end
The above code is to control several robots so that those robots will move forward following walls in left and right side. It is the same as the first example (doubled_wall.wld). We can use the same code for wall following part. As we can see, before moving the robot, we should decide which robot we want to move. We can do iteration to move all the robots sequentially.
Limitations
Azolla is not a real time robot simulator. If we add more and more robots, the simulation will run slower. To make simulation faster, we can increase time step for simulation.
While for sensor reading, it is based on pixel reading of the screen. In this case, we must make sure that the simulation is run in the area of the main window. If the robot goes out of the main window, the sensor algorithm will read the wrong screen pixels. And also, if we have another window on top of the main window and that window can be reached by sensor of the robot, the sensor algorithm will also read the wrong screen pixels. For the next release, I plan to implement geometrical method for sensor instead of reading screen pixel values.
Points of Interest
I really hope you try this simulation software. There have been plenty of improvements I made since the first release. Previously, the simulation didn't work in a multi-core computer. That bug has been fixed. Excessive CPU usage issue has also been fixed. Overall, I can say it works very nicely. I hope you like it and it is helpful for you. You can read the History section to see the details of the improvements made. For further information, please take a look at the provided PDF file.
References
- A Tutorial and Elementary Trajectory Model for the Differential Steering System of Robot Wheel Actuators by G.W. Lucas
- Lua reference manual
Future Work
For future work, I want to make this simulation software more reliable so it can be used for study and research purposes in the area of mobile robots. To reach that goal, there are many things that need to be done.
History
- 1.0.0 February, 2009
- Initial post
- 1.0.0 March, 2009
- Article updated
- Minor bug fixes
- 1.0.1 February, 2010
- Article updated
- Name changed to Azolla
- Data type for simulation is changed from
doubletofloat - Fixed: Wrong kinematic equation, causing strange robot motion
- Fixed: Bug on multithreading, causing excessive CPU usage, and simulation doesn't work on multi-core CPUs
- Added: User can show/hide robot trail
- Added: User can show/hide grid in world editor
- Added: Sonar type sensor
- Added: User can modify maximum, minimum, and cone angle of the sonar sensors (if zero is selected for the cone angle, the sensors will become laser-beam type sensors)
- Added: User can apply Gaussian noise on sensor readings
- Added: User can modify time step for simulation
- Added: Auto completion in code editor
- Added: "Find next" in code editor
- Added: "Select all" in world editor
- 1.0.2 February, 2010
- Article updated
- Fixed: Kinematic equation runs much faster
- Fixed: Robot's front side looks better
- Fixed: Glitch appears while running simulation
- Added: Support for multiple robot simulation
- Added: More icons on toolbar
- 1.03 March, 2010
- Fixed: Bug when showing trajectory
- Added: Zoom in and zoom out function
- Added: A color can be assigned to each robot
- Added: Simple collision detection
- Many other bug fixes and feature enhancements
- 1.04 July 2010
- Added: Log window and target mark
- Added: Several new commands
- Sensors now work using geometrical methods such as: intersection of line to line, line to rectangle and line to ellipse
- Better collision detection
- More informative error message
- Many other bug fixes and feature enhancements
License
This article, along with any associated source code and files, is licensed under A Public Domain dedication
 Indonesia
- Azolla 1.0.4(바이너리) 다운로드 - 583.21KB
- Azolla 1.0.4 다운로드(소스) - 1.36MB
- azolla104-bin.zip azolla104-src-vs2005.zip
- 시작하기 문서 다운로드 - 227.78KB
소개
여기서는 2D 모바일 로봇 시뮬레이터를 소개하고자 합니다. 이 시뮬레이터를 사용하면 우리가 설계한 일련의 규칙을 사용하여 로봇이 2D 세계에서 어떻게 탐색할지 설계할 수 있습니다. 규칙은 Lua 스크립트를 사용하여 설계되었습니다. Lua 자체는 강력하고 빠르며 가벼우며 내장 가능한 스크립팅 언어입니다. Lua를 사용하면 모바일 로봇용 알고리즘을 설계하는 데 많은 이점을 얻을 수 있습니다. 월드 에디터의 경우 GDI Device Context 프로그래밍을 사용합니다. 사용자는 클릭 앤 드래그 방식을 이용하여 로봇 테스트를 위한 환경을 구축할 수 있습니다. 기능을 요약하면 다음과 같습니다.


- 차동 조향 로봇
- 다중 로봇 시뮬레이션
- 소나 및 레이저 빔형 거리 센서
- 로봇 코드에 내장된 Lua 스크립트
- 그래픽 세계 편집기
- 구문 색상화 및 자동 완성 기능을 갖춘 코드 편집기
Lua에 대한 지식도 필요합니다. 루아는 배우기 어려운 것이 아닙니다. 루아 홈페이지를 확인하실 수 있습니다 .
로봇 이론
여기 있는 로봇은 바퀴 달린 로봇입니다. 바퀴가 두 개 있어요. 차동 조향 드라이브 시스템으로 탐색합니다. 차동 조향 구동 시스템은 바퀴달린 의자와 같습니다. 바퀴가 달린 의자를 조종하는 것은 바퀴의 속도를 변화시킴으로써 이루어질 수 있습니다. 한 바퀴가 더 빨리 회전하면 바퀴 달린 의자는 곡선 경로를 만듭니다. 두 바퀴가 같은 속도로 움직인다면 직선 경로를 만들 것입니다.
로봇 수학
모바일 로봇 이론에 대한 자세한 내용은 GW Lucas 튜토리얼을 참조하세요 . 단순화하기 위해 차동 조향 동작을 모델링하는 데 사용되는 방정식은 다음과 같습니다.
왼쪽 바퀴와 오른쪽 바퀴의 속도가 같은 경우 위의 방정식은 0으로 나누기 오류가 발생하므로 구현할 수 없습니다. L'Hospital의 규칙을 사용하면 방정식에 직선에 접근하는 한계가 있음을 알 수 있습니다(GW Lucas 튜토리얼을 다시 확인하세요). 따라서 왼쪽 바퀴와 오른쪽 바퀴가 동일한 속도에 있을 때 다음 방정식을 사용하십시오( dx/dt현재 x 위치와 이전 x 위치 간의 차이를 의미함).
로봇의 현재 위치를 얻으려면 위의 방정식에 시간, 왼쪽 바퀴 속도, 오른쪽 바퀴 속도만 입력하면 됩니다. 로봇 각도도 계산해야 하는 항목입니다. 로봇 각도를 계산하는 방정식은 다음과 같습니다.
마지막으로 해당 방정식의 구현 코드는 다음과 같습니다.
void CRobot::goRobotGo( double *t){ if (canResetTime){ *t = 0 ; canResetTime = false ; } int plusFactor = m_robot.rWheelSpeed + m_robot.lWheelSpeed; int minusFactor = m_robot.lWheelSpeed - m_robot.rWheelSpeed; if (m_robot.lWheelSpeed - m_robot.rWheelSpeed != 0 . 0 ){ m_robot.theta = m_theta0 + minusFactor * (*t) / m_robot.size ; m_robot.pos.x = ceil(m_pos0.x + m_robot.size / 2 * plusFactor / minusFactor * (sin(minusFactor * (*t) / m_robot.size + m_robot.theta0) - sin(m_robot.theta0))); m_robot.pos.y = m_pos0.y - m_robot.size / 2 * plusFactor / minusFactor * (cos(minusFactor * (*t) / m_robot.size + m_robot.theta0) - cos(m_robot.theta0)); } 또 다른 { m_robot.pos.x = plusFactor / 2 * cos(m_robot.theta) * (*t) + m_pos0.x; m_robot.pos.y = plusFactor / 2 * sin(m_robot.theta) * (*t) + m_pos0.y; } }
로봇과 관련된 모든 것들은 클래스의 Robot.h 및 Robot.cppCRobot 파일에 저장됩니다 .
월드에디터
월드 에디터는 단순히 GDI 장치 컨텍스트 프로그래밍을 구현한 것입니다. 직사각형, 타원, 선 등의 간단한 그래프를 사용하여 공간과 장애물을 만듭니다. 약간의 수학을 사용하면 해당 그래프를 선택 가능하고 이동 가능하며 크기 조정 가능하게 만들 수 있습니다. 이 월드 에디터는 내 이전 작업을 기반으로 합니다 . 나는 그것에 대해 몇 가지 나쁜 반응을 받았기 때문에 그것이 매우 간단하고 좋지 않다는 것을 알고 있습니다. 시간이 있으면 더 좋게 만들겠습니다. 월드 에디터와 관련된 모든 것들은 Canvas.h 및 Canvas.cppCCanvas 파일에 있습니다 .
코드 편집기
코드 편집기로는 Scintilla 라이브러리를 사용합니다. Scintilla 라이브러리를 사용하면 구문 색상화를 지원하는 편집기를 쉽게 만들 수 있습니다. CodeProject에서 찾은 기사를 통해 이 라이브러리에 대해 배웠습니다. 여기 와 여기를 확인하세요 . 월드 에디터와 관련된 모든 것들은 EditorDlg.h 및 EditorDlg.cpp 파일에 있습니다 .
임베디드 루아
Lua는 매우 훌륭한 프로그래밍 언어입니다. 애플리케이션 확장을 위해 설계된 가볍고 작은 공간을 차지하는 프로그래밍 언어입니다. 여기서는 RhicadS 에서 만든 Lua 스크립트 C++ 래퍼를 사용하여 여러 C++ 함수를 Lua에 포함했습니다 .
readsensor(integer index)센서 인덱스를 받아들입니다. 활성 로봇의 측정된 거리를 반환합니다.setspeed(integer left, integer right)활성 로봇의 왼쪽 및 오른쪽 바퀴 속도를 받아들입니다. 아무것도 반환하지 않습니다.getangle()아무것도 받아들이지 않습니다. 활성 로봇의 현재 각도 위치(라디안 단위)를 반환합니다.getnumofrobots()아무것도 받아들이지 않습니다. 기존 로봇의 수를 반환합니다.getposition()아무것도 받아들이지 않습니다. 활성 로봇의 x 및 y 위치를 반환합니다.gettarget(int index)대상 인덱스를 허용합니다. 선택한 대상의 x 및 y 위치를 반환합니다.textline(string msg)표시될 메시지를 수락합니다. 아무것도 반환하지 않습니다.setactiverobot(integer index)특정 로봇을 활성화합니다.stepforward()시뮬레이션을 한 단계씩 실행합니다.
기본적으로 이러한 기능은 로봇을 조작하는 데 사용됩니다. Lua 자체에는 알고리즘을 개발하는 데 사용할 수 있는 많은 내부 함수가 있습니다. Lua 참조 매뉴얼을 확인하여 수학, 문자열 또는 파일 조작을 위한 함수와 같은 사용 가능한 함수를 확인할 수 있습니다.
사용하는 방법
보기 >> 편집기를 클릭하거나 도구 모음에서 코드 편집기 보기 (Ctrl+E)를 클릭하여 코드 편집기 창을 표시할 수 있습니다 . 월드 파일은 *.wld 확장자로 저장되고, 코드 파일은 *.lua 확장자로 저장됩니다. 로드와 저장은 별도로 수행됩니다.
한번 시도해 봅시다. 먼저 월드 에디터에 큰 타원을 그립니다. 그런 다음 첫 번째 타원 안에 또 다른 작은 타원을 그립니다(또는 doubled_wall.wld 파일을 로드할 수 있음 ). 이 두 개의 타원으로 이루어진 골목 안으로 로봇을 드래그하세요. 코드 편집기를 로드하고 다음 코드를 붙여넣습니다. 시뮬레이션을 실행합니다. 로봇이 사라지면 Robot >> Reset Position 메뉴를 클릭하세요 .
함수 azolla.main(azolla)
    아졸라:setspeed(20,20)
    사실이지만
        a = 아졸라:읽기 센서(1)
        b = 아졸라:readsensor(5)
        (a - b > 2)이면
            아졸라:setspeed(30,20)
        끝

        (a - b < -2)이면
            아졸라:setspeed(20,30)
        끝

        if( (a - b > -2) 및 (a - b < 2) ) then
            아졸라:setspeed(20,20)
        끝
        아졸라:앞으로()
    끝
끝
위 코드는 로봇이 벽을 따라 전진하도록 하는 코드입니다. 센서 값을 어떻게 읽는지 확인하세요. 로봇에는 기본적으로 6개의 센서가 있습니다. 로봇 >> 속성 설정 메뉴를 사용하여 센서 수를 수정할 수 있습니다 . 그들은 모두 레이저 빔 유형 거리입니다. 아시다시피 소나형 거리 센서도 있습니다. 사진을보세요. 센서 번호는 로봇 머리부터 시작하며, 시계 방향으로 인덱스가 증가합니다.
다른 것을 시도해 봅시다. 데모에는 trinity.wrl 및 trinity.lua 라는 두 개의 파일이 포함되어 있습니다 . 두 파일을 로드합니다. 다음 코드를 복사하여 붙여넣습니다.
함수 azolla.main(azolla)
    azolla:textline("START...\n")
    동안(true) 할
        i = 0인 경우 azolla:getnumofrobots() - 1 do
            azolla:setactiverobot(i)
            전면 = azolla:readsensor(0)
            왼쪽 = azolla:readsensor(5)
            오른쪽 = azolla:readsensor(1)

            (앞 < 10)이면
                아졸라:setspeed(4,-4)

            또 다른
                델타 = 0.5 * (오른쪽 - 왼쪽)
                azolla:setspeed(4 + delta,4 - delta)
            끝
        끝
    아졸라:앞으로()
    끝
끝
좀 더 자세히 살펴보겠습니다. function azolla.main(azolla)항상 먼저 호출됩니다. 주요 기능입니다. 함수는 항상 function azolla.function_name(azolla)<function_name(parameter_if_exist)>< />와 같은 형식으로 작성됩니다. 위 코드에서 로봇은 간단한 P(비례) 알고리즘을 사용하여 미로 주위를 이동합니다. 로봇은 왼쪽 및 오른쪽 센서의 입력을 읽습니다. 제어 신호( delta)는 왼쪽과 오른쪽 센서 값의 차이를 기준으로 계산됩니다. 이 제어 신호는 두 바퀴의 속도를 수정하는 데 사용됩니다.< />
다중 로봇 시뮬레이션
버전 1.0.2부터 Azolla는 이제 다중 로봇 시뮬레이션을 지원합니다. 여러 로봇을 추가하고 동시에 실행할 수 있습니다. 특정 로봇을 활성화하려면 setcativerobot반드시 사용해야 합니다. 다음 코드를 살펴보세요.
함수 azolla.main(this)
    아졸라:setspeed(20,20)
    사실이지만
        --로봇을 하나씩 활성화하세요!!!
        i = 0인 경우, azolla:getnumofrobot() - 1 do
            --이 부분은 벽을 따라가는 부분입니다.
            azolla:setactiverobot(i)
            a = 아졸라:읽기 센서(1)
            b = 아졸라:readsensor(5)

            (a - b > 2)이면
                아졸라:setspeed(30,20)
            끝

            (a - b < -2)이면
                아졸라:setspeed(20,30)
            끝

            if( (a - b > -2) 및 (a - b < 2) ) then
                아졸라:setspeed(20,20)
            끝
        끝
        아졸라:앞으로()
    끝
끝
위 코드는 여러 로봇이 좌우 벽을 따라 전진하도록 제어하는 코드입니다. 첫 번째 예시( doubled_wall.wld ) 와 동일합니다 . 벽을 따라가는 부분에도 동일한 코드를 사용할 수 있습니다. 보시다시피, 로봇을 움직이기 전에 어떤 로봇을 움직일지 결정해야 합니다. 모든 로봇을 순차적으로 이동하기 위해 반복을 수행할 수 있습니다.
제한사항
Azolla는 실시간 로봇 시뮬레이터가 아닙니다. 로봇을 점점 더 추가하면 시뮬레이션 실행 속도가 느려집니다. 시뮬레이션을 더 빠르게 하기 위해 시뮬레이션의 시간 단계를 늘릴 수 있습니다.
센서 판독의 경우 화면의 픽셀 판독을 기반으로 합니다. 이 경우 시뮬레이션이 메인 창 영역에서 실행되는지 확인해야 합니다. 로봇이 기본 창 밖으로 나가면 센서 알고리즘이 잘못된 화면 픽셀을 읽습니다. 또한 기본 창 위에 다른 창이 있고 로봇의 센서가 해당 창에 접근할 수 있는 경우 센서 알고리즘도 잘못된 화면 픽셀을 읽습니다. 다음 릴리스에서는 화면 픽셀 값을 읽는 대신 센서에 기하학적 방법을 구현할 계획입니다.
가볼만한 곳
이 시뮬레이션 소프트웨어를 사용해 보시길 바랍니다. 첫 번째 릴리스 이후 많은 개선이 이루어졌습니다. 이전에는 멀티 코어 컴퓨터에서 시뮬레이션이 작동하지 않았습니다. 해당 버그가 수정되었습니다. 과도한 CPU 사용 문제도 수정되었습니다. 전반적으로 매우 훌륭하게 작동한다고 말할 수 있습니다. 나는 당신이 그것을 좋아하고 그것이 당신에게 도움이되기를 바랍니다. 기록 섹션을 읽어 개선 사항에 대한 세부 정보를 확인할 수 있습니다. 자세한 내용은 제공된 PDF 파일을 살펴보시기 바랍니다.
참고자료
미래의 일
향후 작업에서는 이 시뮬레이션 소프트웨어를 더욱 안정적으로 만들어 모바일 로봇 분야의 연구 및 연구 목적으로 사용할 수 있도록 하고 싶습니다. 그 목표를 달성하려면 해야 할 일이 많습니다.
역사
- 1.0.0 2009년 2월
- 초기 게시물
- 1.0.0 2009년 3월
- 기사가 업데이트되었습니다.
- 사소한 버그 수정
- 1.0.1 2010년 2월
- 기사가 업데이트되었습니다.
- 이름이 아졸라(Azolla)로 변경되었습니다.
double시뮬레이션을 위한 데이터 유형이 에서 로 변경되었습니다.float- 수정됨 : 잘못된 운동 방정식으로 인해 이상한 로봇 동작이 발생함
- 수정됨 : 과도한 CPU 사용을 유발하는 멀티스레딩 버그 및 멀티 코어 CPU에서 시뮬레이션이 작동하지 않음
- 추가됨 : 사용자가 로봇 트레일을 표시하거나 숨길 수 있습니다.
- 추가됨 : 사용자가 월드 에디터에서 그리드를 표시하거나 숨길 수 있습니다.
- 추가 : 소나형 센서
- 추가 : 사용자가 소나 센서의 최대, 최소 및 원뿔 각도를 수정할 수 있습니다. (원추 각도를 0으로 선택하면 센서가 레이저 빔 유형 센서가 됩니다.)
- 추가됨 : 사용자는 센서 판독값에 가우스 노이즈를 적용할 수 있습니다.
- 추가됨 : 사용자가 시뮬레이션을 위한 시간 단계를 수정할 수 있습니다.
- 추가됨 : 코드 편집기에서 자동 완성
- 추가됨 : 코드 편집기에서 "다음 찾기"
- 추가됨 : 월드 에디터에서 "모두 선택"
- 1.0.2 2010년 2월
- 기사가 업데이트되었습니다.
- 수정됨 : 운동 방정식이 훨씬 빠르게 실행됩니다.
- 수정 : 로봇의 앞면이 더 좋아보임
- 수정됨 : 시뮬레이션을 실행하는 동안 결함이 나타납니다.
- 추가됨 : 다중 로봇 시뮬레이션 지원
- 추가됨 : 도구 모음에 더 많은 아이콘이 있습니다.
- 2010년 3월 1.03일
- 수정 : 궤적 표시시 버그
- 추가 : 확대 및 축소 기능
- 추가 : 각 로봇에 색상을 할당할 수 있습니다.
- 추가됨 : 단순 충돌 감지
- 기타 다양한 버그 수정 및 기능 개선
- 2010년 7월 1.04일
- 추가 : 로그창 및 타겟 마크
- 추가됨 : 몇 가지 새로운 명령
- 이제 센서는 선과 선, 선과 직사각형, 선과 타원의 교차와 같은 기하학적 방법을 사용하여 작동합니다.
- 더 나은 충돌 감지
- 더 많은 정보를 제공하는 오류 메시지
- 기타 다양한 버그 수정 및 기능 개선
특허
이 기사는 관련 소스 코드 및 파일과 함께 공개 도메인 제공 에 따라 라이센스가 부여됩니다.
광고 클릭에서 발생하는 수익금은 모두 웹사이트 서버의 유지 및 관리, 그리고 기술 콘텐츠 향상을 위해 쓰여집니다.
댓글 0
| 번호 | 제목 | 글쓴이 | 날짜 | 조회 수 |
|---|---|---|---|---|
| 1 |
[WPF] Using Images in WPF TabControl Headers 탭컨트롤 헤더 이미지
 | 졸리운_곰 | 2024.02.18 | 211 |