Build a Hybrid Application with the Ionic Framework and Azure Mobile Services, Part 2: Creating the User Interface
In part one of this series I discussed how to get up and running with an Ionic project. We configured our basic shell project, reconfigured our code to a more modern style, and prepared our user interface for a real implementation. In part two we will complete our user interface in preparation for wiring up our Azure Mobile Service backend in part three. Without further ado, let’s get started!
Create Our Goal Setter Service
Generally, when working on a new project, I prefer to start with my user interface and work backwards. By employing this front-to-back approach I find my backend API is much tighter, featuring only what is actually necessary. Since I am utilizing this technique we need to create a mock service to return some sample data in a similar structure to what we can expect our legitimate service to return. Lets do that now.
1
2
3
4
5
6
7
8
9
10
11
12
13
14
15
16
17
18
19
20
21
22
23
24
25
26
27
28
29
30
31
32
33
34
35
36
37
38
39
40
41
42
43
44
45
|
(function(){
angular
.module('goalSetter')
.factory('GoalSetterFactory', GoalSetterFactory);
GoalSetterFactory.$inject = ['$q','$ionicLoading'];
function GoalSetterFactory($q, $ionicLoading){
var fakeGoals = [
{ description: 'Run 4 miles', date: moment().format('MMM Do YY'), complete: false },
{ description: 'Learn Angular', date: moment().format('MMM Do YY'), complete: false },
{ description: 'Build a mobile app', date: moment().format('MMM Do YY'), complete: false },
{ description: 'Do 100 push-ups', date: moment().subtract(1, 'days').format('MMM Do YY'), complete: false },
{ description: 'Ace the test', date: moment().subtract(1, 'days').format('MMM Do YY'), complete: false }
];
var service = {
getGoals: getGoals,
saveGoal: saveGoal
};
return service;
function getGoals(){
var deferred = $q.defer();
if(fakeGoals){
deferred.resolve(fakeGoals)
}else {
deferred.reject();
}
return deferred.promise;
}
function saveGoal(goal){
var deferred = $q.defer();
setTimeout(function(){
goal.complete = false;
goal.date = moment(goal.date).format('MMM Do YY');
fakeGoals.push(goal);
deferred.resolve(goal);
}, 100);
return deferred.promise;
}
}
})();
|
As you can see, I simply created some fake goals for testing purposes wrapping my ‘getGoals’ and ‘saveGoals’ data calls in $q promises. This was not necessary but it will allow us to write more realistic controllers that can remain unchanged when we swap our fake data calls with our Azure Mobile Service backend in the next lesson.
Create the Main Goal Controller and View
Now that we have our fake service in place, let’s create our main goal controller and view that will display the user’s goals and allow the entry of new goals for tracking. In Ionic, all of your views will be surrounded by the ‘ion-content’ directive. This directive fills the remaining space in between your applications sticky header and footer. The other components in my view are Ionic lists and buttons which look very presentable out of the box. This is one major advantage of using a framework such as Ionic.
1
2
3
4
5
6
7
8
9
10
11
12
13
14
15
16
17
18
19
20
21
22
23
24
25
26
27
28
29
30
31
32
33
34
35
36
37
38
39
40
41
42
43
44
45
46
47
|
(function(){
angular
.module('goalSetter')
.controller('Goals', Goals);
Goals.$inject = ['GoalSetterFactory'];
function Goals(GoalSetterFactory){
var vm = this;
vm.title = "Goals";
vm.goals = [];
vm.toggleGoal = toggleGoal;
vm.date = date;
vm.previousDay = previousDay;
vm.nextDay = nextDay;
vm.offset = 0;
activate();
function activate(){
return GoalSetterFactory.getGoals().then(function(data){
vm.goals = data;
})
}
function toggleGoal(goal){
goal.complete = !goal.complete;
}
function date(){
if(vm.offset === 0){
return moment().format('MMM Do YY');
}else {
return moment().add(vm.offset, 'days').format('MMM Do YY');
}
}
function previousDay(){
vm.offset = vm.offset - 1;
}
function nextDay(){
vm.offset = vm.offset + 1;
}
}
})();
|
1
2
3
4
5
6
7
8
9
10
11
12
13
14
15
16
17
18
19
20
21
|
<ion-view title="{{vm.date()}}">
<ion-nav-buttons side="right">
<i class="button icon-left ion-chevron-right button-clear button-dark" ng-click="vm.nextDay()"></i>
</ion-nav-buttons>
<ion-nav-buttons side="left">
<i class="button icon-left ion-chevron-left button-clear button-dark" ng-click="vm.previousDay()"></i>
</ion-nav-buttons>
<ion-content>
<button class="button button-full button-dark" ui-sref="tab.create-goals">
Add New
</button>
<ion-list>
<ion-item class="item item-checkbox" ng-repeat="goal in vm.goals | filter: vm.date()">
<label class="checkbox">
<input type="checkbox" ng-model="goal.complete" ng-click="vm.toggleGoal(goal)">
</label>
{{goal.description}}
</ion-item>
</ion-list>
</ion-content>
</ion-view>
|
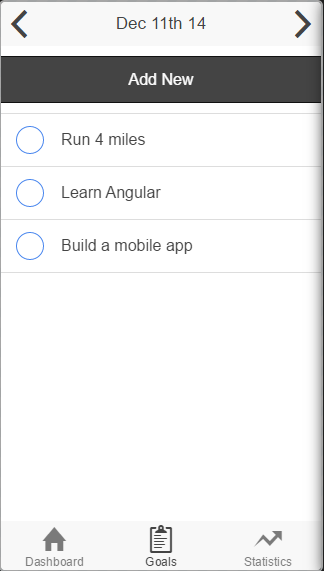
Main Goals Screen
Please note that I have included moment.js to gracefully deal with JavaScript dates and lodash.js for utility in our statistics section. To install these libraries simply run the ‘bower install moment’ and ‘bower install lodash’ commands from the project root and include these references in your index.html file. Now, let’s provide the user the ability to add new goals to be tracked by adding a controller and view to create goals.
1
2
3
4
5
6
7
8
9
10
11
12
13
14
15
16
17
18
19
|
(function(){
angular
.module('goalSetter')
.controller('GoalCreator', GoalCreator);
GoalCreator.$inject = ['GoalSetterFactory', '$state'];
function GoalCreator(GoalSetterFactory, $state){
var vm = this;
vm.goal = {};
vm.saveGoal = saveGoal;
function saveGoal(){
GoalSetterFactory.saveGoal(vm.goal).then(function(){
$state.go("tab.goals");
})
}
}
})();
|
1
2
3
4
5
6
7
8
9
10
11
12
13
14
15
|
<ion-view title="Add Goal">
<ion-content padding="true" class="has-header">
<label class="item item-input">
<span class="input-label">Date</span>
<input type="date" placeholder="Date" ng-model="vm.goal.date">
</label>
<label class="item item-input">
<span class="input-label">Description</span>
<textarea placeholder="Description" ng-model="vm.goal.description"> </textarea>
</label>
<button class="button button-full button-dark" ng-click="vm.saveGoal()">
Add Goal
</button>
</ion-content>
</ion-view>
|
Once we have these components in place we need to update our routing to accommodate the new sub-view.
1
2
3
4
5
6
7
8
9
10
11
12
13
14
15
16
17
18
19
20
21
22
23
24
25
26
27
28
29
30
31
32
33
34
35
36
37
38
39
40
41
42
43
|
$stateProvider
.state('tab', {
url: "/tab",
abstract: true,
templateUrl: "app/views/tabs.html"
})
.state('tab.dash', {
url: '/dash',
views: {
'tab-dash': {
templateUrl: 'app/views/tab-dash.html',
controller: 'Dashboard as vm'
}
}
})
.state('tab.goals', {
url: '/goals',
views: {
'tab-goals': {
templateUrl: 'app/views/tab-goals.html',
controller: 'Goals as vm'
}
}
})
.state('tab.create-goals', {
url: '/goals/create',
views: {
'tab-goals': {
templateUrl: 'app/views/create-goal.html',
controller: 'GoalCreator as vm'
}
}
})
.state('tab.statistics', {
url: '/statistics',
views: {
'tab-statistics': {
templateUrl: 'app/views/tab-statistics.html',
controller: 'Statistics as vm'
}
}
});
$urlRouterProvider.otherwise('/tab/dash');
|
Create the Statistics View
As the user completes goals, we want to provide them feedback and history regarding their successes and failures. Let’s create our statistics controller and view to display this valuable information to the user of our application.
1
2
3
4
5
6
7
8
9
10
11
12
13
14
15
16
17
18
19
20
21
22
23
24
25
26
27
|
(function(){
angular
.module('goalSetter')
.controller('Statistics', Statistics);
Statistics.$inject = ['GoalSetterFactory'];
function Statistics(GoalSetterFactory){
var vm = this;
vm.title = "Statistics";
vm.goals = [];
vm.completed = 0;
vm.todaysGoals = 0;
vm.completedToday = 0;
activate();
function activate(){
return GoalSetterFactory.getGoals().then(function(data){
vm.goals = data;
vm.completed = _.where(vm.goals, {'complete': true}).length;
vm.todaysGoals = _.where(vm.goals, {'date': moment().format('MMM Do YY')}).length;
vm.completedToday = _.where(vm.goals, {'complete': true, 'date': moment().format('MMM Do YY')}).length;
})
}
}
})();
|
1
2
3
4
5
6
7
8
9
10
11
12
13
14
15
16
17
18
19
20
21
22
23
24
25
26
|
<ion-view title="Statistics">
<ion-content padding="true" class="has-header">
<div class="list">
<a class="item" href="#">
Total Goals
<span class="badge badge-assertive">{{vm.goals.length}}</span>
</a>
<a class="item" href="#">
Completed Today
<span class="badge badge-assertive">{{vm.completedToday}}</span>
</a>
<a class="item" href="#">
Remaining Today
<span class="badge badge-assertive">{{vm.todaysGoals - vm.completedToday}}</span>
</a>
<a class="item" href="#">
Completed All Time
<span class="badge badge-assertive">{{vm.completed}}</span>
</a>
<a class="item" href="#">
Percentage Complete
<span class="badge badge-assertive">{{(vm.completed / vm.goals.length) * 100}}%</span>
</a>
</div>
</ion-content>
</ion-view>
|
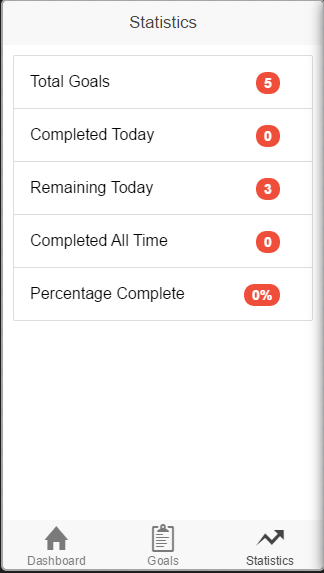
Statistics Screen
Create the Welcome Screen
We only have one thing left to do, let’s create a welcome screen to provide basic information about our application and offer navigation into our main goal view.
1
2
3
4
5
6
7
8
9
10
11
12
13
|
<ion-view title="Goal Setter">
<ion-content class="padding">
<h2 class="text-center padding-bottom padding-top">Welcome!</h2>
<p>The goal setter application will allow you to set and track your daily goals, keeping you on track for achieving your dreams. Let's get started!</p>
<div class="row row-bottom">
<div class="col col-bottom">
<button class="button button-positive button-full" ui-sref="tab.goals">
View Today's Goals!
</button>
</div>
</div>
</ion-content>
</ion-view>
|
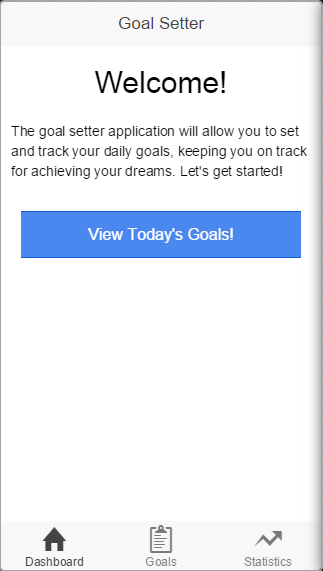
Welcome Screen
That’s it, we are ready to start tracking our goals!
Conclusion
In this article we set up our user interface, employing fake data to ensure everything looks good. In the next part of this series we are going to sub out these fake service calls, subbing in an Azure Mobile Service backend. We will see just how easy it is to get up and running with a secure, highly scalable mobile backend and prepare our application for the final stage, adding authentication. For the full code from this article, please check out my GitHub page. Thanks for reading and until next time, happy coding!
[출처] http://briantroncone.com/?p=365


