
- 전체
- HTML
- Web Design (웹디자인)
- XE 응용 개발
- wordpress plugin dev
- Javascript & JavaScript Application
- MEAN Stack : full stack javascript
- angular js & ionic framework
- bootstrap
- WebGL, Three.js and Babylon.js
- restful api design
- mobile web
- node.js 응용
- Cloud Service 응용
- 웹 어셈블리 개발 [WASM, WebAssembly]
- 마이크로서비스, MSA (microservice architecture)
- WebGL / WebGPU
- next.js 개발
- micro frontend (마이크로프론트앤드)
- 전자상거래/쇼핑몰
- 서버 클라우드 (aws, azure, google)
JavaScript [Javascript, ajax] XMLHttpRequest, jQuery Ajax 예제
2021.05.17 12:52
[Javascript, ajax] XMLHttpRequest, jQuery Ajax 예제
1. Ajax란?
Asynchronous JavaScript and XML의 약자로, 페이지 새로고침 없이 JavaScript로 서버에 정보를 요청해서 받은 후 일부만 로드할 수 있게 하는 기법이다.
2. 예제 설명
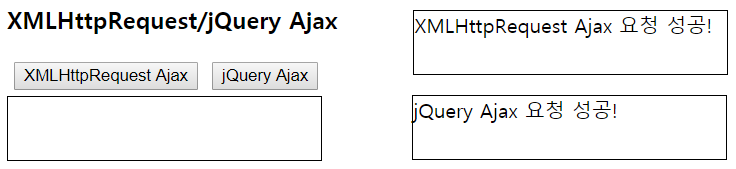
XMLHttpRequest Ajax 버튼을 클릭하면, XMLHttpRequest을 이용해서 데이터를 주고받고,
jQuery Ajax 버튼을 클릭하면, jQuery의 $.ajax()를 이용해서 데이터를 주고받는 예제입니다.
서버 쪽은 Spring의 @RestController를 사용했습니다.
3. HTML 코드
|
|
<h3>XMLHttpRequest/jQuery Ajax</h3> |
|
|
<button id="btnXMLHttpRequest">XMLHttpRequest Ajax</button> |
|
|
<button id="btnjQuery">jQuery Ajax</button> |
|
|
<div id="divAjax" style="width: 250px; height: 50px; margin-top: 5px; border: 1px solid black"></div> |
예제의 결과를 확인하기 위한 간단한 HTML 코드입니다.
4-1. XMLHttpRequest 코드
|
|
var btn = document.querySelector("#btnXMLHttpRequest"); |
|
|
btn.addEventListener('click', function(){ |
|
|
|
|
|
var oReq = new XMLHttpRequest(); |
|
|
oReq.addEventListener("load", function () { |
|
|
var data = JSON.parse(oReq.responseText); |
|
|
var div = document.querySelector("#divAjax"); |
|
|
div.innerHTML = data.result; |
|
|
|
|
|
}); |
|
|
oReq.open("GET", "<%=request.getContextPath()%>/ajax?type=XMLHttpRequest"); |
|
|
oReq.send(); |
|
|
|
|
|
}); |
XMLHttpRequest를 이용해서 /ajax에 type=XMLHttpRequest 파라미터를 GET방식으로 보낸 후, 받은 데이터를 divAjax에 표시합니다.


4-2. $.ajax() 코드
|
|
$("#btnjQuery").click(function(){ |
|
|
|
|
|
$.ajax({ |
|
|
url : "<%=request.getContextPath()%>/ajax", |
|
|
data : "type=jQuery", |
|
|
type : "GET", |
|
|
success : function(data){ |
|
|
$("#divAjax").html(data.result); |
|
|
} |
|
|
}); |
|
|
|
|
|
}); |
$.ajax()를 이용해서 /ajax에 type=jQuery 파라미터를 GET방식으로 보낸 후, 받은 데이터를 divAjax에 표시합니다.
4-1과 4-2의 코드는 같은 기능을 다른 방법을 이용해서 구현한 것입니다.
5. Controller 코드
|
|
@RestController |
|
|
public class SampleController { |
|
|
|
|
|
@GetMapping(path="/ajax") |
|
|
public Map<String, Object> ajax(@RequestParam(name="type") String type){ |
|
|
Map<String, Object> map = new HashMap<>(); |
|
|
String result = type + " Ajax 요청 성공!"; |
|
|
map.put("result", result); |
|
|
return map; |
|
|
} |
|
|
|
|
|
} |
파라미터로 받은 type 값 뒤에 " Ajax 요청 성공!"을 더해서 리턴합니다.
6. 전체 코드
sample.jsp
|
|
<%@ page language="java" contentType="text/html; charset=UTF-8" |
|
|
pageEncoding="UTF-8"%> |
|
|
|
|
|
<html> |
|
|
<head> |
|
|
<meta http-equiv="Content-Type" content="text/html; charset=UTF-8"> |
|
|
<title>Ajax</title> |
|
|
<script src="<%=request.getContextPath() %>/js/jquery-3.3.1.js"></script> |
|
|
</head> |
|
|
<body> |
|
|
|
|
|
<h3>XMLHttpRequest/jQuery Ajax</h3> |
|
|
<button id="btnXMLHttpRequest">XMLHttpRequest Ajax</button> |
|
|
<button id="btnjQuery">jQuery Ajax</button> |
|
|
<div id="divAjax" style="width: 250px; height: 50px; margin-top: 5px; border: 1px solid black"></div> |
|
|
|
|
|
<script> |
|
|
/* XMLHttpRequest를 이용한 Ajax */ |
|
|
var btn = document.querySelector("#btnXMLHttpRequest"); |
|
|
btn.addEventListener('click', function(){ |
|
|
|
|
|
var oReq = new XMLHttpRequest(); |
|
|
oReq.addEventListener("load", function () { |
|
|
var data = JSON.parse(oReq.responseText); |
|
|
var div = document.querySelector("#divAjax"); |
|
|
div.innerHTML = data.result; |
|
|
|
|
|
}); |
|
|
oReq.open("GET", "<%=request.getContextPath()%>/ajax?type=XMLHttpRequest"); |
|
|
oReq.send(); |
|
|
|
|
|
}); |
|
|
|
|
|
/* jQuery를 이용한 Ajax */ |
|
|
$("#btnjQuery").click(function(){ |
|
|
|
|
|
$.ajax({ |
|
|
url : "<%=request.getContextPath()%>/ajax", |
|
|
data : "type=jQuery", |
|
|
type : "GET", |
|
|
success : function(data){ |
|
|
$("#divAjax").html(data.result); |
|
|
} |
|
|
}); |
|
|
|
|
|
}); |
|
|
</script> |
|
|
|
|
|
</body> |
|
|
</html> |
SampleController.java
|
|
package sample.controller; |
|
|
|
|
|
import java.util.HashMap; |
|
|
import java.util.Map; |
|
|
|
|
|
import org.springframework.web.bind.annotation.GetMapping; |
|
|
import org.springframework.web.bind.annotation.RequestParam; |
|
|
import org.springframework.web.bind.annotation.RestController; |
|
|
|
|
|
|
|
|
public class SampleController { |
|
|
|
|
|
(path="/ajax") |
|
|
public Map<String, Object> ajax(@RequestParam(name="type") String type){ |
|
|
Map<String, Object> map = new HashMap<>(); |
|
|
String result = type + " Ajax 요청 성공!"; |
|
|
map.put("result", result); |
|
|
return map; |
|
|
} |
|
|
|
|
|
} |
[출처] https://congcoding.tistory.com/3
본 웹사이트는 광고를 포함하고 있습니다.
광고 클릭에서 발생하는 수익금은 모두 웹사이트 서버의 유지 및 관리, 그리고 기술 콘텐츠 향상을 위해 쓰여집니다.
광고 클릭에서 발생하는 수익금은 모두 웹사이트 서버의 유지 및 관리, 그리고 기술 콘텐츠 향상을 위해 쓰여집니다.
댓글 0
| 번호 | 제목 | 글쓴이 | 날짜 | 조회 수 |
|---|---|---|---|---|
| 1 |
[AWS] 인프라/AWS VPC 구성 후 SSH 연결하기
 | 졸리운_곰 | 2024.07.24 | 503 |