
- 전체
- JAVA 일반
- JAVA 수학
- JAVA 그래픽
- JAVA 자료구조
- JAVA 인공지능
- JAVA 인터넷
- Java Framework
- Java GUI (AWT,SWING,SWT,JFACE)
- SWT and RCP (web RAP/RWT)[eclipse], EMF
JAVA 일반 [Java],[AWT],[Layout],[AWT Layout],
2015.02.13 21:29
자바 AWT Layout 예제
/*
* FlowLayout
* 컴포넌트를 왼쪽,중앙,오른쪽으로 정렬하여 배치한다.
*/
import java.awt.*;
class Form extends Frame
{
private Button bt1 = new Button("버튼1"); // 버튼 컴포넌트
private Button bt2 = new Button("버튼2");
private Button bt3 = new Button("버튼3");
private FlowLayout layout1 = new FlowLayout(FlowLayout.LEFT); // 레이아웃 메니저
public Form(String title, int width, int height, boolean visible) {
super(title);
init();
super.setSize(width, height); // 프레임 크기
Dimension screen =Toolkit.getDefaultToolkit().getScreenSize(); // 모니터화면의 해상도 얻기
Dimension f1_size = super.getSize(); // 프레임크기
// 프레임이 화면 중앙에 위치하도록 left, top 계산
int left = (screen.width / 2) - (f1_size.width / 2);
int top = (screen.height / 2) - (f1_size.height /2 );
super.setLocation(left, top); // left, top 설정
super.setResizable(true); // 크기조절 불가능 설정
super.setVisible(visible); // 프레임이 보이도록 설정
}
public void init() {
this.setLayout(layout1); // 레이아웃 설정
this.add(bt1); // 버튼 컴포넌트 추가
this.add(bt2);
this.add(bt3);
}
}
public class FormTest {
public static void main(String[] args) {
Form f1 = new Form("FlowLayout 예제입니다.", 320, 240, true);
}
}
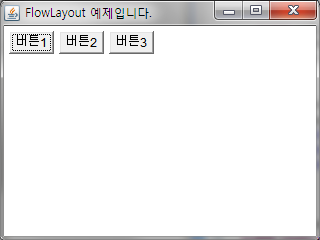
/*
* GridLayout
* 행과 열을 설정하여 화면을 채우며 배치한다.
*/
import java.awt.*;
class Form extends Frame
{
private Button bt1 = new Button("버튼1"); // 버튼 컴포넌트
private Button bt2 = new Button("버튼2");
private Button bt3 = new Button("버튼3");
private Button bt4 = new Button("버튼4");
private Button bt5 = new Button("버튼5");
private Button bt6 = new Button("버튼6");
private GridLayout layout1 = new GridLayout(3, 2, 10, 10); // 레이아웃 메니저(3행 2열, 20px 여백)
public Form(String title, int width, int height, boolean visible) {
super(title);
init();
super.setSize(width, height); // 프레임 크기
Dimension screen =Toolkit.getDefaultToolkit().getScreenSize(); // 모니터화면의 해상도 얻기
Dimension f1_size = super.getSize(); // 프레임크기
// 프레임이 화면 중앙에 위치하도록 left, top 계산
int left = (screen.width / 2) - (f1_size.width / 2);
int top = (screen.height / 2) - (f1_size.height /2 );
super.setLocation(left, top); // left, top 설정
super.setResizable(true); // 크기조절 불가능 설정
super.setVisible(visible); // 프레임이 보이도록 설정
}
public void init() {
this.setLayout(layout1); // 레이아웃 설정
this.add(bt1); // 버튼 컴포넌트 추가
this.add(bt2);
this.add(bt3);
this.add(bt4);
this.add(bt5);
this.add(bt6);
}
}
public class FormTest {
public static void main(String[] args) {
Form f1 = new Form("GridLayout 예제입니다.", 320, 240, true);
}
}


/*
* BorderLayout
* 컴포넌트를 5개의 방향으로 배치한다. (왼쪽, 오른쪽, 위, 아레, 중앙, 배치 형태)
*/
import java.awt.*;
class Form extends Frame
{
private Button bt1 = new Button("오른쪽"); // 버튼 컴포넌트
private Button bt2 = new Button("왼쪽");
private Button bt3 = new Button("아래쪽");
private Button bt4 = new Button("위쪽");
private Button bt5 = new Button("중앙");
private BorderLayout layout1 = new BorderLayout(); // 레이아웃 메니저
public Form(String title, int width, int height, boolean visible) {
super(title);
init();
super.setSize(width, height); // 프레임 크기
Dimension screen =Toolkit.getDefaultToolkit().getScreenSize(); // 모니터화면의 해상도 얻기
Dimension f1_size = super.getSize(); // 프레임크기
// 프레임이 화면 중앙에 위치하도록 left, top 계산
int left = (screen.width / 2) - (f1_size.width / 2);
int top = (screen.height / 2) - (f1_size.height /2 );
super.setLocation(left, top); // left, top 설정
super.setResizable(true); // 크기조절 불가능 설정
super.setVisible(visible); // 프레임이 보이도록 설정
}
public void init() {
this.setLayout(layout1); // 레이아웃 설정
this.add("East", bt1); // 버튼 컴포넌트 추가
this.add("West", bt2);
this.add("South", bt3);
this.add("North", bt4);
this.add("Center", bt5);
}
}
public class FormTest {
public static void main(String[] args) {
Form f1 = new Form("BorderLayout 예제입니다.", 320, 240, true);
}
}

/*
* GridBagLayout
*/
import java.awt.*;
class Form extends Frame
{
private Button bt1 = new Button("버튼1"); // 버튼 컴포넌트
private Button bt2 = new Button("버튼2");
private Button bt3 = new Button("버튼3");
private Button bt4 = new Button("버튼4");
private Button bt5 = new Button("버튼5");
private GridBagLayout layout1 = new GridBagLayout(); // 레이아웃 메니저
private GridBagConstraints gc = new GridBagConstraints();
public Form(String title, int width, int height, boolean visible) {
super(title);
init();
super.setSize(width, height); // 프레임 크기
Dimension screen =Toolkit.getDefaultToolkit().getScreenSize(); // 모니터화면의 해상도 얻기
Dimension f1_size = super.getSize(); // 프레임크기
// 프레임이 화면 중앙에 위치하도록 left, top 계산
int left = (screen.width / 2) - (f1_size.width / 2);
int top = (screen.height / 2) - (f1_size.height /2 );
super.setLocation(left, top); // left, top 설정
super.setResizable(true); // 크기조절 불가능 설정
super.setVisible(visible); // 프레임이 보이도록 설정
}
public void init() {
this.setLayout(layout1); // 레이아웃 설정
gc.gridx = 0;
gc.gridy = 0;
layout1.setConstraints(bt1, gc);
this.add(bt1);
gc.gridx = 1;
gc.gridy = 0;
layout1.setConstraints(bt2, gc);
this.add(bt2);
gc.gridx = 1;
gc.gridy = 1;
layout1.setConstraints(bt3, gc);
this.add(bt3);
gc.gridx = 2;
gc.gridy = 1;
layout1.setConstraints(bt4, gc);
this.add(bt4);
}
}
public class FormTest {
public static void main(String[] args) {
Form f1 = new Form("GridBagLayout 예제입니다.", 320, 240, true);
}
}

[출처] http://sugame.tistory.com/617
광고 클릭에서 발생하는 수익금은 모두 웹사이트 서버의 유지 및 관리, 그리고 기술 콘텐츠 향상을 위해 쓰여집니다.
