
Learn to create and configure spring boot application which uses JSP template files to render view layer. It uses embedded Tomcat server to run the application.
Sourcecode Structure
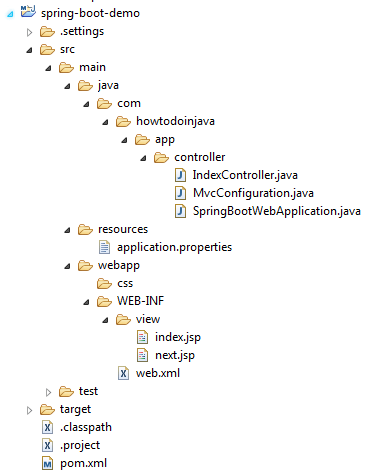
The files in this application are placed as given structure in image.
Maven dependencies – pom.xml
This application uses given below dependencies.
<project xmlns="http://maven.apache.org/POM/4.0.0" xmlns:xsi="http://www.w3.org/2001/XMLSchema-instance" <modelVersion>4.0.0</modelVersion> <groupId>com.howtodoinjava</groupId> <artifactId>spring-boot-demo</artifactId> <packaging>war</packaging> <version>0.0.1-SNAPSHOT</version> <name>spring-boot-demo Maven Webapp</name> <parent> <groupId>org.springframework.boot</groupId> <artifactId>spring-boot-starter-parent</artifactId> <version>1.5.1.RELEASE</version> </parent> <properties> <java.version>1.8</java.version> </properties> <dependencies> <!-- Web --> <dependency> <groupId>org.springframework.boot</groupId> <artifactId>spring-boot-starter-web</artifactId> </dependency> <!-- Tomcat Embed --> <dependency> <groupId>org.springframework.boot</groupId> <artifactId>spring-boot-starter-tomcat</artifactId> <scope>provided</scope> </dependency> <!-- JSTL --> <dependency> <groupId>javax.servlet</groupId> <artifactId>jstl</artifactId> </dependency> <!-- To compile JSP files --> <dependency> <groupId>org.apache.tomcat.embed</groupId> <artifactId>tomcat-embed-jasper</artifactId> <scope>provided</scope> </dependency> </dependencies></project> |
Spring Boot Application Initializer
The first step in producing a deployable war file is to provide a SpringBootServletInitializer subclass and override its configure() method. This makes use of Spring Framework’s Servlet 3.0 support and allows you to configure your application when it’s launched by the servlet container.
package com.howtodoinjava.app.controller;import org.springframework.boot.SpringApplication;import org.springframework.boot.autoconfigure.SpringBootApplication;import org.springframework.boot.builder.SpringApplicationBuilder;import org.springframework.boot.web.support.SpringBootServletInitializer;@SpringBootApplicationpublic class SpringBootWebApplication extends SpringBootServletInitializer { @Override protected SpringApplicationBuilder configure(SpringApplicationBuilder application) { return application.sources(SpringBootWebApplication.class); } public static void main(String[] args) throws Exception { SpringApplication.run(SpringBootWebApplication.class, args); }} |
Spring Controller
Controller classes can have methods mapped to specific URLs in the application. In given application, it has two views i.e. “/” and “/next”.
package com.howtodoinjava.app.controller;import java.util.Map;import org.springframework.stereotype.Controller;import org.springframework.web.bind.annotation.RequestMapping;@Controllerpublic class IndexController { @RequestMapping("/") public String home(Map<String, Object> model) { model.put("message", "HowToDoInJava Reader !!"); return "index"; } @RequestMapping("/next") public String next(Map<String, Object> model) { model.put("message", "You are in new page !!"); return "next"; }} |
Configure JSP View Resolver
To resolve JSP files location, you can have two approaches.


1) Add entries in application.properties
spring.mvc.view.prefix=/WEB-INF/view/spring.mvc.view.suffix=.jsp//For detailed logging during developmentlogging.level.org.springframework=TRACElogging.level.com=TRACE |
2) Configure InternalResourceViewResolver
package com.howtodoinjava.app.controller;import org.springframework.context.annotation.ComponentScan;import org.springframework.context.annotation.Configuration;import org.springframework.web.servlet.config.annotation.EnableWebMvc;import org.springframework.web.servlet.config.annotation.ViewResolverRegistry;import org.springframework.web.servlet.config.annotation.WebMvcConfigurerAdapter;import org.springframework.web.servlet.view.InternalResourceViewResolver;import org.springframework.web.servlet.view.JstlView;@Configuration@EnableWebMvc@ComponentScanpublic class MvcConfiguration extends WebMvcConfigurerAdapter{ @Override public void configureViewResolvers(ViewResolverRegistry registry) { InternalResourceViewResolver resolver = new InternalResourceViewResolver(); resolver.setPrefix("/WEB-INF/view/"); resolver.setSuffix(".jsp"); resolver.setViewClass(JstlView.class); registry.viewResolver(resolver); }} |
JSP Files
Two used JSP files in this spring boot jsp example – are below.
index.jsp
<!DOCTYPE html><html lang="en"><body> <div> <div> <h1>Spring Boot JSP Example</h1> <h2>Hello ${message}</h2> Click on this <strong><a href="next">link</a></strong> to visit another page. </div> </div></body></html> |
next.jsp
<!DOCTYPE html><html lang="en"><body> <div> <div> <h1>Another page</h1> <h2>Hello ${message}</h2> Click on this <strong><a href="/">link</a></strong> to visit previous page. </div> </div></body></html> |
Run the application
After whole code is written and placed inside folders, run the application by executing main() method in SpringBootWebApplication class.
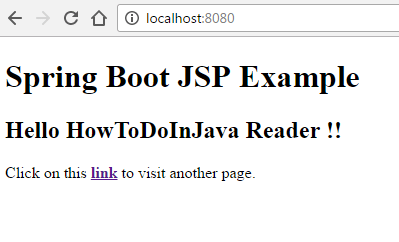
Now hit the URL: http://localhost:8080/
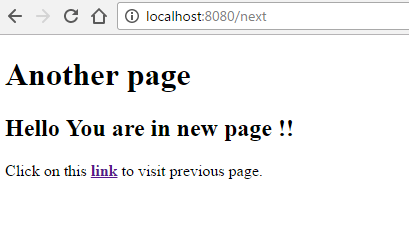
Click next link
Spring Boot JSP example Source Code
[출처] https://howtodoinjava.com/spring/spring-boot/spring-boot-jsp-view-example/
