
Create a Web Application With Spring Boot
2018.05.03 15:56
Create a Web Application With Spring Boot
This guide shows how to create a simple MVC web application using Spring Boot.
Prerequisites:
- Eclipse IDE (neon release)
- Maven 4
- Java 1.8
1. Create maven web project
Open eclipse then create a new maven web project and name it as SpringBootWebJsp.
The structure of the generated projects look like the following: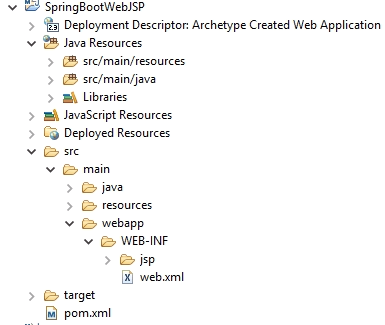
2. pom.xml
After creating the web project, the first step is to configure Spring Boot inside pom.xml, so we add the following as a parent dependency:
Spring Boot exposes a starter called spring-boot-starter-web which automatically imports all the required jars needed to setup a typical Spring MVC application and automatically configures the view resolver and the servlet dispatcher of the application so that the developer focuses on the development rather than the configuration, so we add the starter as a dependency:
Since we’re using JSP as the front end technology, we need to add the following dependency in order to be able to compile JSP and make use of its features:
That’s all, just 2 dependencies can make your MVC application up. Below are the auto-imported jars: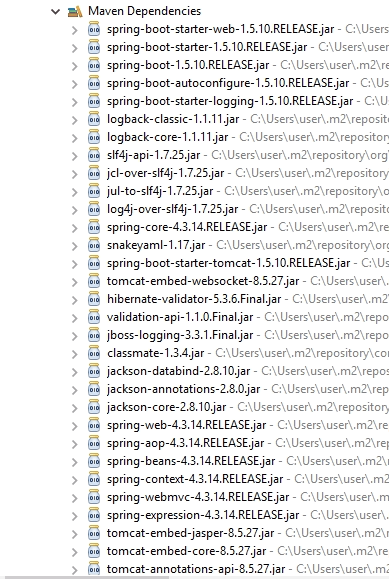
This is the whole pom.xml for reference:
P.S: when using JSP as a front end technology, you should make sure to set the “packaging” attribute as war not jar, since Spring Boot team claimed that currently there is limitations for supporting JSP inside jar file ( the view resolver wouldn’t map correctly).
3. Application.java
The second step is to create the Spring Boot initializer class, this is the entry point of our application. When annotating a class with @SpringBootApplication, we’re configuring our application to run over the embedded servlet container provided by Spring Boot (tomcat by default).


4. application.properties
Spring Boot auto configures the view resolver and the dispatcher servlet of the web application and provides us a way to define our own configuration using application.properties.
So we create application.properties under src/main/resources and define the following properties:
Here we’re configuring the view resolver to map the views to files of type jsp under “WEB-INF/jsp/”. We also change the default port of the embedded tomcat to be 9093, as well as defining other business message properties to be used later on inside our application.
5. home.jsp
In this tutorial, we’re creating a very simple MVC application which displays a welcome message to the end user, so we create a very basic jsp file called home.jsp under WEB-INF/jsp:
6. HomeController.java
Now we create our main controller named HomeController under com.programmer.gate and we define it to serve requests coming from the root path as the following:
Our controller simply reads the welcome message from application.properties and then redirects to home.jsp.
7. Deploy the application
Following are the steps to deploy our application:
- Right click pom.xml -> run-as -> Maven install
- Maven generates a war file called SpringBootWebJSP-0.0.1-SNAPSHOT.war inside target folder
- Open cmd, then run the war using: java -jar SpringBootWebJSP-0.0.1-SNAPSHOT.war
Here we go, our application is up and ready to serve requests at port 9093.
That’s it, i hope you like it. For clarifications please leave your thoughts in the comments section below.
광고 클릭에서 발생하는 수익금은 모두 웹사이트 서버의 유지 및 관리, 그리고 기술 콘텐츠 향상을 위해 쓰여집니다.
