Spring Boot(BackEnd) + React(FrontEnd) 통합 설정에 대해서 설명한다. (자세한 명령어에 대해서는 설명을 안한다.)
BackEnd, FrontEnd를 분리해서 적용하는 것을 추천하지만 통합할 때 장점과 단점에 대해서 확인하기 위해서 작성하였다.
환경 설정
- Rest Repositories
- Thymeleaf
- JPA
- H2
- Java 11
- Lombok
모듈 구조
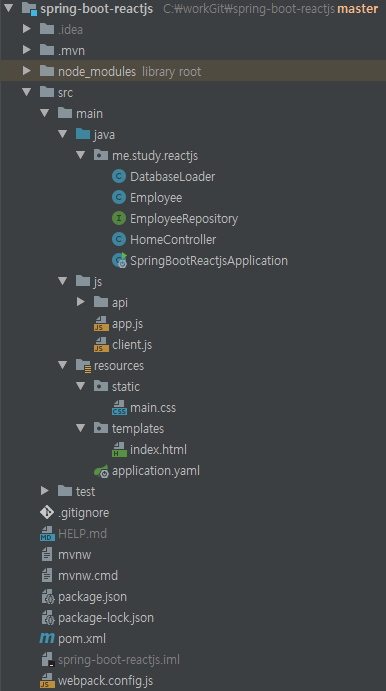
도메인 선언
1 2 3 4 5 6 7 8 9 10 11 12 13 14 15 16 17 |
public class Employee { private Long id; private String firstName; private String lastName; private String description; public Employee(String firstName, String lastName, String description) { this.firstName = firstName; this.lastName = lastName; this.description = description; } } |
@Entity는 관계형 테이블에 클래스를 저장하기위한 주석이다.@Id및@GeneratedValue기본키로 사용할 JPA 주석이고,필요할 때 자동으로 생성된다.
저장소 정의
1 2 3 |
public interface EmployeeRepository extends CrudRepository<Employee, Long> { } |
- 도메인 객체 유형과 기본키를 연결한다.
데모 데이터 생성
1 2 3 4 5 6 7 8 9 10 11 |
public class DatabaseLoader implements CommandLineRunner { private final EmployeeRepository repository; public void run(String... args) throws Exception { this.repository.save(new Employee("Frodo", "Baggins", "ring bearer")); } } |
- Spring의
@Component주석을 표시해서@SpringBootApplication에 자동 선택되게 한다. CommandLineRunner는 모든 Bean을 등록후 에 애플리케이션이 동작하게 한다.EmployeeRepository생성한다.run()메소드를 통해 명령행에 있는 데이터를 로드한다.
루트 URL 조정
동일한 경로에서 WEB UI를 호출해서 루트 URL를 변경 해줘야된다.
1 2 3 4 |
spring: data: rest: base-path: /api |
Spring Boot(Back-End) 실행
./mvnw spring-boot:run 또는 IDE 으로 실행
1 2 3 4 5 6 7 8 |
public class SpringBootReactjsApplication { public static void main(String[] args) { SpringApplication.run(SpringBootReactjsApplication.class, args); } } |
REST 서비스 호출 해보기
1 2 3 4 5 6 7 8 9 10 11 |
$ curl localhost:8080/api { "_links" : { "employees" : { "href" : "http://localhost:8080/api/employees" }, "profile" : { "href" : "http://localhost:8080/api/profile" } } } |
1 2 3 4 5 6 7 8 9 10 11 12 13 14 15 16 17 18 19 20 21 22 23 24 25 26 27 28 |
$ curl localhost:8080/api/employees { "_embedded": { "employees": [ { "firstName": "Frodo", "lastName": "Baggins", "description": "ring bearer", "_links": { "self": { "href": "http://localhost:8080/api/employees/1" }, "employee": { "href": "http://localhost:8080/api/employees/1" } } } ] }, "_links": { "self": { "href": "http://localhost:8080/api/employees" }, "profile": { "href": "http://localhost:8080/api/profile/employees" } } } |
UI Controller 설정
Spring에 MVC Controller가 필요하다.
1 2 3 4 5 6 7 8 9 |
public class HomeController { (value = "/") public String index() { return "index"; } } |
@Controller는 클래스를 Spring MVC 컨트롤러로 표시합니다.@RequestMapping“/“ 경로로 접속하면index()메소드 호출한다.- 자동 설정된 뷰 리졸버가 매핑 할 템플릿의 이름(
index)으로 반환 한다.(src/main/resources/templates/index.html)
HTML 템플릿 정의와 CSS 추가
1 2 3 4 5 6 7 8 9 10 11 12 13 14 15 |
<html xmlns:th="https://www.thymeleaf.org"> <head lang="en"> <meta charset="UTF-8"/> <title>ReactJS + Spring Data REST</title> <link rel="stylesheet" href="/main.css" /> </head> <body> <div id="react"></div> <script src="built/bundle.js"></script> </body> </html> |
이 템플릿의 중요한 부분은 <div id="react"></div>이고, React에 렌더링된 부분을 출력하라고 하는 부분이다.
1 2 3 4 5 6 7 8 9 |
table { border-collapse: collapse; } td, th { border: 1px solid #999; padding: 0.5rem; text-align: left; } |
Spring Boot에서 src/main/resources/static는 서버에서 자동으로 로드 하기 때문에 main.css파일을 넣었지만 자세한 내용은 다루지 않는다.
JavaScript 모듈 로드
자바 스크립트를 실행하지 않는대신 pom.xml을 추가해야된다.
pom.xml 추가
1 2 3 4 5 6 7 8 9 10 11 12 13 14 15 16 17 18 19 20 21 22 23 24 25 26 27 28 29 30 31 32 33 34 35 36 37 38 39 40 41 42 43 44 45 46 47 48 49 50 51 52 53 54 55 56 57 58 59 60 61 62 63 64 65 66 67 68 69 70 71 72 73 74 75 76 77 78 79 80 81 82 83 84 85 86 87 88 89 90 91 92 93 94 95 96 97 98 99 100 101 102 103 |
<project xmlns="http://maven.apache.org/POM/4.0.0" xmlns:xsi="http://www.w3.org/2001/XMLSchema-instance" xsi:schemaLocation="http://maven.apache.org/POM/4.0.0 https://maven.apache.org/xsd/maven-4.0.0.xsd"> <modelVersion>4.0.0</modelVersion> <parent> <groupId>org.springframework.boot</groupId> <artifactId>spring-boot-starter-parent</artifactId> <version>2.1.7.RELEASE</version> <relativePath/> <!-- lookup parent from repository --> </parent> <groupId>me.study.reactjs</groupId> <artifactId>spring-boot-reactjs</artifactId> <version>0.0.1-SNAPSHOT</version> <name>spring-boot-reactjs</name> <description>Demo project for Spring Boot</description> <properties> <project.build.sourceEncoding>UTF-8</project.build.sourceEncoding> <java.version>11</java.version> </properties> <dependencies> <dependency> <groupId>org.springframework.boot</groupId> <artifactId>spring-boot-starter-thymeleaf</artifactId> </dependency> <dependency> <groupId>org.springframework.boot</groupId> <artifactId>spring-boot-starter-data-jpa</artifactId> </dependency> <dependency> <groupId>org.springframework.boot</groupId> <artifactId>spring-boot-starter-data-rest</artifactId> </dependency> <dependency> <groupId>org.springframework.boot</groupId> <artifactId>spring-boot-devtools</artifactId> </dependency> <dependency> <groupId>com.h2database</groupId> <artifactId>h2</artifactId> <scope>runtime</scope> </dependency> <dependency> <groupId>org.springframework.boot</groupId> <artifactId>spring-boot-starter-test</artifactId> <scope>test</scope> </dependency> <dependency> <groupId>org.projectlombok</groupId> <artifactId>lombok</artifactId> <optional>true</optional> </dependency> </dependencies> <build> <plugins> <plugin> <groupId>org.springframework.boot</groupId> <artifactId>spring-boot-maven-plugin</artifactId> </plugin> <!-- tag::frontend-maven-plugin[] --> <plugin> <groupId>com.github.eirslett</groupId> <artifactId>frontend-maven-plugin</artifactId> <version>1.6</version> <configuration> <installDirectory>target</installDirectory> </configuration> <executions> <execution> <id>install node and npm</id> <goals> <goal>install-node-and-npm</goal> </goals> <configuration> <nodeVersion>v10.11.0</nodeVersion> <npmVersion>6.4.1</npmVersion> </configuration> </execution> <execution> <id>npm install</id> <goals> <goal>npm</goal> </goals> <configuration> <arguments>install</arguments> </configuration> </execution> <execution> <id>webpack build</id> <goals> <goal>webpack</goal> </goals> </execution> </executions> </plugin> <!-- end::frontend-maven-plugin[] --> </plugins> </build> </project> |
frontend-maven-plugin[] JavaScript 빌드에 사용될 부분이다.


플러그인 작동 순서
install-node-and-npm명령은 Node.js를npm명령어를 통해서 패키지 관리 도구를/tartget폴더에 설치 한다.npm install명령을 통해서package.json에 정의된 내용으로 설치한다.webpack명령은 JavaScript 코드를 컴파일(webpack.config.js)하는 webpack 바이너리를 실행한다.
1 2 3 4 5 6 7 8 9 10 11 12 13 14 15 16 17 18 19 20 21 22 23 24 25 26 27 28 29 30 31 32 33 34 35 36 37 38 |
{ "name": "spring-boot-reactjs", "version": "0.1.0", "description": "Demo of ReactJS + Spring Data REST", "repository": { "type": "git", "url": "git@github.com:jaehyun8719/spring-boot-reactjs.git" }, "keywords": [ "rest", "hateoas", "spring", "data", "react" ], "author": "Jaehyun", "license": "Apache-2.0", "bugs": { "url": "https://github.com/jaehyun8719/spring-boot-reactjs/issues" }, "homepage": "https://github.com/jaehyun8719/spring-boot-reactjs", "dependencies": { "react": "^16.5.2", "react-dom": "^16.5.2", "rest": "^1.3.1" }, "scripts": { "watch": "webpack --watch -d" }, "devDependencies": { "@babel/core": "^7.1.0", "@babel/preset-env": "^7.1.0", "@babel/preset-react": "^7.0.0", "babel-loader": "^8.0.2", "webpack": "^4.19.1", "webpack-cli": "^3.1.0" } } |
1 2 3 4 5 6 7 8 9 10 11 12 13 14 15 16 17 18 19 20 21 22 23 24 25 26 |
var path = require('path'); module.exports = { entry: './src/main/js/app.js', devtool: 'sourcemaps', cache: true, mode: 'development', output: { path: __dirname, filename: './src/main/resources/static/built/bundle.js' }, module: { rules: [ { test: path.join(__dirname, '.'), exclude: /(node_modules)/, use: [{ loader: 'babel-loader', options: { presets: ["@babel/preset-env", "@babel/preset-react"] } }] } ] } }; |
React 작성
1 2 3 4 5 6 7 8 9 10 11 12 13 14 15 16 17 18 19 20 21 22 23 24 25 26 27 28 29 30 31 32 33 34 35 36 37 38 39 40 41 42 43 44 45 46 47 48 49 50 51 52 53 54 55 56 57 58 59 60 61 62 63 64 65 66 67 68 69 70 71 72 |
; // tag::vars[] const React = require('react'); const ReactDOM = require('react-dom'); const client = require('./client'); // end::vars[] // tag::app[] class App extends React.Component { constructor(props) { super(props); this.state = {employees: []}; } componentDidMount() { client({method: 'GET', path: '/api/employees'}).done(response => { this.setState({employees: response.entity._embedded.employees}); }); } render() { return ( <EmployeeList employees={this.state.employees}/> ) } } // end::app[] // tag::employee-list[] class EmployeeList extends React.Component{ render() { const employees = this.props.employees.map(employee => <Employee key={employee._links.self.href} employee={employee}/> ); return ( <table> <tbody> <tr> <th>First Name</th> <th>Last Name</th> <th>Description</th> </tr> {employees} </tbody> </table> ) } } // end::employee-list[] // tag::employee[] class Employee extends React.Component{ render() { return ( <tr> <td>{this.props.employee.firstName}</td> <td>{this.props.employee.lastName}</td> <td>{this.props.employee.description}</td> </tr> ) } } // end::employee[] // tag::render[] ReactDOM.render( <App />, document.getElementById('react') ) // end::render[] |
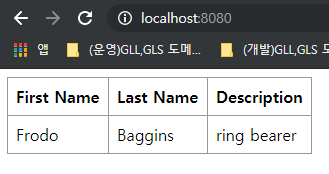
결과 화면
./mvnw package실행bundle.js와/target폴더 생성 확인

./mvnw spring-boot:run또는 IDE 으로 실행http://localhost:8080/접속 후 확인
결론
개인적인 생각이지만 간단한 서비스에는 Spring Boot(BackEnd) + React(FrontEnd) 통합 설정을 하면 좋을듯 하지만, BackEnd, FrontEnd를 분류 해서 사용하는게 좋을듯 하다.

그 이유는 서비스1, 서비스2, 서비스3에 공통으로 사용할 API를 따로 만들어야되고, Spring Boot 를 run 하기전에 항상 package 빌드를 해야 된다는 것이다.

이와 반대로 BackEnd, FrontEnd를 분류하게되면 API를 공통으로 사용할 수 있고, 로컬이나 테스트 서버에 API 서버를 기동후 FrontEnd 작업을 할 수 있다는 장점이 있다.
소스코드