
LINUX VI 에디터 사용법
2013.01.15 13:23
LINUX VI 에디터 사용법
[출처] http://www.yolinux.com/TUTORIALS/LinuxTutorialAdvanced_vi.html
| Vim Intro: |
This "vi" tutorial is intended for those who wish to master and advance their skills beyond the basic features of the basic editor. It covers buffers, "vi" command line instructions, interfacing with UNIX commands, and ctags. The vim editor is an enhanced version of vi. The improvements are clearly noticed in the handling of tags.
The advantage of learning vi and learning it well is that one will find vi on all Unix based systems and it does not consume an inordinate amount of system resources. Vi works great over slow network ppp modem connections and on systems of limited resources. One can completely utilize vi without departing a single finger from the keyboard. (No hand to mouse and return to keyboard latency)
NOTE: Microsoft PC Notepad users who do not wish to use "vi" should use "gedit" (GNOME edit) or "gnp" (GNOME Note Pad) on Linux. This is very similar in operation to the Microsoft Windows editor, "Notepad". (Other Unix systems GUI editors: "dtpad", which can be found in /usr/dt/bin/dtpad for AIX, vuepad on HP/UX, or xedit on all Unix systems.)
See our list of Linux GUI editors
| Vim Installation: |
Red Hat / CentOS / Fedora:
- rpm -ivh vim-common-...rpm vim-minimal-...rpm vim-enhanced-...rpm vim-X11-...rpm
- yum install vim-common vim-minimal vim-enhanced vim-X11
Ubuntu / Debian:
- apt-get install vim vim-common vim-gnome vim-gui-common vim-runtime
Compiling Vim from source:
- Download vim source from http://vim.org
- tar xzf vim-7.0.tar.gz
- cd vim70
- ./configure --prefix=/opt --enable-cscope
- make
- make install
| Basic "vi" features |
One edits a file in vi by issuing the command: vi file-to-edit.txt
The vi editor has three modes, command mode, insert mode and command line mode.
- Command mode: letters or sequence of letters interactively command vi. Commands are case sensitive. The ESC key can end a command.
- Insert mode: Text is inserted. The ESC key ends insert mode and returns you to command mode. One can enter insert mode with the "i" (insert), "a" (insert after), "A" (insert at end of line), "o" (open new line after current line) or "O" (Open line above current line) commands.
- Command line mode: One enters this mode by typing ":" which puts the command line entry at the foot of the screen.
Partial list of interactive commands:
- Cursor movement:
-
Keystrokes Action h/j/k/l Move cursor left/down/up/right spacebar Move cursor right one space -/+ Move cursor down/up in first column ctrl-d Scroll down one half of a page ctrl-u Scroll up one half of a page ctrl-f Scroll forward one page ctrl-b Scroll back one page M (shift-m) Move cursor to middle of page H (shift-h) Move cursor to top of page L (shift-l) Move cursor to bottom of page W
w
5wMove cursor a word at a time
Move cursor ahead 5 wordsB
b
5bMove cursor back a word at a time
Move cursor back a word at a time
Move cursor back 5 wordse
5eMove cursor to end of word
Move cursor ahead to the end of the 5th word0 (zero) Move cursor to beginning of line $ Move cursor to end of line ) Move cursor to beginning of next sentence ( Move cursor to beginning of current sentence G Move cursor to end of file % Move cursor to the matching bracket.
Place cursor on {}[]() and type "%".
Use the matchit or xmledit plug-in to extend this capability to XML/XHTML tags.'. Move cursor to previously modified line. 'a Move cursor to line mark "a" generated by marking with keystroke "ma" 'A Move cursor to line mark "a" (global between buffers) generated by marking with keystroke "mA" ]' Move cursor to next lower case mark. [' Move cursor to previous lower case mark.
Editing commands:
-
Keystrokes Action i Insert at cursor a Append after cursor A Append at end of line ESC Terminate insert mode u Undo last change U Undo all changes to entire line o Open a new line dd
3ddDelete line
Delete 3 lines.D Delete contents of line after cursor C Delete contents of line after cursor and insert new text. Press esc key to end insertion. dw
4dwDelete word
Delete 4 wordscw Change word x Delete character at cursor r Replace character R Overwrite characters from cursor onward s Substitute one character under cursor continue to insert S Substitute entire line and begin to insert at beginning of line ~ Change case of individual character ctrl-a
ctrl-xIncrement number under the cursor.
Decrement number under the cursor./search_string{CR} Search for search_string ?search_string{CR} Search backwards (up in file) for search_string /\<search_string\>{CR} Search for search_word
Ex: /\<s\>
Search for variable "s" but ignore declaration "string" or words containing "s". This will find "string s;", "s = fn(x);", "x = fn(s);", etcn Find next occurrence of search_word N Find previous occurrence of search_word . repeat last command action.
-
Terminate session:
- Use command: ZZ
Save changes and quit. - Use command line: ":wq"
Save (write) changes and quit. - Use command line: ":w"
Save (write) changes without quitting. - Use command line: ":q!"
Ignore changes and quit. No changes from last write will be saved. - Use command line: ":qa"
Quit all files opened.
| Vi/Vim modes: |
Vi/Vim modes are set using the "set" command and its many options.
:set all - display all mode settings of your editing session.
:set termcap - display terminal settings of your editing session.
:set ic - Change default to ignore case for text searches
Default is changed from noignorecase to ignorecase. (ic is a short form otherwise type set ignorecase)
Common options to set:
-
See full list of set optionsFull "set" Command Short form Description :set autoindent
:set noautoindent:set ai
:set noai{CR} returns to indent of previous line.
Turn on autoindent: :set ai
Turn off autoindent: :set noai
Set indent width: set shiftwidth=4
Intelligent auto-indent: set smartindent
Toggle autoindent on/off when pasting text (press F2 key to toggle mode after one is in "insert" mode): set pastetoggle=<F2>:set autowrite
:set noautowrite:set aw
:set noawThis tells vim to automatically write the file when switching to edit another file. See tags :set backspace=indent,eol,start
:set backspace:set bs=indent,eol,start
:set bsAllow backspacing over an indent, line break (end of line) or start of an insert :set backup=on
:set backup=off:set bk=on
:set bk=offCreate backup file of file changes while editing.
To automatically remove the backup file after the file being edited is written, use the option :set writebackup=on/off
File backup mode settings: :set backupcopy=yes/no/auto:set cryptmethod=zip
set cryptmethod=blowfishSet file encryption for file save of buffer contents. - zip: pkzip
- blowfish: strong encryption
Vim 7.3+:set errorbells
:set noerrorbells:set eb
:set noebSilence error beep :set flash
:set noflash:set fl
:set noflScreen flashes upon error (for deaf people or when noerrorbells is set) :set tabstop=8 :set ts Tab key displays 8 spaces :set ignorecase
:set noignorecase:set ic
:set noicCase sensitive searches :set number
:set nonumber:set nu
:set nonuDisplay line numbers :set showmatch
:set noshowmatchno abbreviations Cursor shows matching ")" and "}" :set showmode
:set noshowmodeno abbreviations Editor mode is displayed on bottom of screen :set showmatch
:set noshowmatchno abbreviations Cursor shows matching ")" and "}" :set syntax on
:set syntax offno abbreviations Set syntax highlighting and color highlighting for a file type (eg XML, HTML, C++, Java, etc). Also cursor shows matching ")" and "}"
Also can set syntax highlighting explicitly: :set syntax=html
Syntax definition files: /usr/share/vim/vim73/syntax/:set taglength :set tl Default=0. Set significant characters :set closepunct='".,;)]} % key shows matching symbol.
Also see showmatch:set linelimit=1048560 Maximum file size to edit :set wrapscan
:set nowrapscan:set ws
:set nowsBreaks line if too long :set wrapmargin=0
:set nowrapmargin:set wm
:set nowmDefine right margin for line wrapping. :set list
:set nolistDisplay all Tabs and Ends of lines (Dislays these hidden characters). :set bg=dark
:set bg=lightVIM: choose color scheme for "dark" or "light" console background.
| Advanced "vi" features |
Interactive Commands:
- Marking a line:
- Any line can be "Book Marked" for a quick cursor return.
- Type the letter "m" and any other letter to identify the line.
- This "marked" line can be referenced by the keystroke sequence "'" and the identifying letter.
Example: "mt" will mark a line by the identifier "t".
"'t" will return the cursor to this line at any time.
A block of text may be referred to by its marked lines. i.e.'t,'b
- Any line can be "Book Marked" for a quick cursor return.
- vi line buffers:
- To capture lines into the buffer:
- Single line: "yy" - yanks a single line (defined by current cursor position) into the buffer
- Multiple lines: "y't" - yanks from current cursor position to the line marked "t"
- Multiple lines: "3yy" - yank 3 lines. Current line and two lines below it.
- "p" - place contents of buffer after current line defined by current cursor position.
- To capture lines into the buffer:
- vim: Shift a block of code left or right:
- Enter into visual mode by typing the letter "v" at the top (or bottom) of the block of text to be shifted.
- Move the cursor to the bottom (or top) of the block of text using "j", "k" or the arrow keys.
Tip: Select from the first collumn of the top line and the last character of the line on the bottom line.
Zero ("0") will move the cursor to the first character of a line and "$" will move the cursor to the last character of the line. - Type >> to shift the block to the right.
Type << to shift the block to the left.
This can be placed in your $HOME/.vimrc file.
Command Line:
- command options:
- The vi command line interface is available by typing ":". Terminate with a carriage return.
Example commands:- :help topic
If the exact name is unknown, TAB completion will cycle through the various options given the first few letters. Ctrl-d will print the complete list of possibilites.
- :help topic
- The vi command line interface is available by typing ":". Terminate with a carriage return.
- Executing Unix commands in vi:
- Any UNIX command can be executed from the vi command line by typing an "!" before the UNIX command.
Examples:- ":!pwd" - shows your current working directory.
- ":r !date" - reads the results from the date command into a new line following the cursor.
- ":r !ls -1" - Place after the cursor, the current directory listing displayed as a single column.
- Any UNIX command can be executed from the vi command line by typing an "!" before the UNIX command.
- Line numbers:
- Lines may be referenced by their line numbers. The last line in the file can be referenced by the "$" sign.
The entire file may be referenced by the block "1,$" or "%"
The current line is referred to as "."
A block of text may be referred to by its marked lines. i.e. 5,38 or 't,'b
- Lines may be referenced by their line numbers. The last line in the file can be referenced by the "$" sign.
- Find/Replace:
- Example:
- :%s/fff/rrrrr/ - For all lines in a file, find string "fff" and replace with string "rrrrr" for the first instance on a line.
- :%s/fff/rrrrr/g - For all lines in a file, find string "fff" and replace with string "rrrrr" for each instance on a line.
- :%s/fff/rrrrr/gc - For all lines in a file, find string "fff" and replace with string "rrrrr" for each instance on a line. Ask for confirmation
- :%s/fff/rrrrr/gi - For all lines in a file, find string "fff" and replace with string "rrrrr" for each instance on a line. Case insensitive.
- :'a,'bs/fff/rrrrr/gi - For all lines between line marked "a" (ma) and line marked "b" (mb), find string "fff" and replace with string "rrrrr" for each instance on a line. Case insensitive.
- :5,20s/fff/rrrrr/gc - For all lines between line 2 and line 20, find string "fff" and replace with string "rrrrr" for each instance on a line. Confirm each change with y/n.
- :%s/*$/ - For all lines in a file, delete blank spaces at end of line.
- :%s/\(.*\):\(.*\)/142:7594/g - For all lines in a file, move last field delimited by ":" to the first field. Swap fields if only two.
- :%s#<[^>]\+>##g - Find and remove all HTML tags but keep the text contents.
- :%s/^\(.*\)\n7594$/7594/ - Find and remove all duplicate lines
- :help substitute
- :help pattern
- :help gdefault
- :help cmdline-ranges
- Example:
- Sorting:
- Example:
- Mark a block of text at the top line and bottom line of the block of text. i.e. "mt" and "mb" on two separate lines. This text block is then referenced as "'t,'b.
- :'t,'b !sort
- Example:
- Moving columns, manipulating fields and awk:
- :'t,. !awk '{print
LINUX VI 에디터 사용법
[출처] http://www.yolinux.com/TUTORIALS/LinuxTutorialAdvanced_vi.html
Vim Intro: This "vi" tutorial is intended for those who wish to master and advance their skills beyond the basic features of the basic editor. It covers buffers, "vi" command line instructions, interfacing with UNIX commands, and ctags. The vim editor is an enhanced version of vi. The improvements are clearly noticed in the handling of tags.
The advantage of learning vi and learning it well is that one will find vi on all Unix based systems and it does not consume an inordinate amount of system resources. Vi works great over slow network ppp modem connections and on systems of limited resources. One can completely utilize vi without departing a single finger from the keyboard. (No hand to mouse and return to keyboard latency)
NOTE: Microsoft PC Notepad users who do not wish to use "vi" should use "gedit" (GNOME edit) or "gnp" (GNOME Note Pad) on Linux. This is very similar in operation to the Microsoft Windows editor, "Notepad". (Other Unix systems GUI editors: "dtpad", which can be found in /usr/dt/bin/dtpad for AIX, vuepad on HP/UX, or xedit on all Unix systems.)
See our list of Linux GUI editors
Vim Installation: Red Hat / CentOS / Fedora:
- rpm -ivh vim-common-...rpm vim-minimal-...rpm vim-enhanced-...rpm vim-X11-...rpm
- yum install vim-common vim-minimal vim-enhanced vim-X11
Ubuntu / Debian:
- apt-get install vim vim-common vim-gnome vim-gui-common vim-runtime
Compiling Vim from source:
- Download vim source from http://vim.org
- tar xzf vim-7.0.tar.gz
- cd vim70
- ./configure --prefix=/opt --enable-cscope
- make
- make install
Basic "vi" features One edits a file in vi by issuing the command: vi file-to-edit.txt
The vi editor has three modes, command mode, insert mode and command line mode.
- Command mode: letters or sequence of letters interactively command vi. Commands are case sensitive. The ESC key can end a command.
- Insert mode: Text is inserted. The ESC key ends insert mode and returns you to command mode. One can enter insert mode with the "i" (insert), "a" (insert after), "A" (insert at end of line), "o" (open new line after current line) or "O" (Open line above current line) commands.
- Command line mode: One enters this mode by typing ":" which puts the command line entry at the foot of the screen.
Partial list of interactive commands:
- Cursor movement:
-
Keystrokes Action h/j/k/l Move cursor left/down/up/right spacebar Move cursor right one space -/+ Move cursor down/up in first column ctrl-d Scroll down one half of a page ctrl-u Scroll up one half of a page ctrl-f Scroll forward one page ctrl-b Scroll back one page M (shift-m) Move cursor to middle of page H (shift-h) Move cursor to top of page L (shift-l) Move cursor to bottom of page W
w
5wMove cursor a word at a time
Move cursor ahead 5 wordsB
b
5bMove cursor back a word at a time
Move cursor back a word at a time
Move cursor back 5 wordse
5eMove cursor to end of word
Move cursor ahead to the end of the 5th word0 (zero) Move cursor to beginning of line $ Move cursor to end of line ) Move cursor to beginning of next sentence ( Move cursor to beginning of current sentence G Move cursor to end of file % Move cursor to the matching bracket.
Place cursor on {}[]() and type "%".
Use the matchit or xmledit plug-in to extend this capability to XML/XHTML tags.'. Move cursor to previously modified line. 'a Move cursor to line mark "a" generated by marking with keystroke "ma" 'A Move cursor to line mark "a" (global between buffers) generated by marking with keystroke "mA" ]' Move cursor to next lower case mark. [' Move cursor to previous lower case mark.
Editing commands:
-
Keystrokes Action i Insert at cursor a Append after cursor A Append at end of line ESC Terminate insert mode u Undo last change U Undo all changes to entire line o Open a new line dd
3ddDelete line
Delete 3 lines.D Delete contents of line after cursor C Delete contents of line after cursor and insert new text. Press esc key to end insertion. dw
4dwDelete word
Delete 4 wordscw Change word x Delete character at cursor r Replace character R Overwrite characters from cursor onward s Substitute one character under cursor continue to insert S Substitute entire line and begin to insert at beginning of line ~ Change case of individual character ctrl-a
ctrl-xIncrement number under the cursor.
Decrement number under the cursor./search_string{CR} Search for search_string ?search_string{CR} Search backwards (up in file) for search_string /\<search_string\>{CR} Search for search_word
Ex: /\<s\>
Search for variable "s" but ignore declaration "string" or words containing "s". This will find "string s;", "s = fn(x);", "x = fn(s);", etcn Find next occurrence of search_word N Find previous occurrence of search_word . repeat last command action.
-
Terminate session:
- Use command: ZZ
Save changes and quit. - Use command line: ":wq"
Save (write) changes and quit. - Use command line: ":w"
Save (write) changes without quitting. - Use command line: ":q!"
Ignore changes and quit. No changes from last write will be saved. - Use command line: ":qa"
Quit all files opened.
Vi/Vim modes: Vi/Vim modes are set using the "set" command and its many options.
:set all - display all mode settings of your editing session.
:set termcap - display terminal settings of your editing session.:set ic - Change default to ignore case for text searches
Default is changed from noignorecase to ignorecase. (ic is a short form otherwise type set ignorecase)Common options to set:
-
See full list of set optionsFull "set" Command Short form Description :set autoindent
:set noautoindent:set ai
:set noai{CR} returns to indent of previous line.
Turn on autoindent: :set ai
Turn off autoindent: :set noai
Set indent width: set shiftwidth=4
Intelligent auto-indent: set smartindent
Toggle autoindent on/off when pasting text (press F2 key to toggle mode after one is in "insert" mode): set pastetoggle=<F2>:set autowrite
:set noautowrite:set aw
:set noawThis tells vim to automatically write the file when switching to edit another file. See tags :set backspace=indent,eol,start
:set backspace:set bs=indent,eol,start
:set bsAllow backspacing over an indent, line break (end of line) or start of an insert :set backup=on
:set backup=off:set bk=on
:set bk=offCreate backup file of file changes while editing.
To automatically remove the backup file after the file being edited is written, use the option :set writebackup=on/off
File backup mode settings: :set backupcopy=yes/no/auto:set cryptmethod=zip
set cryptmethod=blowfishSet file encryption for file save of buffer contents. - zip: pkzip
- blowfish: strong encryption
Vim 7.3+:set errorbells
:set noerrorbells:set eb
:set noebSilence error beep :set flash
:set noflash:set fl
:set noflScreen flashes upon error (for deaf people or when noerrorbells is set) :set tabstop=8 :set ts Tab key displays 8 spaces :set ignorecase
:set noignorecase:set ic
:set noicCase sensitive searches :set number
:set nonumber:set nu
:set nonuDisplay line numbers :set showmatch
:set noshowmatchno abbreviations Cursor shows matching ")" and "}" :set showmode
:set noshowmodeno abbreviations Editor mode is displayed on bottom of screen :set showmatch
:set noshowmatchno abbreviations Cursor shows matching ")" and "}" :set syntax on
:set syntax offno abbreviations Set syntax highlighting and color highlighting for a file type (eg XML, HTML, C++, Java, etc). Also cursor shows matching ")" and "}"
Also can set syntax highlighting explicitly: :set syntax=html
Syntax definition files: /usr/share/vim/vim73/syntax/:set taglength :set tl Default=0. Set significant characters :set closepunct='".,;)]} % key shows matching symbol.
Also see showmatch:set linelimit=1048560 Maximum file size to edit :set wrapscan
:set nowrapscan:set ws
:set nowsBreaks line if too long :set wrapmargin=0
:set nowrapmargin:set wm
:set nowmDefine right margin for line wrapping. :set list
:set nolistDisplay all Tabs and Ends of lines (Dislays these hidden characters). :set bg=dark
:set bg=lightVIM: choose color scheme for "dark" or "light" console background.
Advanced "vi" features Interactive Commands:
- Marking a line:
- Any line can be "Book Marked" for a quick cursor return.
- Type the letter "m" and any other letter to identify the line.
- This "marked" line can be referenced by the keystroke sequence "'" and the identifying letter.
Example: "mt" will mark a line by the identifier "t".
"'t" will return the cursor to this line at any time.
A block of text may be referred to by its marked lines. i.e.'t,'b
- Any line can be "Book Marked" for a quick cursor return.
- vi line buffers:
- To capture lines into the buffer:
- Single line: "yy" - yanks a single line (defined by current cursor position) into the buffer
- Multiple lines: "y't" - yanks from current cursor position to the line marked "t"
- Multiple lines: "3yy" - yank 3 lines. Current line and two lines below it.
- "p" - place contents of buffer after current line defined by current cursor position.
- To capture lines into the buffer:
- vim: Shift a block of code left or right:
- Enter into visual mode by typing the letter "v" at the top (or bottom) of the block of text to be shifted.
- Move the cursor to the bottom (or top) of the block of text using "j", "k" or the arrow keys.
Tip: Select from the first collumn of the top line and the last character of the line on the bottom line.
Zero ("0") will move the cursor to the first character of a line and "$" will move the cursor to the last character of the line. - Type >> to shift the block to the right.
Type << to shift the block to the left.
This can be placed in your $HOME/.vimrc file.
Command Line:
- command options:
- The vi command line interface is available by typing ":". Terminate with a carriage return.
Example commands:- :help topic
If the exact name is unknown, TAB completion will cycle through the various options given the first few letters. Ctrl-d will print the complete list of possibilites.
- :help topic
- The vi command line interface is available by typing ":". Terminate with a carriage return.
- Executing Unix commands in vi:
- Any UNIX command can be executed from the vi command line by typing an "!" before the UNIX command.
Examples:- ":!pwd" - shows your current working directory.
- ":r !date" - reads the results from the date command into a new line following the cursor.
- ":r !ls -1" - Place after the cursor, the current directory listing displayed as a single column.
- Any UNIX command can be executed from the vi command line by typing an "!" before the UNIX command.
- Line numbers:
- Lines may be referenced by their line numbers. The last line in the file can be referenced by the "$" sign.
The entire file may be referenced by the block "1,$" or "%"
The current line is referred to as "."
A block of text may be referred to by its marked lines. i.e. 5,38 or 't,'b
- Lines may be referenced by their line numbers. The last line in the file can be referenced by the "$" sign.
- Find/Replace:
- Example:
- :%s/fff/rrrrr/ - For all lines in a file, find string "fff" and replace with string "rrrrr" for the first instance on a line.
- :%s/fff/rrrrr/g - For all lines in a file, find string "fff" and replace with string "rrrrr" for each instance on a line.
- :%s/fff/rrrrr/gc - For all lines in a file, find string "fff" and replace with string "rrrrr" for each instance on a line. Ask for confirmation
- :%s/fff/rrrrr/gi - For all lines in a file, find string "fff" and replace with string "rrrrr" for each instance on a line. Case insensitive.
- :'a,'bs/fff/rrrrr/gi - For all lines between line marked "a" (ma) and line marked "b" (mb), find string "fff" and replace with string "rrrrr" for each instance on a line. Case insensitive.
- :5,20s/fff/rrrrr/gc - For all lines between line 2 and line 20, find string "fff" and replace with string "rrrrr" for each instance on a line. Confirm each change with y/n.
- :%s/*$/ - For all lines in a file, delete blank spaces at end of line.
- :%s/\(.*\):\(.*\)/\2:\1/g - For all lines in a file, move last field delimited by ":" to the first field. Swap fields if only two.
- :%s#<[^>]\+>##g - Find and remove all HTML tags but keep the text contents.
- :%s/^\(.*\)\n\1$/\1/ - Find and remove all duplicate lines
- :help substitute
- :help pattern
- :help gdefault
- :help cmdline-ranges
- Example:
- Sorting:
- Example:
- Mark a block of text at the top line and bottom line of the block of text. i.e. "mt" and "mb" on two separate lines. This text block is then referenced as "'t,'b.
- :'t,'b !sort
- Example:
- Moving columns, manipulating fields and awk:
- :'t,. !awk '{print $3 " " $2 " " $1}' - This will reverse the order of the columns in the block of text. The block of text is defined here as from the line marked with the keystroke "bt" and the current line ("."). This text block is referenced as "'t,."
              aaa bbb ccc              ccc bbb aaa
              xxx yyy zzz   becomes->  zzz yyy xxx
              111 222 333              333 222 111
- :'t,. !awk '{print $3 " " $2 " " $1}' - This will reverse the order of the columns in the block of text. The block of text is defined here as from the line marked with the keystroke "bt" and the current line ("."). This text block is referenced as "'t,."
- Source Code Formatting: C++/Java
-
- Use vim visual text selection to mark the lines to format (beautify):
- eg. Whole file:
- Go to first line in file: shift-v
- Go to last line in file: shift-g
- Select the key equals: =
- eg. Whole file:
- Use vim visual text selection to mark the lines to format (beautify):
-
- Text Formatting:
-
- Mark a block of text at the top line and bottom line of the block. i.e. "mt" and "mb" on two separate lines.
- Example: ":'t,'b !nroff"
- You can insert nroff commands i.e.:
-
.ce 3 Center the next three lines .fi Fill text - left and right justify (default) .nf No Fill .ls 2 Double line spacing .sp Single line space .sv 1.0i Vertical space at top of page space .ns Turn off spacing mode .rs Restore spacing mode .ll 6.0i Line length = 6 inches .in 1.0i Indent one inch .ti 1.0i Temporarily one time only indent one inch .pl 8.0i Page length = 8 inches .bp Page break
-
.fi
.pl 2i
.in 1.0i
.ll 6.0i
.ce
Title to be centered
.sp
The following text bla bla bla bla bla bla bla bla bla bla
bla bla bla bla bla bla bla bla bla bla bla bla bla bla bla bla
bla bla bla bla bla bla bla bla bla bla bla bla bla bla
bla bla bla bla bla bla bla bla bla bla bla bla bla bla bla
bla bla bla bla bla
Becomes:
-
                         Title to be centered

          The following text bla bla bla bla bla bla bla bla
          bla  bla  bla  bla bla bla bla bla bla bla bla bla
          bla bla bla bla bla bla bla bla bla  bla  bla  bla
          bla  bla  bla  bla bla bla bla bla bla bla bla bla
          bla bla bla bla bla bla bla bla bla  bla  bla  bla
          bla bla bla bla
-
-
- Spell Checking:
-
- Mark a block of text by marking the top line and bottom line of the block. i.e. "mt" and "mb" on two separate lines.
- :'t,'b !spell will cause the block to be replaced with misspelled words.
- Press "u" to undo.
- Proceed to correct words misspelled.
-
- Macros:
- :map letter commands_strung_together
:map - lists current key mappings
Example - :map g n cwNEW_WORD{ctrl-v}{esc}i{ctrl-v}{CR}
This example would find the next search occurrence, change the word and insert a line feed after the word. The macro is invoked by typing the letter "g".- Control/Escape/Carriage control characters must be prefixed with ctrl-V.
- Choose a letter which is not used or important. (i.e. a poor choice would be "i" as this is used for insert)
- :map letter commands_strung_together
- Double spacing:
- :%s/$/{ctrl-V}{CR}/g
This command applies an extra carriage return at the end of all lines
- :%s/$/{ctrl-V}{CR}/g
- Strip blanks at end of line:
- :%s/{TAB}*$//
- Delete all lines beginning with or matching a pattern:
- :1,$ /^#/d
Delete all (first to last line: 1,$ or g) comments lines in file. Delete all lines beginning (^) with "#" (specify text pattern). - :g/#/d
Delete all lines (g) containing comments (comments follow "#") in file. Delete all lines containing "#". - :g!/^#/d
Delete all lines except (g! or v) comment lines beginning (^) with "#".
- :1,$ /^#/d
- Strip DOS ctrl-M's:
- :1,$ s/{ctrl-V}{ctrl-M}//
Note: In order to enter a control character, one muust first enter ctrl-v. This is true throughout vi. For example, if searching for a control character (i.e. ctrl-m): /ctrl-v ctrl-M If generating a macro and you need to enter esc without exiting the vi command line the esc must be prefixed with a ctrl-v: ctrl-v esc. - Editing multiple files:
- vi file1 file2 file3
- :n Edit next file (file2)
- :n Edit next file (file3)
- :rew Rewind to the first file (file1)
- Line folding:
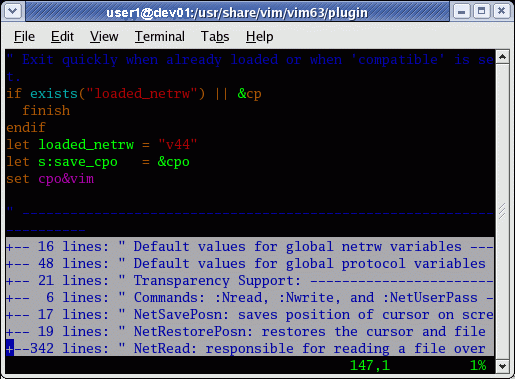
Many times one may encounter a file with folded lines or may wish to fold lines. The following image is of a file with folded lines where each "+" represents a set of lines not viewed but a marker line prefixed with a "+" is shown stating how many lines have been folded and out of view. Folding helps manage large files which are more easily managed when text lines are grouped into "folds".
Example: vim /usr/share/vim/vim63/plugin/netrw.vim
Keystrokes:
-
Keystroke Description zR Unfold all folded lines in file. za Open/close (toggle) a folded group of lines. zA Open a closed fold or close an open fold recursively. zc Close a folded group of lines. zC Close all folded lines recursively. zd Delete a folded line. zD Delete all folded lines recursively. zE Eliminate all folded lines in file. zF Create "N" folded lines.
- Hyper-Linking to include files:
- Place cursor over the file name (i.e. #include "fileABC.h")
- Enter the letter combination: gf
(go to file)
-
"Recursively set the path of the project.
set path=$PWD/**
- Batch execution of vi from a command file:
Command file to change HTML file to lower case and XHTML compliance:-
:1,$ s/<HTML>/<html>/g
:1,$ s/<\/HTML>/<\/html>/g
:1,$ s/<HEAD>/<head>/g
:1,$ s/<\/HEAD>/<\/head>/g
:1,$ s/<TITLE>/<title>/g
:1,$ s/<\/TITLE>/<\/title>/g
:1,$ s/<BODY/<body/g
:1,$ s/<\/BODY/<\/body/g
:1,$ s/<UL>/<ul>/g
:1,$ s/<\/UL>/<\/ul>/g
...
..
.
:1,$ s/<A HREF/<a href/g
:1,$ s/<A NAME/<a name/g
:1,$ s/<\/A>/<\/a>/g
:1,$ s/<P>/<p>/g
:1,$ s/<B>/<b>/g
:1,$ s/<\/B>/<\/b>/g
:1,$ s/<I>/<i>/g
:1,$ s/<\/I>/<\/i>/g
:wq
[Potential Pitfall]: This must be performed while vim has none of the files open which are to be affected. If it does, vim will error due to conflicts with the vim swap file.
-
Tagging: This functionality allows one to jump between files to locate subroutines.
-
- ctags *.h *.c This creates a file names "tags".
Edit the file using vi.
-
- Unix command line: vi -t subroutine_name This will find the correct file to edit.
OR - Vi command line: :tag subroutine_name This will jump from your current file to the file containing the subroutine. (short form :ta subroutine_name )
OR - By cursor position: ctrl-] Place cursor on the first character of the subroutine name and press ctrl-] This will jump to the file containing the subroutine.
Note: The key combination ctrl-] is also the default telnet connection interrupt. To avoid this problem when using telnet block this telnet escape key by specifying NULL or a new escape key:- telnet -E file-name
- telnet -e "" file-name
- Unix command line: vi -t subroutine_name This will find the correct file to edit.
In all cases you will be entered into the correct file and the cursor will be positioned at the subroutine desired.
If it is not working properly look at the "tags" file created by ctags. Also the tag name (first column) may be abbreviated for convenience. One may shorten the significant characters using :set taglength=numberTag Notes:
- A project may have a tags file which can be added and referred to by: :set tags=tags\ /ad/src/project1.tags
A "\" must separate the file names. - :set autowrite will automatically save changes when jumping from file to file, otherwise you need to use the :w command.
vim tagging notes: (These specific tag features not available in vi)
Tag Command Description :tag start-of-tag-name_TAB Vim supports tag name completion. Start the typing the tag name and then type the TAB key and name completion will complete the tag name for you. :tag /search-string Jump to a tag name found by a search. ctrl-] The vim editor will jump into the tag to follow it to a new position in the file or to a new file. ctrl-t The vim editor will allow the user to jump back a level.
(or :pop):tselect <function-name> When multiple entries exist in the tags file, such as a function declaration in a header file and a function definition (the function itself), the operator can choose by issuing this command. The user will be presented with all the references to the function and the user will be prompted to enter the number associated with the appropriate one. :tnext When multiple answers are available you can go to the next answer. :set ignorecase
(or :set ic)The ignore case directive affects tagging. :tags Show tag stack (history) :4pop Jump to a particular position in the tag stack (history).
(jump to the 4th from bottom of tag stack (history).
The command ":pop" will move by default "1" backwards in the stack (history).)
or
:4tag
(jump to the 4th from top of tag stack):tnext Jump to next matching tag.
(Also short form :tn and jump two :2tnext):tprevious Jump to previous matching tag.
(Also short form :tp and jump two :2tp):tfirst Jump to first matching tag.
(Also short form :tf, :trewind, :tr):tlast Jump to last matching tag.
(Also short form :tl):set tags=./tags,./subdir/tags
Using multiple tag files (one in each directory).
Allows one to specify all tags files in directory tree: set tags=src/**/tags
Use Makefile to generate tags files as well as compile in each directory.Links:
The ctags utility: There are more than one version of ctags out there. The original Unix version, the GNU version and the version that comes with vim. This discussion is about the one that comes with vim. (default with Red Hat)
For use with C++:
- ctags version 5.5.4:
ctags *.cpp ../inc/*.h
- ctags version 5.0.1:
ctags --lang=c++ --c-types=+Ccdefgmnpstuvx *.cpp ../inc/*.h
To generate a tags file for all files in all subdirectories: ctags -R .
The ctags program which is written by the VIM team is called " Exuberant Ctags" and supports the most features in VIM.
Man page: ctags - Generate tag files for source code
Defaults file: VIM: $HOME/.exrc
- ~/.vimrc
- ~/.gvimrc
- ~/.vim/ (directory of vim config files.)
VI: $HOME/.exrc
- Example:
         set autoindent
         set wrapmargin=0
         map g hjlhjlhjlhlhjl
         "
         " S = save current vi buffer contents and run spell on it,
         "     putting list of misspelled words at the end of the vi buffer.
         map S G:w!^M:r!spell %^M
         colorscheme desert
         "Specify that a dark terminal background is being used.
         set bg=dark
Notes:
- Look in /usr/share/vim/vim61/colors/ for available colorschemes.
(I also like "colorscheme desert") - Alternate use of autoindent: set ai sw=3
Using vim and cscope: Cscope was developed to cross reference C source code. It now can be used with C++ and Java and can interface with vim.
Using Cscope to cross reference souce code will create a database and allow you to traverse the source to find calls to a function, occurances of a function, variable, macros, class or object and their respective declarations. Cscope offers more complete navigation than ctags as it has more complete cross referencing.
Vim must be compiled with Cscope support. Red Hat Enterprise Linux 5 (or CentOS 5), includes vim 7.0 with cscope support. Earlier versions of Red Hat or Fedora RPM does not support Cscope and thus must be compiled.
Compiling Vim from source:
- Download vim source from http://vim.org
- tar xzf vim-7.0.tar.gz
- cd vim70
- ./configure --prefix=/opt --enable-cscope
- make
- make install
Using Cscope with vim:
The Cscope database (cscope.out) is generated the first time it is invoked. Subsequent use will update the database based on file changes.
The database can be generated manually using the command i.e.: cscope -b *.cpp *.h or cscope -b -R .Invoke Cscope from within vim from the vim command line. Type the following: :cscope find search-type search-string The short form of the command is ":cs f" where the "search-type" is:
-
Search Type Type short form Description symbol s Find all references to a symbol global g Find global definition calls c Find calls of this function called d Find functions that the specified function calls text t Find specified text string file f Open file include i Find files that "#include" the specified file
Results of the Cscope query will be displayed at the bottom of the vim screen.
- To jump to a result type the results number (+ enter)
- Use tags commands to return after a jump to a result: ctrl-t
To return to same spot as departure, use ctrl-o - To use "tags" navigation to search for words under the cursor (ctrl-\ or ctrl-]) instead of using the vim command line ":cscope" (and "ctrl-spaceBar" instead of ":scscope"), use the vim plugin, cscope_maps.vim [cache]
When using this plugin, overlapping ctags navigation will not be available. This should not be a problem since cscope plugin navigation is the same but with superior indexing and cross referenceing.
Place this plugin in your directory "$HOME/.vim/plugin"
Plugin required for vim 5 and 6. This feature is compiled in with vim 7.0 on Red Hat Enterprise Linux 5 and CentOS 5 and newer Linux OS's. Attempts to use the plugin when not required will result in the following error:- E568: duplicate cscope database not added
- Cycle through results:
- Next result: :tnext
- Previous result: :tprevious
- Create a split screen for Cscope results: :scscope find search-type search-string
(Short form: :scs f search-type search-string) - Use command line argument ":cscope -R": Scan subdirectories recursively
- Use Cscope ncurses based GUI without vim: cscope
- ctrl-d: Exit Cscope GUI
Cscope command line arguments:
-
Argument Description -R Scan subdirectories recursively -b Build the cross-reference only. -C Ignore letter case when searching. -fFileName Specify Cscope database file name instead of default "cscope.out". -Iinclude-directories Look in "include-directories" for any #include files whose names do not begin with "/". -iFiles Scan specified files listed in "Files". File names are separated by linefeed. Cscope uses the default file name "cscope.files". -k Kernel mode ignores /usr/include.
Typical: cscope -b -q -k-q create inverted index database for quick search for large projects. -sDirectoryName Use specified directory for source code. Ignored if specified by "-i". -u Unconditionally build a new cross-reference file.. -v Verbose mode. file1 file2 ... List files to cross reference on the command line.
Cscope environment variable:
-
Environment Variable Description CSCOPE_EDITOR Editor to use: /usr/bin/vim EDITOR Default: /usr/bin/vim INCLUDEDIRS Colon-separated list of directories to search for #include files. SOURCEDIRS Colon-separated list of directories to search for additional source files. VPATH Colon-separated list of directories to search. If not set, cscope searches only in the current directory.
Manually Generating file cscope.files
- File: $HOME/bin/gen_cscope or /opt/bin/gen_cscope
Generates cscope.files of ".cpp" and ".hpp" source files for a C++ project.#!/bin/bash find ./ -name "*.[ch]pp" -print > cscope.files cscope -b -q -k
Note that this generates CScope files in the current working directory. The CScope files are only usefull if you begin the vim session in the same directory. Thus if you have a heirarchy of directories, perform this in the top directory and reference the files to be edited on the command line with the relative path from the same directory in which the CScope files were generated.
Also see:
Vim plugins: Vim default plugins:
Vim comes with some default plugins which can be found in:
- Red Hat / CentOS / Fedora:
- RHEL4/5: /usr/share/vim/vim70/autoload/
- Fedora 3:/usr/share/vim/vim63/plugin/
- Ubuntu / Debian:
- Ubuntu 6.06: /usr/share/vim/vim64/plugin/
Additional custom plugins:
User added plugins are added to the user's local directory: ~/.vim/plugin/ or ~/.vimrc/plugin/
- Vim.org: List of all plugins
Default vim plugins: File Explorer / List Files: explorer.vim
Help is available with the following command: :help file-explorer
-
Command Description :Explore List files in your current directory :Explore directory-name List files in specified directory :Vexplore Split with a new vertical window and then list files in your current directory :Sexplore Split with a new horizontal window and then list files in your current directory
The new window buffer created by ":Vexplore" and ":Sexplore" can be closed with ":bd" (buffer delete).
Additional custom plugins: CScope: cscope_maps.vim
See cscope and vim description and use in this tutorial above.
Tabbed pages: minibufexpl.vim
This plugin allows you to open multiple text files and accessed by their tabs displayed at the top of the frame.
-
Keystroke Description :bn New buffer :bd Buffer delete :b3 Go to buffer number 3 ctrl-w followed by "k" New buffer. Puts curson in upper tabbed portion of window. Navigate with arrow keys or "h"/"l". :qa Quit vim out of all buffers tab The "tab" key jumps between tabbed buffers.
Recommended ~/.vimrc file entry:
-
This vim directive will allow undo history to remain when switching buffers."Hide abandon buffers in order to not lose undo history. set hid
The new window buffer tab created can be closed with ":bd" (buffer delete).
Links:
Alternate between the commensurate include and source file: a.vim
Most usefull when used with the vim plugin "minibufexpl.vim"
Usefull for C/C++ programmers to switch between the source ".cpp" and commensurate ".hpp" or ".h" file and vice versa.
-
If you are editing fileX.c and you enter ":A" in vim, you will be switched to the file fileX.hCommand Description :A switches to the header file corresponding to the current file being edited (or vise versa) :AS splits and switches :AV vertical splits and switches :AT new tab and switches :AN cycles through matches :IH switches to file under cursor :IHS splits and switches :IHV vertical splits and switches :IHT new tab and switches :IHN cycles through matches
Links:
Plug-in Installation:
Example of installation of a.vim and minibufexpl.vim plug-ins:
- mkdir -p ~/.vim/plugin
- cd ~/.vim/plugin
- wget -O a.vim http://www.vim.org/scripts/download_script.php?src_id=7218
- wget -O minibufexpl.vim http://www.vim.org/scripts/download_script.php?src_id=3640
Note that the URL of the plug-in can be found from the home page of the plug-in.
Vim tip: Using a mousewheel with vim in an xterm. Place in file $HOME/.Xdefaults
-
XTerm*VT100.Translations: #override \n\
: string("0x9b") string("[64~") \n\
: string("0x9b") string("[65~")
- :'t,. !awk '{print
              aaa bbb ccc              ccc bbb aaa
              xxx yyy zzz   becomes->  zzz yyy xxx
              111 222 333              333 222 111
-
- Use vim visual text selection to mark the lines to format (beautify):
- eg. Whole file:
- Go to first line in file: shift-v
- Go to last line in file: shift-g
- Select the key equals: =
- eg. Whole file:
- Use vim visual text selection to mark the lines to format (beautify):
-
- Mark a block of text at the top line and bottom line of the block. i.e. "mt" and "mb" on two separate lines.
- Example: ":'t,'b !nroff"
- You can insert nroff commands i.e.:
-
.ce 3 Center the next three lines .fi Fill text - left and right justify (default) .nf No Fill .ls 2 Double line spacing .sp Single line space .sv 1.0i Vertical space at top of page space .ns Turn off spacing mode .rs Restore spacing mode .ll 6.0i Line length = 6 inches .in 1.0i Indent one inch .ti 1.0i Temporarily one time only indent one inch .pl 8.0i Page length = 8 inches .bp Page break
-
.fi
.pl 2i
.in 1.0i
.ll 6.0i
.ce
Title to be centered
.sp
The following text bla bla bla bla bla bla bla bla bla bla
bla bla bla bla bla bla bla bla bla bla bla bla bla bla bla bla
bla bla bla bla bla bla bla bla bla bla bla bla bla bla
bla bla bla bla bla bla bla bla bla bla bla bla bla bla bla
bla bla bla bla bla
Becomes:
-
                         Title to be centered

          The following text bla bla bla bla bla bla bla bla
          bla  bla  bla  bla bla bla bla bla bla bla bla bla
          bla bla bla bla bla bla bla bla bla  bla  bla  bla
          bla  bla  bla  bla bla bla bla bla bla bla bla bla
          bla bla bla bla bla bla bla bla bla  bla  bla  bla
          bla bla bla bla
-
-
- Mark a block of text by marking the top line and bottom line of the block. i.e. "mt" and "mb" on two separate lines.
- :'t,'b !spell will cause the block to be replaced with misspelled words.
- Press "u" to undo.
- Proceed to correct words misspelled.
- :map letter commands_strung_together
:map - lists current key mappings
Example - :map g n cwNEW_WORD{ctrl-v}{esc}i{ctrl-v}{CR}
This example would find the next search occurrence, change the word and insert a line feed after the word. The macro is invoked by typing the letter "g".- Control/Escape/Carriage control characters must be prefixed with ctrl-V.
- Choose a letter which is not used or important. (i.e. a poor choice would be "i" as this is used for insert)
- :%s/$/{ctrl-V}{CR}/g
This command applies an extra carriage return at the end of all lines
- :%s/{TAB}*$//
- :1,$ /^#/d
Delete all (first to last line: 1,$ or g) comments lines in file. Delete all lines beginning (^) with "#" (specify text pattern). - :g/#/d
Delete all lines (g) containing comments (comments follow "#") in file. Delete all lines containing "#". - :g!/^#/d
Delete all lines except (g! or v) comment lines beginning (^) with "#".
- :1,$ s/{ctrl-V}{ctrl-M}//
Note: In order to enter a control character, one muust first enter ctrl-v. This is true throughout vi. For example, if searching for a control character (i.e. ctrl-m): /ctrl-v ctrl-M If generating a macro and you need to enter esc without exiting the vi command line the esc must be prefixed with a ctrl-v: ctrl-v esc.
- vi file1 file2 file3
- :n Edit next file (file2)
- :n Edit next file (file3)
- :rew Rewind to the first file (file1)
Many times one may encounter a file with folded lines or may wish to fold lines. The following image is of a file with folded lines where each "+" represents a set of lines not viewed but a marker line prefixed with a "+" is shown stating how many lines have been folded and out of view. Folding helps manage large files which are more easily managed when text lines are grouped into "folds".
Example: vim /usr/share/vim/vim63/plugin/netrw.vim

Keystrokes:
-
Keystroke Description zR Unfold all folded lines in file. za Open/close (toggle) a folded group of lines. zA Open a closed fold or close an open fold recursively. zc Close a folded group of lines. zC Close all folded lines recursively. zd Delete a folded line. zD Delete all folded lines recursively. zE Eliminate all folded lines in file. zF Create "N" folded lines.
- Place cursor over the file name (i.e. #include "fileABC.h")
- Enter the letter combination: gf
(go to file)
-
"Recursively set the path of the project.
set path=$PWD/**
Command file to change HTML file to lower case and XHTML compliance:
-
:1,$ s/<HTML>/<html>/g
:1,$ s/<\/HTML>/<\/html>/g
:1,$ s/<HEAD>/<head>/g
:1,$ s/<\/HEAD>/<\/head>/g
:1,$ s/<TITLE>/<title>/g
:1,$ s/<\/TITLE>/<\/title>/g
:1,$ s/<BODY/<body/g
:1,$ s/<\/BODY/<\/body/g
:1,$ s/<UL>/<ul>/g
:1,$ s/<\/UL>/<\/ul>/g
...
..
.
:1,$ s/<A HREF/<a href/g
:1,$ s/<A NAME/<a name/g
:1,$ s/<\/A>/<\/a>/g
:1,$ s/<P>/<p>/g
:1,$ s/<B>/<b>/g
:1,$ s/<\/B>/<\/b>/g
:1,$ s/<I>/<i>/g
:1,$ s/<\/I>/<\/i>/g
:wq
[Potential Pitfall]: This must be performed while vim has none of the files open which are to be affected. If it does, vim will error due to conflicts with the vim swap file.
| Tagging: |
This functionality allows one to jump between files to locate subroutines.
-
- ctags *.h *.c This creates a file names "tags".
Edit the file using vi.
-
- Unix command line: vi -t subroutine_name This will find the correct file to edit.
OR - Vi command line: :tag subroutine_name This will jump from your current file to the file containing the subroutine. (short form :ta subroutine_name )
OR - By cursor position: ctrl-] Place cursor on the first character of the subroutine name and press ctrl-] This will jump to the file containing the subroutine.
Note: The key combination ctrl-] is also the default telnet connection interrupt. To avoid this problem when using telnet block this telnet escape key by specifying NULL or a new escape key:- telnet -E file-name
- telnet -e "" file-name
- Unix command line: vi -t subroutine_name This will find the correct file to edit.
In all cases you will be entered into the correct file and the cursor will be positioned at the subroutine desired.
If it is not working properly look at the "tags" file created by ctags. Also the tag name (first column) may be abbreviated for convenience. One may shorten the significant characters using :set taglength=number
Tag Notes:
- A project may have a tags file which can be added and referred to by: :set tags=tags\ /ad/src/project1.tags
A "\" must separate the file names. - :set autowrite will automatically save changes when jumping from file to file, otherwise you need to use the :w command.
vim tagging notes: (These specific tag features not available in vi)
| Tag Command | Description |
|---|---|
| :tag start-of-tag-name_TAB | Vim supports tag name completion. Start the typing the tag name and then type the TAB key and name completion will complete the tag name for you. |
| :tag /search-string | Jump to a tag name found by a search. |
| ctrl-] | The vim editor will jump into the tag to follow it to a new position in the file or to a new file. |
| ctrl-t | The vim editor will allow the user to jump back a level. (or :pop) |
| :tselect <function-name> | When multiple entries exist in the tags file, such as a function declaration in a header file and a function definition (the function itself), the operator can choose by issuing this command. The user will be presented with all the references to the function and the user will be prompted to enter the number associated with the appropriate one. |
| :tnext | When multiple answers are available you can go to the next answer. |
| :set ignorecase (or :set ic) |
The ignore case directive affects tagging. |
| :tags | Show tag stack (history) |
| :4pop | Jump to a particular position in the tag stack (history). (jump to the 4th from bottom of tag stack (history). The command ":pop" will move by default "1" backwards in the stack (history).) or :4tag (jump to the 4th from top of tag stack) |
| :tnext | Jump to next matching tag. (Also short form :tn and jump two :2tnext) |
| :tprevious | Jump to previous matching tag. (Also short form :tp and jump two :2tp) |
| :tfirst | Jump to first matching tag. (Also short form :tf, :trewind, :tr) |
| :tlast | Jump to last matching tag. (Also short form :tl) |
:set tags=./tags,./subdir/tags |
Using multiple tag files (one in each directory). Allows one to specify all tags files in directory tree: set tags=src/**/tags Use Makefile to generate tags files as well as compile in each directory. |
Links:
| The ctags utility: |
There are more than one version of ctags out there. The original Unix version, the GNU version and the version that comes with vim. This discussion is about the one that comes with vim. (default with Red Hat)
For use with C++:
- ctags version 5.5.4:
ctags *.cpp ../inc/*.h
- ctags version 5.0.1:
ctags --lang=c++ --c-types=+Ccdefgmnpstuvx *.cpp ../inc/*.h
To generate a tags file for all files in all subdirectories: ctags -R .
The ctags program which is written by the VIM team is called " Exuberant Ctags" and supports the most features in VIM.


Man page: ctags - Generate tag files for source code
| Defaults file: |
VIM: $HOME/.exrc
- ~/.vimrc
- ~/.gvimrc
- ~/.vim/ (directory of vim config files.)
VI: $HOME/.exrc
- Example:
         set autoindent
         set wrapmargin=0
         map g hjlhjlhjlhlhjl
         "
         " S = save current vi buffer contents and run spell on it,
         "     putting list of misspelled words at the end of the vi buffer.
         map S G:w!^M:r!spell %^M
         colorscheme desert
         "Specify that a dark terminal background is being used.
         set bg=dark
Notes:
- Look in /usr/share/vim/vim61/colors/ for available colorschemes.
(I also like "colorscheme desert") - Alternate use of autoindent: set ai sw=3
| Using vim and cscope: |
Cscope was developed to cross reference C source code. It now can be used with C++ and Java and can interface with vim.
Using Cscope to cross reference souce code will create a database and allow you to traverse the source to find calls to a function, occurances of a function, variable, macros, class or object and their respective declarations. Cscope offers more complete navigation than ctags as it has more complete cross referencing.
Vim must be compiled with Cscope support. Red Hat Enterprise Linux 5 (or CentOS 5), includes vim 7.0 with cscope support. Earlier versions of Red Hat or Fedora RPM does not support Cscope and thus must be compiled.
Compiling Vim from source:
- Download vim source from http://vim.org
- tar xzf vim-7.0.tar.gz
- cd vim70
- ./configure --prefix=/opt --enable-cscope
- make
- make install
Using Cscope with vim:
The Cscope database (cscope.out) is generated the first time it is invoked. Subsequent use will update the database based on file changes.
The database can be generated manually using the command i.e.: cscope -b *.cpp *.h or cscope -b -R .
Invoke Cscope from within vim from the vim command line. Type the following: :cscope find search-type search-string The short form of the command is ":cs f" where the "search-type" is:
-
Search Type Type short form Description symbol s Find all references to a symbol global g Find global definition calls c Find calls of this function called d Find functions that the specified function calls text t Find specified text string file f Open file include i Find files that "#include" the specified file
Results of the Cscope query will be displayed at the bottom of the vim screen.
- To jump to a result type the results number (+ enter)
- Use tags commands to return after a jump to a result: ctrl-t
To return to same spot as departure, use ctrl-o - To use "tags" navigation to search for words under the cursor (ctrl-\ or ctrl-]) instead of using the vim command line ":cscope" (and "ctrl-spaceBar" instead of ":scscope"), use the vim plugin, cscope_maps.vim [cache]
When using this plugin, overlapping ctags navigation will not be available. This should not be a problem since cscope plugin navigation is the same but with superior indexing and cross referenceing.
Place this plugin in your directory "$HOME/.vim/plugin"
Plugin required for vim 5 and 6. This feature is compiled in with vim 7.0 on Red Hat Enterprise Linux 5 and CentOS 5 and newer Linux OS's. Attempts to use the plugin when not required will result in the following error:- E568: duplicate cscope database not added
- Cycle through results:
- Next result: :tnext
- Previous result: :tprevious
- Create a split screen for Cscope results: :scscope find search-type search-string
(Short form: :scs f search-type search-string) - Use command line argument ":cscope -R": Scan subdirectories recursively
- Use Cscope ncurses based GUI without vim: cscope
- ctrl-d: Exit Cscope GUI
Cscope command line arguments:
-
Argument Description -R Scan subdirectories recursively -b Build the cross-reference only. -C Ignore letter case when searching. -fFileName Specify Cscope database file name instead of default "cscope.out". -Iinclude-directories Look in "include-directories" for any #include files whose names do not begin with "/". -iFiles Scan specified files listed in "Files". File names are separated by linefeed. Cscope uses the default file name "cscope.files". -k Kernel mode ignores /usr/include.
Typical: cscope -b -q -k-q create inverted index database for quick search for large projects. -sDirectoryName Use specified directory for source code. Ignored if specified by "-i". -u Unconditionally build a new cross-reference file.. -v Verbose mode. file1 file2 ... List files to cross reference on the command line.
Cscope environment variable:
-
Environment Variable Description CSCOPE_EDITOR Editor to use: /usr/bin/vim EDITOR Default: /usr/bin/vim INCLUDEDIRS Colon-separated list of directories to search for #include files. SOURCEDIRS Colon-separated list of directories to search for additional source files. VPATH Colon-separated list of directories to search. If not set, cscope searches only in the current directory.
Manually Generating file cscope.files
- File: $HOME/bin/gen_cscope or /opt/bin/gen_cscope
Generates cscope.files of ".cpp" and ".hpp" source files for a C++ project.#!/bin/bash find ./ -name "*.[ch]pp" -print > cscope.files cscope -b -q -k
Note that this generates CScope files in the current working directory. The CScope files are only usefull if you begin the vim session in the same directory. Thus if you have a heirarchy of directories, perform this in the top directory and reference the files to be edited on the command line with the relative path from the same directory in which the CScope files were generated.
Also see:
| Vim plugins: |
Vim default plugins:
Vim comes with some default plugins which can be found in:
- Red Hat / CentOS / Fedora:
- RHEL4/5: /usr/share/vim/vim70/autoload/
- Fedora 3:/usr/share/vim/vim63/plugin/
- Ubuntu / Debian:
- Ubuntu 6.06: /usr/share/vim/vim64/plugin/
Additional custom plugins:
User added plugins are added to the user's local directory: ~/.vim/plugin/ or ~/.vimrc/plugin/
- Vim.org: List of all plugins
| Default vim plugins: |
File Explorer / List Files: explorer.vim
Help is available with the following command: :help file-explorer
-
Command Description :Explore List files in your current directory :Explore directory-name List files in specified directory :Vexplore Split with a new vertical window and then list files in your current directory :Sexplore Split with a new horizontal window and then list files in your current directory
The new window buffer created by ":Vexplore" and ":Sexplore" can be closed with ":bd" (buffer delete).
| Additional custom plugins: |
CScope: cscope_maps.vim
See cscope and vim description and use in this tutorial above.
Tabbed pages: minibufexpl.vim
This plugin allows you to open multiple text files and accessed by their tabs displayed at the top of the frame.
-
Keystroke Description :bn New buffer :bd Buffer delete :b3 Go to buffer number 3 ctrl-w followed by "k" New buffer. Puts curson in upper tabbed portion of window. Navigate with arrow keys or "h"/"l". :qa Quit vim out of all buffers tab The "tab" key jumps between tabbed buffers.
Recommended ~/.vimrc file entry:
-
This vim directive will allow undo history to remain when switching buffers."Hide abandon buffers in order to not lose undo history. set hid
The new window buffer tab created can be closed with ":bd" (buffer delete).
Links:
Alternate between the commensurate include and source file: a.vim
Most usefull when used with the vim plugin "minibufexpl.vim"
Usefull for C/C++ programmers to switch between the source ".cpp" and commensurate ".hpp" or ".h" file and vice versa.
-
If you are editing fileX.c and you enter ":A" in vim, you will be switched to the file fileX.hCommand Description :A switches to the header file corresponding to the current file being edited (or vise versa) :AS splits and switches :AV vertical splits and switches :AT new tab and switches :AN cycles through matches :IH switches to file under cursor :IHS splits and switches :IHV vertical splits and switches :IHT new tab and switches :IHN cycles through matches
Links:
Plug-in Installation:
Example of installation of a.vim and minibufexpl.vim plug-ins:
- mkdir -p ~/.vim/plugin
- cd ~/.vim/plugin
- wget -O a.vim http://www.vim.org/scripts/download_script.php?src_id=7218
- wget -O minibufexpl.vim http://www.vim.org/scripts/download_script.php?src_id=3640
Note that the URL of the plug-in can be found from the home page of the plug-in.
| Vim tip: |
Using a mousewheel with vim in an xterm. Place in file $HOME/.Xdefaults
-
XTerm*VT100.Translations: #override \n\
: string("0x9b") string("[64~") \n\
: string("0x9b") string("[65~")
광고 클릭에서 발생하는 수익금은 모두 웹사이트 서버의 유지 및 관리, 그리고 기술 콘텐츠 향상을 위해 쓰여집니다.
