
[ 一日30分 인생승리의 학습법]500 Lines or Less Blockcode: A Visual Programming Toolkit : 500줄 이하의 블록코드: 시각적 프로그래밍 툴킷
2024.02.12 00:57
[ 一日30分 인생승리의 학습법]500 Lines or Less Blockcode: A Visual Programming Toolkit : 500줄 이하의 블록코드: 시각적 프로그래밍 툴킷
500 Lines or Less
Blockcode: A Visual Programming Toolkit
Dethe is a geek dad, aesthetic programmer, mentor, and creator of the Waterbear visual programming tool. He co-hosts the Vancouver Maker Education Salons and wants to fill the world with robotic origami rabbits.
In block-based programming languages, you write programs by dragging and connecting blocks that represent parts of the program. Block-based languages differ from conventional programming languages, in which you type words and symbols.
Learning a programming language can be difficult because they are extremely sensitive to even the slightest of typos. Most programming languages are case-sensitive, have obscure syntax, and will refuse to run if you get so much as a semicolon in the wrong place—or worse, leave one out. Further, most programming languages in use today are based on English and their syntax cannot be localized.
In contrast, a well-done block language can eliminate syntax errors completely. You can still create a program which does the wrong thing, but you cannot create one with the wrong syntax: the blocks just won't fit that way. Block languages are more discoverable: you can see all the constructs and libraries of the language right in the list of blocks. Further, blocks can be localized into any human language without changing the meaning of the programming language.
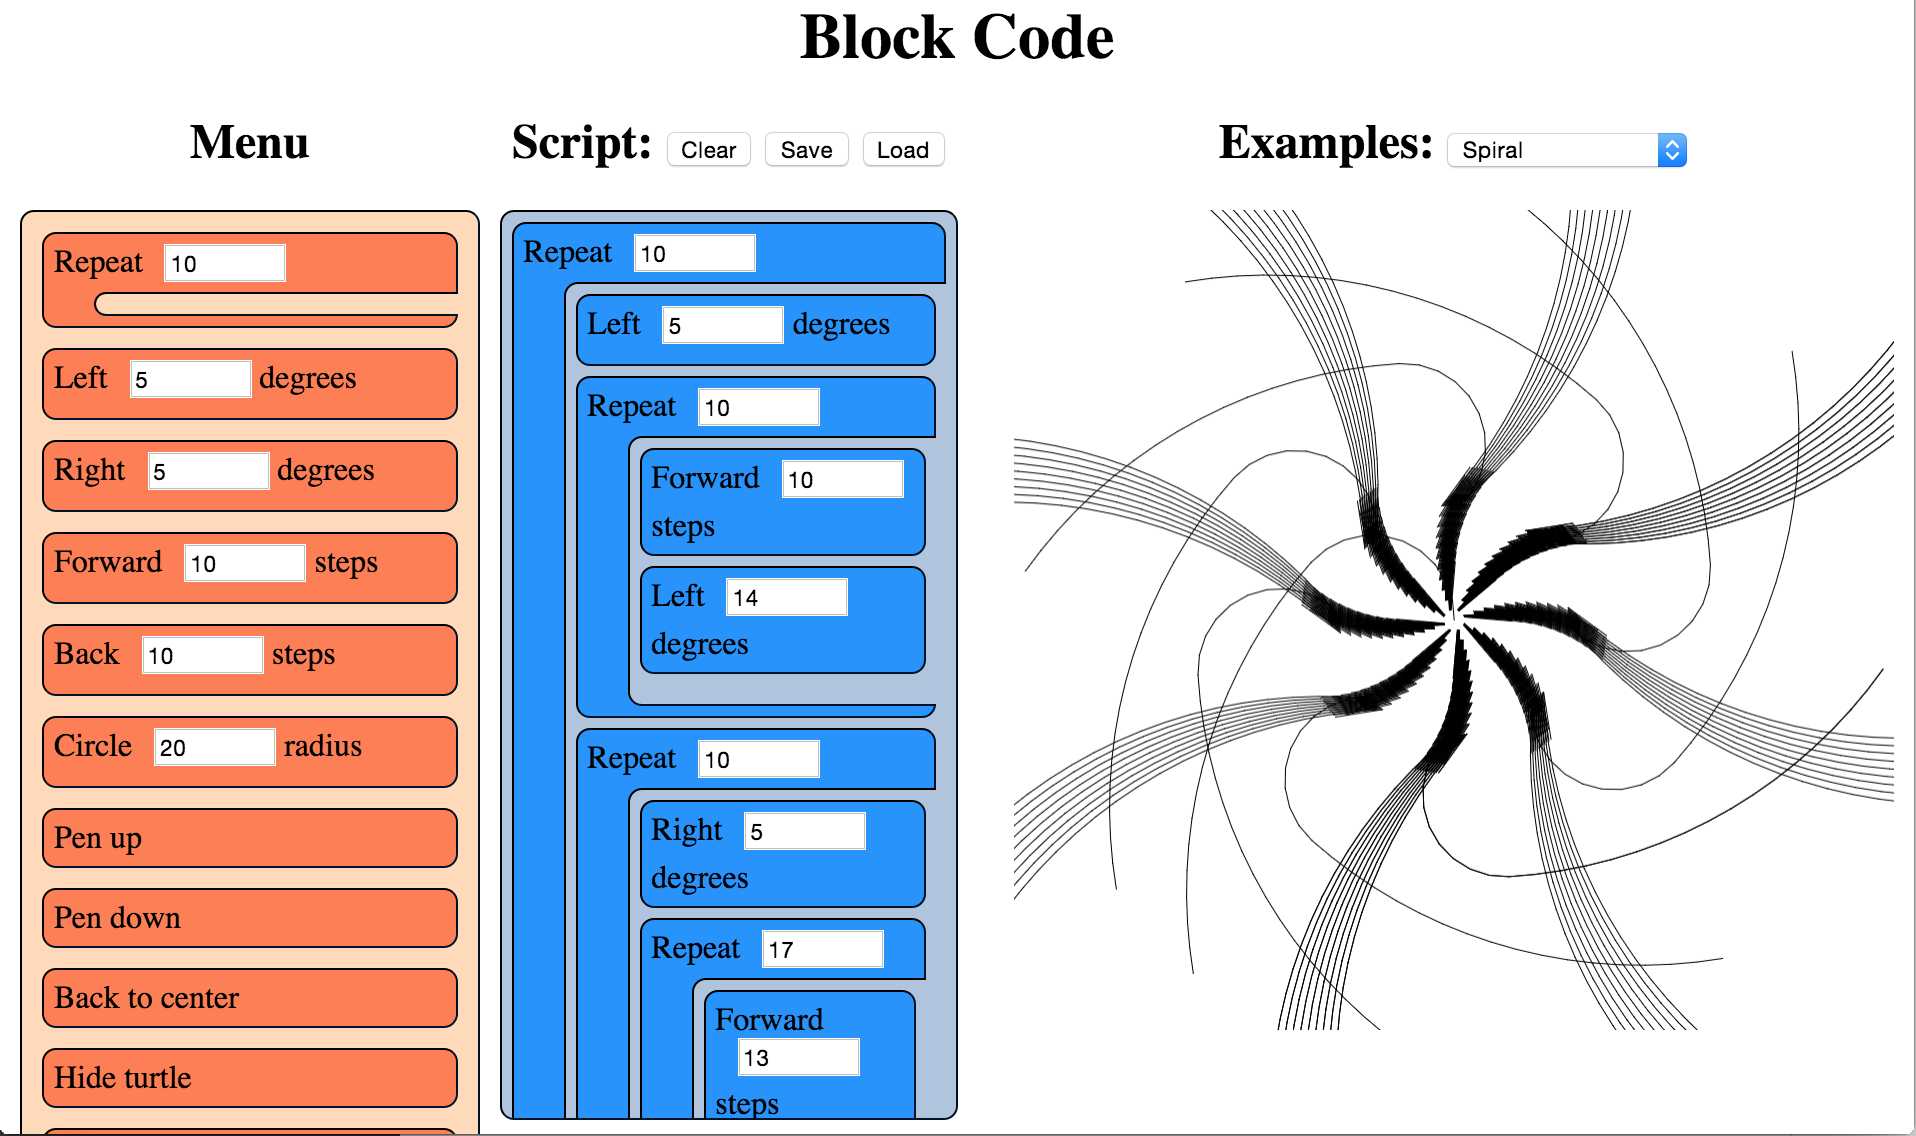
Figure 1.1 - The Blockcode IDE in use
Block-based languages have a long history, with some of the prominent ones being Lego Mindstorms, Alice3D, StarLogo, and especially Scratch. There are several tools for block-based programming on the web as well: Blockly, AppInventor, Tynker, and many more.
The code in this chapter is loosely based on the open-source project Waterbear, which is not a language but a tool for wrapping existing languages with a block-based syntax. Advantages of such a wrapper include the ones noted above: eliminating syntax errors, visual display of available components, ease of localization. Additionally, visual code can sometimes be easier to read and debug, and blocks can be used by pre-typing children. (We could even go further and put icons on the blocks, either in conjunction with the text names or instead of them, to allow pre-literate children to write programs, but we don't go that far in this example.)
The choice of turtle graphics for this language goes back to the Logo language, which was created specifically to teach programming to children. Several of the block-based languages above include turtle graphics, and it is a small enough domain to be able to capture in a tightly constrained project such as this.
If you would like to get a feel for what a block-based-language is like, you can experiment with the program that is built in this chapter from author's GitHub repository.
Goals and Structure
I want to accomplish a couple of things with this code. First and foremost, I want to implement a block language for turtle graphics, with which you can write code to create images through simple dragging-and-dropping of blocks, using as simple a structure of HTML, CSS, and JavaScript as possible. Second, but still important, I want to show how the blocks themselves can serve as a framework for other languages besides our mini turtle language.
To do this, we encapsulate everything that is specific to the turtle language into one file (turtle.js) that we can easily swap with another file. Nothing else should be specific to the turtle language; the rest should just be about handling the blocks (blocks.js and menu.js) or be generally useful web utilities (util.js, drag.js, file.js). That is the goal, although to maintain the small size of the project, some of those utilities are less general-purpose and more specific to their use with the blocks.
One thing that struck me when writing a block language was that the language is its own IDE. You can't just code up blocks in your favourite text editor; the IDE has to be designed and developed in parallel with the block language. This has some pros and cons. On the plus side, everyone will use a consistent environment and there is no room for religious wars about what editor to use. On the downside, it can be a huge distraction from building the block language itself.
The Nature of Scripts
A Blockcode script, like a script in any language (whether block- or text-based), is a sequence of operations to be followed. In the case of Blockcode the script consists of HTML elements which are iterated over, and which are each associated with a particular JavaScript function which will be run when that block's turn comes. Some blocks can contain (and are responsible for running) other blocks, and some blocks can contain numeric arguments which are passed to the functions.
In most (text-based) languages, a script goes through several stages: a lexer converts the text into recognized tokens, a parser organizes the tokens into an abstract syntax tree, then depending on the language the program may be compiled into machine code or fed into an interpreter. That's a simplification; there can be more steps. For Blockcode, the layout of the blocks in the script area already represents our abstract syntax tree, so we don't have to go through the lexing and parsing stages. We use the Visitor pattern to iterate over those blocks and call predefined JavaScript functions associated with each block to run the program.
There is nothing stopping us from adding additional stages to be more like a traditional language. Instead of simply calling associated JavaScript functions, we could replace turtle.js with a block language that emits byte codes for a different virtual machine, or even C++ code for a compiler. Block languages exist (as part of the Waterbear project) for generating Java robotics code, for programming Arduino, and for scripting Minecraft running on Raspberry Pi.
Web Applications
In order to make the tool available to the widest possible audience, it is web-native. It's written in HTML, CSS, and JavaScript, so it should work in most browsers and platforms.
Modern web browsers are powerful platforms, with a rich set of tools for building great apps. If something about the implementation became too complex, I took that as a sign that I wasn't doing it "the web way" and, where possible, tried to re-think how to better use the browser tools.
An important difference between web applications and traditional desktop or server applications is the lack of a main() or other entry point. There is no explicit run loop because that is already built into the browser and implicit on every web page. All our code will be parsed and executed on load, at which point we can register for events we are interested in for interacting with the user. After the first run, all further interaction with our code will be through callbacks we set up and register, whether we register those for events (like mouse movement), timeouts (fired with the periodicity we specify), or frame handlers (called for each screen redraw, generally 60 frames per second). The browser does not expose full-featured threads either (only shared-nothing web workers).
Stepping Through the Code
I've tried to follow some conventions and best practices throughout this project. Each JavaScript file is wrapped in a function to avoid leaking variables into the global environment. If it needs to expose variables to other files it will define a single global per file, based on the filename, with the exposed functions in it. This will be near the end of the file, followed by any event handlers set by that file, so you can always glance at the end of a file to see what events it handles and what functions it exposes.
The code style is procedural, not object-oriented or functional. We could do the same things in any of these paradigms, but that would require more setup code and wrappers to impose on what exists already for the DOM. Recent work on Custom Elements make it easier to work with the DOM in an OO way, and there has been a lot of great writing on Functional JavaScript, but either would require a bit of shoe-horning, so it felt simpler to keep it procedural.
There are eight source files in this project, but index.html and blocks.css are basic structure and style for the app and won't be discussed. Two of the JavaScript files won't be discussed in any detail either: util.js contains some helpers and serves as a bridge between different browser implementations—similar to a library like jQuery but in less than 50 lines of code. file.js is a similar utility used for loading and saving files and serializing scripts.
These are the remaining files:
block.jsis the abstract representation of a block-based language.drag.jsimplements the key interaction of the language: allowing the user to drag blocks from a list of available blocks (the "menu") to assemble them into a program (the "script").menu.jshas some helper code and is also responsible for actually running the user's program.turtle.jsdefines the specifics of our block language (turtle graphics) and initializes its specific blocks. This is the file that would be replaced in order to create a different block language.
blocks.js
Each block consists of a few HTML elements, styled with CSS, with some JavaScript event handlers for dragging-and-dropping and modifying the input argument. The blocks.js file helps to create and manage these groupings of elements as single objects. When a type of block is added to the block menu, it is associated with a JavaScript function to implement the language, so each block in the script has to be able to find its associated function and call it when the script runs.
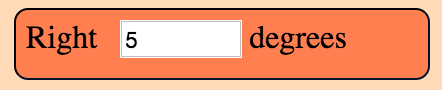
Figure 1.2 - An example block
Blocks have two optional bits of structure. They can have a single numeric parameter (with a default value), and they can be a container for other blocks. These are hard limits to work with, but would be relaxed in a larger system. In Waterbear there are also expression blocks which can be passed in as parameters; multiple parameters of a variety of types are supported. Here in the land of tight constraints we'll see what we can do with just one type of parameter.
<!-- The HTML structure of a block -->
<div class="block" draggable="true" data-name="Right">
    Right
    <input type="number" value="5">
    degrees
</div>
It's important to note that there is no real distinction between blocks in the menu and blocks in the script. Dragging treats them slightly differently based on where they are being dragged from, and when we run a script it only looks at the blocks in the script area, but they are fundamentally the same structures, which means we can clone the blocks when dragging from the menu into the script.
The createBlock(name, value, contents) function returns a block as a DOM element populated with all internal elements, ready to insert into the document. This can be used to create blocks for the menu, or for restoring script blocks saved in files or localStorage. While it is flexible this way, it is built specifically for the Blockcode "language" and makes assumptions about it, so if there is a value it assumes the value represents a numeric argument and creates an input of type "number". Since this is a limitation of the Blockcode, this is fine, but if we were to extend the blocks to support other types of arguments, or more than one argument, the code would have to change.
    function createBlock(name, value, contents){
        var item = elem('div',
            {'class': 'block', draggable: true, 'data-name': name},
            [name]
        );
        if (value !== undefined && value !== null){
            item.appendChild(elem('input', {type: 'number', value: value}));
        }
        if (Array.isArray(contents)){
            item.appendChild(
                elem('div', {'class': 'container'}, contents.map(function(block){
                return createBlock.apply(null, block);
            })));
        }else if (typeof contents === 'string'){
            // Add units (degrees, etc.) specifier
            item.appendChild(document.createTextNode(' ' + contents));
        }
        return item;
    }
We have some utilities for handling blocks as DOM elements:
blockContents(block)retrieves the child blocks of a container block. It always returns a list if called on a container block, and always returns null on a simple blockblockValue(block)returns the numerical value of the input on a block if the block has an input field of type number, or null if there is no input element for the blockblockScript(block)will return a structure suitable for serializing with JSON, to save blocks in a form they can easily be restored fromrunBlocks(blocks)is a handler that runs each block in an array of blocks
    function blockContents(block){
        var container = block.querySelector('.container');
        return container ? [].slice.call(container.children) : null;
    }

    function blockValue(block){
        var input = block.querySelector('input');
        return input ? Number(input.value) : null;
    }

    function blockUnits(block){
        if (block.children.length > 1 &&
            block.lastChild.nodeType === Node.TEXT_NODE &&
            block.lastChild.textContent){
            return block.lastChild.textContent.slice(1);
        }
    }

    function blockScript(block){
        var script = [block.dataset.name];
        var value = blockValue(block);
        if (value !== null){
            script.push(blockValue(block));
        }
        var contents = blockContents(block);
        var units = blockUnits(block);
        if (contents){script.push(contents.map(blockScript));}
        if (units){script.push(units);}
        return script.filter(function(notNull){ return notNull !== null; });
    }

    function runBlocks(blocks){
        blocks.forEach(function(block){ trigger('run', block); });
    }
drag.js
The purpose of drag.js is to turn static blocks of HTML into a dynamic programming language by implementing interactions between the menu section of the view and the script section. The user builds their program by dragging blocks from the menu into the script, and the system runs the blocks in the script area.
We're using HTML5 drag-and-drop; the specific JavaScript event handlers it requires are defined here. (For more information on using HTML5 drag-and-drop, see Eric Bidleman's article.) While it is nice to have built-in support for drag-and-drop, it does have some oddities and some pretty major limitations, like not being implemented in any mobile browser at the time of this writing.
We define some variables at the top of the file. When we're dragging, we'll need to reference these from different stages of the dragging callback dance.
    var dragTarget = null; // Block we're dragging
    var dragType = null; // Are we dragging from the menu or from the script?
    var scriptBlocks = []; // Blocks in the script, sorted by position
Depending on where the drag starts and ends, drop will have different effects:
- If dragging from script to menu, delete
dragTarget(remove block from script). - If dragging from script to script, move
dragTarget(move an existing script block). - If dragging from menu to script, copy
dragTarget(insert new block in script). - If dragging from menu to menu, do nothing.
During the dragStart(evt) handler we start tracking whether the block is being copied from the menu or moved from (or within) the script. We also grab a list of all the blocks in the script which are not being dragged, to use later. The evt.dataTransfer.setData call is used for dragging between the browser and other applications (or the desktop), which we're not using, but have to call anyway to work around a bug.
    function dragStart(evt){
        if (!matches(evt.target, '.block')) return;
        if (matches(evt.target, '.menu .block')){
            dragType = 'menu';
        }else{
            dragType = 'script';
        }
        evt.target.classList.add('dragging');
        dragTarget = evt.target;
        scriptBlocks = [].slice.call(
            document.querySelectorAll('.script .block:not(.dragging)'));
        // For dragging to take place in Firefox, we have to set this, even if
        // we don't use it
        evt.dataTransfer.setData('text/html', evt.target.outerHTML);
        if (matches(evt.target, '.menu .block')){
            evt.dataTransfer.effectAllowed = 'copy';
        }else{
            evt.dataTransfer.effectAllowed = 'move';
        }
    }
While we are dragging, the dragenter, dragover, and dragout events give us opportunities to add visual cues by highlighting valid drop targets, etc. Of these, we only make use of dragover.
    function dragOver(evt){
        if (!matches(evt.target, '.menu, .menu *, .script, .script *, .content')) {
            return;
        }
        // Necessary. Allows us to drop.
        if (evt.preventDefault) { evt.preventDefault(); }
        if (dragType === 'menu'){
            // See the section on the DataTransfer object.
            evt.dataTransfer.dropEffect = 'copy';
        }else{
            evt.dataTransfer.dropEffect = 'move';
        }
        return false;
    }
When we release the mouse, we get a drop event. This is where the magic happens. We have to check where we dragged from (set back in dragStart) and where we have dragged to. Then we either copy the block, move the block, or delete the block as needed. We fire off some custom events using trigger() (defined in util.js) for our own use in the block logic, so we can refresh the script when it changes.
    function drop(evt){
        if (!matches(evt.target, '.menu, .menu *, .script, .script *')) return;
        var dropTarget = closest(
            evt.target, '.script .container, .script .block, .menu, .script');
        var dropType = 'script';
        if (matches(dropTarget, '.menu')){ dropType = 'menu'; }
        // stops the browser from redirecting.
        if (evt.stopPropagation) { evt.stopPropagation(); }
        if (dragType === 'script' && dropType === 'menu'){
            trigger('blockRemoved', dragTarget.parentElement, dragTarget);
            dragTarget.parentElement.removeChild(dragTarget);
        }else if (dragType ==='script' && dropType === 'script'){
            if (matches(dropTarget, '.block')){
                dropTarget.parentElement.insertBefore(
                    dragTarget, dropTarget.nextSibling);
            }else{
                dropTarget.insertBefore(dragTarget, dropTarget.firstChildElement);
            }
            trigger('blockMoved', dropTarget, dragTarget);
        }else if (dragType === 'menu' && dropType === 'script'){
            var newNode = dragTarget.cloneNode(true);
            newNode.classList.remove('dragging');
            if (matches(dropTarget, '.block')){
                dropTarget.parentElement.insertBefore(
                    newNode, dropTarget.nextSibling);
            }else{
                dropTarget.insertBefore(newNode, dropTarget.firstChildElement);
            }
            trigger('blockAdded', dropTarget, newNode);
        }
    }
The dragEnd(evt) is called when we mouse up, but after we handle the drop event. This is where we can clean up, remove classes from elements, and reset things for the next drag.
    function _findAndRemoveClass(klass){
        var elem = document.querySelector('.' + klass);
        if (elem){ elem.classList.remove(klass); }
    }

    function dragEnd(evt){
        _findAndRemoveClass('dragging');
        _findAndRemoveClass('over');
        _findAndRemoveClass('next');
    }
menu.js
The file menu.js is where blocks are associated with the functions that are called when they run, and contains the code for actually running the script as the user builds it up. Every time the script is modified, it is re-run automatically.
"Menu" in this context is not a drop-down (or pop-up) menu, like in most applications, but is the list of blocks you can choose for your script. This file sets that up, and starts the menu off with a looping block that is generally useful (and thus not part of the turtle language itself). This is kind of an odds-and-ends file, for things that may not fit anywhere else.
Having a single file to gather random functions in is useful, especially when an architecture is under development. My theory of keeping a clean house is to have designated places for clutter, and that applies to building a program architecture too. One file or module becomes the catch-all for things that don't have a clear place to fit in yet. As this file grows it is important to watch for emerging patterns: several related functions can be spun off into a separate module (or joined together into a more general function). You don't want the catch-all to grow indefinitely, but only to be a temporary holding place until you figure out the right way to organize the code.
We keep around references to menu and script because we use them a lot; no point hunting through the DOM for them over and over. We'll also use scriptRegistry, where we store the scripts of blocks in the menu. We use a very simple name-to-script mapping which does not support either multiple menu blocks with the same name or renaming blocks. A more complex scripting environment would need something more robust.
We use scriptDirty to keep track of whether the script has been modified since the last time it was run, so we don't keep trying to run it constantly.
    var menu = document.querySelector('.menu');
    var script = document.querySelector('.script');
    var scriptRegistry = {};
    var scriptDirty = false;
When we want to notify the system to run the script during the next frame handler, we call runSoon() which sets the scriptDirty flag to true. The system calls run() on every frame, but returns immediately unless scriptDirty is set. When scriptDirty is set, it runs all the script blocks, and also triggers events to let the specific language handle any tasks it needs before and after the script is run. This decouples the blocks-as-toolkit from the turtle language to make the blocks re-usable (or the language pluggable, depending how you look at it).
As part of running the script, we iterate over each block, calling runEach(evt) on it, which sets a class on the block, then finds and executes its associated function. If we slow things down, you should be able to watch the code execute as each block highlights to show when it is running.
The requestAnimationFrame method below is provided by the browser for animation. It takes a function which will be called for the next frame to be rendered by the browser (at 60 frames per second) after the call is made. How many frames we actually get depends on how fast we can get work done in that call.
    function runSoon(){ scriptDirty = true; }

    function run(){
        if (scriptDirty){
            scriptDirty = false;
            Block.trigger('beforeRun', script);
            var blocks = [].slice.call(
                document.querySelectorAll('.script > .block'));
            Block.run(blocks);
            Block.trigger('afterRun', script);
        }else{
            Block.trigger('everyFrame', script);
        }
        requestAnimationFrame(run);
    }
    requestAnimationFrame(run);

    function runEach(evt){
        var elem = evt.target;
        if (!matches(elem, '.script .block')) return;
        if (elem.dataset.name === 'Define block') return;
        elem.classList.add('running');
        scriptRegistry[elem.dataset.name](elem);
        elem.classList.remove('running');
    }
We add blocks to the menu using menuItem(name, fn, value, contents) which takes a normal block, associates it with a function, and puts in the menu column.
    function menuItem(name, fn, value, units){
        var item = Block.create(name, value, units);
        scriptRegistry[name] = fn;
        menu.appendChild(item);
        return item;
    }
We define repeat(block) here, outside of the turtle language, because it is generally useful in different languages. If we had blocks for conditionals and reading and writing variables they could also go here, or into a separate trans-language module, but right now we only have one of these general-purpose blocks defined.
    function repeat(block){
        var count = Block.value(block);
        var children = Block.contents(block);
        for (var i = 0; i < count; i++){
            Block.run(children);
        }
    }
    menuItem('Repeat', repeat, 10, []);
turtle.js
turtle.js is the implementation of the turtle block language. It exposes no functions to the rest of the code, so nothing else can depend on it. This way we can swap out the one file to create a new block language and know nothing in the core will break.
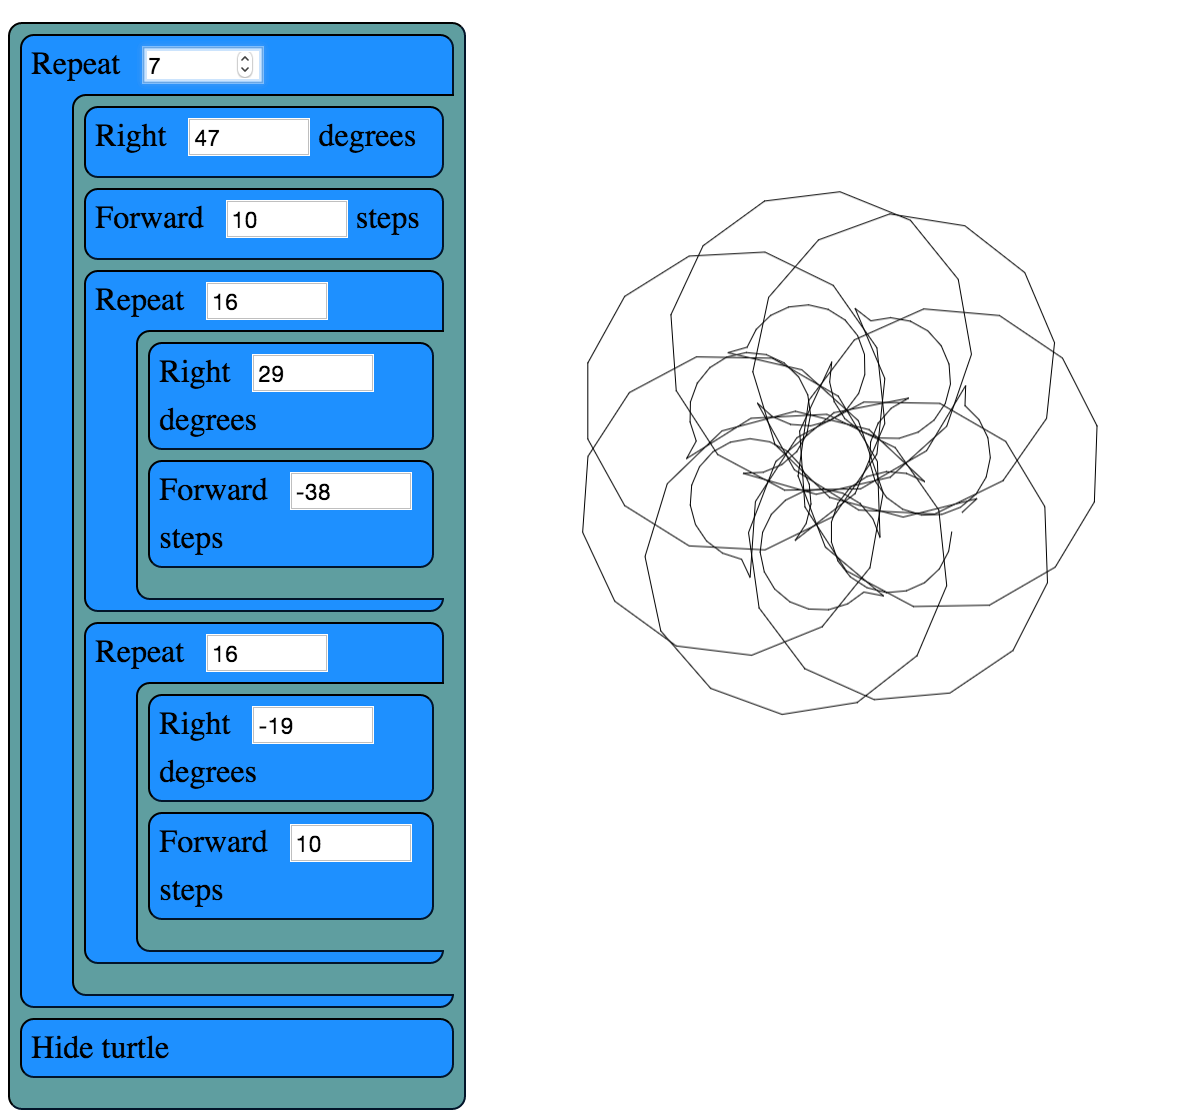
Figure 1.3 - Example of Turtle code running
Turtle programming is a style of graphics programming, first popularized by Logo, where you have an imaginary turtle carrying a pen walking on the screen. You can tell the turtle to pick up the pen (stop drawing, but still move), put the pen down (leaving a line everywhere it goes), move forward a number of steps, or turn a number of degrees. Just those commands, combined with looping, can create amazingly intricate images.
In this version of turtle graphics we have a few extra blocks. Technically we don't need both turn right and turn left because you can have one and get the other with negative numbers. Likewise move back can be done with move forward and negative numbers. In this case it felt more balanced to have both.
The image above was formed by putting two loops inside another loop and adding a move forward and turn right to each loop, then playing with the parameters interactively until I liked the image that resulted.
    var PIXEL_RATIO = window.devicePixelRatio || 1;
    var canvasPlaceholder = document.querySelector('.canvas-placeholder');
    var canvas = document.querySelector('.canvas');
    var script = document.querySelector('.script');
    var ctx = canvas.getContext('2d');
    var cos = Math.cos, sin = Math.sin, sqrt = Math.sqrt, PI = Math.PI;
    var DEGREE = PI / 180;
    var WIDTH, HEIGHT, position, direction, visible, pen, color;
The reset() function clears all the state variables to their defaults. If we were to support multiple turtles, these variables would be encapsulated in an object. We also have a utility, deg2rad(deg), because we work in degrees in the UI, but we draw in radians. Finally, drawTurtle() draws the turtle itself. The default turtle is simply a triangle, but you could override this to draw a more aesthetically-pleasing turtle.
Note that drawTurtle uses the same primitive operations that we define to implement the turtle drawing. Sometimes you don't want to reuse code at different abstraction layers, but when the meaning is clear it can be a big win for code size and performance.
    function reset(){
        recenter();
        direction = deg2rad(90); // facing "up"
        visible = true;
        pen = true; // when pen is true we draw, otherwise we move without drawing
        color = 'black';
    }

    function deg2rad(degrees){ return DEGREE * degrees; }

    function drawTurtle(){
        var userPen = pen; // save pen state
        if (visible){
            penUp(); _moveForward(5); penDown();
            _turn(-150); _moveForward(12);
            _turn(-120); _moveForward(12);
            _turn(-120); _moveForward(12);
            _turn(30);
            penUp(); _moveForward(-5);
            if (userPen){
                penDown(); // restore pen state
            }
        }
    }
We have a special block to draw a circle with a given radius at the current mouse position. We special-case drawCircle because, while you can certainly draw a circle by repeating MOVE 1 RIGHT 1 360 times, controlling the size of the circle is very difficult that way.
    function drawCircle(radius){
        // Math for this is from http://www.mathopenref.com/polygonradius.html
        var userPen = pen; // save pen state
        if (visible){
            penUp(); _moveForward(-radius); penDown();
            _turn(-90);
            var steps = Math.min(Math.max(6, Math.floor(radius / 2)), 360);
            var theta = 360 / steps;
            var side = radius * 2 * Math.sin(Math.PI / steps);
            _moveForward(side / 2);
            for (var i = 1; i < steps; i++){
                _turn(theta); _moveForward(side);
            }
            _turn(theta); _moveForward(side / 2);
            _turn(90);
            penUp(); _moveForward(radius); penDown();
            if (userPen){
                penDown(); // restore pen state
            }
        }
    }
Our main primitive is moveForward, which has to handle some elementary trigonometry and check whether the pen is up or down.
    function _moveForward(distance){
        var start = position;
        position = {
            x: cos(direction) * distance * PIXEL_RATIO + start.x,
            y: -sin(direction) * distance * PIXEL_RATIO + start.y
        };
        if (pen){
            ctx.lineStyle = color;
            ctx.beginPath();
            ctx.moveTo(start.x, start.y);
            ctx.lineTo(position.x, position.y);
            ctx.stroke();
        }
    }
Most of the rest of the turtle commands can be easily defined in terms of what we've built above.
    function penUp(){ pen = false; }
    function penDown(){ pen = true; }
    function hideTurtle(){ visible = false; }
    function showTurtle(){ visible = true; }
    function forward(block){ _moveForward(Block.value(block)); }
    function back(block){ _moveForward(-Block.value(block)); }
    function circle(block){ drawCircle(Block.value(block)); }
    function _turn(degrees){ direction += deg2rad(degrees); }
    function left(block){ _turn(Block.value(block)); }
    function right(block){ _turn(-Block.value(block)); }
    function recenter(){ position = {x: WIDTH/2, y: HEIGHT/2}; }
When we want a fresh slate, the clear function restores everything back to where we started.
    function clear(){
        ctx.save();
        ctx.fillStyle = 'white';
        ctx.fillRect(0,0,WIDTH,HEIGHT);
        ctx.restore();
        reset();
        ctx.moveTo(position.x, position.y);
    }
When this script first loads and runs, we use our reset and clear to initialize everything and draw the turtle.
    onResize();
    clear();
    drawTurtle();
Now we can use the functions above, with the Menu.item function from menu.js, to make blocks for the user to build scripts from. These are dragged into place to make the user's programs.
    Menu.item('Left', left, 5, 'degrees');
    Menu.item('Right', right, 5, 'degrees');
    Menu.item('Forward', forward, 10, 'steps');
    Menu.item('Back', back, 10, 'steps');
    Menu.item('Circle', circle, 20, 'radius');
    Menu.item('Pen up', penUp);
    Menu.item('Pen down', penDown);
    Menu.item('Back to center', recenter);
    Menu.item('Hide turtle', hideTurtle);
    Menu.item('Show turtle', showTurtle);
Lessons Learned
Why Not Use MVC?
Model-View-Controller (MVC) was a good design choice for Smalltalk programs in the '80s and it can work in some variation or other for web apps, but it isn't the right tool for every problem. All the state (the "model" in MVC) is captured by the block elements in a block language anyway, so replicating it into Javascript has little benefit unless there is some other need for the model (if we were editing shared, distributed code, for instance).
An early version of Waterbear went to great lengths to keep the model in JavaScript and sync it with the DOM, until I noticed that more than half the code and 90% of the bugs were due to keeping the model in sync with the DOM. Eliminating the duplication allowed the code to be simpler and more robust, and with all the state on the DOM elements, many bugs could be found simply by looking at the DOM in the developer tools. So in this case there is little benefit to building further separation of MVC than we already have in HTML/CSS/JavaScript.
Toy Changes Can Lead to Real Changes
Building a small, tightly scoped version of the larger system I work on has been an interesting exercise. Sometimes in a large system there are things you are hesitant to change because they affect too many other things. In a tiny, toy version you can experiment freely and learn things which you can then take back to the larger system. For me, the larger system is Waterbear and this project has had a huge impact on the way Waterbear is structured.
Small Experiments Make Failure OK
Some of the experiments I was able to do with this stripped-down block language were:
- using HTML5 drag-and-drop,
- running blocks directly by iterating through the DOM calling associated functions,
- separating the code that runs cleanly from the HTML DOM,
- simplified hit testing while dragging,
- building our own tiny vector and sprite libraries (for the game blocks), and
- "live coding" where the results are shown whenever you change the block script.
The thing about experiments is that they do not have to succeed. We tend to gloss over failures and dead ends in our work, where failures are punished instead of treated as important vehicles for learning, but failures are essential if you are going to push forward. While I did get the HTML5 drag-and-drop working, the fact that it isn't supported at all on any mobile browser means it is a non-starter for Waterbear. Separating the code out and running code by iterating through the blocks worked so well that I've already begun bringing those ideas to Waterbear, with excellent improvements in testing and debugging. The simplified hit testing, with some modifications, is also coming back to Waterbear, as are the tiny vector and sprite libraries. Live coding hasn't made it to Waterbear yet, but once the current round of changes stabilizes I may introduce it.
What Are We Trying to Build, Really?
Building a small version of a bigger system puts a sharp focus on what the important parts really are. Are there bits left in for historical reasons that serve no purpose (or worse, distract from the purpose)? Are there features no-one uses but you have to pay to maintain? Could the user interface be streamlined? All these are great questions to ask while making a tiny version. Drastic changes, like re-organizing the layout, can be made without worrying about the ramifications cascading through a more complex system, and can even guide refactoring the complex system.
A Program is a Process, Not a Thing
There are things I wasn't able to experiment with in the scope of this project that I may use the blockcode codebase to test out in the future. It would be interesting to create "function" blocks which create new blocks out of existing blocks. Implementing undo/redo would be simpler in a constrained environment. Making blocks accept multiple arguments without radically expanding the complexity would be useful. And finding various ways to share block scripts online would bring the webbiness of the tool full circle.
[출처] https://aosabook.org/en/500L/blockcode-a-visual-programming-toolkit.html
500줄 이하의
블록코드: 시각적 프로그래밍 툴킷


Dethe 는 괴짜 아빠이자 미적 프로그래머, 멘토이자 Waterbear 시각적 프로그래밍 도구의 제작자입니다. 그는 Vancouver Maker Education Salons를 공동 주최하며 로봇 종이접기 토끼로 세상을 채우고 싶어합니다.
블록 기반 프로그래밍 언어에서는 프로그램의 일부를 나타내는 블록을 끌어서 연결하여 프로그램을 작성합니다. 블록 기반 언어는 단어와 기호를 입력하는 기존 프로그래밍 언어와 다릅니다.
프로그래밍 언어를 배우는 것은 사소한 오타에도 극도로 민감하기 때문에 어려울 수 있습니다. 대부분의 프로그래밍 언어는 대소문자를 구분하고 구문이 모호하며 잘못된 위치에 세미콜론이 많이 있거나 더 나쁜 경우에는 실행을 거부합니다. 또한 오늘날 사용되는 대부분의 프로그래밍 언어는 영어를 기반으로 하며 해당 구문을 현지화할 수 없습니다.
대조적으로, 잘 만들어진 블록 언어는 구문 오류를 완전히 제거할 수 있습니다. 잘못된 작업을 수행하는 프로그램을 만들 수는 있지만 잘못된 구문을 사용하여 프로그램을 만들 수는 없습니다. 블록은 그런 식으로 적합하지 않습니다. 블록 언어는 검색 가능성이 더 높습니다. 블록 목록에서 바로 언어의 모든 구성과 라이브러리를 볼 수 있습니다. 또한 프로그래밍 언어의 의미를 변경하지 않고도 블록을 인간 언어로 지역화할 수 있습니다.
그림 1.1 - 사용 중인 Blockcode IDE
블록 기반 언어는 오랜 역사를 가지고 있으며, 대표적인 언어로는 Lego Mindstorms , Alice3D , StarLogo 및 특히 Scratch가 있습니다 . 웹에는 Blockly , AppInventor , Tynker 등 블록 기반 프로그래밍을 위한 여러 도구 가 있습니다 .
이 장의 코드는 언어가 아니라 기존 언어를 블록 기반 구문으로 래핑하는 도구인 오픈 소스 프로젝트 Waterbear를 대략적으로 기반으로 합니다. 이러한 래퍼의 장점에는 위에서 언급한 구문 오류 제거, 사용 가능한 구성 요소의 시각적 표시, 지역화 용이성 등이 포함됩니다. 또한 시각적 코드는 때로는 읽고 디버깅하기가 더 쉬울 수 있으며 하위 항목을 미리 입력하여 블록을 사용할 수 있습니다. (더 나아가 텍스트 이름과 함께 또는 텍스트 이름 대신 블록에 아이콘을 배치하여 읽기 전 어린이가 프로그램을 작성할 수 있도록 할 수도 있지만 이 예에서는 그렇게까지 진행하지 않습니다.)
이 언어에 대한 거북이 그래픽의 선택은 아이들에게 프로그래밍을 가르치기 위해 특별히 만들어진 로고 언어로 거슬러 올라갑니다. 위의 블록 기반 언어 중 일부에는 거북이 그래픽이 포함되어 있으며 이는 이와 같이 엄격하게 제한된 프로젝트에서 캡처할 수 있을 만큼 충분히 작은 도메인입니다.
블록 기반 언어가 어떤 것인지 감을 잡고 싶다면 저자의 GitHub 저장소 에서 이 장에 구축된 프로그램을 실험해 볼 수 있습니다 .
목표와 구조
이 코드를 사용하여 몇 가지 작업을 수행하고 싶습니다. 무엇보다도 HTML, CSS, JavaScript의 간단한 구조를 사용하여 간단한 블록 드래그 앤 드롭을 통해 이미지를 생성하는 코드를 작성할 수 있는 거북이 그래픽용 블록 언어를 구현하고 싶습니다. 둘째, 그러나 여전히 중요한 점은 블록 자체가 미니 거북이 언어 외에 다른 언어의 프레임워크 역할을 할 수 있는 방법을 보여주고 싶다는 것입니다.
이를 위해 거북이 언어와 관련된 모든 것을 다른 파일 turtle.js과 쉽게 교환할 수 있는 하나의 파일( )로 캡슐화합니다. 다른 어떤 것도 거북이 언어에만 국한되어서는 안 됩니다. 나머지는 단지 블록( blocks.js및 menu.js) 처리에 관한 것이거나 일반적으로 유용한 웹 유틸리티( util.js, drag.js, file.js)여야 합니다. 이것이 목표입니다. 비록 프로젝트의 작은 크기를 유지하기 위한 유틸리티 중 일부는 덜 범용적이고 블록과 함께 사용하는 데 더 구체적입니다.
블록 언어를 작성할 때 저를 놀라게 한 한 가지는 언어가 자체 IDE라는 것입니다. 즐겨 사용하는 텍스트 편집기에서 블록을 코딩할 수는 없습니다. IDE는 블록 언어와 병행하여 설계 및 개발되어야 합니다. 여기에는 몇 가지 장단점이 있습니다. 장점으로는 모든 사람이 일관된 환경을 사용하게 되며 어떤 편집기를 사용할지에 대한 종교 전쟁의 여지가 없습니다. 단점은 블록 언어 자체를 구축하는 데 큰 방해가 될 수 있다는 것입니다.
스크립트의 성격
모든 언어(블록 기반이든 텍스트 기반이든)의 스크립트와 마찬가지로 블록코드 스크립트는 따라야 할 일련의 작업입니다. Blockcode의 경우 스크립트는 반복되는 HTML 요소로 구성되며, 각 요소는 해당 블록의 차례가 오면 실행될 특정 JavaScript 함수와 연결됩니다. 일부 블록은 다른 블록을 포함할 수 있고 실행을 담당할 수 있으며, 일부 블록은 함수에 전달되는 숫자 인수를 포함할 수 있습니다.
대부분의 (텍스트 기반) 언어에서 스크립트는 여러 단계를 거칩니다. 어휘 분석기는 텍스트를 인식된 토큰으로 변환하고, 파서는 토큰을 추상 구문 트리로 구성한 다음, 언어에 따라 프로그램을 기계어 코드로 컴파일하거나 통역사에게 먹였습니다. 그것은 단순화된 것입니다. 더 많은 단계가 있을 수 있습니다. Blockcode의 경우 스크립트 영역의 블록 레이아웃은 이미 추상 구문 트리를 나타내므로 어휘 분석 및 구문 분석 단계를 거칠 필요가 없습니다. 우리는 방문자 패턴을 사용하여 해당 블록을 반복하고 각 블록과 연관된 사전 정의된 JavaScript 함수를 호출하여 프로그램을 실행합니다.
전통적인 언어처럼 되기 위해 추가 단계를 추가하는 것을 막을 수 있는 것은 없습니다. 단순히 관련 JavaScript 함수를 호출하는 대신 turtle.js다른 가상 머신에 대한 바이트 코드나 심지어 컴파일러에 대한 C++ 코드를 생성하는 블록 언어로 대체할 수 있습니다. Java 로봇 코드 생성, Arduino 프로그래밍, Raspberry Pi에서 실행되는 Minecraft 스크립팅을 위한 블록 언어가 Waterbear 프로젝트의 일부로 존재합니다.
웹 애플리케이션
이 도구는 최대한 많은 사람들이 사용할 수 있도록 웹 기반으로 만들어졌습니다. HTML, CSS, JavaScript로 작성되었으므로 대부분의 브라우저와 플랫폼에서 작동합니다.
최신 웹 브라우저는 훌륭한 앱을 구축하기 위한 풍부한 도구 세트를 갖춘 강력한 플랫폼입니다. 구현에 관한 어떤 것이 너무 복잡해지면 나는 그것을 "웹 방식"으로 하고 있지 않다는 신호로 받아들이고 가능하다면 브라우저 도구를 더 잘 사용하는 방법을 다시 생각하려고 노력했습니다.
웹 애플리케이션과 기존 데스크톱 또는 서버 애플리케이션 간의 중요한 차이점은 main()다른 진입점이 없다는 것입니다. 명시적인 실행 루프는 이미 브라우저에 내장되어 있고 모든 웹 페이지에 암시되어 있으므로 존재하지 않습니다. 모든 코드는 로드 시 구문 분석되고 실행되며, 이 시점에서 사용자와 상호 작용하기 위해 관심 있는 이벤트를 등록할 수 있습니다. 첫 번째 실행 후, 코드와의 모든 추가 상호 작용은 이벤트(예: 마우스 움직임), 시간 초과(지정한 주기로 실행) 또는 프레임 핸들러(각각 호출됨)에 대해 등록하는지 여부에 관계없이 우리가 설정하고 등록하는 콜백을 통해 이루어집니다. 화면 다시 그리기, 일반적으로 초당 60프레임). 브라우저는 모든 기능을 갖춘 스레드를 노출하지 않습니다(비공유 웹 작업자만 해당).
코드 단계별 실행
저는 이 프로젝트 전반에 걸쳐 몇 가지 규칙과 모범 사례를 따르려고 노력했습니다. 각 JavaScript 파일은 전역 환경으로 변수가 누출되는 것을 방지하기 위해 함수로 래핑됩니다. 변수를 다른 파일에 노출해야 하는 경우 파일 이름을 기반으로 파일당 단일 전역을 정의하고 노출된 함수를 포함합니다. 이는 파일의 끝 근처에 있으며 해당 파일에서 설정한 이벤트 핸들러가 따라옵니다. 따라서 파일의 끝을 보면 언제든지 파일이 처리하는 이벤트와 표시되는 기능을 확인할 수 있습니다.
코드 스타일은 객체 지향적이거나 기능적이지 않고 절차적입니다. 이러한 패러다임 중 어느 것에서나 동일한 작업을 수행할 수 있지만 DOM에 대해 이미 존재하는 것에 적용하려면 더 많은 설정 코드와 래퍼가 필요합니다. Custom Elements 에 대한 최근 작업을 통해 OO 방식으로 DOM 작업을 더 쉽게 할 수 있었고 Functional JavaScript 에 대한 훌륭한 글이 많이 있었지만 어느 쪽이든 약간의 수고가 필요하므로 절차를 유지하는 것이 더 간단하다고 느꼈습니다. .
이 프로젝트에는 8개의 소스 파일이 있지만 index.html과 는 blocks.css앱의 기본 구조와 스타일이므로 논의하지 않습니다. JavaScript 파일 중 두 개는 자세히 논의되지 않습니다. util.js일부 도우미를 포함하고 다양한 브라우저 구현 간의 브리지 역할을 합니다. jQuery와 같은 라이브러리와 유사하지만 코드가 50줄 미만입니다. file.js파일을 로드 및 저장하고 스크립트를 직렬화하는 데 사용되는 유사한 유틸리티입니다.
나머지 파일은 다음과 같습니다.
block.js블록 기반 언어의 추상적 표현입니다.drag.js언어의 주요 상호 작용을 구현합니다. 즉, 사용자가 사용 가능한 블록 목록("메뉴")에서 블록을 끌어서 프로그램("스크립트")으로 조합할 수 있습니다.menu.js일부 도우미 코드가 있으며 실제로 사용자 프로그램을 실행하는 역할도 담당합니다.turtle.js블록 언어(거북이 그래픽)의 세부 사항을 정의하고 특정 블록을 초기화합니다. 다른 블록 언어를 만들기 위해 교체되는 파일입니다.
blocks.js
각 블록은 CSS로 스타일이 지정된 몇 가지 HTML 요소와 입력 인수를 끌어서 놓기 및 수정하기 위한 일부 JavaScript 이벤트 핸들러로 구성됩니다. 파일 blocks.js은 이러한 요소 그룹을 단일 개체로 만들고 관리하는 데 도움이 됩니다. 블록 메뉴에 어떤 종류의 블록을 추가하면 자바스크립트 함수와 연결되어 언어를 구현하게 되므로, 스크립트의 각 블록은 해당 함수를 찾아서 스크립트 실행 시 호출할 수 있어야 합니다.
그림 1.2 - 예시 블록
블록에는 두 개의 선택적 구조 비트가 있습니다. 단일 숫자 매개변수(기본값 포함)를 가질 수 있으며 다른 블록의 컨테이너가 될 수 있습니다. 이는 작업하기 어려운 제한이지만 더 큰 시스템에서는 완화될 수 있습니다. Waterbear에는 매개변수로 전달할 수 있는 표현식 블록도 있습니다. 다양한 유형의 여러 매개변수가 지원됩니다. 여기 엄격한 제약 조건이 있는 곳에서 단 한 가지 유형의 매개변수로 무엇을 할 수 있는지 살펴보겠습니다.
<!-- The HTML structure of a block -->
<div class="block" draggable="true" data-name="Right">
    Right
    <input type="number" value="5">
    degrees
</div>
메뉴의 블록과 스크립트의 블록 사이에는 실질적인 차이가 없다는 점에 유의하는 것이 중요합니다. 드래그는 드래그되는 위치에 따라 약간 다르게 처리하며 스크립트를 실행할 때 스크립트 영역의 블록만 보지만 기본적으로 동일한 구조입니다. 메뉴를 스크립트에 추가합니다.
이 createBlock(name, value, contents)함수는 문서에 삽입할 준비가 된 모든 내부 요소로 채워진 DOM 요소로 블록을 반환합니다. 메뉴에 대한 블록을 생성하거나 파일 또는 에 저장된 스크립트 블록을 복원하는 데 사용할 수 있습니다 localStorage. 이러한 방식은 유연하지만 블록코드 "언어"용으로 특별히 구축되었으며 이에 대한 가정을 합니다. 따라서 값이 있는 경우 해당 값이 숫자 인수를 나타내는 것으로 가정하고 "숫자" 유형의 입력을 생성합니다. 이는 Blockcode의 제한사항이므로 괜찮지만, 다른 유형의 인수나 둘 이상의 인수를 지원하기 위해 블록을 확장하려면 코드를 변경해야 합니다.
    function createBlock(name, value, contents){
        var item = elem('div',
            {'class': 'block', draggable: true, 'data-name': name},
            [name]
        );
        if (value !== undefined && value !== null){
            item.appendChild(elem('input', {type: 'number', value: value}));
        }
        if (Array.isArray(contents)){
            item.appendChild(
                elem('div', {'class': 'container'}, contents.map(function(block){
                return createBlock.apply(null, block);
            })));
        }else if (typeof contents === 'string'){
            // Add units (degrees, etc.) specifier
            item.appendChild(document.createTextNode(' ' + contents));
        }
        return item;
    }
블록을 DOM 요소로 처리하기 위한 몇 가지 유틸리티가 있습니다.
blockContents(block)컨테이너 블록의 하위 블록을 검색합니다. 컨테이너 블록에서 호출되면 항상 목록을 반환하고 단순 블록에서는 항상 null을 반환합니다.blockValue(block)블록에 숫자 유형의 입력 필드가 있으면 블록 입력의 숫자 값을 반환하고, 블록에 대한 입력 요소가 없으면 null을 반환합니다.blockScript(block)쉽게 복원할 수 있는 형식으로 블록을 저장하기 위해 JSON으로 직렬화하는 데 적합한 구조를 반환합니다.runBlocks(blocks)블록 배열의 각 블록을 실행하는 핸들러입니다.
    function blockContents(block){
        var container = block.querySelector('.container');
        return container ? [].slice.call(container.children) : null;
    }

    function blockValue(block){
        var input = block.querySelector('input');
        return input ? Number(input.value) : null;
    }

    function blockUnits(block){
        if (block.children.length > 1 &&
            block.lastChild.nodeType === Node.TEXT_NODE &&
            block.lastChild.textContent){
            return block.lastChild.textContent.slice(1);
        }
    }

    function blockScript(block){
        var script = [block.dataset.name];
        var value = blockValue(block);
        if (value !== null){
            script.push(blockValue(block));
        }
        var contents = blockContents(block);
        var units = blockUnits(block);
        if (contents){script.push(contents.map(blockScript));}
        if (units){script.push(units);}
        return script.filter(function(notNull){ return notNull !== null; });
    }

    function runBlocks(blocks){
        blocks.forEach(function(block){ trigger('run', block); });
    }
drag.js
의 목적은 drag.js뷰의 메뉴 섹션과 스크립트 섹션 간의 상호 작용을 구현하여 HTML의 정적 블록을 동적 프로그래밍 언어로 바꾸는 것입니다. 사용자는 메뉴의 블록을 스크립트로 끌어서 프로그램을 작성하고 시스템은 스크립트 영역에서 블록을 실행합니다.
우리는 HTML5 드래그 앤 드롭을 사용하고 있습니다. 필요한 특정 JavaScript 이벤트 핸들러는 여기에 정의되어 있습니다. (HTML5 드래그 앤 드롭 사용에 대한 자세한 내용은 Eric Bidleman의 기사를 참조하세요 .) 드래그 앤 드롭을 기본적으로 지원하는 것은 좋지만 몇 가지 이상한 점과 꽤 중요한 제한 사항이 있습니다. 이 글을 쓰는 시점의 모든 모바일 브라우저에서 구현되었습니다.
파일 상단에 몇 가지 변수를 정의합니다. 드래그할 때 드래그 콜백 댄스의 다양한 단계에서 이를 참조해야 합니다.
    var dragTarget = null; // Block we're dragging
    var dragType = null; // Are we dragging from the menu or from the script?
    var scriptBlocks = []; // Blocks in the script, sorted by position
드래그가 시작되고 끝나는 위치에 따라 drop다른 효과가 나타납니다.
- 스크립트에서 메뉴로 드래그하는 경우 삭제
dragTarget(스크립트에서 블록 제거). - 스크립트에서 스크립트로 드래그하는 경우 이동
dragTarget(기존 스크립트 블록 이동)합니다. - 메뉴에서 스크립트로 드래그하는 경우 복사
dragTarget(스크립트에 새 블록 삽입)합니다. - 메뉴에서 메뉴로 드래그하는 경우에는 아무 작업도 수행하지 마세요.
핸들러 동안 dragStart(evt)우리는 블록이 메뉴에서 복사되는지 또는 스크립트 내에서(또는 내부에서) 이동되는지 추적하기 시작합니다. 또한 나중에 사용하기 위해 드래그되지 않는 스크립트의 모든 블록 목록을 가져옵니다. 이 evt.dataTransfer.setData호출은 우리가 사용하지 않는 브라우저와 다른 애플리케이션(또는 데스크톱) 사이를 드래그하는 데 사용되지만 버그를 해결하려면 어쨌든 호출해야 합니다.
    function dragStart(evt){
        if (!matches(evt.target, '.block')) return;
        if (matches(evt.target, '.menu .block')){
            dragType = 'menu';
        }else{
            dragType = 'script';
        }
        evt.target.classList.add('dragging');
        dragTarget = evt.target;
        scriptBlocks = [].slice.call(
            document.querySelectorAll('.script .block:not(.dragging)'));
        // For dragging to take place in Firefox, we have to set this, even if
        // we don't use it
        evt.dataTransfer.setData('text/html', evt.target.outerHTML);
        if (matches(evt.target, '.menu .block')){
            evt.dataTransfer.effectAllowed = 'copy';
        }else{
            evt.dataTransfer.effectAllowed = 'move';
        }
    }
드래그하는 동안 , dragenter및 dragover이벤트 dragout는 유효한 놓기 대상 등을 강조 표시하여 시각적 단서를 추가할 수 있는 기회를 제공합니다. 이 중에서 우리는 만 사용합니다 dragover.
    function dragOver(evt){
        if (!matches(evt.target, '.menu, .menu *, .script, .script *, .content')) {
            return;
        }
        // Necessary. Allows us to drop.
        if (evt.preventDefault) { evt.preventDefault(); }
        if (dragType === 'menu'){
            // See the section on the DataTransfer object.
            evt.dataTransfer.dropEffect = 'copy';
        }else{
            evt.dataTransfer.dropEffect = 'move';
        }
        return false;
    }
마우스를 놓으면 drop이벤트가 발생합니다. 이것이 바로 마법이 일어나는 곳입니다. dragStart드래그한 위치(에서 다시 설정 )와 드래그한 위치를 확인해야 합니다 . 그런 다음 필요에 따라 블록을 복사하거나, 블록을 이동하거나, 삭제합니다. 블록 로직에서 자체적으로 사용할 수 있도록 trigger()(에 정의됨 ) 을 사용하여 일부 사용자 정의 이벤트를 실행하므로 스크립트가 변경될 때 스크립트를 새로 고칠 수 있습니다.util.js
    function drop(evt){
        if (!matches(evt.target, '.menu, .menu *, .script, .script *')) return;
        var dropTarget = closest(
            evt.target, '.script .container, .script .block, .menu, .script');
        var dropType = 'script';
        if (matches(dropTarget, '.menu')){ dropType = 'menu'; }
        // stops the browser from redirecting.
        if (evt.stopPropagation) { evt.stopPropagation(); }
        if (dragType === 'script' && dropType === 'menu'){
            trigger('blockRemoved', dragTarget.parentElement, dragTarget);
            dragTarget.parentElement.removeChild(dragTarget);
        }else if (dragType ==='script' && dropType === 'script'){
            if (matches(dropTarget, '.block')){
                dropTarget.parentElement.insertBefore(
                    dragTarget, dropTarget.nextSibling);
            }else{
                dropTarget.insertBefore(dragTarget, dropTarget.firstChildElement);
            }
            trigger('blockMoved', dropTarget, dragTarget);
        }else if (dragType === 'menu' && dropType === 'script'){
            var newNode = dragTarget.cloneNode(true);
            newNode.classList.remove('dragging');
            if (matches(dropTarget, '.block')){
                dropTarget.parentElement.insertBefore(
                    newNode, dropTarget.nextSibling);
            }else{
                dropTarget.insertBefore(newNode, dropTarget.firstChildElement);
            }
            trigger('blockAdded', dropTarget, newNode);
        }
    }
마우스를 올려 놓을 때 호출 되지만 이벤트를 dragEnd(evt)처리한 후에 호출됩니다 drop. 여기에서 요소를 정리하고, 클래스를 제거하고, 다음 드래그를 위해 항목을 재설정할 수 있습니다.
    function _findAndRemoveClass(klass){
        var elem = document.querySelector('.' + klass);
        if (elem){ elem.classList.remove(klass); }
    }

    function dragEnd(evt){
        _findAndRemoveClass('dragging');
        _findAndRemoveClass('over');
        _findAndRemoveClass('next');
    }
menu.js
파일은 menu.js블록이 실행될 때 호출되는 함수와 연관된 위치이며, 사용자가 스크립트를 빌드할 때 실제로 스크립트를 실행하기 위한 코드를 포함합니다. 스크립트가 수정될 때마다 자동으로 다시 실행됩니다.
이 맥락에서 "메뉴"는 대부분의 응용 프로그램에서처럼 드롭다운(또는 팝업) 메뉴가 아니지만 스크립트에 대해 선택할 수 있는 블록 목록입니다. 이 파일은 이를 설정하고 일반적으로 유용한(따라서 거북이 언어 자체의 일부가 아닌) 반복 블록으로 메뉴를 시작합니다. 이것은 다른 곳에는 맞지 않을 수 있는 일종의 잡동사니 파일입니다.
임의의 기능을 수집할 수 있는 단일 파일을 갖는 것은 특히 아키텍처가 개발 중인 경우 유용합니다. 집을 깨끗하게 유지하는 나의 이론은 어수선한 장소를 지정하는 것이며 이는 프로그램 아키텍처 구축에도 적용됩니다. 하나의 파일이나 모듈은 아직 적합한 위치가 명확하지 않은 항목을 포괄하는 기능이 됩니다. 이 파일이 커짐에 따라 새로운 패턴을 관찰하는 것이 중요합니다. 여러 관련 기능을 별도의 모듈로 분리할 수 있습니다(또는 보다 일반적인 기능으로 결합할 수 있습니다). 포괄적인 내용이 무한정 커지는 것을 원하지 않고 코드를 구성하는 올바른 방법을 찾을 때까지 임시 보관 장소로만 사용되기를 바랍니다.
우리는 그것을 많이 사용하기 때문에 계속해서 언급합니다 menu. script계속해서 DOM을 통해 검색할 필요가 없습니다. scriptRegistry또한 메뉴에 있는 블록의 스크립트를 저장하는 를 사용할 것입니다 . 우리는 동일한 이름을 가진 여러 메뉴 블록이나 이름 바꾸기 블록을 지원하지 않는 매우 간단한 이름-스크립트 매핑을 사용합니다. 더 복잡한 스크립팅 환경에는 더 강력한 것이 필요합니다.
우리는 scriptDirty스크립트가 마지막으로 실행된 이후 수정되었는지 여부를 추적하는 데 사용하므로 지속적으로 실행하려고 하지 않습니다.
    var menu = document.querySelector('.menu');
    var script = document.querySelector('.script');
    var scriptRegistry = {};
    var scriptDirty = false;
다음 프레임 처리기 동안 스크립트를 실행하도록 시스템에 알리려면 플래그를 로 runSoon()설정하는 호출을 호출합니다 . 시스템은 모든 프레임을 호출하지만 설정되지 않은 경우 즉시 반환됩니다. 이 설정 되면 모든 스크립트 블록을 실행하고 스크립트 실행 전후에 특정 언어가 필요한 모든 작업을 처리할 수 있도록 이벤트를 트리거합니다. 이는 거북이 언어에서 툴킷으로서의 블록을 분리하여 블록을 재사용 가능하게 만듭니다(또는 보는 방법에 따라 언어를 플러그 가능하게 만듭니다).scriptDirtytruerun()scriptDirtyscriptDirty
스크립트 실행의 일부로 각 블록을 반복하여 호출하고 runEach(evt)블록에 클래스를 설정한 다음 관련 기능을 찾아서 실행합니다. 속도가 느려지면 각 블록이 강조 표시되어 실행 중일 때 코드가 실행되는 것을 볼 수 있습니다.
아래 방법은 requestAnimationFrame애니메이션용 브라우저에서 제공하는 방법입니다. 호출이 이루어진 후 브라우저에서 렌더링할 다음 프레임(초당 60프레임)에 대해 호출되는 함수가 필요합니다. 실제로 얻는 프레임 수는 해당 호출에서 작업을 얼마나 빨리 완료할 수 있는지에 따라 달라집니다.
    function runSoon(){ scriptDirty = true; }

    function run(){
        if (scriptDirty){
            scriptDirty = false;
            Block.trigger('beforeRun', script);
            var blocks = [].slice.call(
                document.querySelectorAll('.script > .block'));
            Block.run(blocks);
            Block.trigger('afterRun', script);
        }else{
            Block.trigger('everyFrame', script);
        }
        requestAnimationFrame(run);
    }
    requestAnimationFrame(run);

    function runEach(evt){
        var elem = evt.target;
        if (!matches(elem, '.script .block')) return;
        if (elem.dataset.name === 'Define block') return;
        elem.classList.add('running');
        scriptRegistry[elem.dataset.name](elem);
        elem.classList.remove('running');
    }
menuItem(name, fn, value, contents)일반 블록을 가져와 이를 기능과 연결하고 메뉴 열에 넣는 기능을 사용하여 메뉴에 블록을 추가합니다 .
    function menuItem(name, fn, value, units){
        var item = Block.create(name, value, units);
        scriptRegistry[name] = fn;
        menu.appendChild(item);
        return item;
    }
repeat(block)일반적으로 다른 언어에서 유용하기 때문에 거북이 언어 외부에서 여기에서 정의합니다 . 조건부 블록과 변수 읽기 및 쓰기를 위한 블록이 있는 경우 여기로 이동하거나 별도의 언어 변환 모듈로 이동할 수도 있지만 지금은 이러한 범용 블록 중 하나만 정의되어 있습니다.
    function repeat(block){
        var count = Block.value(block);
        var children = Block.contents(block);
        for (var i = 0; i < count; i++){
            Block.run(children);
        }
    }
    menuItem('Repeat', repeat, 10, []);
turtle.js
turtle.js거북이 블록 언어의 구현입니다. 나머지 코드에는 어떤 기능도 노출되지 않으므로 다른 어떤 것도 여기에 의존할 수 없습니다. 이런 식으로 우리는 하나의 파일을 교체하여 새로운 블록 언어를 만들 수 있으며 코어의 어떤 것도 손상되지 않을 것이라는 것을 알 수 있습니다.
그림 1.3 - 실행 중인 Turtle 코드의 예
거북이 프로그래밍은 Logo에 의해 처음 대중화된 그래픽 프로그래밍 스타일로, 가상의 거북이가 펜을 들고 화면 위를 걷는 모습을 보여줍니다. 거북이에게 펜을 집거나(그리기를 중지하지만 계속 이동), 펜을 내려 놓거나(가는 곳마다 선을 남김), 여러 단계 앞으로 이동하거나 여러 각도로 회전하라고 지시할 수 있습니다. 반복과 결합된 이러한 명령만으로도 놀랍도록 복잡한 이미지를 만들 수 있습니다.
이 버전의 거북이 그래픽에는 몇 가지 추가 블록이 있습니다. 기술적으로 우리는 둘 다 필요하지 않으며 turn right하나 turn left를 갖고 다른 하나를 음수로 얻을 수 있기 때문입니다. 마찬가지로 및 음수를 move back사용하여 수행할 수 있습니다 . move forward이 경우에는 두 가지를 모두 갖는 것이 더 균형 잡힌 느낌을 받았습니다.
위의 이미지는 두 개의 루프를 다른 루프 안에 넣고 각 루프에 move forward및를 추가한 turn right다음 결과 이미지가 마음에 들 때까지 대화식으로 매개 변수를 사용하여 구성되었습니다.
    var PIXEL_RATIO = window.devicePixelRatio || 1;
    var canvasPlaceholder = document.querySelector('.canvas-placeholder');
    var canvas = document.querySelector('.canvas');
    var script = document.querySelector('.script');
    var ctx = canvas.getContext('2d');
    var cos = Math.cos, sin = Math.sin, sqrt = Math.sqrt, PI = Math.PI;
    var DEGREE = PI / 180;
    var WIDTH, HEIGHT, position, direction, visible, pen, color;
이 reset()함수는 모든 상태 변수를 기본값으로 지웁니다. 여러 거북이를 지원한다면 이러한 변수는 객체에 캡슐화됩니다. deg2rad(deg)UI에서는 각도 단위로 작업하지만 라디안으로 그리기 때문에 유틸리티도 있습니다 . 마지막으로 drawTurtle()거북이 자체를 그립니다. 기본 거북이는 단순한 삼각형이지만 이를 재정의하여 미학적으로 더욱 만족스러운 거북이를 그릴 수 있습니다.
drawTurtle거북이 그리기를 구현하기 위해 정의한 것과 동일한 기본 작업을 사용한다는 점에 유의하세요 . 때로는 다른 추상화 계층에서 코드를 재사용하고 싶지 않지만 의미가 명확하면 코드 크기와 성능 면에서 큰 이점이 될 수 있습니다.
    function reset(){
        recenter();
        direction = deg2rad(90); // facing "up"
        visible = true;
        pen = true; // when pen is true we draw, otherwise we move without drawing
        color = 'black';
    }

    function deg2rad(degrees){ return DEGREE * degrees; }

    function drawTurtle(){
        var userPen = pen; // save pen state
        if (visible){
            penUp(); _moveForward(5); penDown();
            _turn(-150); _moveForward(12);
            _turn(-120); _moveForward(12);
            _turn(-120); _moveForward(12);
            _turn(30);
            penUp(); _moveForward(-5);
            if (userPen){
                penDown(); // restore pen state
            }
        }
    }
현재 마우스 위치에 주어진 반경을 가진 원을 그리는 특수 블록이 있습니다. drawCircle360번을 반복하면 원을 그릴 수 있지만 MOVE 1 RIGHT 1원의 크기를 조절하는 것은 매우 어렵기 때문에 특별한 경우입니다 .
    function drawCircle(radius){
        // Math for this is from http://www.mathopenref.com/polygonradius.html
        var userPen = pen; // save pen state
        if (visible){
            penUp(); _moveForward(-radius); penDown();
            _turn(-90);
            var steps = Math.min(Math.max(6, Math.floor(radius / 2)), 360);
            var theta = 360 / steps;
            var side = radius * 2 * Math.sin(Math.PI / steps);
            _moveForward(side / 2);
            for (var i = 1; i < steps; i++){
                _turn(theta); _moveForward(side);
            }
            _turn(theta); _moveForward(side / 2);
            _turn(90);
            penUp(); _moveForward(radius); penDown();
            if (userPen){
                penDown(); // restore pen state
            }
        }
    }
우리의 주요 기본 요소는 moveForward기본 삼각법을 처리하고 펜이 위 또는 아래에 있는지 확인해야 하는 것입니다.
    function _moveForward(distance){
        var start = position;
        position = {
            x: cos(direction) * distance * PIXEL_RATIO + start.x,
            y: -sin(direction) * distance * PIXEL_RATIO + start.y
        };
        if (pen){
            ctx.lineStyle = color;
            ctx.beginPath();
            ctx.moveTo(start.x, start.y);
            ctx.lineTo(position.x, position.y);
            ctx.stroke();
        }
    }
나머지 거북이 명령의 대부분은 위에서 구축한 내용을 바탕으로 쉽게 정의할 수 있습니다.
    function penUp(){ pen = false; }
    function penDown(){ pen = true; }
    function hideTurtle(){ visible = false; }
    function showTurtle(){ visible = true; }
    function forward(block){ _moveForward(Block.value(block)); }
    function back(block){ _moveForward(-Block.value(block)); }
    function circle(block){ drawCircle(Block.value(block)); }
    function _turn(degrees){ direction += deg2rad(degrees); }
    function left(block){ _turn(Block.value(block)); }
    function right(block){ _turn(-Block.value(block)); }
    function recenter(){ position = {x: WIDTH/2, y: HEIGHT/2}; }
새로운 슬레이트를 원할 때 이 clear기능은 모든 것을 시작한 곳으로 다시 복원합니다.
    function clear(){
        ctx.save();
        ctx.fillStyle = 'white';
        ctx.fillRect(0,0,WIDTH,HEIGHT);
        ctx.restore();
        reset();
        ctx.moveTo(position.x, position.y);
    }
이 스크립트가 처음 로드되고 실행될 때 reset및를 사용하여 clear모든 것을 초기화하고 거북이를 그립니다.
    onResize();
    clear();
    drawTurtle();
이제 위의 함수를 Menu.itemfrom 함수 와 함께 사용하여 menu.js사용자가 스크립트를 작성할 수 있는 블록을 만들 수 있습니다. 이것들을 끌어서 사용자의 프로그램을 만듭니다.
    Menu.item('Left', left, 5, 'degrees');
    Menu.item('Right', right, 5, 'degrees');
    Menu.item('Forward', forward, 10, 'steps');
    Menu.item('Back', back, 10, 'steps');
    Menu.item('Circle', circle, 20, 'radius');
    Menu.item('Pen up', penUp);
    Menu.item('Pen down', penDown);
    Menu.item('Back to center', recenter);
    Menu.item('Hide turtle', hideTurtle);
    Menu.item('Show turtle', showTurtle);
교훈
MVC를 사용하지 않는 이유는 무엇입니까?
MVC(Model-View-Controller)는 80년대 Smalltalk 프로그램을 위한 좋은 디자인 선택이었고 웹 앱에 대해 어떤 변형으로든 작동할 수 있지만 모든 문제에 적합한 도구는 아닙니다. 모든 상태(MVC의 "모델")는 어쨌든 블록 언어의 블록 요소에 의해 캡처되므로 모델에 대한 다른 요구가 없는 한 이를 Javascript로 복제하는 것은 거의 이점이 없습니다(공유 분산 코드를 편집하는 경우, 예를 들어).
Waterbear의 초기 버전은 모델을 JavaScript로 유지하고 DOM과 동기화하기 위해 많은 노력을 기울였습니다. 코드의 절반 이상과 버그의 90%가 모델을 DOM과 동기화하는 데 기인한다는 사실을 알게 되었습니다. 중복을 제거하면 코드가 더욱 단순해지고 강력해졌으며 DOM 요소의 모든 상태에서 개발자 도구의 DOM을 살펴보는 것만으로도 많은 버그를 찾을 수 있었습니다. 따라서 이 경우 HTML/CSS/JavaScript에서 이미 구현한 것보다 MVC를 더 분리하는 데 따른 이점은 거의 없습니다.
장난감의 변화는 실제 변화로 이어질 수 있습니다
내가 작업하고 있는 대규모 시스템의 작고 범위가 제한된 버전을 구축하는 것은 흥미로운 작업이었습니다. 때때로 대규모 시스템에는 너무 많은 다른 것들에 영향을 미치기 때문에 변경하기를 주저하는 것들이 있습니다. 작은 장난감 버전에서는 자유롭게 실험하고 학습한 내용을 더 큰 시스템으로 가져올 수 있습니다. 나에게 있어 더 큰 시스템은 Waterbear이며 이 프로젝트는 Waterbear의 구조에 큰 영향을 미쳤습니다.
작은 실험으로 실패해도 괜찮다
이 간단한 블록 언어로 제가 할 수 있었던 몇 가지 실험은 다음과 같습니다:
- HTML5 드래그 앤 드롭을 사용하여,
- DOM 호출 관련 함수를 반복하여 블록을 직접 실행하고,
- HTML DOM에서 깔끔하게 실행되는 코드를 분리하고,
- 드래그하는 동안 단순화된 적중 테스트,
- (게임 블록용) 자체 작은 벡터 및 스프라이트 라이브러리 구축
- 블록 스크립트를 변경할 때마다 결과가 표시되는 "라이브 코딩"입니다.
실험의 중요한 점은 성공할 필요가 없다는 것입니다. 우리는 실패와 막다른 골목을 얼버무리는 경향이 있습니다. 여기서 실패는 학습을 위한 중요한 수단으로 취급되는 대신 처벌을 받지만 앞으로 나아가려면 실패가 필수적입니다. HTML5 드래그 앤 드롭이 작동하기는 했지만 모바일 브라우저에서 전혀 지원되지 않는다는 사실은 이것이 Waterbear의 시작이 아니라는 것을 의미합니다. 블록을 반복하여 코드를 분리하고 코드를 실행하는 것이 매우 잘 작동하여 이미 테스트 및 디버깅이 크게 개선되어 이러한 아이디어를 Waterbear에 가져오기 시작했습니다. 약간의 수정을 가한 단순화된 적중 테스트도 작은 벡터 및 스프라이트 라이브러리와 마찬가지로 Waterbear로 다시 제공됩니다. 라이브 코딩은 아직 Waterbear에 적용되지 않았지만 현재 변경 사항이 안정화되면 도입할 수도 있습니다.
우리는 실제로 무엇을 만들려고 하는 걸까요?
더 큰 시스템의 작은 버전을 구축하면 실제로 중요한 부분이 무엇인지에 초점을 맞춥니다. 목적에 부합하지 않는(더 나쁘게는 목적에서 벗어나는) 역사적 이유로 남겨진 부분이 있습니까? 아무도 사용하지 않지만 유지하려면 비용을 지불해야 하는 기능이 있습니까? 사용자 인터페이스를 간소화할 수 있습니까? 이 모든 것은 작은 버전을 만드는 동안 물어볼 수 있는 좋은 질문입니다. 레이아웃 재구성과 같은 급격한 변경은 더 복잡한 시스템으로 인해 발생할 수 있는 결과에 대해 걱정하지 않고 이루어질 수 있으며 복잡한 시스템의 리팩토링을 안내할 수도 있습니다.
프로그램은 사물이 아니라 과정이다
이 프로젝트의 범위에서 제가 실험할 수 없었던 것들이 나중에 블록코드 코드베이스를 사용하여 테스트할 수 있습니다. 기존 블록에서 새로운 블록을 생성하는 "기능" 블록을 생성하는 것은 흥미로울 것입니다. 제한된 환경에서는 실행 취소/다시 실행을 구현하는 것이 더 간단합니다. 복잡성을 근본적으로 확장하지 않고 블록이 여러 인수를 허용하도록 만드는 것이 유용할 것입니다. 그리고 블록 스크립트를 온라인으로 공유하는 다양한 방법을 찾으면 도구의 웹 기능이 완전하게 활용될 것입니다.
광고 클릭에서 발생하는 수익금은 모두 웹사이트 서버의 유지 및 관리, 그리고 기술 콘텐츠 향상을 위해 쓰여집니다.
