
So recently I had to reinstall XAMPP, which includes Apache, MySQL and PHP. In my case, I develop on a Windows 10 system using VS Code. If you’re new to web development, XAMPP is a handy little tool to set up a local web server (and database, etc.) for web development.
It’s very much a development server though, and not something that should be run for a production site. Possibly something I’ll cover in another blog post.
When I reinstalled XAMPP it came with PHP 8, the latest version in the PHP family. It has quite a few changes since PHP 7 which can cause some issues with existing sites. This is why it’s handy to have a few PHP versions running side-by-side. Although if my experience has taught me anything, it’s that it’s a pain in the backside to set up (took a bit of trial and error).
Some web hosts offer this with an easy to change setting. XAMPP, however, doesn’t have a setting for this, so it requires a bit of manual work. There’s also a small catch, which I’ll cover below.
We’re going to be working towards 2 versions of PHP installed, in my case PHP 8.0.3 and PHP 7.4.16 with XAMPP, which is configured on a per-directory basis.
Your folder structure
I’m going to assume you’ve already downloaded and installed XAMPP into the typical directory C:\xampp. Everything I’ll refer to will be in reference to this directory, but I’ll try and make it as straightforward as possible because I don’t believe in making life difficult!
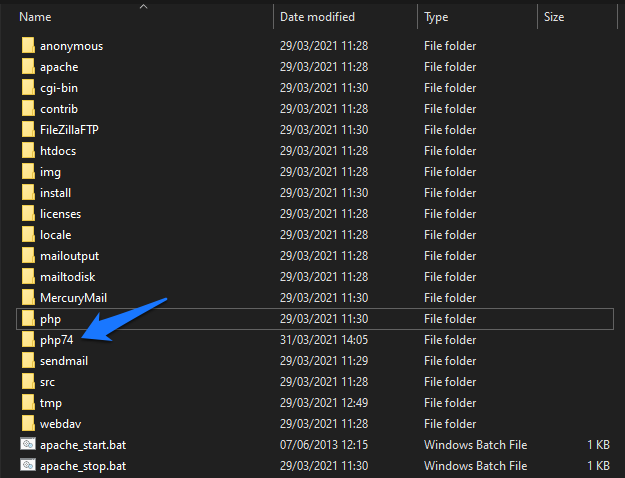
So, your XAMPP folder should contain the default folders – apache, htdocs, php, tmp – and a load of other bits and pieces.
Setting up support for multiple PHP versions
Step 1 – Download your new version of PHP
As mentioned above, I use Windows 10. If you use something different, your files may need to be slightly different.
I’m going to install PHP 7.4.16 to go alongside my PHP 8.0, so I can still work on older sites and upgrade them bit by bit to support PHP 8. We’ll need the NTS version (non-thread safe), which can be downloaded from the PHP website, or the archive (if it’s an older version you’re after).
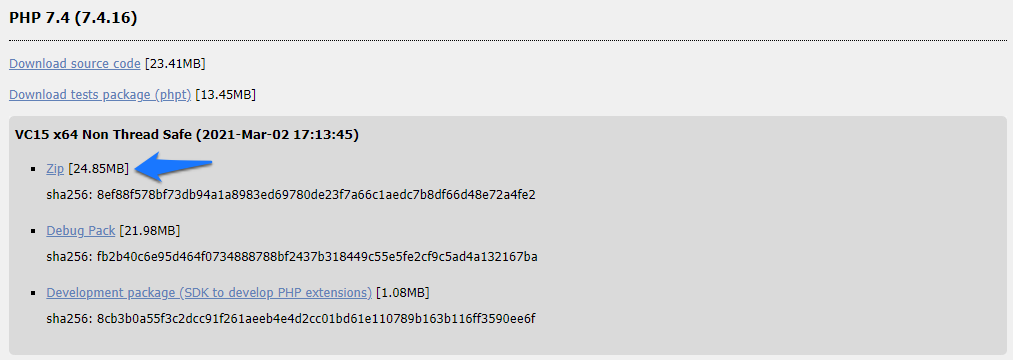
Step 2 – Extract the files to your XAMPP folder
Once your download is complete, we’ll need to extract all of the files to your XAMPP folder.
It would be good practice to put it in a folder matching the PHP version, so in my case, I’ll extract it to php74 in C:\xampp\
Step 3 – Download Fast CGI
The caveat I mentioned above… here it is.
Apache in itself can’t run multiple versions of PHP. So, what we’re going to do is update it to use Fast CGI. It has its advantages and disadvantages, but in this case, it’s needed. As we’re only using it for local development, the negatives shouldn’t be overly noticeable.
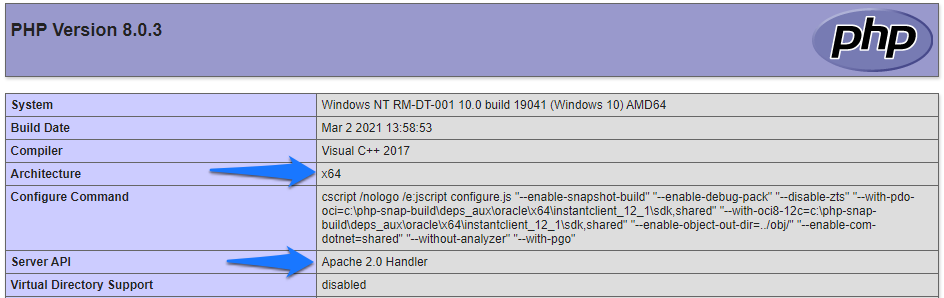
The one thing you need to know at this stage is what version of XAMPP you have – 32-bit or 64-bit. Most modern systems will be running 64-bit. If you don’t know, you need to run a simple PHP script, which will output all the info needed. In fact, it’s a good idea to do this, so we can check it all later on too.
<?php

phpinfo();
This will list everything about your PHP setup, including the “architecture” line, which will show x64 for 64-bit, or x86 for 32-bit.
Also note the Server API value. In my case, it’s Apache 2.0 Handler. This is the part we’re replacing with Fast CGI.
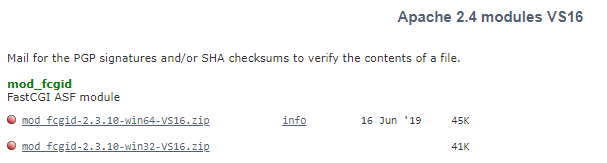
Now we have this information to hand, go to the Apache Lounge to download Fast CGI.
The files of interest are the mod_fcgid files, either the win64 or win32 version (which depends on the version of XAMPP you are running based on the architecture above). Based on my architecture above, I’m going to download mod_fcgid-2.3.10-win64-VS16.zip


Step 4- Install Fast CGI
Once you have this, copy of mod_fcgid.so file from the ZIP file to your Apache\modules directory, e.g. C:\xampp\apache\modules.
If Apache is running in XAMPP, you can stop it here, ready to make some changes to the configuration. This can be accessed by clicking on Config and selecting httpd-xampp.conf in the XAMPP control panel
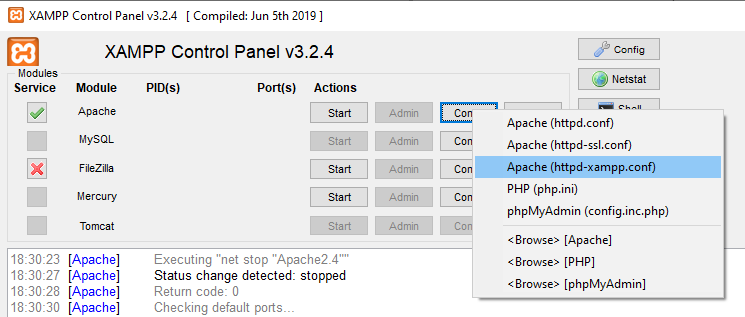
We’ll need to find the lines similar to the below, which we’re going to replace.
#
# PHP-Module setup
#
LoadFile "C:/xampp/php/php8ts.dll"
LoadFile "C:/xampp/php/libpq.dll"
LoadModule php_module "C:/xampp/php/php8apache2_4.dll"

<FilesMatch "\.php$">
    SetHandler application/x-httpd-php
</FilesMatch>
<FilesMatch "\.phps$">
    SetHandler application/x-httpd-php-source
</FilesMatch>
Replace this with:
#
# PHP-Module setup
#
LoadFile "C:/xampp/php/php7ts.dll"
LoadFile "C:/xampp/php/libpq.dll"

LoadModule fcgid_module modules/mod_fcgid.so

<IfModule fcgid_module>
	FcgidInitialEnv PATH "C:/xampp/php"
	FcgidInitialEnv SystemRoot "C:/Windows"
	FcgidInitialEnv SystemDrive "C:"
	FcgidInitialEnv TEMP "C:/xampp/tmp"
	FcgidInitialEnv TMP "C:/xampp/tmp"
	FcgidInitialEnv windir "C:/windows"
	FcgidIOTimeout 64
	FcgidConnectTimeout 16
	FcgidMaxRequestsPerProcess 1000
	FcgidMaxProcesses 3
	FcgidMaxRequestLen 8131072
	# Location php.ini:
	FcgidInitialEnv PHPRC "C:/xampp/php"
	FcgidInitialEnv PHP_FCGI_MAX_REQUESTS 1000

	<Files ~ "\.php$">
		Options Indexes FollowSymLinks ExecCGI
		AddHandler fcgid-script .php
		FcgidWrapper "C:/xampp/php/php-cgi.exe" .php
	</Files>
</IfModule>
We’ll also need to update the PHPMyAdmin section to prevent any issues later on.
    Alias /phpmyadmin "C:/xampp/phpMyAdmin/"
    <Directory "C:/xampp/phpMyAdmin">

        # add this option allow FastCGI
        Options ExecCGI

        AllowOverride AuthConfig
        Require local
        ErrorDocument 403 /error/XAMPP_FORBIDDEN.html.var
    </Directory>
Re-run the phpinfo() script we created earlier, and you should now see a small change. The Server API should now show FastCGI.
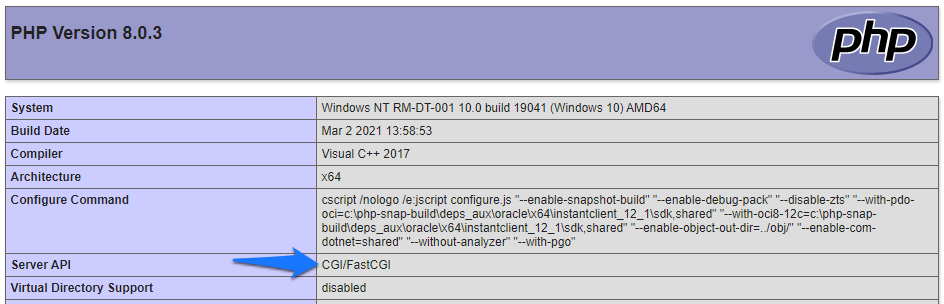
Don’t close this config file just yet…
Step 5 – Updating XAMPP Config
Now that’s installed, we can run multiple PHP versions! ???? We’re not done yet though. We may have 2 versions of PHP installed, but nothing says what we want to use and where.
Our next step is to set this up. Using the config file we just edited above (if you’ve closed it, it’s the httpd-xampp.conf file), add the below lines to bottom of the file:
# PHP 7.4
ScriptAlias /php74 "C:/xampp/php74"
Action application/x-httpd-php74-cgi /php74/php-cgi.exe
SetEnv PHPRC "\xampp\php74"
<Directory "C:/xampp/php74">
    AllowOverride None
    Options None
    Require all denied
    <Files "php-cgi.exe">
        Require all granted
    </Files>
</Directory>
This now adds support for PHP 7.4 in my case. And while this enables it, it still doesn’t set up a project to use it. So one last thing…
Step 6 – Change the PHP version of a project
If you have a set up like me, you have various projects set up in your vhosts file. This can be found by going to Config > Browse apache from your XAMPP control panel, and then going to conf > extra > httpd-vhosts.conf.
You may already have some data here, but if not, you can add a blanket cover, or tweak it, to work with your set up.
<VirtualHost mywebsite.local:8080>

    DocumentRoot "C:\websites\mywebsite\public_html"

    <Directory "C:\websites\mywebsite\public_html">
        #Allow from all
        Require all granted
        #Options Indexes
        AllowOverride All
		<FilesMatch "\.php$">
			SetHandler application/x-httpd-php74-cgi
		</FilesMatch>
    </Directory>

</VirtualHost>
What this does, is directs any traffic to the website mywebsite.local on port 8080 (which is the port my XAMPP runs on, it’s set to 80 by default), to the files in C:\websites\mywebsite\public_html.
But the key line here in this case is the one matching any PHP files, and saying “use PHP74”, which we set before.
Finally…
And finally, restart Apache in the XAMPP control panel, if you haven’t already done so.
You can try accessing the same phpinfo() file we created earlier on if you want to give it a test, and this should now reflect the new PHP version.
[출처] https://mathewparker.co.uk/2021/04/running-multiple-php-versions-on-xampp/
