
가짜 동영상 제작툴 사용법 : deepfake : DeepFakes FakeApp Tutorial
2018.05.26 23:33
가짜 동영상 제작툴 사용법 : deepfake : DeepFakes FakeApp Tutorial
DeepFakes FakeApp Tutorial
UPDATE April 2018:
Download our new OpenFaceSwap GUI that combines open source, cutting-edge deepfakes advances with an easy-to-use interface and installation for non-technical users.
———————————————
The guide below is for FakeApp 1.1.
We do NOT recommend FakeApp 2.2. FakeApp has technical deficiencies, unexpected or hidden algorithm behavior, and history of security issues including a cryptominer and at least one case of packaging with malware due to the absence of security hashes.
We’ve shown that the python faceswap scripts have superior performance and quality to FakeApp. If you do not want to use the GUI above, you can download a portable no-install command line version from the forums here. For a quick introduction to using python and the scripts, see our guide. Otherwise, continue to the original tutorial below.
This tutorial is for FakeApp version 1.1. If you would like to use FakeApp, we still recommend that you use version 1.1, as it has the best technical capabilities and safest implementation of the FakeApp series.
Contents [hide]
Requirements
You must be running a modern version of Windows.
Minimum hardware
- Your computer must have an NVIDIA-based graphics card with 2 GB VRAM or higher that is fully compatible with the CUDA 8.0 Toolkit.
- 5 GB free space on the C:\ drive.
- 4 GB RAM.
Even if you meet the minimum hardware requirements, there is a good chance that you will not be able to run the FakeApp properly. You should aim for the recommended hardware specifications.
Recommended hardware
- NVIDIA GTX 1060 or better graphics card.
- 10+ GB free space on the C:\ drive.
- 8+ GB RAM.
Software installation
Required: CUDA 8.0
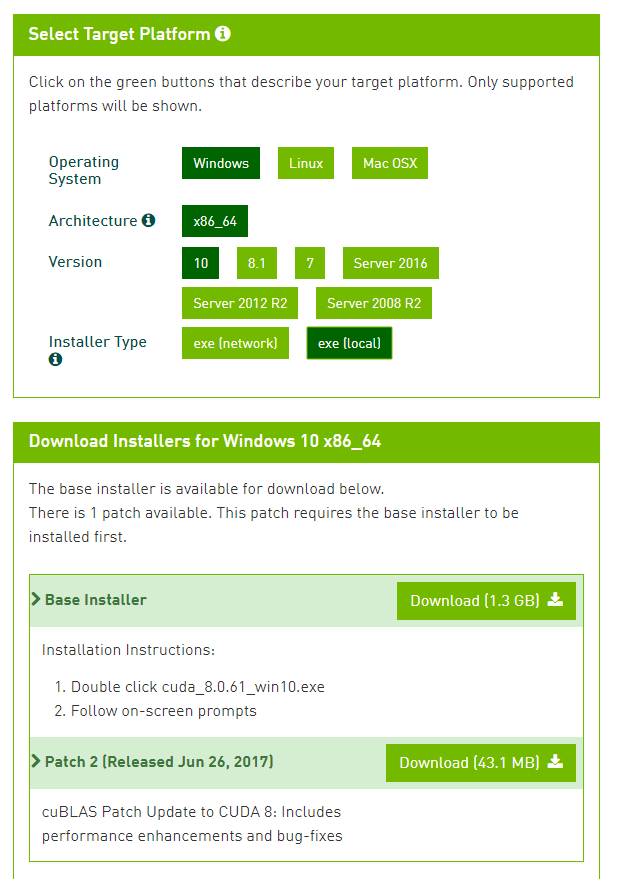
Download the CUDA 8.0 installer from the NVIDIA page. Select the correct version of Windows (shown for Windows 10 in the figure) and download the installer. You can also download the patch.
Run the base installer. The installer will ask where to extract temporary files. You can accept the default location if your hard drive has enough space. This step may be slower than a usual extraction if you have antimalware services running in the background.
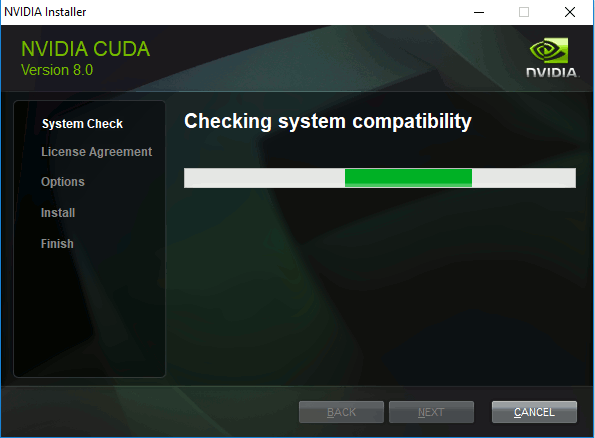
The installer will verify that you have a compatible system. This step can take up to a minute or so. If you do not pass this step, it means that your hardware is not compatible with CUDA 8.0 and you will not be able to proceed.
Follow the default suggestions for an Express installation. If you have a previous version of CUDA, it will automatically be first removed.
NOTE: If the installer informs you that Visual Studio is not installed, accept the option to proceed anyways. Visual Studio is NOT required to use the precompiled FakeApp.
After installation is complete, you can run the patch installer. Follow the default settings for Express installation.
The CUDA paths should already be added to the PATH environmental variable. However, you should check to be sure and add them manually if necessary.
Click on the Windows key on your keyboard or click on the search button on the taskbar and type environment.
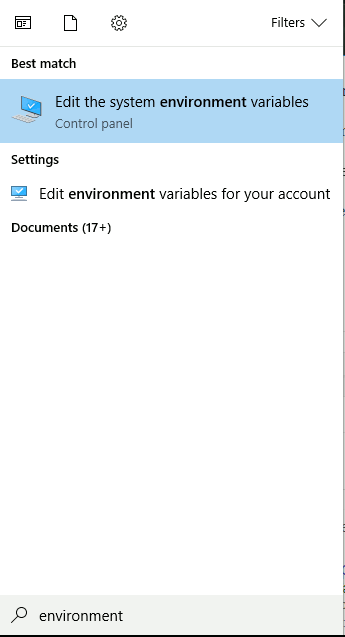
Select the suggested action to edit environment variables. This opens a System Properties window. Click on Environment Variables in the lower right.
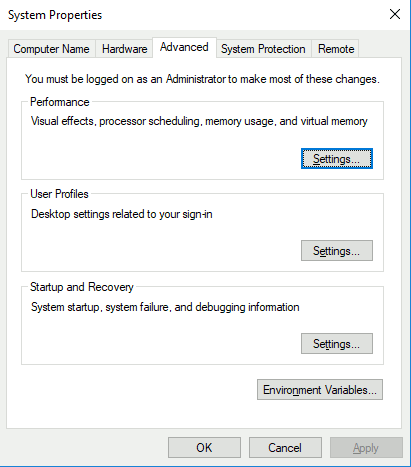
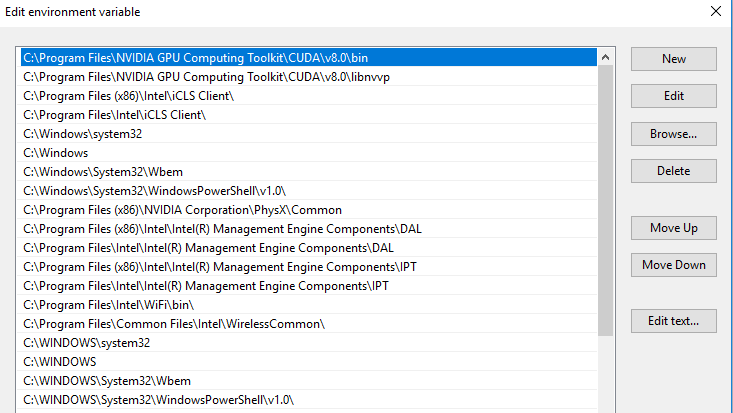
Scroll down to the line that says “Path”. Select this line and click the Edit button.
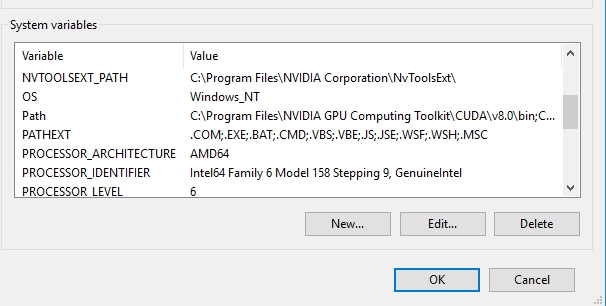
Scroll through the list. You should see two lines corresponding to the CUDA paths, as shown in the top two lines of the figure above. If the paths are already present, you can close the window and continue with the next steps. Otherwise, you should manually add the paths. For each path, click the New button, enter the path, and then click the OK button. If you followed the default installer suggestions, the two paths should be:
C:\Program Files\NVIDIA GPU Computing Toolkit\CUDA\v8.0\bin
C:\Program Files\NVIDIA GPU Computing Toolkit\CUDA\v8.0\libnvvp
Otherwise, you need to manually find the installation directory.
This completes the CUDA 8.0 installation.
Required: FakeApp
Make sure that you completed the CUDA 8.0 Toolkit installation successfully, including verification of the PATH updates.
Download the FakeApp zip file here.
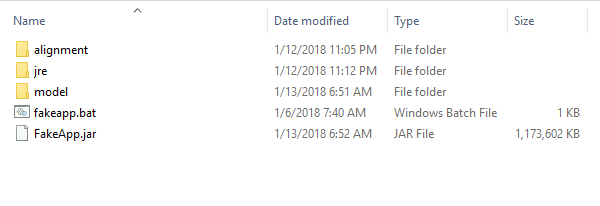
Unzip the file to your root C:\ directory. That is, C:\FakeApp should contain 3 folders and two files as shown below.
Create a new folder C:\fakes. Within C:\fakes, create two new folders called data_A and data_B. Finally, copy the folder called model (COPY NOT MOVE) from C:\FakeApp to C:\fakes. The folder C:\fakes should now look like the figure below, with the model directory containing three files.

To start the program, go to C:\FakeApp and double-click the fakeapp.bat file.
Strongly recommended: FFmpeg
FFmpeg is a free video processing tool. It is highly versatile but can be difficult to use for beginners. Download the latest stable build for your version of Windows from here. If you are using Windows 10, you should select the options as shown in the figure below.

Unzip the file into your chosen location. Then, add the bin directory to your PATH environment variable, as you did for the CUDA Toolkit above. You MUST perform this action, as the path will not be added automatically.
Find the exact path. If you unzipped to the C:\ root directory, the path may look something like:
C:\ffmpeg-3.4.1-win64-static\bin
Add this line to your PATH environment variable.
We will cover using FFmpeg to extract frames from video and to build video from frames further in the tutorial.
Recommended: Lightning Image Resizer
Download the Lightning Image Resizer by clicking on the Download tab and following the prompts on this page.
Unzip the file into the directory of your choice. Lightning Image Resizer does not need to be installed. Just double-click the LIR.exe file to open Lightning Image Resizer.
You can use Lightning Image Resizer as follows.
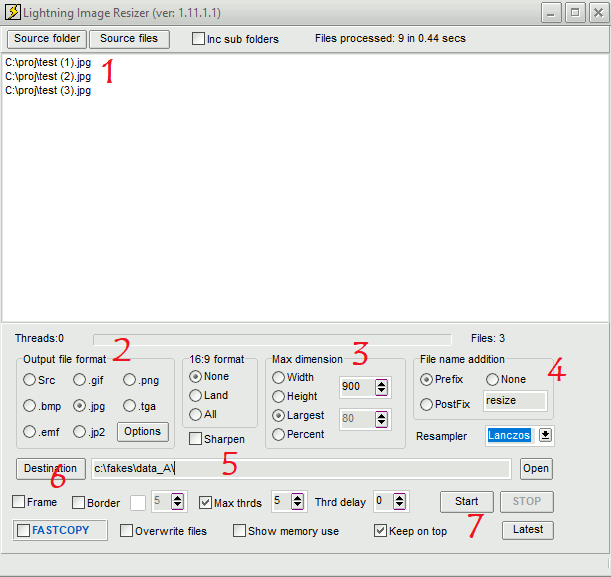
Drag the files you with to resize into the area marked “1” in the figure above, or you can choose the folder or images with the buttons. Change the output file format to jpg in area marked “2”. Change the max dimension to “Largest” and “900” in the area marked “3”. If you have a high-end computer, you could try adjusting these settings as well. In the area marked “4”, you may wish to add a prefix such as “resize” to distinguish your resized images. Enter the destination in the area marked “5”. Make sure that the boxes are unchecked in area “6” or you will have extra objects in your images. Finally, click the Start button in the area marked “7” to process your images.
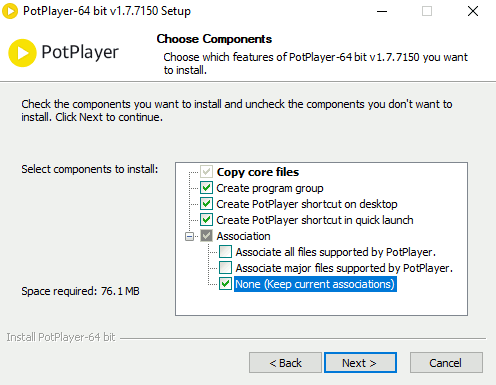
Recommended: Daum PotPlayer
Go to the PotPlayer page and install the 64-bit version. Follow the prompts for the default installation. If you do not want to change the file associations, just be sure to click the option to keep current associations as shown below. (PotPlayer is a great multi-purpose player.)
FFmpeg is preferred for extracting full frames from videos as it is more flexible. PotPlayer has strange file naming systems that makes it difficult for beginners to turn frames back into video. However, if you simply want to extract frames for training from short 1-3 second segments in a video, it is easier to play through each part using PotPlayer and extract the corresponding frames. For that kind of training, you do not need to preserve the exact order of the video frames with simple naming. Here is how you do that.
Open you video file by dragging it to PotPlayer. Find the start of the video segment that you would like to extract frames from. Pause the video.
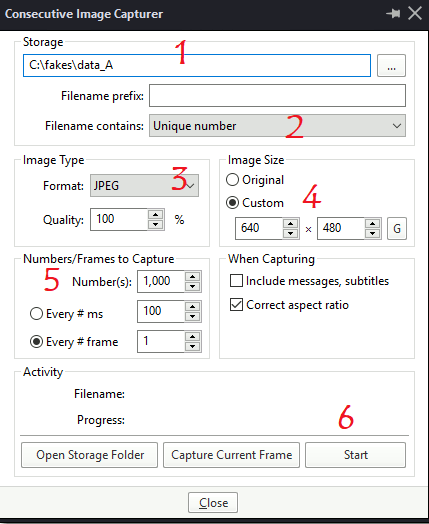
Press Ctrl+G on your keyboard to open the frame extraction window.
Select the destination directory in the area marked “1” in the figure above. In the area marked “2”, you can choose the naming convention. (However, note that the filenames will not be perfectly sequential starting from 0 or 1, regardless of what method you choose. That is why I recommend FFmpeg for the target video conversion, and to use PotPlayer for extracting training frames quickly from desired video locations.) In the area marked “3”, you can choose the image type. I recommend JPG at 100% quality, as PNGs cause errors for some users of FakeApp. You can pick the image size in the area marked “4” so that you do not need to readjust the size again. In the area marked “5” you can select the frame capture rate. The settings are shown for extracting every frame. If you want to extract every tenth frame, you could enter “10” instead. If you want to extract 1 frame every 100 ms, you can choose the other radio button option, or adjust the ms interval accordingly. You also set the total number of frames to extract here, shown as 1000. Finally, hit the Start button in the area marked “6”.
Unpause the video. Frames will automatically be extracted according to the parameters you set. When you want to stop, pause the video again. Open the destination folder, and you should see our desired frames.
Step 1: Extraction
After opening FakeApp, the first step you will have to perform is extraction. During the extraction step, faces are cropped from your training images and aligned.
Training data preparation
You need to prepare two sets of training images. Set A will be the original face that you want to replace. Set B will be the desired face that you will substitute into Set A. Just remember that A = original, B = desired.
You should collect at least several hundred images of Face A and Face B. Ideally, the faces are already similar. The easiest face swap would also have Face A, the original, looking forward the entire time. Then, you would only need to train the computer model how to draw Face B looking forward. However, as most faces move around in video, this is usually not the case, so you will need to provide diverse angles and lighting to train the computer model how to predict faces under all conditions.
You can extract image frames from segments of video clips using PotPlayer as described above to generate images with a variety of angles and facial expressions. You should avoid images where the faces is covered by hair, glasses, hands, or other obstacles. We also recommend that you remove all images with more than one face. Alternatively, you can edit images with more than one face by deleting the other faces that you do not want.
It is important to have a well-curated training data set. Diversity and quality are more important than the sheer number of training pictures.
Resize all of your images using Lightning Image Resizer as described above, or another method, to 1280×720 or smaller. Later, if you run into memory problems during extraction, you can reduce the images to 900×900 or smaller.
Target video clip preparation
Usually, you will have a particular video clip for Face A that you would like to replace. Make sure to include images from this clip in your training set. Some choose to train the computer model on a variety of general face images before training on the particular clip of choice. For your first attempt, you should simply extract all of the frames from your target clip and use that as the training data for Face A. You should start with a shorter clip of perhaps 10 seconds in length. If you installed FFmpeg and updated the PATH as described above, you can extract every single frame to replace from this video clip using FFmpeg.
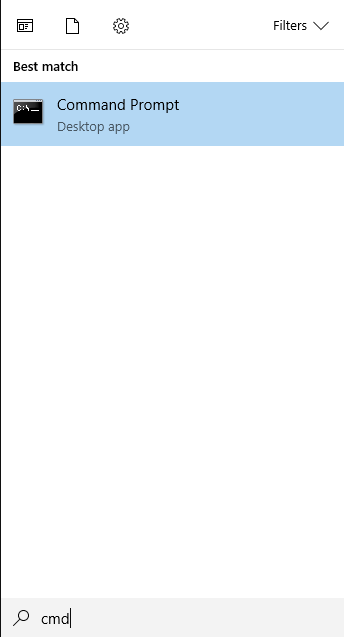
Enter “cmd” into the Windows search box. Press Enter to open the command window.


Type “cd \” (without the quotes) to return the root C:\ directory. Type “cd folder“, where folder is the name of the complete path that has your video clip. In the example shown above, the video file is called clip.mp4 and is located in C:\proj. While in the directory containing the video file, enter:
ffmpeg -i clipname -vf fps=framerate -qscale:v 2 "imagename%04d.jpg"
Here clipname specifies the video filename, framerate specifices the rate of frame extraction (use 25 if you are unsure) and imagename is the prefix name for your image sequence. The “%04d means that the image files will form a sequence that is padded with zero to give 4 decimal places, such as name0001.jpg, name0002.jpg, name0003.jpg, and so on.
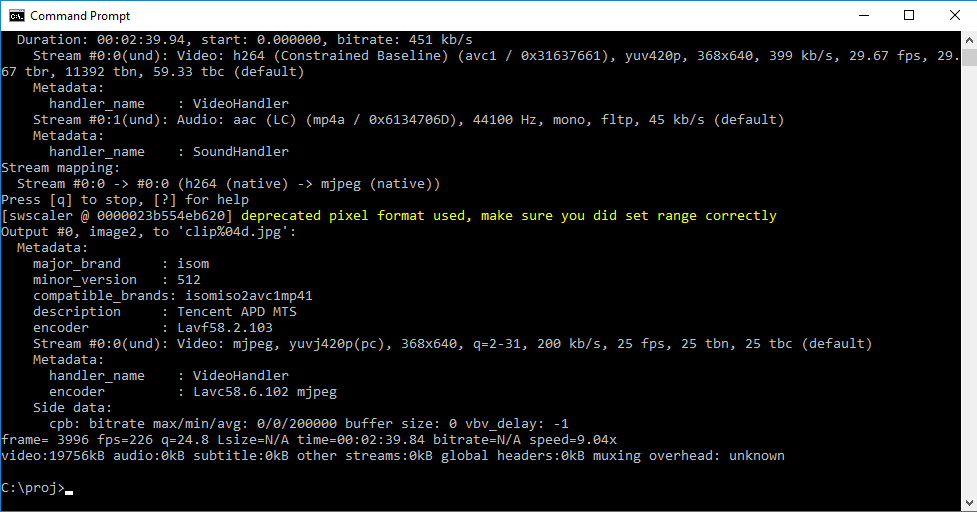
You should see the progress as your frames are extract.
Resize all of your images using Lightning Image Resizer as described above, or another method, to 1280×720 or smaller. Later, if you run into memory problems during extraction, you can reduce the images to 900×900 or smaller.
Original face extraction
Copy all of your resized images for Face A into the directory C:\fakes\data_A. This directory should already be created if you installed FakeApp according to the directions above. Make sure there are no other images in this directory.
NOTE: It is highly recommended that you close all other programs when running FakeApp.
Start FakeApp by running fakeapp.bat. Click on the Extract tab.
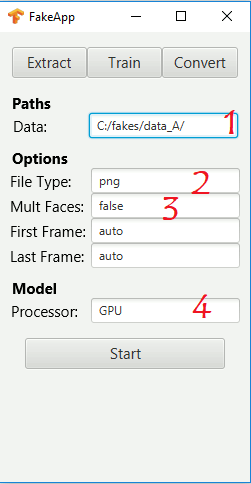
In the Data path dialog box marked “1” in the figure above, enter exactly “C:/fakes/data_A/” without the quotes. Note that the slashes are forward instead of the usual Windows backslash. Also note that there is a forward slash at the end. Under the area marked “2”, you can specify jpg or png filetypes, depending on what you used for your training data set. You can try png images, but if you have errors, simply use jpg images instead. Make sure all of your images in the training set are in fact the correct file type. Under the area marked “3” you can specify whether there are multiple faces in the images. We recommend that you keep this to “false” and only use training sets with single faces to start out. In the area marked “4” you can specify whether you want to use the GPU or CPU for image processing. If you meet the minimum hardware requirements, you should leave this as the default GPU setting, as GPUs will be much faster. However, CPUs can perform the Extract and Convert processes in a reasonable amount of time.
Press the Start button.
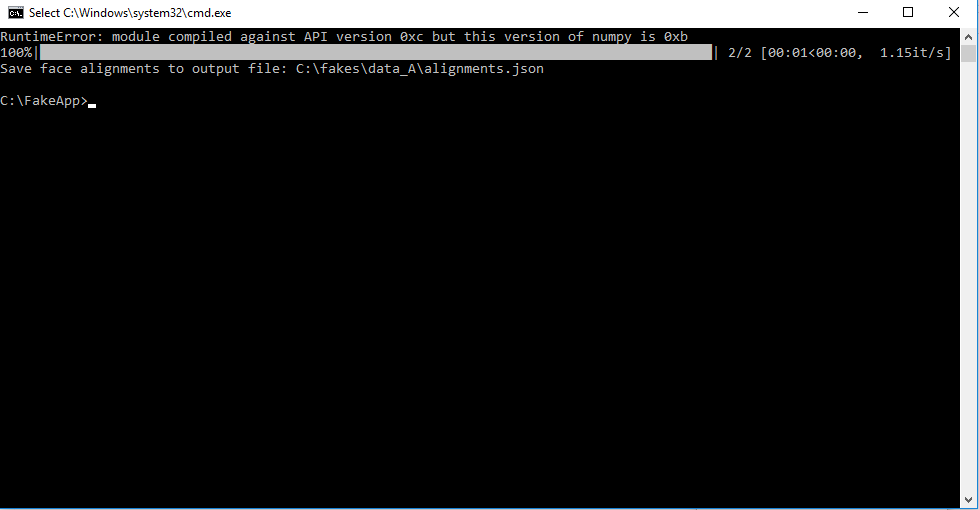
A new command window will appear. If you see something like the above, you successfully extract the faces for your training data. The example above is for only 2 images, and the whole process could take 10-30 minutes depending on how many images you have and the specifications of your computer. The initial RuntimeError on the first line is normal and always shows up. Sometimes, the algorithm will not be able to detect faces. It will indicate this in the command window and move on to the next image. This is not a problem if your training data set is large.
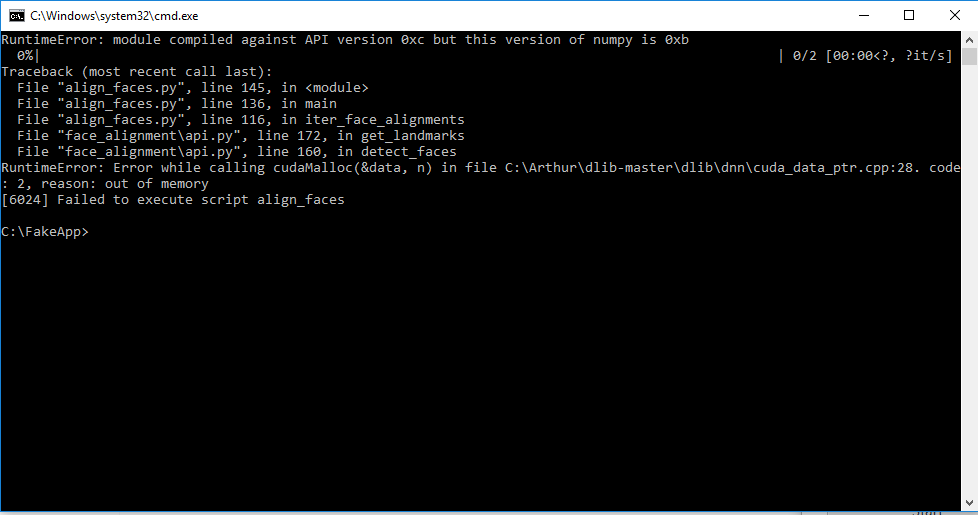
If you see a message as shown above, your face extraction failed because you had an out-of-memory error. You need to reduce the size of your training images and try again. It is best to use the largest size images that your memory can handle, so do not drastically reduce image sizes. You can reduce the image size to about 900×900, where most users have success, or a little higher or a little lower.
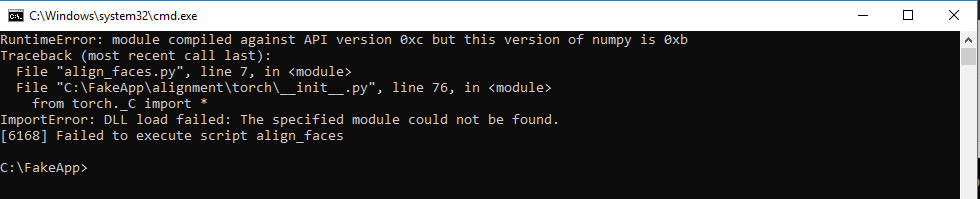
If you see an error about torch._C import as shown above, you need to install an updated Visual C++ Redistributable. Google for “Visual C++ Redistributable for Visual Studio 2015” and install the 64-bit package.
Desired face extraction
Copy all of your resized images for Face B into the directory C:\fakes\data_B. Repeat all of the instructions as above, but replace the dialog box in the Extract tab with the correct path to data_b with forward slashes.
Cleaning the aligned data
Once you have successfully extracted both data sets, you should manually check the extract face images to remove problematic ones. There will be a new folder called “aligned” at C:\fakes\data_A\aligned and C:\fakes\data_B\aligned. Remove any obvious errors in face detection. Remove faces that are partially obscured or that have extreme lighting conditions. It is important to have a clean training data set for the best results.
Step 2: Training
The training step teaches a computer model how to draw the faces using a neural network. Models are specific to transforming a particular pair of faces, but models can also be re-used for similar looking faces for more rapid training.
Starting a new model
If you are starting a project from the beginning, make sure that you have copied a fresh version of C:\FakeApp\model into C:\fakes\model, as described for the FakeApp installation step above. Otherwise, you will train on top of an existing deep learning model that incorporates features of other faces.
Saving a model
If you have previously run the FakeApp and would like to save the existing model, copy the entire contents of the C:\fakes\model directory into another location.
Loading a model
If you have previously saved a model, you can copy it into C:\fakes\model for further training. You can also use models that you may have downloaded from elsewhere, if you happen to run across such files.
Begin training
Once your model folder is setup correctly, and all of your aligned images are cleaned and ready, click the Train tab.
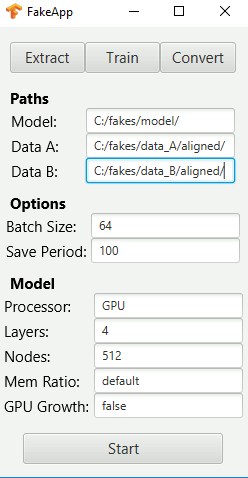
Be sure to enter the correct paths with forward slashes and a slash at the end, as shown above.
IMPORTANT: Even if the defaults look correct, you must click on each box and re-type the path. Again, if there are default values, make sure to re-type the complete path, and add the slash at the end. Otherwise, you may get an error as the defaults are not loaded properly.
If you have a GTX 1070 or 1080, you will likely use the other default settings. If you have a GTX 1080, you can also try increasing the batch size by powers of 2 and increasing the nodes to 1024 for higher quality results.
If you have low amounts of VRAM, you can reduce the batch size, layers, and nodes. However, reducing the layers and nodes will simplify the computer model, resulting in lower quality results. The recommended way to try fitting the model into memory is to set batch=16 (you cannot currently go lower), set layers=4, and begin reducing the nodes value in powers of 2 (512, 256, 128, 64, etc.). For the lowest limit of 2GB VRAM, settings that users have reported to work include (batch=64, layers=1, nodes=128), (batch=32, layers=2, nodes=32), and (batch=16, layers=2, nodes=64).
To start, you can just try the initial default setting.

You should close all other programs for optimal performance. Then, click the Start button. A new command window will open. The first line will say Using TensorFlow backend. You will see additional text.

For some graphics cards, you may see a warning that is “not a failure”, as shown above. This warning is fine and you do not need to worry about it.
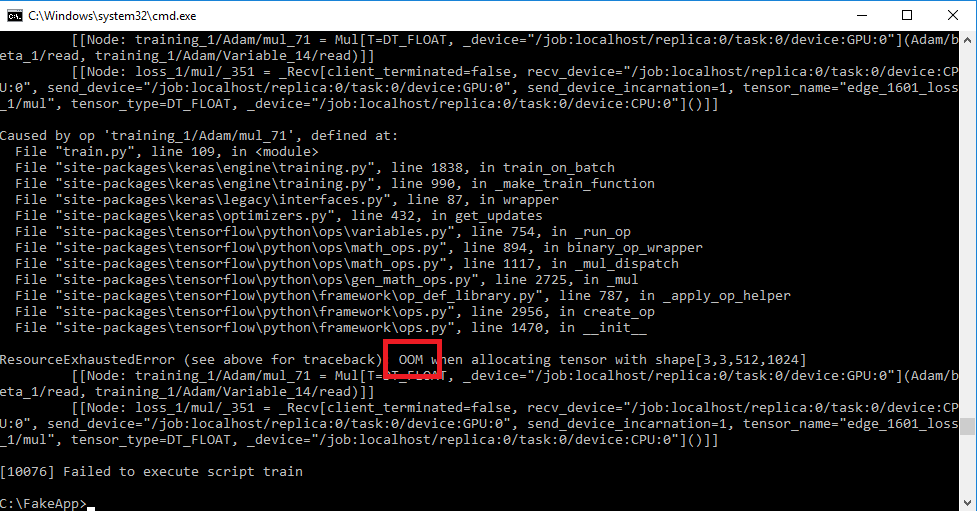
If the command line quits with an error, the most common cause is running out of memory. You will see the “OOM” error shown in red above. In this case, readjust the batch, layers, or nodes settings and try again. You will need to optimize the settings the most with lower end graphics cards.
Once the training has successfully begun, you will see a preview of the model training shown in thumbnails.
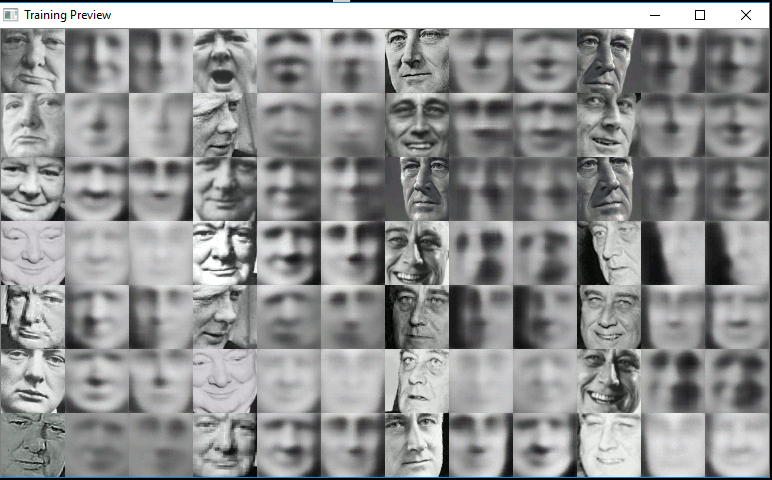
The first six columns show face A being transformed into face B, and vice versa for the last six columns. Within each group of three images, the leftmost is the original image, the middle image is the model trying to redraw the original image, and the rightmost is the predicted transformation. You can monitor the rightmost image to see when it starts looking like the desired face in clear detail. It will usually take at least several hours, if not more, to reach a satisfactory level of model training.
You can press the key “q” while this window is selected to quit training and save your progress.
Monitor and finish training
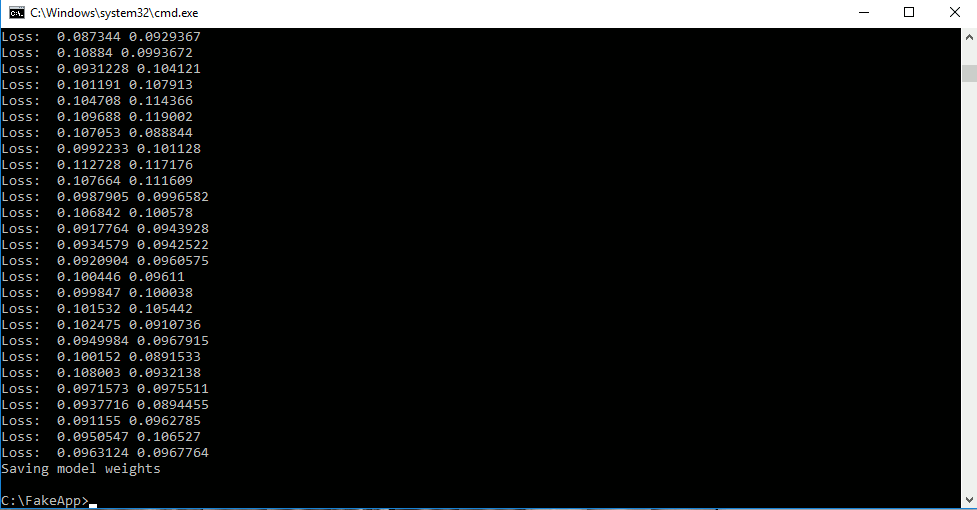
In addition to the thumbnail previews, you will see a changing list of loss values being printed in a command window. Smaller loss values indicate a high quality model. Ideally, you should aim for loss values at least below 0.02. If your loss values are below 0.02 and your transformed faces look poor, you may need better training data, or the complexity of your model may be too low.
Once you are done, you can stop the training by pressing “q” as noted above.
You can change the training images (make sure to re-extract and clean the training set properly) and continue the training later if you desire as long as you save the model files. Be sure to use the same layers and nodes parameters if you decide to train again later.
Step 3: Converting
Preparing the target image files
If you want to convert all of the images in C:\fakes\data_A into face B, then proceed to the next step.
If you have a specific video clip that you would like to convert, and there are extra images from other sources in your training data set, you will need to prepare the video clip images now.
First, copy all of the files in C:\fakes\data_A to another folder for safe keeping.
Then, extract every frame from the target video clip using FFmpeg as described above under Target video clip preparation.
Resize all of these images, copy to C:\fakes\data_A, and then extract/align/clean the faces as before. If these images were not part of the original training data set, you should train again until your loss values are below 0.02.
Creating the merged image files
Once the model training is complete, you can convert face A to face B. Click on the Convert tab.
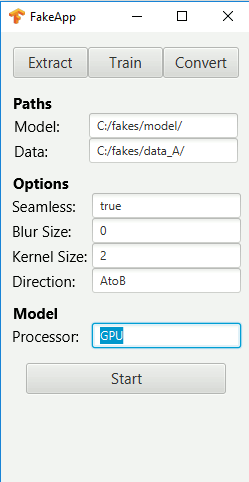
Enter the exact paths as shown above, with forward slashes and slashes at the end. You can try toggling the “Seamless” setting to “true” or “false”. You may see a box around the replaced face, or you might see some flickering. You can adjust the blur size and kernel size if you would like to make the face transition smoother with blurring and image erosions. If your resulting images are too blurry or messy, try setting these both to 0. The default direction is to turn face A into face B, given by the “AtoB” setting.
Click Start to begin. You can perform conversion processes in a reasonable amount of time even without a GPU.
A new folder will be created in C:\fakes\data_A\merged containing all of the converted images.
You may wish to check the quality of the results and alter the conversion settings if desired. If the results are still too poor, you may need to train further.
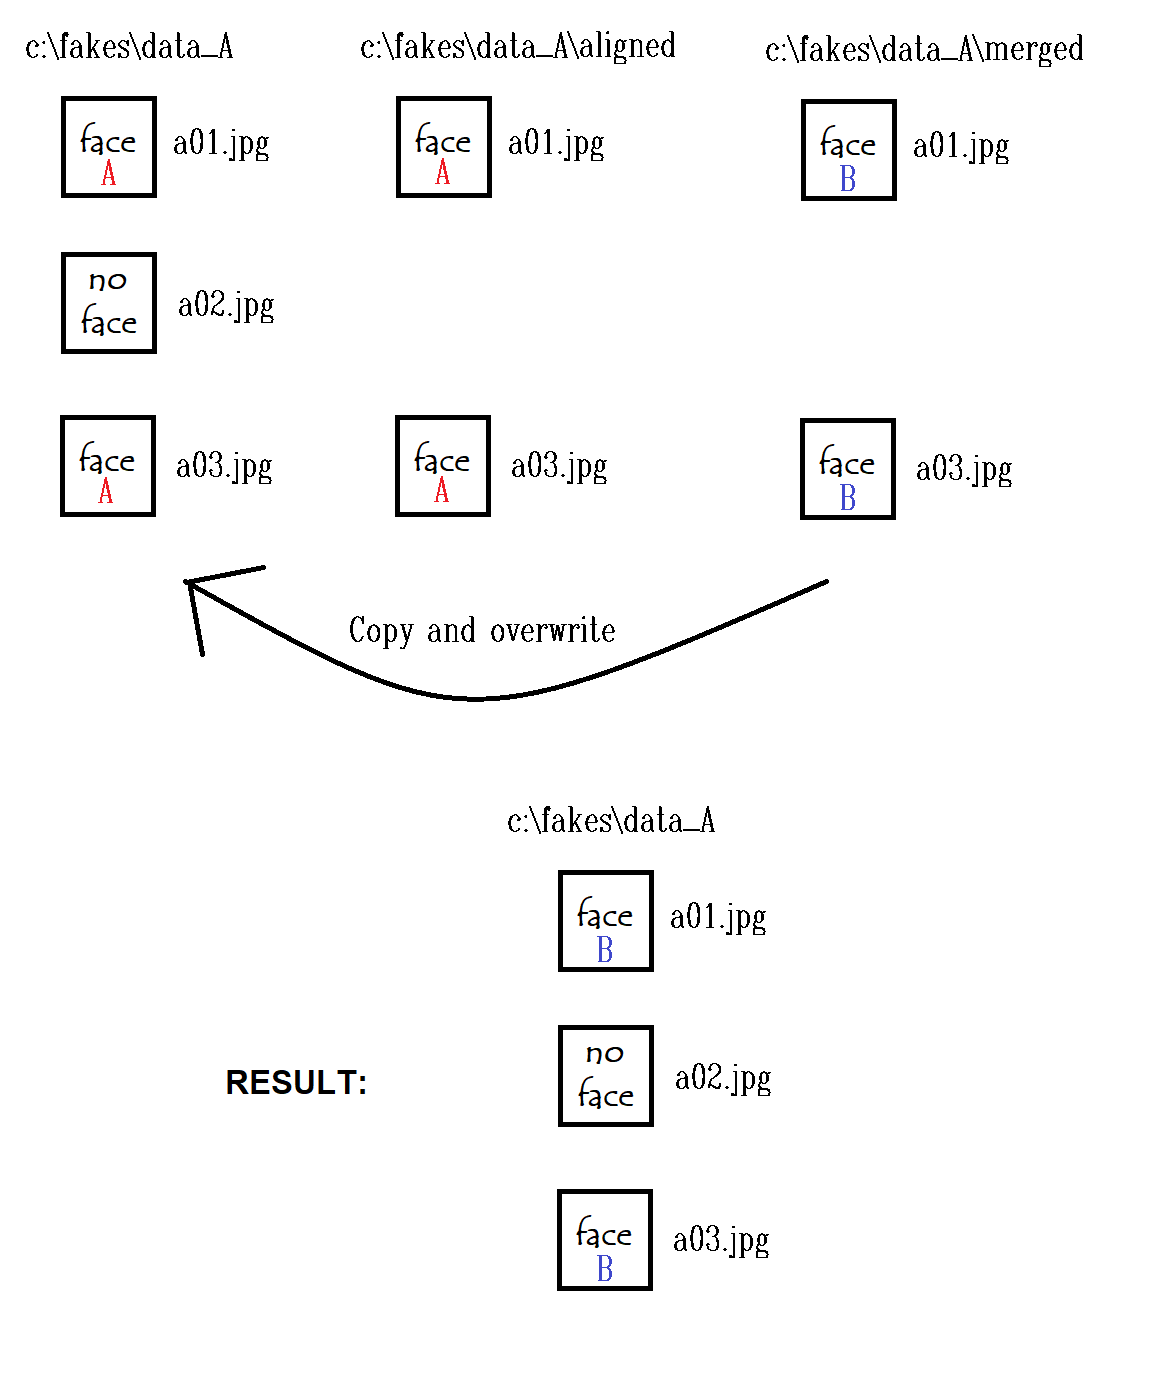
Generate video from converted images
The merged folder will not contain all of the frames from the original video clip. This is because frames without any faces, for example, will not be aligned or converted, and will thus be left out of the “merged” folder. To restore the full video sequence, you can use Explorer to copy all of the files in C:\fakes\data_A\merged to C:\fakes\data_A. Because the original files and merged files have the same filenames, you can overwrite the original files that have faces with your merged files, while preserving the file naming structure for all extracted frames that are in between the face frames.
Of course, this will overwrite your resized training images. You can always copy the training images to another folder first, but we are using these instructions for clarity on what is going on. If this is difficult to understand, see the diagram below. The desired result is to have a directory with all of the frames from a video in ordered number with the faces replaced.
Finally, open the command window. Change directory as before to C:\fakes\data_A, which contains all of your final images. Enter the command:
ffmpeg -f image2 -i imagename%04d.jpg -vcodec libx264 -crf 15 -pix_fmt yuv420p output_filename.mp4
This will generate a video clip from the sequence of image files with filenames imagename0001.jpg, imagename0002.jpg, etc. The video clip name is output_filename.mp4. The -crf option sets the video quality, with smaller numbers being better, and values between 0 and 51 allowed. The default frame rate without specifying will be 25 frames per second, which you can change by adding the option -r.
You need to replace imagename with the name of your actual files. You can also pick the desired output name under output_filename.mp4. If you are not sure about the input filenames, check your “merged” folder. If the filenames are bob0001.jpg, bob0002.jpg, etc. you would replace that portion with bob%04d.jpg.
Your deepfakes video is now ready for viewing. You may need to alter the conversion or continue training if the results are not satisfactory. Some users also edit individual problematic frames using other video editing tools.
Syncing audio
If you would like to sync audio from the unconverted video with the final video, you can use ffmpeg. When creating the video, as above, make sure to specify the framerate of the video with the -r switch when generating the video. The frame rate, shown as 25 in the example below, needs to exactly match the frame rate of the original video. Make sure the -r switch is placed immediately after the word “ffmpeg”.
ffmpeg -r 25 -f image2 -i imagename%04d.jpg -vcodec libx264 -crf 15 -pix_fmt yuv420p nosound_filename.mp4
If you need help determining the frame rate of the original video, you can use PotPlayer and hit the “Tab” key. This will show the video information, include the frame rate as “FPS”. Then, enter the following command to copy the audio track.
ffmpeg -i nosound_filename.mp4 -i original_filename.mp4 -map 0:v:0 -map 1:a:0 -c:v copy -c:a copy output_filename.mp4
Replace nosound_filename.mp4 with the name of the audioless clip, original_filename.mp4 with the name of the original clip with audio, and output_filename.mp4 with the desired name of the final result. The two input clips should have the exact same length. (Credit to jslurm from the forums for this section.)
광고 클릭에서 발생하는 수익금은 모두 웹사이트 서버의 유지 및 관리, 그리고 기술 콘텐츠 향상을 위해 쓰여집니다.