[웹어셈블리] Visual Studio 2019와 Emscripten (emcc) 개발

Emscripten

December 30, 2018 7 Comments
 

 3105 total views, 3 views today


Ever wanted to make applications that run in the browser and are coded in C/C++? Well that’s what Emscripten is for. It is a compiler that will take C/C++ program and compile it to WASM, which can then be executed in all newer browsers.

Why would you use C or C++ to code programs that run in the browser, and not JavaScript for example? Well there are plenty of reasons, and it mostly revolves around the need to have a full-fledged and very fast language that does not suffer from performance issues, so that we can create applications like: 3D games, Virtual Reality or Augmented Reality programs, processing images or other high-computational algorithms, creating programs for communicating with various industrial machines, etc. For such applications you need to use the language that is extremely fast and efficient, hence the Emscripten to compile it for usage in the browser. If you want to read more about it, please go here.

The architecture is rather simple if we are looking from 10.000 feet, so it would look something like this:
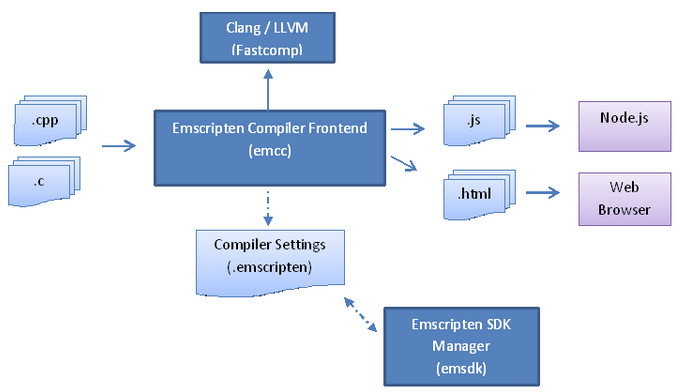
Figure 1.1Emscripten Toolchain

Emscripten compiler takes the C or C++ code and converts it to LLVM bitcode, and then compiler’s core is used to compile the bitcode to WASM (web assembly), that can be executed in the browser. We are going to be using Emscripten Compiler Frontend (emcc) in our examples.

SAMPLE PROGRAMS

The sample programs would be created in Visual Studio 2019, then we need to compile it using Emscripten and run it in the browser. There is no any specific reason for using VS 2019, since VS 2017 would also work just fine. You can find the code for these examples here.

For the beginning, we would just create a simple Hello World example to demonstrate that it works, and then would go on to actually draw something in the browser to demonstrate that we can use drawing libraries (simple libraries or Open GL) from C/C++ code.

Before we do that, we need to install the compiler itself, so here are the pre-requisites:

•  Install Python

•  Clone Emscripten from GitHub

•  Install Emscripten

•  Create C/C++ program and compile it to WASM module

First, we need to install Python, at the time of writing this post the latest version was Python 3.7.2. Just go to the web site and find the web installer, the installation is straightforward. We need it because the core Emscripten SDK is in Python. If you have it already, then you do not need to re-install. I use Chocolatey to install Python, and many other packages, so if you wish to try it then you can read more about it here, and if you already use Chocolatey then execute this command in command prompt (with elevated privileges as administrator):

choco install python2 --version 2.7.13

Please note that all this is very experimental, and one of the issues I found was that with Python 3 or Python 2 versions 2.7.2 or lower it would not work, as it internally relies on these, so the safest solution for you is to issue the above Chocolatey command to install this specific version of Python.

Git needs to be installed as well, and I am using a Windows 10 machine that has Visual Studio 2019 Preview 1.1 installed (you can use Visual Studio 2017, it should work just fine). So please go to this link, and the install should start automatically. We need Git because we need to first clone the compiler from GitHub and then to install it.

Now open VS developer command prompt, and type this:

git –-version

It returns git version 2.20.1.windows.1 with me. Ok, now we need a folder to clone the Emscripten compiler. I have created the folder “c:\temp\EmscriptenSDK” on my machine, then cd to that folder, and then issues the following command:

git clone https://github.com/juj/emsdk.git

This would download the bootstrap, now we need to install it. Please execute the following commands:

cd emsdk
git pull
emsdk install latest
emsdk activate latest

This installed this version of compiler with me: Emscripten-1.38.21. The whole folder would be around 1.12 Gb, so please be patient.

Okay, so now we have an Emscript compiler installed. Do not close the current command prompt, and execute the following command:

emsdk_env.bat

This should add the environment variable to the PATH, so that we can call the compiler even after we close the command prompt. So close the command prompt, and re-open it again, and try typing this:

emcc --version

It should show you the version, something like emcc (Emscripten gcc/clang-like replacement) 1.38.21 in my case.

If you did not get the version, then you need to set up the environment variable manually…so go to Control Panel -> System -> Advanced System Settings -> Environment Variables… -> and then in System Variables find Path variable -> Edit -> New -> and add “c:\temp\EmscriptenSDK\emsdk” folder (or other folder in your case, if you did not use this one to install the sdk).

Example 1: Show simple message

Let us now fire up Visual Studio, add New Project and create a new empty C++ project. This is what I’ve got:
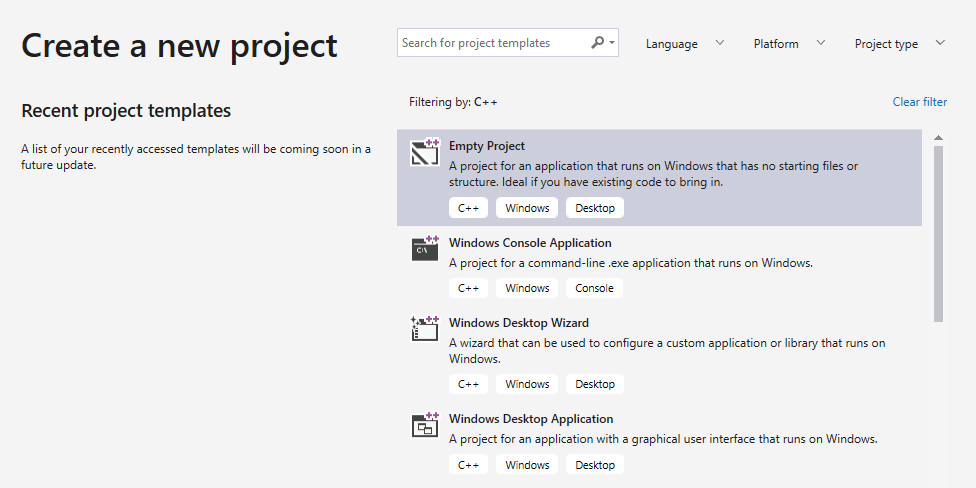
Figure 1.2: Empty C++ Project

Then click next, and add the name to the project:
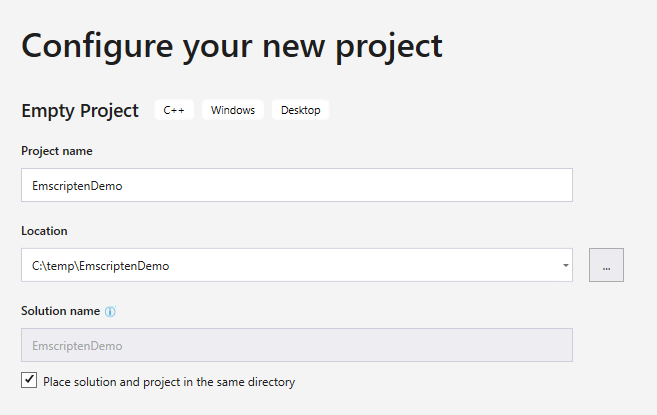
Figure 1.3: Configure the Project

And finally click on “Create” button. As you can see, I have created the project in c:\temp\EmscriptenDemo folder.

Now right click on the “Source Files” folder in the SolutionExplorer, add new C file and name it test.c, and add the following code to it:

#include <stdio.h>
 
int main(int argc, char ** argv)
{
printf( "Hello there from WASM module!\n" );
}

So not much there, just the main function and printing a message that should show in the browser. Let’s try to compile this now and run it in the browser. First compile it in Visual Studio, to make sure everything works, by clicking on Build -> Build EmscriptenDemo, or by pressing SHIFT+F6. If it compiles, then please go to Command Prompt, navigate to the root folder (C:\temp\EmscriptenDemo\EmscriptenDemo in my case), where the test.c file is located in, and execute this command:

emcc test.c -s WASM=1 -o test.html

First time it can take around 20-30 seconds to compile from a cold-started compiler. Every subsequent compilation would be immediate.

This should have produced the following files in the same folder: test.html, test.js and test.wasm.

Please open this folder and right click the test.html file and open it in the browser (I am using FF). You will see the page opened and displaying our message in the console part of the page.

Now just for run, go back to Visual Studio, change the message to “Hello AGAIN there from WASM module!\n” (or something else), save the file, compile with SHIFT+F6, then back to command prompt and execute the same command….after it completes then F5 refresh the browser, it should show you the new message. Don’t close the browser, we’ll need it for the next example.

Example 2: Draw on canvas

Let us now try to do more by drawing on the canvas in the browser. We can use the same project, so please add the new C++ file to the Source Files folder, and name it “testsdl.cpp”, then add this code to it:

#include <iostream>
#include "SDL.h"
#include "SDL_opengl.h"
 
int main(int argc, char ** argv)
{
printf("Testing SDL...!\n");
 
SDL_Init(SDL_INIT_VIDEO);
 
// Try to create window
SDL_Window *window = SDL_CreateWindow("Test", SDL_WINDOWPOS_CENTERED, SDL_WINDOWPOS_CENTERED, 640, 480, SDL_WINDOW_SHOWN);
if (!window)
{
fprintf(stderr, "Cannot create window: %s\n", SDL_GetError());
return 1;
}
 
// Setup renderer
SDL_Renderer* renderer = NULL;
renderer = SDL_CreateRenderer(window, -1, SDL_RENDERER_ACCELERATED);
 
// Bckg color
SDL_SetRenderDrawColor(renderer, 0, 255, 0, 255);
SDL_RenderClear(renderer);
 
// Creat a rect at pos ( 120, 100 ) that's 80 pixels wide and 80 pixels high.
SDL_Rect rect = { 120, 100, 80, 80 };
 
// Square color
SDL_SetRenderDrawColor(renderer, 255, 128, 0, 255);
 
// Now render
SDL_RenderFillRect(renderer, &rect);
SDL_RenderPresent(renderer);
 
//Clean up
SDL_DestroyWindow(window);
SDL_Quit();
 
return 0;
}

This code uses the SDL library for drawing, and since you most likely do not have it installed then it cannot see it and compiling this with SHIFT+F6 would give you a lot of errors. SDL stands for Simple DirectMedia Layer library, and it is used for creating games and such. The code is simple and has comments, it just paints the background with one color and then draws a rectangle and fills it with another color. Nothing fancy really, but we want to show that we can do this from C++ code in the browser. And besides, if you can draw rectangles (or triangles, to be more precise) then you can create any game or graphical type of application as well, as everything is created using triangles (yes, even the spheres).

There are now two roads from here: we can add the SDL library and make it compile in Visual Studio, and then compile it with Emscripten, or compile it just with Emscripten using the port of SDL and specify the switch for the compiler. How is this possible? Well it is very logical indeed, since we do not really need to compile in Visual Studio and we were doing that only to make sure it really works and can compile, and then did a compilation with Emscripten to WASM. Since I am providing the code for this example you can be sure it works, so you can just go ahead and skip to the section b. Compile with Emscripten. If you still want to compile it with Microsoft C++ compiler in Visual Studio, and maybe use this to add some more functionality and play with it, then start with the next section a. Compile with Microsoft C++ Compiler and then continue with b. Compile with Emscripten.

a. Compile with Microsoft C++ Compiler

We need to add the SDL library if we were to compile this in Visual Studio, so please follow these steps:

•  Go to SDL homepage here, then Downloads and then SDL 2.0, find the link “SDL2-devel-2.0.9-VC.zip (Visual C++ 32/64-bit)“ and unpack it somewhere. Then copy the newly created folder to C:\temp or somewhere as per your liking, and rename it to SDL2 (so that we can more easily manipulate it).
•  My SDL installation is in C:\temp\SDL2 … please go to Visual Studio, right click on the project, then C/C++ and General, and add the following path to the “Additional Include Directories”: c:\temp\SDL2\include (or your folder, if different).
•  Then go to Linker -> General and do the same for “Additional Include Directories”.
•  Now we need to add libs, so go to the project, right click on the project, Add -> An existing item…then navigate to c:\temp\SDL2\lib\x86 folder and add these files: SDL2.dllSDL.2.lib and SDL2main.lib. They should now appear in the Solution Explorer.
•  Try to build the project now with SHIFT+F6, it should build fine.

My Solution Explorer now looks like this:
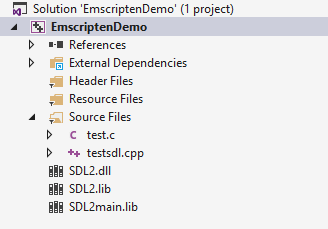
Figure 1.4: Solution with Libraries

b. Compile with Emscripten

Let us now compile the code in testsdl.cpp with Emscripten and run it in the browser. Please go to the command prompt and execute this command:

emcc test.c -s WASM=1 -o test.html

Now this is different than before, right, because we are now telling the compiler to use the port of SDL2. You can read more about it here: Emscripten Ports. In any case, it should compile our file (you will see the port of SDL2 being downloaded from GitHub) and since we are outputting it to the same html file we can just refresh the existing test.html, and we should see something like this:
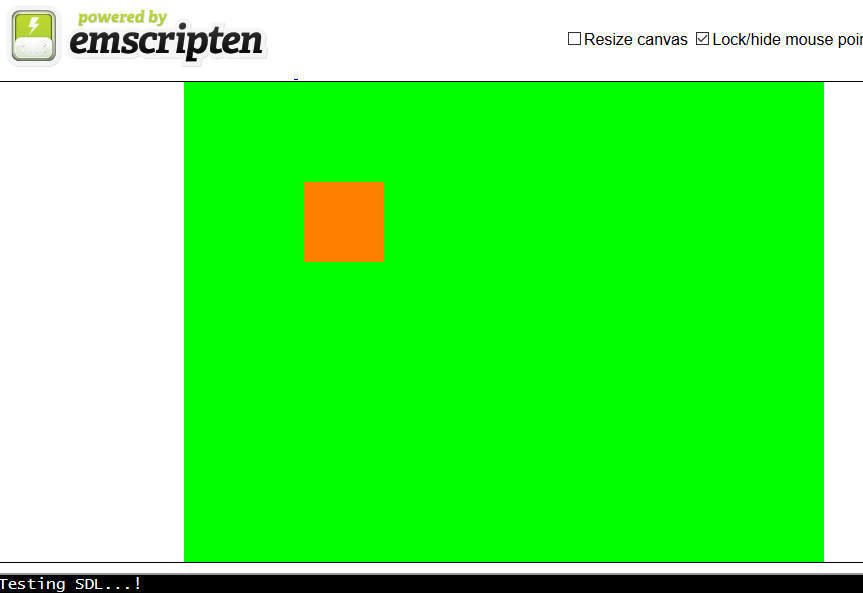
Figure 1.5: Drawing on Canvas from C++

So all good…we can now draw on the canvas in the browser from C/C++ code.

CONCLUSION

Emscripten compiler is the powerful solution to use C/C++ or other languages to create applications that target browsers. This opens endless possibilities since we can now use the native code and run it anywhere, from PCs over Linux or Max to iPads. We do not have to port anything to JavaScript or learn JavaScript at all, and this by itself is a huge advantage.

Many projects have already been converted with Emscripten, like Unreal Engine 4Unity engine, Bullet Physics Engine…you can check a more comprehensive list here.


[출처] https://mirano.blog/emscripten/


Emscripten

2018 년 12 월 30 일 댓글 7 개
 

 3105 총 조회, 오늘 3 조회

경축! 아무것도 안하여 에스천사게임즈가 새로운 모습으로 재오픈 하였습니다.
어린이용이며, 설치가 필요없는 브라우저 게임입니다.
https://s1004games.com


브라우저에서 실행되고 C / C ++로 코딩 된 애플리케이션을 만들고 싶었던 적이 있습니까? 그것이 Emscripten의 목적입니다. C / C ++ 프로그램을 가져와 WASM으로 컴파일 한 다음 모든 최신 브라우저에서 실행할 수있는 컴파일러입니다.

예를 들어 JavaScript가 아닌 브라우저에서 실행되는 프로그램을 코딩하는 데 C 또는 C ++를 사용하는 이유는 무엇입니까? 많은 이유가 있으며, 성능 문제를 겪지 않는 본격적이고 매우 빠른 언어가 필요하기 때문에 주로 3D 게임, 가상 현실 또는 증강 현실 프로그램과 같은 응용 프로그램을 만들 수 있습니다. 이미지 또는 기타 높은 계산 알고리즘을 처리하고, 다양한 산업 기계와 통신하기위한 프로그램을 만드는 등. 이러한 응용 프로그램의 경우 매우 빠르고 효율적인 언어를 사용해야하므로 Emscripten이 브라우저에서 사용하기 위해 컴파일해야합니다. 자세한 내용을 보려면 여기 로 이동 하십시오 .

10.000 피트에서 바라 보면 아키텍처는 다소 단순하므로 다음과 같이 보일 것입니다.

그림 1.1 : Emscripten 툴체인

Emscripten 컴파일러는 C 또는 C ++ 코드를 가져 와서 LLVM 비트 코드로 변환 한 다음 컴파일러의 코어를 사용하여 비트 코드를 브라우저에서 실행할 수있는 WASM (웹 어셈블리)으로 컴파일합니다. 예제에서는 Emscripten Compiler Frontend (emcc)를 사용할 것입니다.

샘플 프로그램

샘플 프로그램은 Visual Studio 2019에서 생성 된 다음 Emscripten을 사용하여 컴파일하고 브라우저에서 실행해야합니다. VS 2017도 잘 작동하기 때문에 VS 2019를 사용하는 특별한 이유는 없습니다. 여기에서 이러한 예제에 대한 코드를 찾을 수 있습니다.

처음에는 간단한 Hello World 예제를 만들어 작동하는지 보여준 다음 브라우저에서 실제로 무언가를 그려 C / C ++에서 드로잉 라이브러리 (단순 라이브러리 또는 Open GL)를 사용할 수 있음을 보여줍니다. 암호.

그러기 전에 컴파일러 자체를 설치해야하므로 다음은 필수 구성 요소입니다.

• Python 설치

• GitHub에서 Emscripten 복제

• Emscripten 설치

• C / C ++ 프로그램 생성 및 WASM 모듈로 컴파일

먼저 Python 을 설치 해야합니다. 이 게시물을 작성할 당시 최신 버전은 Python 3.7.2였습니다. 웹 사이트로 이동하여 웹 설치 프로그램을 찾으면 설치가 간단합니다. 핵심 Emscripten SDK가 Python에 있기 때문에 필요합니다. 이미 설치되어있는 경우 다시 설치할 필요가 없습니다. 나는 Chocolatey를 사용하여 Python과 다른 많은 패키지를 설치하므로 시도하고 싶다면 여기 에서 자세히 읽을 수 있으며 , Chocolatey를 이미 사용하고 있다면 명령 프롬프트에서이 명령을 실행하십시오 (관리자 권한으로 상승 된 권한 사용).

choco install python2 --version 2.7 . 13

이 모든 것은 매우 실험적이며 내가 발견 한 문제 중 하나는 Python 3 또는 Python 2 버전 2.7.2 이하에서는 내부적으로 이것에 의존하기 때문에 작동하지 않으므로 가장 안전한 해결책은 다음과 같습니다. 위의 Chocolatey 명령을 실행하여이 특정 버전의 Python을 설치합니다.

Git 도 설치해야하며 Visual Studio 2019 Preview 1.1이 설치된 Windows 10 컴퓨터를 사용하고 있습니다 (Visual Studio 2017을 사용할 수 있으며 제대로 작동합니다). 그래서 이동하시기 바랍니다  링크, 그리고 자동으로 시작됩니다 설치합니다. 먼저 GitHub에서 컴파일러를 복제 한 다음 설치해야하므로 Git이 필요합니다.

이제 VS 개발자 명령 프롬프트를 열고 다음을 입력하십시오.

git –-version

나와 함께 git 버전 2.20.1.windows.1 을 반환합니다 이제 Emscripten 컴파일러를 복제 할 폴더가 필요합니다. 내 컴퓨터에“c : \ temp \ EmscriptenSDK”폴더를 만든 다음 해당 폴더로 이동 한 후 다음 명령을 실행합니다.

git clone https : //github.com/juj/emsdk.git

그러면 부트 스트랩이 다운로드되므로 이제 설치해야합니다. 다음 명령을 실행하십시오 :

cd emsdk
git pull
emsdk 최신 설치
emsdk 활성화 최신

이것은 나와 함께이 버전의 컴파일러를 설치했습니다 : Emscripten-1.38.21 . 전체 폴더는 약 1.12Gb이므로 잠시 기다려주십시오.

자, 이제 Emscript 컴파일러가 설치되었습니다. 현재 명령 프롬프트를 닫지 말고 다음 명령을 실행하십시오.

emsdk_env. 박쥐

이렇게하면 PATH에 환경 변수가 추가되어 명령 프롬프트를 닫은 후에도 컴파일러를 호출 할 수 있습니다. 따라서 명령 프롬프트를 닫고 다시 열고 다음을 입력하십시오.

emcc-버전

내 경우에는 emcc (Emscripten gcc / clang-like replacement) 1.38.21과 같은 버전을 보여줄 것 입니다.

버전을 얻지 못한 경우 환경 변수를 수동으로 설정해야합니다. 제어판-> 시스템-> 고급 시스템 설정-> 환경 변수…->로 이동 한 다음 시스템 변수에서 경로 변수 찾기-> 편집 -> 새로 만들기-> "c : \ temp \ EmscriptenSDK \ emsdk"폴더 (또는이 폴더를 사용하여 sdk를 설치하지 않은 경우 다른 폴더)를 추가합니다.

예 1 : 간단한 메시지 표시

이제 Visual Studio를 시작하고 새 프로젝트를 추가하고 빈 C ++ 프로젝트를 새로 만듭니다. 이것이 내가 가진 것입니다.

그림 1.2 : 빈 C ++ 프로젝트

그런 다음 다음을 클릭하고 프로젝트에 이름을 추가합니다.

그림 1.3 : 프로젝트 구성

마지막으로 "만들기"버튼을 클릭합니다. 보시다시피 c : \ temp \ EmscriptenDemo 폴더에 프로젝트를 만들었습니다 .

이제 SolutionExplorer에서“Source Files”폴더를 마우스 오른쪽 버튼으로 클릭하고 새 C 파일을 추가하고 이름을 test.c로 지정한 후 다음 코드를 추가합니다.

#include <stdio.h>
 
int main ( int argc, char ** argv )
{
printf ( "WASM 모듈에서 안녕하세요! \ n" ) ;
}

그다지 많지 않고 브라우저에 표시되어야하는 주요 기능과 메시지를 인쇄하는 것뿐입니다. 지금 컴파일하고 브라우저에서 실행 해 보겠습니다. 먼저 Visual Studio에서 컴파일하여 모든 것이 작동하는지 확인하려면 Build-> Build EmscriptenDemo를 클릭하거나 SHIFT + F6을 누릅니다. 컴파일되면 명령 프롬프트로 이동하여 test.c 파일이있는 루트 폴더 (제 경우에는 C : \ temp \ EmscriptenDemo \ EmscriptenDemo)로 이동하여 다음 명령을 실행하십시오.

emcc test.c -s WASM = 1 -o test.html

처음에는 콜드 스타트 ​​컴파일러에서 컴파일하는 데 약 20-30 초가 걸릴 수 있습니다. 이후의 모든 컴파일은 즉시 이루어집니다.

그러면 동일한 폴더에 test.html, test.js 및 test.wasm 파일이 생성되어야합니다.

이 폴더를 열고 test.html 파일을 마우스 오른쪽 버튼으로 클릭 한 다음 브라우저에서 엽니 다 (FF를 사용하고 있습니다). 페이지가 열리고 페이지의 콘솔 부분에 메시지가 표시되는 것을 볼 수 있습니다.

이제 실행을 위해 Visual Studio로 돌아가서 "Hello AGAIN there from WASM module! \ n"(또는 다른 것)으로 메시지를 변경하고 파일을 저장하고 SHIFT + F6으로 컴파일 한 다음 명령 프롬프트로 돌아가서 동일한 명령…. 완료 후 F5 브라우저를 새로 고치면 새 메시지가 표시됩니다. 브라우저를 닫지 마십시오. 다음 예제에서 필요합니다.

예제 2 : 캔버스에 그리기

이제 브라우저에서 캔버스에 그림을 그려서 더 많은 작업을 시도해 보겠습니다. 동일한 프로젝트를 사용할 수 있으므로 새 C ++ 파일을 Source Files 폴더에 추가하고 이름을 "testsdl.cpp" 로 지정한 다음 다음 코드를 추가하십시오.

#include <iostream>
#include "SDL.h"
#include "SDL_opengl.h"
 
int main ( int argc, char ** argv )
{
printf ( "SDL 테스트 중 ...! \ n" ) ;
 
SDL_Init ( SDL_INIT_VIDEO ) ;
 
// 창 생성 시도
SDL_Window * window = SDL_CreateWindow ( "테스트" , SDL_WINDOWPOS_CENTERED, SDL_WINDOWPOS_CENTERED, 640, 480, SDL_WINDOW_SHOWN ) ;
if ( ! window )
{
fprintf ( stderr, "창을 생성 할 수 없습니다 : % s \ n" , SDL_GetError ()) ;
반환 1;
}
 
// 렌더러 설정
SDL_Renderer * 렌더러 = NULL ;
renderer = SDL_CreateRenderer ( window, -1, SDL_RENDERER_ACCELERATED ) ;
 
// Bckg 색상
SDL_SetRenderDrawColor ( 렌더러, 0, 255, 0, 255 ) ;
SDL_RenderClear ( 렌더러 ) ;
 
// 너비가 80 픽셀이고 높이가 80 픽셀 인 pos (120, 100)에 직사각형을 만듭니다.
SDL_Rect rect = { 120, 100, 80, 80 } ;
 
// 정사각형 색상
SDL_SetRenderDrawColor ( 렌더러, 255, 128, 0, 255 ) ;
 
// 이제 렌더링
SDL_RenderFillRect ( 렌더러, & rect ) ;
SDL_RenderPresent ( 렌더러 ) ;
 
// 정리
SDL_DestroyWindow ( 윈도우 ) ;
SDL_Quit () ;
 
반환 0;
}

이 코드는 그리기를 위해 SDL 라이브러리를 사용하며, 설치하지 않았을 가능성이 높으므로 볼 수 없으며 SHIFT + F6으로 컴파일하면 많은 오류가 발생합니다. SDL은 Simple DirectMedia Layer 라이브러리의 약자로 게임 등을 만드는 데 사용됩니다. 코드는 간단하고 주석이 있습니다. 배경을 한 색상으로 칠한 다음 사각형을 그리고 다른 색상으로 채 웁니다. 정말 멋진 것은 아니지만 브라우저의 C ++ 코드에서이 작업을 수행 할 수 있음을 보여주고 싶습니다. 또한 사각형 (또는 더 정확하게는 삼각형)을 그릴 수 있다면 모든 게임 또는 그래픽 유형의 응용 프로그램을 만들 수 있으며 모든 것이 삼각형 (예, 심지어 구체)을 사용하여 만들어집니다.

이제 두 가지 방법이 있습니다. SDL 라이브러리를 추가하고 Visual Studio에서 컴파일 한 다음 Emscripten으로 컴파일하거나 SDL 포트를 사용하여 Emscripten으로 컴파일하고 컴파일러에 대한 스위치를 지정할 수 있습니다. 이것이 어떻게 가능한지? 실제로 Visual Studio에서 컴파일 할 필요가없고 실제로 작동하고 컴파일 할 수 있는지 확인하기 위해서만 수행 한 다음 Emscripten을 사용하여 WASM으로 컴파일을 수행했기 때문에 매우 논리적입니다. 이 예제에 대한 코드를 제공하고 있으므로 제대로 작동하는지 확인할 수 있으므로 계속해서 b 섹션으로 건너 뛸 수 있습니다 Emscripten으로 컴파일하십시오 . 여전히 Visual Studio에서 Microsoft C ++ 컴파일러로 컴파일하고이를 사용하여 더 많은 기능을 추가하고 함께 재생하려면 다음 섹션부터 시작하십시오.ㅏ. Microsoft C ++ 컴파일러로 컴파일 한 다음 계속 b. Emscripten으로 컴파일하십시오 .

ㅏ. Microsoft C ++ 컴파일러로 컴파일

Visual Studio에서 컴파일하려면 SDL 라이브러리를 추가해야하므로 다음 단계를 따르세요.

• 여기에서 SDL 홈페이지로 이동 한 다음 다운로드, SDL 2.0으로 이동하여 " SDL2-devel-2.0.9-VC.zip (Visual C ++ 32 / 64-bit)" 링크를 찾아 어딘가에서 압축을 풉니 다. 그런 다음 새로 생성 된 폴더를 C : \ temp 또는 원하는 곳에 복사하고 SDL2로 이름을 변경합니다 (더 쉽게 조작 할 수 있도록).
• 내 SDL 설치는 C : \ temp \ SDL2에 있습니다 . Visual Studio로 이동하여 프로젝트를 마우스 오른쪽 단추로 클릭 한 다음 C / C ++ 및 일반을 클릭하고 "추가 포함 디렉터리"에 다음 경로를 추가합니다. c : \ temp \ SDL2 \ include (또는 다른 경우 폴더).
• 그런 다음 링커-> 일반으로 이동하여 "추가 포함 디렉터리"에 대해 동일한 작업을 수행합니다.
• 이제 libs를 추가해야하므로 프로젝트로 이동하여 프로젝트를 마우스 오른쪽 버튼으로 클릭하고 추가-> 기존 항목을 클릭 한 다음 c : \ temp \ SDL2 \ lib \ x86 폴더 로 이동하여 다음 파일을 추가합니다. SDL2.dll , SDL.2.lib 및 SDL2main.lib . 이제 솔루션 탐색기에 나타납니다.
• 지금 SHIFT + F6을 사용하여 프로젝트를 빌드 해보십시오. 정상적으로 빌드됩니다.

내 솔루션 탐색기는 이제 다음과 같습니다.

그림 1.4 : 라이브러리가있는 솔루션

비. Emscripten으로 컴파일

이제 Emscripten을 사용 하여 testsdl.cpp 의 코드를 컴파일 하고 브라우저에서 실행 해 보겠습니다. 명령 프롬프트로 이동하여 다음 명령을 실행하십시오.

emcc test.c -s WASM = 1 -o test.html

이제 이것은 이전과 다릅니다. 이제 컴파일러에게 SDL2의 포트를 사용하도록 지시하고 있기 때문입니다. 여기에서 더 많은 것을 읽을 수 있습니다 : Emscripten Ports . 어쨌든 파일을 컴파일해야합니다 (GitHub에서 다운로드되는 SDL2의 포트를 볼 수 있습니다). 동일한 html 파일로 출력하고 있으므로 기존 test.html을 새로 고칠 수 있으며 다음과 같은 내용이 표시됩니다. :

그림 1.5 : C ++에서 캔버스에 그리기

모두 좋습니다. 이제 C / C ++ 코드에서 브라우저의 캔버스에 그릴 수 있습니다.

결론

Emscripten 컴파일러는 C / C ++ 또는 기타 언어를 사용하여 브라우저를 대상으로하는 애플리케이션을 만드는 강력한 솔루션입니다. 이제 Linux 또는 Max를 통한 PC에서 iPad에 이르기까지 어디서나 네이티브 코드를 사용하고 실행할 수 있으므로 무한한 가능성이 열립니다. 우리는 아무것도 자바 스크립트로 이식하거나 자바 스크립트를 배울 필요가 없습니다. 이것은 그 자체로 큰 이점입니다.

Unreal Engine 4 , Unity 엔진, Bullet Physics Engine 과 같은 많은 프로젝트가 이미 Emscripten으로 변환되었습니다 여기 에서보다 포괄적 인 목록을 확인할 수 있습니다 .


[출처] https://mirano.blog/emscripten/


본 웹사이트는 광고를 포함하고 있습니다.
광고 클릭에서 발생하는 수익금은 모두 웹사이트 서버의 유지 및 관리, 그리고 기술 콘텐츠 향상을 위해 쓰여집니다.
번호 제목 글쓴이 날짜 조회 수
403 Webassembly Tutorial using Emscripten file 졸리운_곰 2020.10.24 646
» [웹어셈블리] Visual Studio 2019와 Emscripten (emcc) 개발 file 졸리운_곰 2020.10.18 2094
401 [속깊은 자바스크립트 강좌] 자바스크립트의 Scope와 Closure 기초 file 졸리운_곰 2020.09.16 447
400 [Javascript] with 명령에 대하여 졸리운_곰 2020.09.16 459
399 HTML DIV tag - 테두리 그리기 STYLE - BORDER 졸리운_곰 2020.08.26 241
398 CSS :: 버튼(Button) 예쁘게 꾸미기, 여러개의 버튼 그룹화 하기 file 졸리운_곰 2020.08.26 994
397 [button] CSS - Button - 버튼스타일 (버튼크기, 버튼색깔, 버튼비활성화, 버튼그룹, 이미지위버튼) 졸리운_곰 2020.08.26 2293
396 워드프레스 데이터베이스 들여다보기. file 졸리운_곰 2020.08.04 673
395 제로보드 XE의 최근 게시글 5개를 DB에서 직접 조회 졸리운_곰 2020.08.04 456
394 GUI 디자이너를 위한 색상 참고 사이트 file 졸리운_곰 2020.08.04 610
393 Webpack 완전정복하기!! file 졸리운_곰 2020.07.20 727
392 [javascript] 압축(Minify) / 난독화(Uglify) 졸리운_곰 2020.07.01 293
391 HTML div 왼쪽, 오른쪽 배치 졸리운_곰 2020.06.02 471
390 [html] iframe을 사용하지 말아야 할 이유. (단점) 졸리운_곰 2020.05.10 568
389 워드프레스 플러그인과 테마 비교 - 사이트별 플러그인 만들기 졸리운_곰 2020.04.21 501
388 워드프레스에서 js 스크립트 파일과 스타일시트를 올바르게 로드하는 방법 졸리운_곰 2020.04.21 736
387 워드프레스 플러그인 만들기 file 졸리운_곰 2020.04.21 500
386 워드프레스 숏코드: 완벽 가이드 file 졸리운_곰 2020.04.21 513
385 생산성을 빠르게 높여주는, 프런트엔드 개발 툴 10가지 file 졸리운_곰 2020.04.10 488
384 자바스크립트 자료구조 연결 리스트(Linked List) file 졸리운_곰 2020.03.30 325
대표 김성준 주소 : 경기 용인 분당수지 U타워 등록번호 : 142-07-27414
통신판매업 신고 : 제2012-용인수지-0185호 출판업 신고 : 수지구청 제 123호 개인정보보호최고책임자 : 김성준 sjkim70@stechstar.com
대표전화 : 010-4589-2193 [fax] 02-6280-1294 COPYRIGHT(C) stechstar.com ALL RIGHTS RESERVED