[ollama] Ollama 및 Next.js를 사용한 로컬 GPT : Local GPT with Ollama and Next.js

Ollama 및 Next.js를 사용한 로컬 GPT


소개

오늘날 AI가 발전함에 따라 컴퓨터에 생성 AI 모델을 설정하여 챗봇을 만드는 것이 쉬워졌습니다.

이 문서에서는 Ollama와 Next.js를 사용하여 시스템에 챗봇을 설정하는 방법을 살펴보겠습니다.

Ollama 설정

먼저 시스템에 Ollama를 설정해 보겠습니다. ollama.com을ollama 방문하여 OS에 맞게 다운로드합니다. 그러면 터미널/명령 프롬프트에서 명령을 사용할 수 있습니다 .

명령을 사용하여 Ollama 버전을 확인하세요. Ollama 라이브러리 페이지ollama -v
에서 모델 목록을 확인하세요 .

모델을 다운로드하고 실행하세요

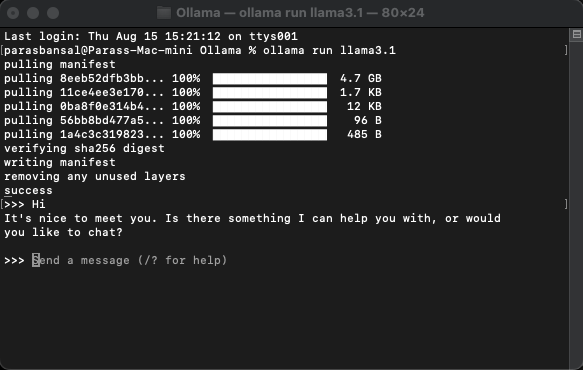
모델을 다운로드하고 실행하려면 다음 명령을 실행하세요. ollama run <model_name>
예: ollama run llama3.1또는ollama run gemma2

터미널에서 바로 모델과 채팅할 수 있습니다.
01 https___dev-to-uploads.s3.amazonaws.com_uploads_articles_zd1tsw2fek8syckli5tr.png


웹 애플리케이션 설정

Next.js에 대한 기본 설정

  • 최신 버전의 Node.js를 다운로드하고 설치하세요
  • 원하는 폴더로 이동한 후 npx create-next-app@latestNext.js 프로젝트를 생성합니다.
  • 보일러플레이트 코드를 생성하기 위해 몇 가지 질문을 할 것입니다. 이 튜토리얼에서는 모든 것을 기본값으로 유지합니다.
  • 선택한 코드 편집기에서 새로 만든 프로젝트를 엽니다. VS Code를 사용할 것입니다.

종속성 설치

ollama를 사용하려면 설치해야 하는 npm 패키지가 몇 가지 있습니다.

  1. vercel의 ai입니다 .
  2. Ollama JavaScript 라이브러리는 JavaScript 프로젝트를 Ollama와 통합하는 가장 쉬운 방법을 제공합니다.
  3. ollama-ai-provider는 연결 ai과 ollama협력을 도와줍니다.
  4. react-markdown 채팅 결과는 마크다운 스타일로 포맷되며, 마크다운을 파싱하려면 react-markdown 패키지를 사용할 것입니다.

이러한 종속성을 설치하려면 .을 실행하세요 npm i ai ollama ollama-ai-provider.

채팅 페이지 만들기

그 아래에는 . app/src이라는 파일이 있습니다 page.tsx.

모든 것을 제거하고 기본적인 기능 구성 요소부터 시작해 보겠습니다.

src/app/page.tsx


export default function Home() {
  return (
    <main className="flex min-h-screen flex-col items-center justify-start p-24">
        {/* Code here... */}
    </main>
  );
}


useChat먼저 hook을 가져오는 것으로 시작해 보겠습니다 ai/react.react-markdown


"use client";
import { useChat } from "ai/react";
import Markdown from "react-markdown";


후크를 사용하고 있으므로 이 페이지를 클라이언트 컴포넌트로 변환해야 합니다.

 : 채팅을 위한 별도의 구성 요소를 만들고 이를 호출하여 page.tsx클라이언트 구성 요소 사용을 제한할 수 있습니다.

구성 요소에서 get messagesinputhandleInputChangefrom handleSubmituseChat hook을 사용합니다.


    const { messages, input, handleInputChange, handleSubmit } = useChat();


JSX에서 대화를 시작하기 위해 사용자 입력을 받는 입력 양식을 만듭니다.


  <form onSubmit={handleSubmit} className="w-full px-3 py-2">
    <input
      className="w-full px-3 py-2 border border-gray-700 bg-transparent rounded-lg text-neutral-200"
      value={input}
      placeholder="Ask me anything..."
      onChange={handleInputChange}
    />
  </form>


이것의 장점은 우리가 핸들러를 바로잡거나 입력 값에 대한 상태를 유지할 필요가 없고, useChat후크가 그것을 우리에게 제공한다는 것입니다.

메시지 배열을 반복하여 메시지를 표시할 수 있습니다.


    messages.map((m, i) => (<div key={i}>{m}</div>)


보낸 사람의 역할에 따른 스타일 버전은 다음과 같습니다.


  <div
    className="min-h-[50vh] h-[50vh] max-h-[50vh] overflow-y-auto p-4"
>
    <div className="min-h-full flex-1 flex flex-col justify-end gap-2 w-full pb-4">
      {messages.length ? (
        messages.map((m, i) => {
          return m.role === "user" ? (
            <div key={i} className="w-full flex flex-col gap-2 items-end">
              <span className="px-2">You</span>
              <div className="flex flex-col items-center px-4 py-2 max-w-[90%] bg-orange-700/50 rounded-lg text-neutral-200 whitespace-pre-wrap">
                <Markdown>{m.content}</Markdown>
              </div>
            </div>
          ) : (
            <div key={i} className="w-full flex flex-col gap-2 items-start">
              <span className="px-2">AI</span>
              <div className="flex flex-col max-w-[90%] px-4 py-2 bg-indigo-700/50 rounded-lg text-neutral-200 whitespace-pre-wrap">
                <Markdown>{m.content}</Markdown>
              </div>
            </div>
          );
        })
      ) : (
        <div className="text-center flex-1 flex items-center justify-center text-neutral-500 text-4xl">
          <h1>Local AI Chat</h1>
        </div>
      )}
    </div>
  </div>


전체 파일을 살펴보자
src/app/page.tsx


"use client";
import { useChat } from "ai/react";
import Markdown from "react-markdown";

export default function Home() {
    const { messages, input, handleInputChange, handleSubmit } = useChat();
    return (
        <main className="flex min-h-screen flex-col items-center justify-start p-24">
            <div className="flex flex-col w-full max-w-lg rounded-lg bg-white/10">
              <form onSubmit={handleSubmit} className="w-full px-3 py-2">
                <input
                  className="w-full px-3 py-2 border border-gray-700 bg-transparent rounded-lg text-neutral-200"
                  value={input}
                  placeholder="Ask me anything..."
                  onChange={handleInputChange}
                />
              </form>
            </div>
        </main>
    );
}


이것으로 프런트엔드 부분은 완료되었습니다. 이제 API를 처리해 보겠습니다.

API 처리

route.ts먼저 inside를 만들어 보겠습니다 app/api/chat.
Next.js 명명 규칙에 따라 엔드포인트에서 요청을 처리할 수 있습니다 localhost:3000/api/chat.

src/app/api/chat/route.ts


import { createOllama } from "ollama-ai-provider";
import { streamText } from "ai";

const ollama = createOllama();

export async function POST(req: Request) {
  const { messages } = await req.json();

  const result = await streamText({
    model: ollama("llama3.1"),
    messages,
  });
  return result.toDataStreamResponse();
}


위 코드는 기본적으로 ollama와 vercel ai를 사용하여 데이터를 응답으로 스트리밍합니다.

  • createOllama시스템에 설치된 모델과 통신할 ollama 인스턴스를 생성합니다.
  • POST/api/chat함수는 메서드를 갖춘 엔드포인트 의 경로 핸들러입니다 post.
  • 요청 본문에는 이전 모든 메시지 목록이 들어 있습니다. 따라서 제한하는 것이 좋습니다. 그렇지 않으면 시간이 지남에 따라 성능이 저하됩니다. 이 예에서 ollama 함수는 "llama3.1"을 모델로 사용하여 메시지 배열을 기반으로 응답을 생성합니다.

시스템의 생성 AI

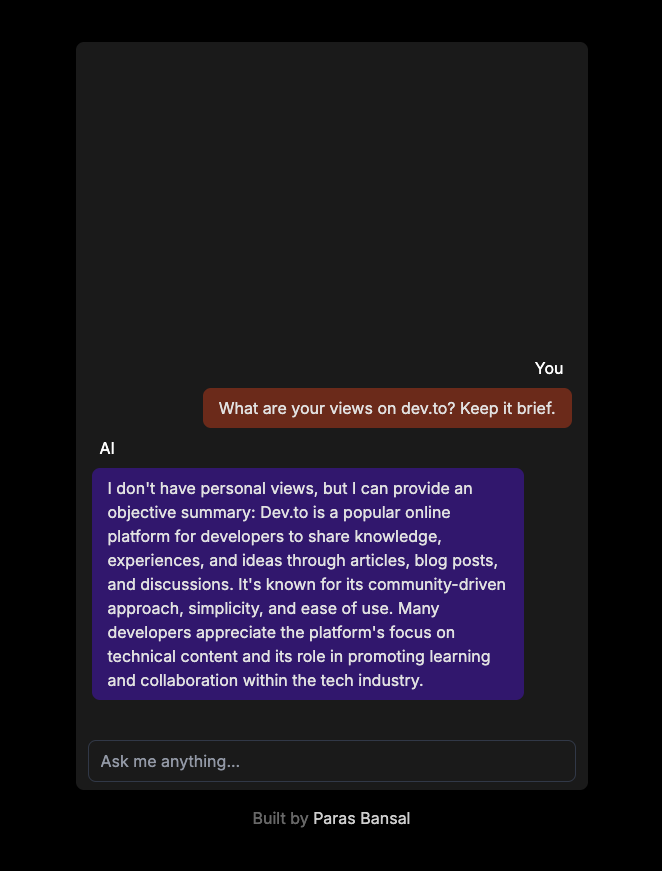
npm run dev개발 모드에서 서버를 시작하려면 실행하세요 .
브라우저를 열고 localhost:3000결과를 보려면 로 이동하세요.
모든 것이 제대로 구성되었다면, 당신은 당신만의 챗봇과 대화할 수 있을 것입니다.
02 https___dev-to-uploads.s3.amazonaws.com_uploads_articles_73wlkc19a5lio2s1r2s2.png


소스 코드는 여기에서 확인할 수 있습니다: https://github.com/parasbansal/ai-chat  ai-chat-main.zip

질문이 있으면 댓글로 남겨주세요. 답변하도록 노력하겠습니다.

[출처] https://dev.to/parasbansal/local-gpt-with-ollama-and-nextjs-534o


Local GPT with Ollama and Next.js


Introduction

With today's AI advancements, it's easy to setup a generative AI model on your computer to create a chatbot.

In this article we will see how a you can setup a chatbot on your system using Ollama and Next.js

경축! 아무것도 안하여 에스천사게임즈가 새로운 모습으로 재오픈 하였습니다.
어린이용이며, 설치가 필요없는 브라우저 게임입니다.
https://s1004games.com

Setup Ollama

Let's start by setting up Ollama on our system. Visit ollama.com and download it for your OS. This will allow us to use ollama command in the terminal/command prompt.

Check Ollama version by using command ollama -v
Check out the list of models on Ollama library page.

Download and run a model

To download and run a model, run command ollama run <model_name>
Example: ollama run llama3.1 or ollama run gemma2

You will be able to chat with the model right in the terminal.

01 https___dev-to-uploads.s3.amazonaws.com_uploads_articles_zd1tsw2fek8syckli5tr.png


Setup web application

Basic setup for Next.js

  • Download and install latest version of Node.js
  • Navigate to a desired folder and run npx create-next-app@latest to generate Next.js project.
  • It will ask some questions to generate boilerplate code. For this tutorial, we will keep everything default.
  • Open the newly created project in your code editor of choice. We are going to use VS Code.

Installing dependencies

There are few npm packages that needs to be installed to use the ollama.

  1. ai from vercel.
  2. ollama The Ollama JavaScript library provides the easiest way to integrate your JavaScript project with Ollama.
  3. ollama-ai-provider helps connect ai and ollama together.
  4. react-markdown Chat results will be formatted in markdown style, to parse markdown we are going to use react-markdown package.

To install these dependencies run npm i ai ollama ollama-ai-provider.

Create chat page

Under app/src there is a file named page.tsx.

Let's remove everything in it and start with the basic functional component:

src/app/page.tsx


export default function Home() {
  return (
    <main className="flex min-h-screen flex-col items-center justify-start p-24">
        {/* Code here... */}
    </main>
  );
}


Let's start by importing useChat hook from ai/react and react-markdown


"use client";
import { useChat } from "ai/react";
import Markdown from "react-markdown";


Because we are using a hook, we need to convert this page to to a client component.

Tip: You can create a separate component for chat and call it in the page.tsx for limiting client component usage.

In the component get messagesinputhandleInputChange and handleSubmit from useChat hook.


    const { messages, input, handleInputChange, handleSubmit } = useChat();


In JSX, create an input form to get the user input in order to initiate conversation.


  <form onSubmit={handleSubmit} className="w-full px-3 py-2">
    <input
      className="w-full px-3 py-2 border border-gray-700 bg-transparent rounded-lg text-neutral-200"
      value={input}
      placeholder="Ask me anything..."
      onChange={handleInputChange}
    />
  </form>


The good think about this is we don't need to right the handler or maintain a state for input value, the useChat hook provide it to us.

We can display the messages by looping through the messages array.


    messages.map((m, i) => (<div key={i}>{m}</div>)


The styled version based on the role of the sender looks like this:


  <div
    className="min-h-[50vh] h-[50vh] max-h-[50vh] overflow-y-auto p-4"
>
    <div className="min-h-full flex-1 flex flex-col justify-end gap-2 w-full pb-4">
      {messages.length ? (
        messages.map((m, i) => {
          return m.role === "user" ? (
            <div key={i} className="w-full flex flex-col gap-2 items-end">
              <span className="px-2">You</span>
              <div className="flex flex-col items-center px-4 py-2 max-w-[90%] bg-orange-700/50 rounded-lg text-neutral-200 whitespace-pre-wrap">
                <Markdown>{m.content}</Markdown>
              </div>
            </div>
          ) : (
            <div key={i} className="w-full flex flex-col gap-2 items-start">
              <span className="px-2">AI</span>
              <div className="flex flex-col max-w-[90%] px-4 py-2 bg-indigo-700/50 rounded-lg text-neutral-200 whitespace-pre-wrap">
                <Markdown>{m.content}</Markdown>
              </div>
            </div>
          );
        })
      ) : (
        <div className="text-center flex-1 flex items-center justify-center text-neutral-500 text-4xl">
          <h1>Local AI Chat</h1>
        </div>
      )}
    </div>
  </div>


Let's take a look at the whole file
src/app/page.tsx


"use client";
import { useChat } from "ai/react";
import Markdown from "react-markdown";

export default function Home() {
    const { messages, input, handleInputChange, handleSubmit } = useChat();
    return (
        <main className="flex min-h-screen flex-col items-center justify-start p-24">
            <div className="flex flex-col w-full max-w-lg rounded-lg bg-white/10">
              <form onSubmit={handleSubmit} className="w-full px-3 py-2">
                <input
                  className="w-full px-3 py-2 border border-gray-700 bg-transparent rounded-lg text-neutral-200"
                  value={input}
                  placeholder="Ask me anything..."
                  onChange={handleInputChange}
                />
              </form>
            </div>
        </main>
    );
}


With this, the frontend part is complete. Now let's handle the API.

Handling API

Let's start by creating route.ts inside app/api/chat.
Based on the Next.js naming convention, it will allow us to handle the requests on localhost:3000/api/chat endpoint.

src/app/api/chat/route.ts


import { createOllama } from "ollama-ai-provider";
import { streamText } from "ai";

const ollama = createOllama();

export async function POST(req: Request) {
  const { messages } = await req.json();

  const result = await streamText({
    model: ollama("llama3.1"),
    messages,
  });
  return result.toDataStreamResponse();
}


The above code is basically using the ollama and vercel ai to stream the data back as response.

  • createOllama creates an instance of the ollama which will communicate with the model installed on the system.
  • POST function is the route handler on the /api/chat endpoint with post method.
  • The request body contains the list of all previous messages. So it's a good idea to limit it or the performance will degrade over time. In this example, the ollama function takes "llama3.1" as the model to generate the response based on the messages array.

Generative AI on your system

Run npm run dev to start the server in the development mode.
Open the browser and go to localhost:3000 to see the results.
If everything is configured properly, you will be able to talk to your very own chatbot.

02 https___dev-to-uploads.s3.amazonaws.com_uploads_articles_73wlkc19a5lio2s1r2s2.png


You can find the source code here: https://github.com/parasbansal/ai-chat ai-chat-main.zip

Let me know if you have any questions in the comments, I'll try to answer those.


[출처] https://dev.to/parasbansal/local-gpt-with-ollama-and-nextjs-534o


본 웹사이트는 광고를 포함하고 있습니다.
광고 클릭에서 발생하는 수익금은 모두 웹사이트 서버의 유지 및 관리, 그리고 기술 콘텐츠 향상을 위해 쓰여집니다.
번호 제목 글쓴이 날짜 조회 수
12 [알아봅시다] [Hugging Face 여행] ???? 인터넷 없이 내 노트북에 작동하는 AI 챗봇 5분 완성 ???? Llama cpp와 Gradio 활용 ????⚡️ 졸리운_곰 2026.03.15 27
11 [알아봅시다] Ollama 사용법: Ollama를 이용한 로컬 LLM 완전 초보 가이드 file 졸리운_곰 2025.10.18 121
10 [Ollama 응용개발] 로컬 환경에서 API 호스팅을 위한 Ollama 설정 종합 가이드 file 졸리운_곰 2025.04.22 76
9 소형 언어 모델 (SLM)을 로컬 및 오프라인으로 실행하기 file 졸리운_곰 2025.01.25 123
8 [Ollama 응용개발] Ollama에 없는 모델 내가 만들어 사용하기 (2) file 졸리운_곰 2025.01.16 51
7 [Ollama 응용개발] Ollama에 없는 모델 내가 만들어 사용하기 (1) file 졸리운_곰 2025.01.16 74
6 [ollama] AI 사라, 사랑스럽고 배려심 많은 여자친구 : AI Sarah, A Loving And Caring Girlfriend 졸리운_곰 2025.01.11 119
» [ollama] Ollama 및 Next.js를 사용한 로컬 GPT : Local GPT with Ollama and Next.js file 졸리운_곰 2025.01.09 104
4 [인공지능 기술] Ollama(올라마) 집중분석 file 졸리운_곰 2024.12.25 153
3 [인공지능 기술] Polyglot-ko-1.3b-lite EleutherAI/polyglot-ko-1.3b를 기반으로, PEFT 기법 중에 하나인 QLoRA로 미세조정한 모델입니다. file 졸리운_곰 2024.12.25 90
2 [인공지능 기술] Ollama #4: AutoGen Studio 를 활용한 로컬LLM + 다중 AI 에이전트 사용 file 졸리운_곰 2024.12.25 81
1 [인공지능 기술] AutoGen 를 사용하여 AI 에이전트 구현 Ollama + llama3 + AutoGen file 졸리운_곰 2024.12.25 72
대표 김성준 주소 : 경기 용인 분당수지 U타워 등록번호 : 142-07-27414
통신판매업 신고 : 제2012-용인수지-0185호 출판업 신고 : 수지구청 제 123호 개인정보보호최고책임자 : 김성준 sjkim70@stechstar.com
대표전화 : 010-4589-2193 [fax] 02-6280-1294 COPYRIGHT(C) stechstar.com ALL RIGHTS RESERVED