
도커와 젠킨스를 이용한 지속적 배포
Tutorial: Continuous Delivery with Docker and Jenkins
POSTED ON NOV 7, 2015. UPDATED ON JAN 20, 2019
Introducing Continuous Delivery means to automate the delivery process and to release our application frequently. This way, we improve the reliability of the release process, reduce the risk and get feedback faster. However, setting up a Continuous Delivery pipeline can be difficult in the beginning. In this step by step tutorial I will show you how to configure a simple Continuous Delivery pipeline using Git, Docker, Maven and Jenkins.
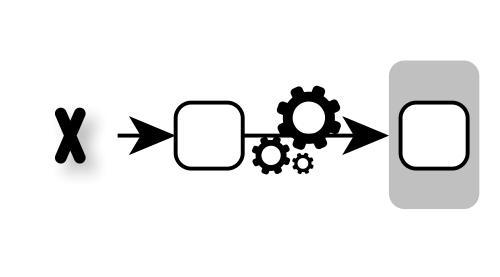
Introduction to Continuous Delivery
Traditional Release Cycle
Following the “old-school” release approach means to ship a release after a certain amount of time (let’s say 6 months). We have to package the release, test it, set up or update the necessary infrastructure and finally deploy it on the server.
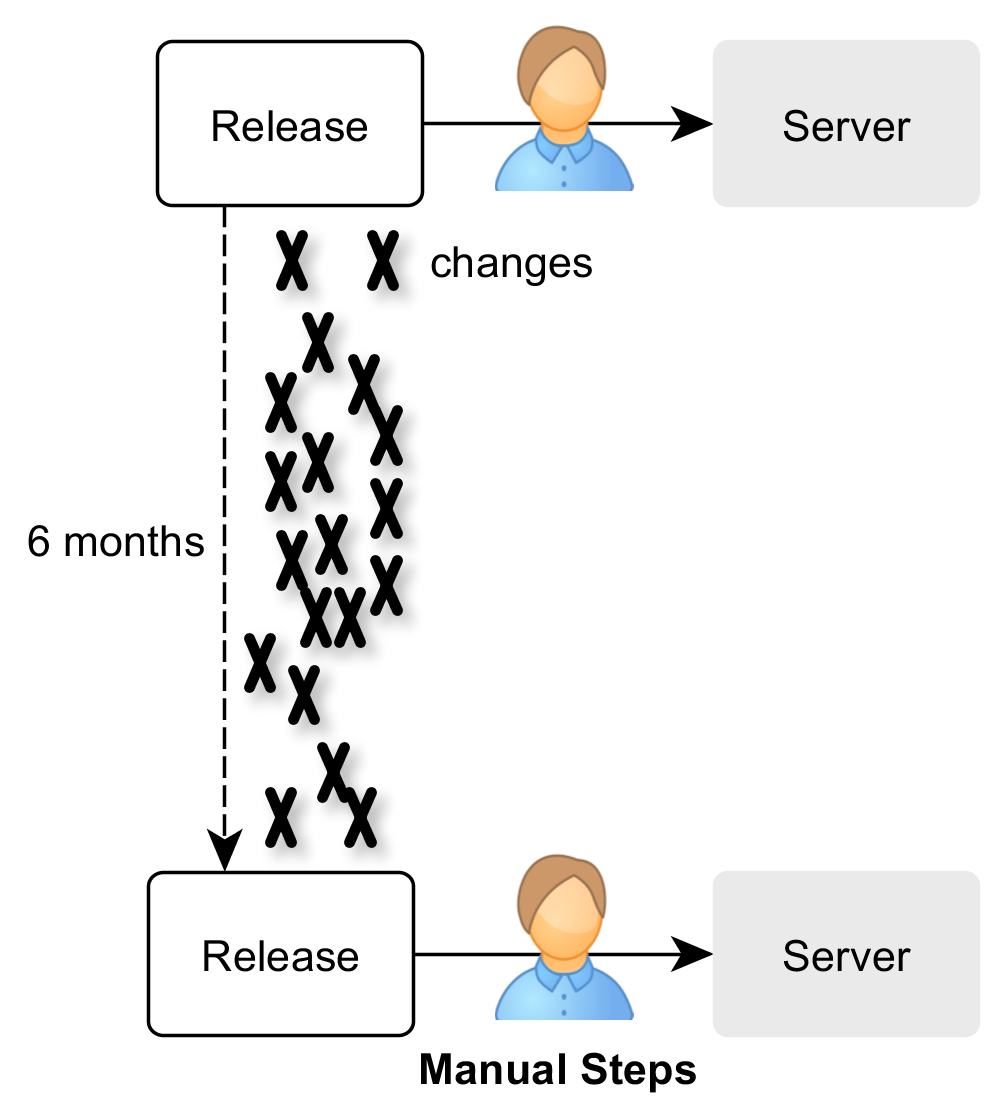
Traditional release cycle: rare releases and manual release process
What are the problems about this approach?
- The release process is done rarely. Consequently, we are barely practiced in releasing. Mistakes can happen more easily.
- Manual steps. The release process consists of a lot of steps which have to be performed manually (shutdown, set up/update infrastructure, deployment, restart and manual tests). The consequences:
- Mistakes are more likely to happen when executing these steps manually.
- The whole release process is more laborious, cumbersome and takes more time.
- There have been a lot of changes performed since the last release 6 months ago. It’s likely that
- something will go wrong when trying to put the different components together (e.g. version conflicts, side-effects, incompatible components) or
- that there are bugs in the application itself.
- But it is hard to see what change is causing the problem, because there have been a lot of changes. The point is that those problems are discovered too late. We are getting feedback too late, because we are trying to release the application too late in the development process and not regularly. We are only trying to release, when we really want to create a release.
All in all, we have a high risk that something will go wrong during our release process or that the application will contain bugs. Releases are dangerous and scary, aren’t they? That’s probably why releases are done so rarely. But doing them rarely makes them even more dangerous and scary. What can we do instead?
Continuous Delivery
“If it hurts do it more often and bring the pain forward.”
A Practical Guide to Continuous Deliveryby Eberhard Wolff
We reduce the pain of releasing by releasing more often. Therefore, we have to automate the whole release process (including package release, set up/update infrastructure, deploy, final tests) and eliminate all manual steps. This way we can increase the release frequency.
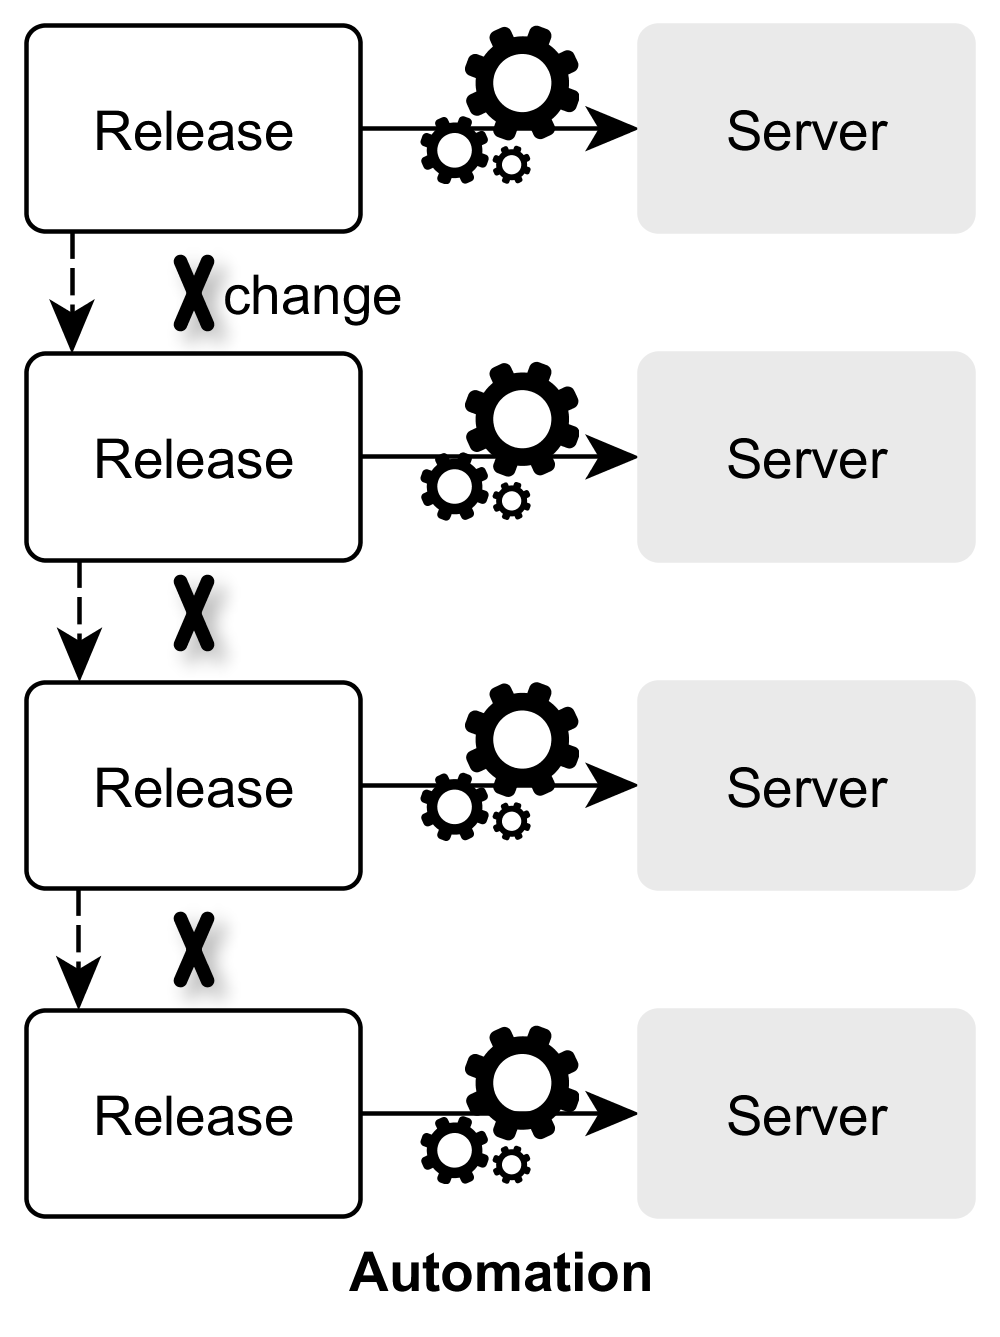
Continuous Delivery: Increased release frequency and automation of the release process.
What are the benefits of this approach?
- Fewer mistakes can happen during an automated process in comparison to a manual one.
- There are fewer changes done between two releases. The danger of mistakes is quite small and we can easily track them back to the causing change.
- We don’t package and ship our application at the end of a development phase. We are doing it early and frequently. This way we’ll discover problems in the release process very soon.
- Due to the automated release process we can bring business value faster into production and therefore reduce the time-to-market.
- Deploying our application into production is low-risk, because we just execute the same automated process for the production as we did for the tests or the pre-production system.
All in all, Continuous Delivery is about
- reduced risks,
- increased reliability,
- faster feedback,
- accelerated release speed and time-to-market.
Continuous Delivery using Docker
From the technical point of view Continuous Delivery revolves around the automation and optimization of the delivery pipeline. A simple delivery pipeline could look like this:
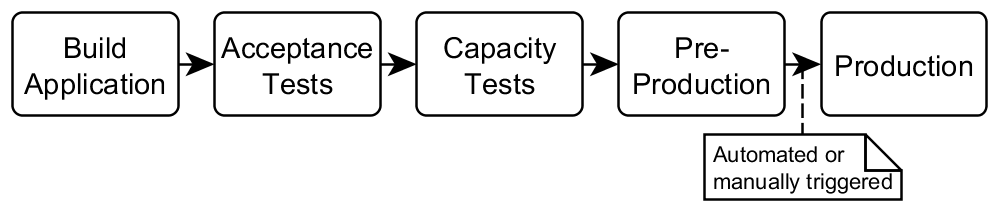
A Delivery Pipeline
The big challenge is the automated setup of the infrastructure and environment, our application needs to run. And we need this infrastructure for _every stage_ of our delivery pipeline. Fortunately, Docker is great at creating reproducible infrastructures. Using Docker we create an image that contains our application and the necessary infrastructure (for instance the application server, JRE, VM arguments, files, permissions). The only thing we have to do is to execute the image in every stage of the delivery pipeline and our application will be up and running. Moreover, Docker is a (lightweight) virtualization, so we can easily clean up old versions of the application and its infrastructure just by stopping the Docker container.
Setting up a Simple Continuous Delivery Pipeline with Docker
Update October 2016
Please mind that some information in this post are a little bit dated. Some points:
- Please take a look at my post about Improving your Continuous Integration Setup with Docker and GitLab-CI
- Jenkins 1.0 doesn’t support delivery pipelines as a first class citizen. Consider using Jenkins 2.0 or GitLab-CI instead.
- Use Docker-Compose instead of the clumsy shell scripts calling
docker run.
Preconditions
I used Ubuntu 14.04 LTS and Docker 1.8.2 for this tutorial. I highly recommend to use a Linux distribution in order to run Docker natively. Sure, you can try docker-toolbox/boot2docker for Windows and Mac OS X. But I wasn´t happy with this tool and the additional VM layer in daily use.
Sources
You can find all sources I used for this tutorial on my Github repository.
The Example Application and the Advantage of Using Runnable Fat Jars
Our example application “hello-world-app” is a simple RESTful microservice created with Dropwizard. Dropwizard let us create a runnable fat jar which already includes an embedded jetty. So we only need to execute the jar in order to start our microservice. This simplifies the necessary infrastructure (no servlet container has to be installed in advance; no deployment of the war into the servlet container) and the deployment process (just copy the jar and execute it). Consequently the architectural decision to use runnable fat jars significantly eases the setup of a Continuous Delivery pipeline.
Big Picture
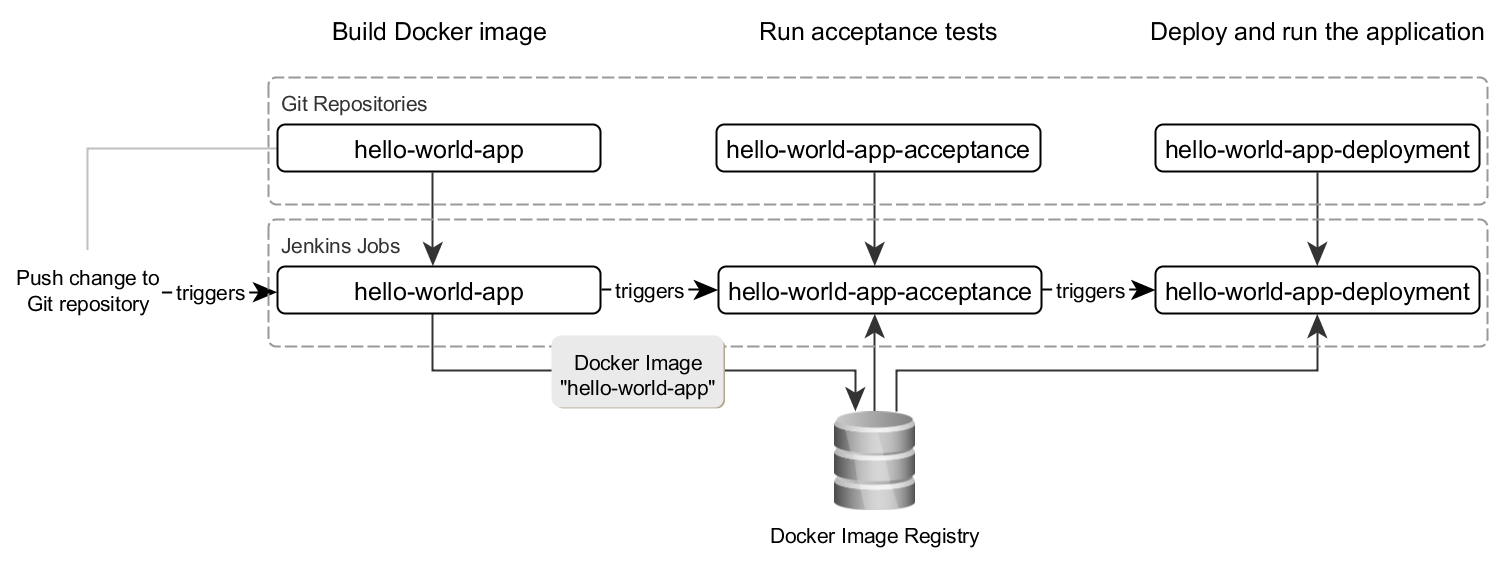
Big Picture for our simple Continuous Delivery pipeline
We will need the following projects:


- hello-world-app: creates the Docker image with the microservice jar using Maven and push the image to our Docker Registry.
- hello-world-app-acceptance: runs some tests against the Docker image, which is retrieved from the Docker Registry
- hello-world-app-deployment: runs the Docker image from the Docker Registry
During this tutorial we will set up
- a Git repository (using GitLab) for our sources,
- a Docker Registry to store our built images and
- a Jenkins to create our Continuous Delivery pipeline.
We won’t clutter up our local machine by installing these components directly. Instead, we start them as Docker containers. This way, we can easily clean up once we are done. We see that besides using Docker to ship our application itself, it is also a great tool to create infrastructure for build and development.
Warning: Technical Spike
Please note, that this tutorial is a simplified demonstration of a Continuous Delivery pipeline. It’s just a technical spike. Some important issues (databases, blue/green deployment, canary releasing, security, encryption, IP handling, distribution, communication between the containers, multiple Jenkins nodes) are poorly realized or not covered at all. But consider this spike as a starting point for your own pipeline.
Step by Step
First of all, you need the IP of your host machine (like 192.168.35.217). Therefore, run ip route to get the IP of the host machine. Look for the IP after the “src” keyword. You can test the IP by trying to ping the IP within a container by running docker exec -it bash (getting bash inside the container) and then ping <IpOfHostMachine>
The Commit Stage
Check out my Github repository using
git clone https://github.com/phauer/continuous-delivery-playground.git
cd continuous-delivery-playground
Let’s start GitLab:
./1startGitLab.sh
Wait for startup. Create and configure our Git projects:
- Open GitLab on
http://localhost:10080/, login as root (password: 5iveL!fe), change password to 12345678 - Create the projects ‘hello-world-app’, ‘hello-world-app-acceptance’ and ‘hello-world-app-deployment’
- We like to notify Jenkins about changes. Therefore go to
http://localhost:10080/root/hello-world-app/hooksand create a webhook for push events with the URLhttp://<IpOfHostMachine>:8090/git/notifyCommit?url=http://<IpOfHostMachine>:10080/root/hello-world-app.git
Next we commit the projects to our Git repository.
./2createProjectsAndCommitToGitLab.sh
Next we launch the Docker Registry.
./3startDockerRegistry.sh
You can see the saved images in the registry by calling http://localhost:5000/v2/_catalog .
Configure the Docker daemon to use an unsecure connection for accessing our local Docker Registry. Therefore, add –insecure-registry <IpOfHostMachine>:5000 to the DOCKER_OPS variable in /etc/default/docker.
Now we are ready to start our Continuous Delivery (!) server Jenkins: :-)
./4startJenkins.sh
Configure Jenkins as follows:
- Installations:
- Open Jenkins on
http://localhost:8090/configureand install Maven and JDK if not already done. - Install the “GIT Plugin” on
http://localhost:8090/pluginManager/availableif not already done.
- Open Jenkins on
- Create the Maven job ‘hello-world-app’ and configure it as follows:
- Configure the Git repository in the job:
http://<IpOfHostMachine>:10080/root/hello-world-app.git. Also configure your GitLab credentials here (root, 12345678). - Build > Goals and options:
deploy -Ddocker.registry.name=<IpOfHostMachine>:5000/ - Build Triggers > Poll SCM check
- Configure the Git repository in the job:
- Press ‘Build Now’
- After the build has finished, you should find the created image in your local Docker Registry. Verify this by calling
http://localhost:5000/v2/_catalogin your browser or take a look into the ~/docker-registry-data folder.
- After the build has finished, you should find the created image in your local Docker Registry. Verify this by calling
Acceptance Test Stage
After the Docker image has been created in the Commit Stage, we’ll run acceptance tests against the Docker image.
- First of all, install “Build Pipeline Plugin” in Jenkins. The plugin provides an overview over our dependent jobs and our Continuous Delivery pipeline.
- Create Job ‘hello-world-app-acceptance’ in Jenkins
- Git URL:
http://<IpOfHostMachine>:10080/root/hello-world-app-acceptance.git - Build > Goals and options:
verify -Ddocker.host.address=<IpOfHostMachine> - Build Triggers > Poll SCM check
- Build after other project are built: hello-world-app
- Git URL:
- Create a build pipeline view
- Create a View and select “Build Pipeline View”
- Select Initial Job: “hello-world-app”
- Open the created build pipeline view
- Hit “Run” and you can see your project is going through the build pipeline consisting of 2 stages. Nice! :-)
Deployment Stage
Finally, we want to run our built and tested docker image.
- Create a Jenkins job “hello-world-app-deployment” as a freestyle project
- Git-URL:
http://<IpOfHostMachine>:10080/root/hello-world-app-deployment.git - Build after other projects are built: hello-world-app-acceptance
- Add build step: “Execute shell” and insert
./runDockerContainer.sh
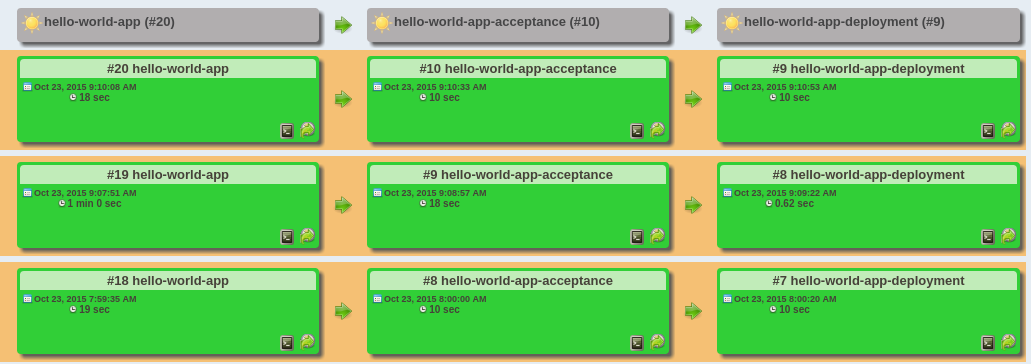
The Jenkins Plugin ‘Build Pipeline’ showing our created Continuous Delivery pipeline.
Voila, that’s it! We successfully set up a simple Continuous Delivery pipeline. Every time we push a change to our hello-world-app Git project, the application goes through the whole pipeline and is finally deployed in “production”. This way we get feedback quickly, increase the reliability of our delivery process and reduce the risk of releasing (due to automation).
Further Readings
- I highly recommend the book A Practical Guide to Continuous Delivery by Eberhard Wolff.
- Version Numbers for Continuous Delivery with Maven and Docker
[출처] https://phauer.com/2015/tutorial-continuous-delivery-with-docker-jenkins/
광고 클릭에서 발생하는 수익금은 모두 웹사이트 서버의 유지 및 관리, 그리고 기술 콘텐츠 향상을 위해 쓰여집니다.
