
- 전체
- android studio
- Android SDK
- Android NDK
- Android ADK
- Android Etc. Lib.
- Android dalvik VM
- Android 보안
- PhoneGap
- AOSP 개발
- MIT App Inventor 2
- kivy (python)
- ionic framework
- Kotlin (코틀린)
- React Native
Android Sync SQLite Database with Server using PHP and MySQL
Lets learn Android Sync SQLite Database with Server. Assume we have to send some information from the application to our webserver and internet is not available on the device at a particular time. So instead of giving error to the user that internet is not available we can store the data to SQLite and send it later automatically when the internet is available. And this is what we are going to learn in this Android Sync SQLite Database with Server Tutorial.
Contents [hide]
- 1 Android Sync Sqlite Database with Server Demo
- 2 Creating Web Service and MySQL Database
- 3 Android Sync SQLite Database with Server
- 4 Testing the Application
- 5 Download Source Code
Android Sync Sqlite Database with Server Demo
- You can first see what we are going to learn in this video where I am showing the application.
- Now lets move ahead and start Android Sync Sqlite Database with Server.
Creating Web Service and MySQL Database
Creating Database
- I have the following database. I am using XAMPP you can use anything you want.

- So we have the database table. Now we will create a php script that will handle the insertion to the database.
Creating Web Service
Creating Script
- Create folder in your root directory (in my case it is htdocs).
- Now create a php file inside the folder, I have created saveName.php. And write the following code.
|
1
2
3
4
5
6
7
8
9
10
11
12
13
14
15
16
17
18
19
20
21
22
23
24
25
26
27
28
29
30
31
32
33
34
35
36
37
38
39
40
41
42
43
44
45
46
47
48
49
50
51
52
|
<?php
/*
* Database Constants
* Make sure you are putting the values according to your database here
*/
define('DB_HOST','localhost');
define('DB_USERNAME','root');
define('DB_PASSWORD','');
define('DB_NAME', 'android');
//Connecting to the database
$conn = new mysqli(DB_HOST, DB_USERNAME, DB_PASSWORD, DB_NAME);
//checking the successful connection
if($conn->connect_error) {
die("Connection failed: " . $conn->connect_error);
}
//making an array to store the response
$response = array();
//if there is a post request move ahead
if($_SERVER['REQUEST_METHOD']=='POST'){
//getting the name from request
$name = $_POST['name'];
//creating a statement to insert to database
$stmt = $conn->prepare("INSERT INTO names (name) VALUES (?)");
//binding the parameter to statement
$stmt->bind_param("s", $name);
//if data inserts successfully
if($stmt->execute()){
//making success response
$response['error'] = false;
$response['message'] = 'Name saved successfully';
}else{
//if not making failure response
$response['error'] = true;
$response['message'] = 'Please try later';
}
}else{
$response['error'] = true;
$response['message'] = "Invalid request";
}
//displaying the data in json format
echo json_encode($response);
|
Testing Script
- Now its time to test the script we created. So in my case the URL is http://localhost/SqliteSync/saveName.php
- I am using POSTMAN to test the script and you can see it in below screenshot.
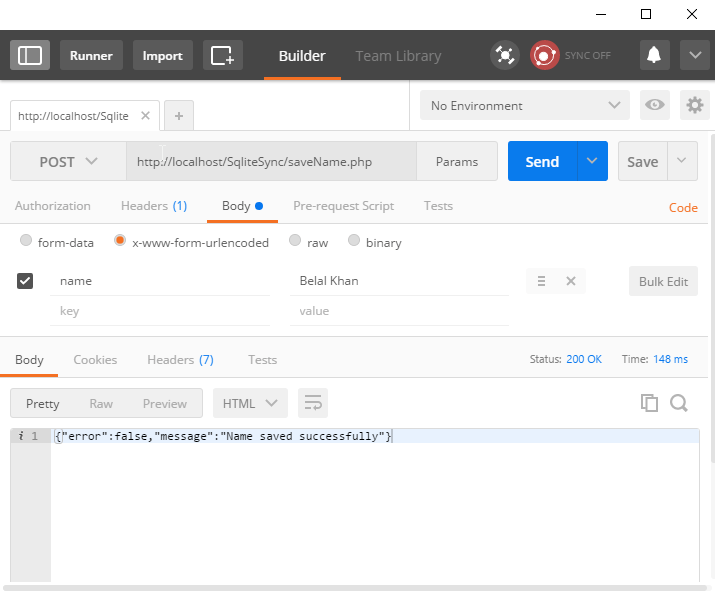
- As you can see the script is working fine. Now lets move ahead in android project.
Android Sync SQLite Database with Server
Creating Android Project
- Create a new project.
- I have created AndroidMySQLSync with an Empty Activity.
Adding Permissions
- We need the following permissions so first add these to AndroidManifest.xml.
|
1
2
|
<uses-permission android:name="android.permission.INTERNET" />
<uses-permission android:name="android.permission.ACCESS_NETWORK_STATE" />
|
Adding Dependencies
- For network requests I am going to use Volley. So add the following line inside dependencies block of your app level build.gradle file.
|
1
2
3
4
5
6
7
8
9
10
11
12
13
|
dependencies {
compile fileTree(dir: 'libs', include: ['*.jar'])
androidTestCompile('com.android.support.test.espresso:espresso-core:2.2.2', {
exclude group: 'com.android.support', module: 'support-annotations'
})
compile 'com.android.support:appcompat-v7:25.0.1'
//add this line
compile 'com.android.volley:volley:1.0.0'
testCompile 'junit:junit:4.12'
}
|
Handling SQLite Operations
- In this case we have to use both SQLite and MySQL. So a class named DatabaseHelper.java and write the following code.
|
1
2
3
4
5
6
7
8
9
10
11
12
13
14
15
16
17
18
19
20
21
22
23
24
25
26
27
28
29
30
31
32
33
34
35
36
37
38
39
40
41
42
43
44
45
46
47
48
49
50
51
52
53
54
55
56
57
58
59
60
61
62
63
64
65
66
67
68
69
70
71
72
73
74
75
76
77
78
79
80
81
82
83
84
85
86
87
88
89
90
91
92
93
94
95
96
97
98
99
100
101
102
103
|
package net.simplifiedcoding.androidmysqlsync;
import android.content.ContentValues;
import android.content.Context;
import android.database.Cursor;
import android.database.sqlite.SQLiteDatabase;
import android.database.sqlite.SQLiteOpenHelper;
/**
* Created by Belal on 1/27/2017.
*/
public class DatabaseHelper extends SQLiteOpenHelper {
//Constants for Database name, table name, and column names
public static final String DB_NAME = "NamesDB";
public static final String TABLE_NAME = "names";
public static final String COLUMN_ID = "id";
public static final String COLUMN_NAME = "name";
public static final String COLUMN_STATUS = "status";
//database version
private static final int DB_VERSION = 1;
//Constructor
public DatabaseHelper(Context context) {
super(context, DB_NAME, null, DB_VERSION);
}
//creating the database
@Override
public void onCreate(SQLiteDatabase db) {
String sql = "CREATE TABLE " + TABLE_NAME
+ "(" + COLUMN_ID +
" INTEGER PRIMARY KEY AUTOINCREMENT, " + COLUMN_NAME +
" VARCHAR, " + COLUMN_STATUS +
" TINYINT);";
db.execSQL(sql);
}
//upgrading the database
@Override
public void onUpgrade(SQLiteDatabase db, int oldVersion, int newVersion) {
String sql = "DROP TABLE IF EXISTS Persons";
db.execSQL(sql);
onCreate(db);
}
/*
* This method is taking two arguments
* first one is the name that is to be saved
* second one is the status
* 0 means the name is synced with the server
* 1 means the name is not synced with the server
* */
public boolean addName(String name, int status) {
SQLiteDatabase db = this.getWritableDatabase();
ContentValues contentValues = new ContentValues();
contentValues.put(COLUMN_NAME, name);
contentValues.put(COLUMN_STATUS, status);
db.insert(TABLE_NAME, null, contentValues);
db.close();
return true;
}
/*
* This method taking two arguments
* first one is the id of the name for which
* we have to update the sync status
* and the second one is the status that will be changed
* */
public boolean updateNameStatus(int id, int status) {
SQLiteDatabase db = this.getWritableDatabase();
ContentValues contentValues = new ContentValues();
contentValues.put(COLUMN_STATUS, status);
db.update(TABLE_NAME, contentValues, COLUMN_ID + "=" + id, null);
db.close();
return true;
}
/*
* this method will give us all the name stored in sqlite
* */
public Cursor getNames() {
SQLiteDatabase db = this.getReadableDatabase();
String sql = "SELECT * FROM " + TABLE_NAME + " ORDER BY " + COLUMN_ID + " ASC;";
Cursor c = db.rawQuery(sql, null);
return c;
}
/*
* this method is for getting all the unsynced name
* so that we can sync it with database
* */
public Cursor getUnsyncedNames() {
SQLiteDatabase db = this.getReadableDatabase();
String sql = "SELECT * FROM " + TABLE_NAME + " WHERE " + COLUMN_STATUS + " = 0;";
Cursor c = db.rawQuery(sql, null);
return c;
}
}
|
Handling Volley RequestQueue
- We are going to use Volley for http request. So for this we will create a singleton class.
- Create a class named VolleySingleton and write the following code.
|
1
2
3
4
5
6
7
8
9
10
11
12
13
14
15
16
17
18
19
20
21
22
23
24
25
26
27
28
29
30
31
32
33
34
35
36
37
38
39
40
41
42
43
44
45
46
47
|
package net.simplifiedcoding.androidmysqlsync;
import android.content.Context;
import android.graphics.Bitmap;
import android.support.v4.util.LruCache;
import com.android.volley.Request;
import com.android.volley.RequestQueue;
import com.android.volley.toolbox.ImageLoader;
import com.android.volley.toolbox.Volley;
/**
* Created by Belal on 21/09/16.
*/
public class VolleySingleton {
private static VolleySingleton mInstance;
private RequestQueue mRequestQueue;
private static Context mCtx;
private VolleySingleton(Context context) {
mCtx = context;
mRequestQueue = getRequestQueue();
}
public static synchronized VolleySingleton getInstance(Context context) {
if (mInstance == null) {
mInstance = new VolleySingleton(context);
}
return mInstance;
}
public RequestQueue getRequestQueue() {
if (mRequestQueue == null) {
// getApplicationContext() is key, it keeps you from leaking the
// Activity or BroadcastReceiver if someone passes one in.
mRequestQueue = Volley.newRequestQueue(mCtx.getApplicationContext());
}
return mRequestQueue;
}
public <T> void addToRequestQueue(Request<T> req) {
getRequestQueue().add(req);
}
}
|
Building Interface
MainActivity
- Now inside activity_main.xml write the following code.
|
1
2
3
4
5
6
7
8
9
10
11
12
13
14
15
16
17
18
19
20
21
22
23
24
25
26
27
28
29
30
31
32
33
34
35
36
37
38
39
40
|
<?xml version="1.0" encoding="utf-8"?>
<LinearLayout xmlns:android="http://schemas.android.com/apk/res/android"
xmlns:tools="http://schemas.android.com/tools"
android:id="@+id/activity_main"
android:layout_width="match_parent"
android:layout_height="match_parent"
android:orientation="vertical"
android:paddingBottom="@dimen/activity_vertical_margin"
android:paddingLeft="@dimen/activity_horizontal_margin"
android:paddingRight="@dimen/activity_horizontal_margin"
android:paddingTop="@dimen/activity_vertical_margin"
tools:context="net.simplifiedcoding.androidmysqlsync.MainActivity">
<LinearLayout
android:layout_width="match_parent"
android:layout_height="wrap_content"
android:orientation="horizontal">
<EditText
android:id="@+id/editTextName"
android:layout_width="match_parent"
android:layout_height="wrap_content"
android:layout_weight="3"
android:hint="Enter a name" />
<Button
android:id="@+id/buttonSave"
android:layout_width="wrap_content"
android:layout_height="wrap_content"
android:layout_weight="1"
android:text="Save" />
</LinearLayout>
<ListView
android:id="@+id/listViewNames"
android:layout_width="match_parent"
android:layout_height="wrap_content"></ListView>
</LinearLayout>
|


- The above code will generate the following output.
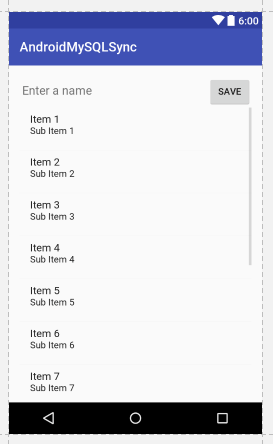
Android Sync SQLite Database with Server
- As you can see we have an EditText, a Button and a ListView.
- Now let me tell you what we are going to do. We will save the Name from EditText and we will also display the saved name in ListView with the Sync Status. So the next part is designing a layout for our Custom ListView.
ListView
- Create an xml file inside layout directory. I have created names.xml.
|
1
2
3
4
5
6
7
8
9
10
11
12
13
14
15
16
17
18
19
20
|
<?xml version="1.0" encoding="utf-8"?>
<RelativeLayout xmlns:android="http://schemas.android.com/apk/res/android"
android:padding="@dimen/activity_horizontal_margin"
android:layout_width="match_parent" android:layout_height="match_parent">
<TextView
android:text="Name"
android:layout_alignParentLeft="true"
android:id="@+id/textViewName"
android:layout_width="wrap_content"
android:layout_height="wrap_content" />
<ImageView
android:background="@drawable/success"
android:layout_alignParentRight="true"
android:id="@+id/imageViewStatus"
android:layout_width="wrap_content"
android:layout_height="wrap_content" />
</RelativeLayout>
|
- As you can see we have a TextView to display the name and an ImageView to display the status.
- Download the icons from the below link, we have two images to display queued or synced.
[download id=”4043″]
- You have to copy the downloaded icons inside drawable folder.
Building ListView
Model Class
- Now create a class Name.java and write the following code.
|
1
2
3
4
5
6
7
8
9
10
11
12
13
14
15
16
17
18
19
20
21
22
23
|
package net.simplifiedcoding.androidmysqlsync;
/**
* Created by Belal on 1/27/2017.
*/
public class Name {
private String name;
private int status;
public Name(String name, int status) {
this.name = name;
this.status = status;
}
public String getName() {
return name;
}
public int getStatus() {
return status;
}
}
|
- Now we will create an Adapter for our ListView.
Adapter
- Create a class NameAdapter.java and write the following code.
|
1
2
3
4
5
6
7
8
9
10
11
12
13
14
15
16
17
18
19
20
21
22
23
24
25
26
27
28
29
30
31
32
33
34
35
36
37
38
39
40
41
42
43
44
45
46
47
48
49
50
51
52
53
54
55
56
57
58
59
|
package net.simplifiedcoding.androidmysqlsync;
import android.content.Context;
import android.view.LayoutInflater;
import android.view.View;
import android.view.ViewGroup;
import android.widget.ArrayAdapter;
import android.widget.ImageView;
import android.widget.TextView;
import java.util.List;
/**
* Created by Belal on 1/27/2017.
*/
public class NameAdapter extends ArrayAdapter<Name> {
//storing all the names in the list
private List<Name> names;
//context object
private Context context;
//constructor
public NameAdapter(Context context, int resource, List<Name> names) {
super(context, resource, names);
this.context = context;
this.names = names;
}
@Override
public View getView(int position, View convertView, ViewGroup parent) {
//getting the layoutinflater
LayoutInflater inflater = (LayoutInflater) context.getSystemService(Context.LAYOUT_INFLATER_SERVICE);
//getting listview itmes
View listViewItem = inflater.inflate(R.layout.names, null, true);
TextView textViewName = (TextView) listViewItem.findViewById(R.id.textViewName);
ImageView imageViewStatus = (ImageView) listViewItem.findViewById(R.id.imageViewStatus);
//getting the current name
Name name = names.get(position);
//setting the name to textview
textViewName.setText(name.getName());
//if the synced status is 0 displaying
//queued icon
//else displaying synced icon
if (name.getStatus() == 0)
imageViewStatus.setBackgroundResource(R.drawable.stopwatch);
else
imageViewStatus.setBackgroundResource(R.drawable.success);
return listViewItem;
}
}
|
Coding MainActivity
- Now lets come inside MainActivity.java and write the following code.
|
1
2
3
4
5
6
7
8
9
10
11
12
13
14
15
16
17
18
19
20
21
22
23
24
25
26
27
28
29
30
31
32
33
34
35
36
37
38
39
40
41
42
43
44
45
46
47
48
49
50
51
52
53
54
55
56
57
58
59
60
61
62
63
64
65
66
67
68
69
70
71
72
73
74
75
76
77
78
79
80
81
82
83
84
85
86
87
88
89
90
91
92
93
94
95
96
97
98
99
100
101
102
103
104
105
106
107
108
109
110
111
112
113
114
115
116
117
118
119
120
121
122
123
124
125
126
127
128
129
130
131
132
133
134
135
136
137
138
139
140
141
142
143
144
145
146
147
148
149
150
151
152
153
154
155
156
157
158
159
160
161
162
163
164
165
166
167
168
169
170
171
172
173
174
175
176
177
178
179
180
181
182
183
184
185
186
187
188
189
190
191
192
193
194
195
|
package net.simplifiedcoding.androidmysqlsync;
import android.Manifest;
import android.app.ProgressDialog;
import android.content.BroadcastReceiver;
import android.content.Context;
import android.content.Intent;
import android.content.IntentFilter;
import android.content.pm.PackageManager;
import android.database.Cursor;
import android.net.ConnectivityManager;
import android.support.v4.content.ContextCompat;
import android.support.v7.app.AppCompatActivity;
import android.os.Bundle;
import android.view.View;
import android.widget.Button;
import android.widget.EditText;
import android.widget.ListView;
import android.widget.Toast;
import com.android.volley.AuthFailureError;
import com.android.volley.Request;
import com.android.volley.RequestQueue;
import com.android.volley.Response;
import com.android.volley.VolleyError;
import com.android.volley.toolbox.StringRequest;
import com.android.volley.toolbox.Volley;
import org.json.JSONException;
import org.json.JSONObject;
import java.util.ArrayList;
import java.util.HashMap;
import java.util.List;
import java.util.Map;
public class MainActivity extends AppCompatActivity implements View.OnClickListener {
/*
* this is the url to our webservice
* make sure you are using the ip instead of localhost
* it will not work if you are using localhost
* */
public static final String URL_SAVE_NAME = "http://192.168.1.107/SqliteSync/saveName.php";
//database helper object
private DatabaseHelper db;
//View objects
private Button buttonSave;
private EditText editTextName;
private ListView listViewNames;
//List to store all the names
private List<Name> names;
//1 means data is synced and 0 means data is not synced
public static final int NAME_SYNCED_WITH_SERVER = 1;
public static final int NAME_NOT_SYNCED_WITH_SERVER = 0;
//a broadcast to know weather the data is synced or not
public static final String DATA_SAVED_BROADCAST = "net.simplifiedcoding.datasaved";
//Broadcast receiver to know the sync status
private BroadcastReceiver broadcastReceiver;
//adapterobject for list view
private NameAdapter nameAdapter;
@Override
protected void onCreate(Bundle savedInstanceState) {
super.onCreate(savedInstanceState);
setContentView(R.layout.activity_main);
//initializing views and objects
db = new DatabaseHelper(this);
names = new ArrayList<>();
buttonSave = (Button) findViewById(R.id.buttonSave);
editTextName = (EditText) findViewById(R.id.editTextName);
listViewNames = (ListView) findViewById(R.id.listViewNames);
//adding click listener to button
buttonSave.setOnClickListener(this);
//calling the method to load all the stored names
loadNames();
//the broadcast receiver to update sync status
broadcastReceiver = new BroadcastReceiver() {
@Override
public void onReceive(Context context, Intent intent) {
//loading the names again
loadNames();
}
};
//registering the broadcast receiver to update sync status
registerReceiver(broadcastReceiver, new IntentFilter(DATA_SAVED_BROADCAST));
}
/*
* this method will
* load the names from the database
* with updated sync status
* */
private void loadNames() {
names.clear();
Cursor cursor = db.getNames();
if (cursor.moveToFirst()) {
do {
Name name = new Name(
cursor.getString(cursor.getColumnIndex(DatabaseHelper.COLUMN_NAME)),
cursor.getInt(cursor.getColumnIndex(DatabaseHelper.COLUMN_STATUS))
);
names.add(name);
} while (cursor.moveToNext());
}
nameAdapter = new NameAdapter(this, R.layout.names, names);
listViewNames.setAdapter(nameAdapter);
}
/*
* this method will simply refresh the list
* */
private void refreshList() {
nameAdapter.notifyDataSetChanged();
}
/*
* this method is saving the name to ther server
* */
private void saveNameToServer() {
final ProgressDialog progressDialog = new ProgressDialog(this);
progressDialog.setMessage("Saving Name...");
progressDialog.show();
final String name = editTextName.getText().toString().trim();
StringRequest stringRequest = new StringRequest(Request.Method.POST, URL_SAVE_NAME,
new Response.Listener<String>() {
@Override
public void onResponse(String response) {
progressDialog.dismiss();
try {
JSONObject obj = new JSONObject(response);
if (!obj.getBoolean("error")) {
//if there is a success
//storing the name to sqlite with status synced
saveNameToLocalStorage(name, NAME_SYNCED_WITH_SERVER);
} else {
//if there is some error
//saving the name to sqlite with status unsynced
saveNameToLocalStorage(name, NAME_NOT_SYNCED_WITH_SERVER);
}
} catch (JSONException e) {
e.printStackTrace();
}
}
},
new Response.ErrorListener() {
@Override
public void onErrorResponse(VolleyError error) {
progressDialog.dismiss();
//on error storing the name to sqlite with status unsynced
saveNameToLocalStorage(name, NAME_NOT_SYNCED_WITH_SERVER);
}
}) {
@Override
protected Map<String, String> getParams() throws AuthFailureError {
Map<String, String> params = new HashMap<>();
params.put("name", name);
return params;
}
};
VolleySingleton.getInstance(this).addToRequestQueue(stringRequest);
}
//saving the name to local storage
private void saveNameToLocalStorage(String name, int status) {
editTextName.setText("");
db.addName(name, status);
Name n = new Name(name, status);
names.add(n);
refreshList();
}
@Override
public void onClick(View view) {
saveNameToServer();
}
}
|
- Now if you will run the application it will save the name to MySQL and SQLite with the sync or unsynced status.
- But to send the unsynced names to the server automatically we have to detect the Network Status of the phone. For this we need one more broadcast receiver.
Detecting Network State
Creating Broadcast Receiver
- Create a class named NetworkStateChecker.java and write the following code.
|
1
2
3
4
5
6
7
8
9
10
11
12
13
14
15
16
17
18
19
20
21
22
23
24
25
26
27
28
29
30
31
32
33
34
35
36
37
38
39
40
41
42
43
44
45
46
47
48
49
50
51
52
53
54
55
56
57
58
59
60
61
62
63
64
65
66
67
68
69
70
71
72
73
74
75
76
77
78
79
80
81
82
83
84
85
86
87
88
89
90
91
92
93
94
95
96
97
98
99
100
101
102
103
104
105
|
package net.simplifiedcoding.androidmysqlsync;
import android.content.BroadcastReceiver;
import android.content.Context;
import android.content.Intent;
import android.database.Cursor;
import android.net.ConnectivityManager;
import android.net.NetworkInfo;
import com.android.volley.AuthFailureError;
import com.android.volley.Request;
import com.android.volley.Response;
import com.android.volley.VolleyError;
import com.android.volley.toolbox.StringRequest;
import org.json.JSONException;
import org.json.JSONObject;
import java.util.HashMap;
import java.util.Map;
/**
* Created by Belal on 1/27/2017.
*/
public class NetworkStateChecker extends BroadcastReceiver {
//context and database helper object
private Context context;
private DatabaseHelper db;
@Override
public void onReceive(Context context, Intent intent) {
this.context = context;
db = new DatabaseHelper(context);
ConnectivityManager cm = (ConnectivityManager) context.getSystemService(Context.CONNECTIVITY_SERVICE);
NetworkInfo activeNetwork = cm.getActiveNetworkInfo();
//if there is a network
if (activeNetwork != null) {
//if connected to wifi or mobile data plan
if (activeNetwork.getType() == ConnectivityManager.TYPE_WIFI || activeNetwork.getType() == ConnectivityManager.TYPE_MOBILE) {
//getting all the unsynced names
Cursor cursor = db.getUnsyncedNames();
if (cursor.moveToFirst()) {
do {
//calling the method to save the unsynced name to MySQL
saveName(
cursor.getInt(cursor.getColumnIndex(DatabaseHelper.COLUMN_ID)),
cursor.getString(cursor.getColumnIndex(DatabaseHelper.COLUMN_NAME))
);
} while (cursor.moveToNext());
}
}
}
}
/*
* method taking two arguments
* name that is to be saved and id of the name from SQLite
* if the name is successfully sent
* we will update the status as synced in SQLite
* */
private void saveName(final int id, final String name) {
StringRequest stringRequest = new StringRequest(Request.Method.POST, MainActivity.URL_SAVE_NAME,
new Response.Listener<String>() {
@Override
public void onResponse(String response) {
try {
JSONObject obj = new JSONObject(response);
if (!obj.getBoolean("error")) {
//updating the status in sqlite
db.updateNameStatus(id, MainActivity.NAME_SYNCED_WITH_SERVER);
//sending the broadcast to refresh the list
context.sendBroadcast(new Intent(MainActivity.DATA_SAVED_BROADCAST));
}
} catch (JSONException e) {
e.printStackTrace();
}
}
},
new Response.ErrorListener() {
@Override
public void onErrorResponse(VolleyError error) {
}
}) {
@Override
protected Map<String, String> getParams() throws AuthFailureError {
Map<String, String> params = new HashMap<>();
params.put("name", name);
return params;
}
};
VolleySingleton.getInstance(context).addToRequestQueue(stringRequest);
}
}
|
Adding Receiver in Manifest
- Add the following code in your AndroidManifest.xml file inside application tag.
|
1
2
3
4
5
|
<receiver android:name=".NetworkStateChecker">
<intent-filter>
<action android:name="android.net.conn.CONNECTIVITY_CHANGE" />
</intent-filter>
</receiver>
|
Registering Receiver
- You also need to register the receiver. So add the following line inside onCreate() method of your MainActivity.java file.
|
1
|
registerReceiver(new NetworkStateChecker(), new IntentFilter(ConnectivityManager.CONNECTIVITY_ACTION));
|
- Now you can run your application.
Testing the Application
- Run your application. And try saving the name when internet is available also turn off the internet and again try saving your name.
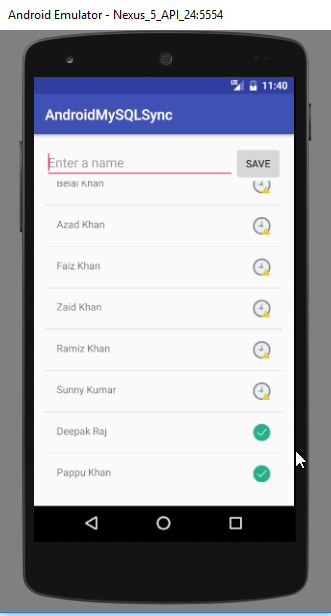
Android Sync SQLite Database with Server
- When the internet will be available again the data will be automatically sent to MySQL.
Download Source Code
android-sqlite-mysql-sync-example-master.zip
https://github.com/probelalkhan/android-sqlite-mysql-sync-example
- You can get the source code from the following GitHub repository.
So thats it for this android sync sqlite database with server tutorial friends. Feel free to leave your comments if you are having any troubles making the project. Also follow the steps carefully as the post is very long. And if you found this helpful please favor us by sharing this post in your social network. Thank You 본 웹사이트는 광고를 포함하고 있습니다.
광고 클릭에서 발생하는 수익금은 모두 웹사이트 서버의 유지 및 관리, 그리고 기술 콘텐츠 향상을 위해 쓰여집니다.